Dual boot Windows XP and Windows 7
Although Windows 7 integrates Windows XP Mode, in some test versions, many users are not really happy with this tool.
If like many other Windows users, you won't care about Vista and still choose to use Windows XP. Tomorrow - October 22, Windows 7 will be officially released and you probably want to try this latest Windows operating system because you have run Microsoft's Windows 7 Upgrade Advisor tool and found that the system configuration The system in use is quite consistent with the requirements of Windows 7.
However, one thing that we do not easily decide is to quit Windows XP right away when Windows 7 is available because some applications have failed to check the compatibility of Windows 7 Upgrade Advisor. . But whatever the reason, we still want to try this new operating system even though we haven't decided to switch to it yet.
So you will have to consider installing Windows 7 in a dual boot configuration with Windows XP. By doing so you will be able to choose to use Windows XP or Windows 7 every time you start the system, and the process of getting familiar with Windows 7 will be much easier. You are free to explore Windows 7, but when you need to do something you can boot into Windows XP. This type of configuration will also help you decide whether or not to switch to Windows 7, or when to 'break up' with Windows XP is best.
The process of moving settings, documents and applications from Windows XP to Windows 7 is quite simple. You can do it manually by booting into Windows XP, checking the installation method of a certain component and then booting into Windows 7 and recreating the same configuration. In case a certain task fails on Windows 7, you can boot into Windows XP and perform this task.
If all goes well with Windows 7, then at some point you'll probably decide to remove the dual boot configuration, and you'll want to install Windows 7 as the main operating system and then remove Windows XP. To make this transition easy, both Windows XP and Windows 7 must be installed on the same hard drive but on separate partitions.
In this article we will use the free partitioning tool Easeus Partition Master Home Edition 4.0.1 because this tool can safely adjust partitions without affecting data. After changing the current partition size of Windows XP, we will install Windows 7 in Windows XP dual boot configuration. As for the method of installing Windows 7 as the main operating system and then uninstalling Windows XP we will send it to you as soon as possible.
Backup data
Although Easeus Partition Master can change partitions without affecting data, if you are careful you should backup all the data to prevent possible worst cases, or copy to the drive. External storage, or burn to CD / DVD.
Create partitions for Windows 7
After downloading and installing Easeus Partition Master Home Edition, it is easy to re-partition the hard disk of Windows XP. When you launch the Partition Master, you will see the system partition displayed in the main window (Figure 1). In this example, we have a 120GB hard drive configured with a 114GB partition on which Windows XP is installed.

Figure 1: Partitioning of Windows XP installation.
First click on the partition and click Resize / Move button to narrow this partition and create a new partition. When you see the Resize / Move Partition dialog box appear, specify the size for the new partition in the Partition Size box and then click OK .

After that we will return to the main window and after completion you will see the changes in the original partition as shown in Figure 3.

Figure 3: Change the partition size of Windows XP.
To start the process press the Apply button. You will then see a confirmation dialog box that appears next to the warning shown in Figure 4. Click Yes on the two dialog boxes to continue.

When you click Yes on the Apply Changes dialog box (with the box selected Shut down the computer after changes selected), the system will reboot and boot into the Partition Master environment where the process of resizing the partition will be done. Once completed, Partition Masters will turn off the system and you will have to reopen. You will see a Partition Master screen that displays a message telling you that the new partition creation process has been successful and that Windows XP will boot normally.
If you restart the Partition Master, you will see the newly created partition (Figure 5). This means that we can now install Windows 7.

Figure 5: The new partition has been successfully created.
Install Windows 7
To get started, insert the Windows 7 installation disc into the CD / DVD drive and restart Windows XP. Once installed for the system to boot from the CD / DVD drive, the installation process will start as usual. When you receive the message of choosing the installation type, select the Custom option shown in Figure 6.

Next we will see the message asking to specify the location of Windows 7 installation as shown in Figure 7, here you select the new partition. Then click Next and continue to follow the instructions to complete the installation.

Start Windows 7
When you reboot the system you will see the Windows Boot Manager menu and here the Windows XP operating system has been renamed to Earlier Version of Windows as shown in Figure 8.

Now you can easily reboot between Windows XP and Windows 7, and move data and install between these two partitions. You can also install Windows 7 as the main operating system and remove Windows XP.
If like many other Windows users, you won't care about Vista and still choose to use Windows XP. Tomorrow - October 22, Windows 7 will be officially released and you probably want to try this latest Windows operating system because you have run Microsoft's Windows 7 Upgrade Advisor tool and found that the system configuration The system in use is quite consistent with the requirements of Windows 7.
However, one thing that we do not easily decide is to quit Windows XP right away when Windows 7 is available because some applications have failed to check the compatibility of Windows 7 Upgrade Advisor. . But whatever the reason, we still want to try this new operating system even though we haven't decided to switch to it yet.
So you will have to consider installing Windows 7 in a dual boot configuration with Windows XP. By doing so you will be able to choose to use Windows XP or Windows 7 every time you start the system, and the process of getting familiar with Windows 7 will be much easier. You are free to explore Windows 7, but when you need to do something you can boot into Windows XP. This type of configuration will also help you decide whether or not to switch to Windows 7, or when to 'break up' with Windows XP is best.
The process of moving settings, documents and applications from Windows XP to Windows 7 is quite simple. You can do it manually by booting into Windows XP, checking the installation method of a certain component and then booting into Windows 7 and recreating the same configuration. In case a certain task fails on Windows 7, you can boot into Windows XP and perform this task.
If all goes well with Windows 7, then at some point you'll probably decide to remove the dual boot configuration, and you'll want to install Windows 7 as the main operating system and then remove Windows XP. To make this transition easy, both Windows XP and Windows 7 must be installed on the same hard drive but on separate partitions.
In this article we will use the free partitioning tool Easeus Partition Master Home Edition 4.0.1 because this tool can safely adjust partitions without affecting data. After changing the current partition size of Windows XP, we will install Windows 7 in Windows XP dual boot configuration. As for the method of installing Windows 7 as the main operating system and then uninstalling Windows XP we will send it to you as soon as possible.
Backup data
Although Easeus Partition Master can change partitions without affecting data, if you are careful you should backup all the data to prevent possible worst cases, or copy to the drive. External storage, or burn to CD / DVD.
Create partitions for Windows 7
After downloading and installing Easeus Partition Master Home Edition, it is easy to re-partition the hard disk of Windows XP. When you launch the Partition Master, you will see the system partition displayed in the main window (Figure 1). In this example, we have a 120GB hard drive configured with a 114GB partition on which Windows XP is installed.
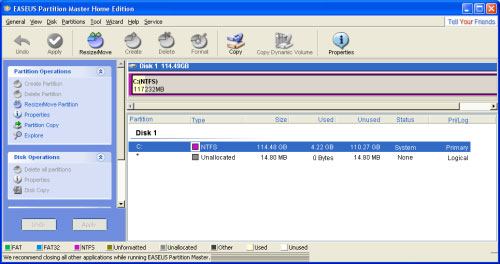
Figure 1: Partitioning of Windows XP installation.
First click on the partition and click Resize / Move button to narrow this partition and create a new partition. When you see the Resize / Move Partition dialog box appear, specify the size for the new partition in the Partition Size box and then click OK .
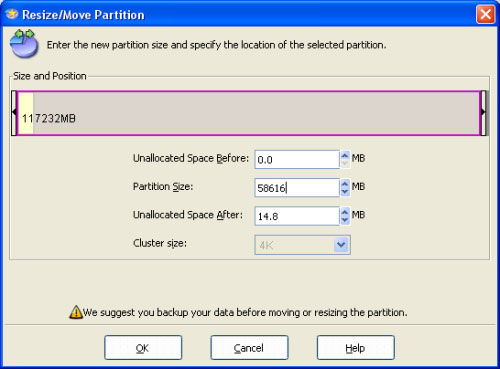
Figure 2: Specify capacity for the new partition.
After that we will return to the main window and after completion you will see the changes in the original partition as shown in Figure 3.
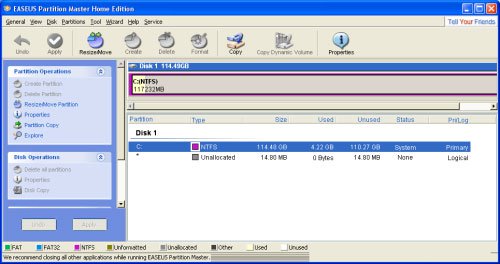
Figure 3: Change the partition size of Windows XP.
To start the process press the Apply button. You will then see a confirmation dialog box that appears next to the warning shown in Figure 4. Click Yes on the two dialog boxes to continue.
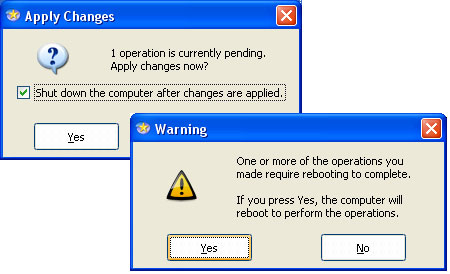
Figure 4: Warning and notification appear when clicking Apply.
When you click Yes on the Apply Changes dialog box (with the box selected Shut down the computer after changes selected), the system will reboot and boot into the Partition Master environment where the process of resizing the partition will be done. Once completed, Partition Masters will turn off the system and you will have to reopen. You will see a Partition Master screen that displays a message telling you that the new partition creation process has been successful and that Windows XP will boot normally.
If you restart the Partition Master, you will see the newly created partition (Figure 5). This means that we can now install Windows 7.
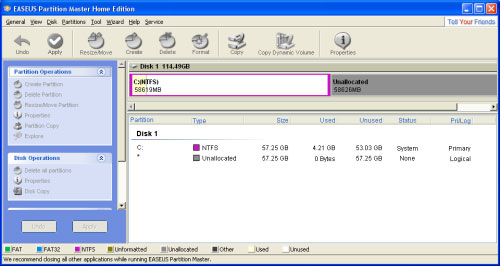
Figure 5: The new partition has been successfully created.
Install Windows 7
To get started, insert the Windows 7 installation disc into the CD / DVD drive and restart Windows XP. Once installed for the system to boot from the CD / DVD drive, the installation process will start as usual. When you receive the message of choosing the installation type, select the Custom option shown in Figure 6.
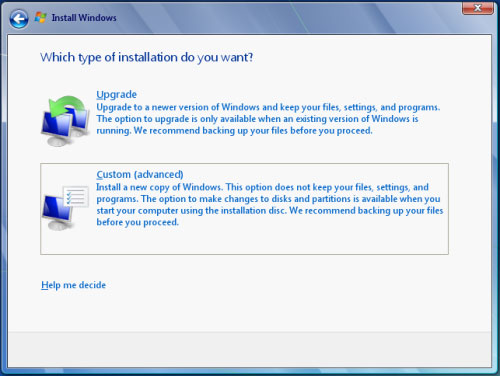
Figure 6: Select the Windows 7 installation type.
Next we will see the message asking to specify the location of Windows 7 installation as shown in Figure 7, here you select the new partition. Then click Next and continue to follow the instructions to complete the installation.
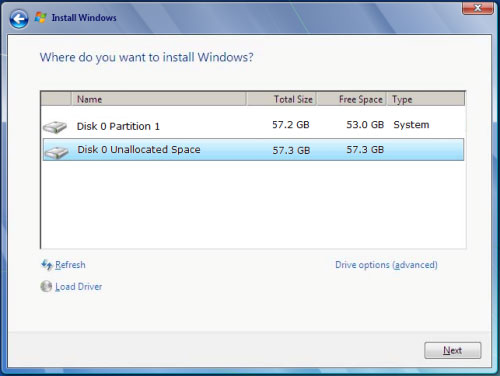
Figure 7: Select the Windows 7 installation partition.
Start Windows 7
When you reboot the system you will see the Windows Boot Manager menu and here the Windows XP operating system has been renamed to Earlier Version of Windows as shown in Figure 8.
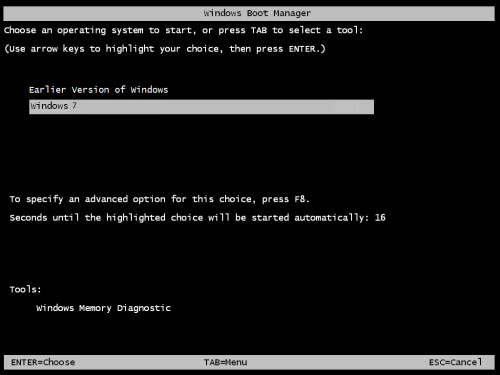
Figure 8: System boot menu after installing Windows 7.
Now you can easily reboot between Windows XP and Windows 7, and move data and install between these two partitions. You can also install Windows 7 as the main operating system and remove Windows XP.
4.5 ★ | 2 Vote
 Install and use Recovery Console in Win XP
 Optimize Windows XP with Seven Remix XP 2.2
 Upgrade Windows Vista to Windows 7
 Connect Windows 7, Vista and Windows XP computers
 How to fix 'dead screen black' error
 What to do when Windows 'becomes'?