Create dual-boot menu after installing Windows XP parallel Vista / 7
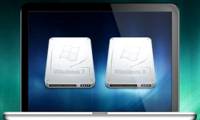
The dual-boot menu is the interface that appears during boot to select the version of Windows you want to use in case the computer installs multiple operating systems. The following article will show you how to create a dual-boot menu in case of installing Windows XP with Windows Vista / 7.
The dual-boot menu is the interface that appears during boot to select the version of Windows you want to use in case the computer installs multiple operating systems. The following article will show you how to create a dual-boot menu in case of installing Windows XP with Windows Vista / 7.
If you are using Windows XP and installing a newer version of Windows, the system will automatically be set to Dual-boot mode, allowing users to select the Windows version to use during the boot process.
 In the opposite case, it means that you have installed a new version of Windows (Vista or Windows 7) but want to install Windows XP to meet certain uses, to create dual-boot, help choose the session. Windows version to use is not easy.
The procedure below will guide you through the steps to install Windows XP on your current Windows Vista / 7, and steps to create a dual-boot menu, which helps you choose the Windows version during the boot process.
Note ́: the steps to perform the sample are done on Windows 7. For Windows Vista users, the steps are quite similar.
Create a new partition to install Windows XP
The first step is to create a new partition on your hard drive and then install Windows XP on this new partition. Follow these steps:
- Right-click My Computer icon, select Manager .
- In the Computer Management dialog box that appears, select Disk Management . The list of hard drive partitions will be listed in the right pane. Right-click on the hard disk partition with the most free space, select Shrink Volume .

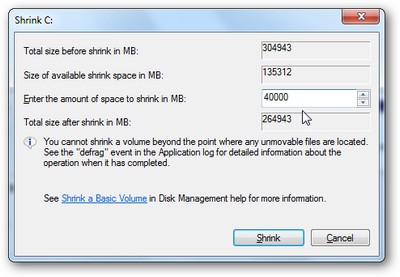
- In the next dialog box, you enter the amount you want to use to initialize the new partition. Available capacity depends on the available space on the partition. In the image shown below, you will see the selected capacity to set to 40 GB. Click the Shrink button to continue.
Save y ́: The partition to install Windows XP only requires a minimum of 1.5 GB.
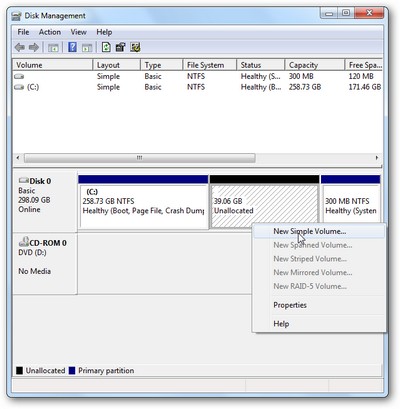
After the disk partitioning process ends, in the list of partitions below, you will see a new partition marked Unallocated . Right-click on this partition and select New Simple Volume .
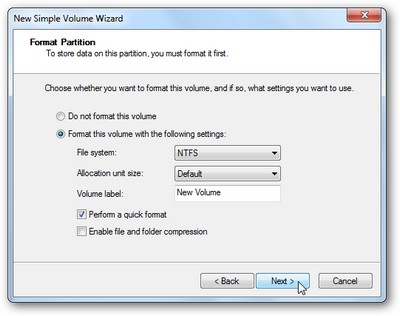
The process of setting up a new partition will be started. In the new dialog box that appears, the process will ask you to select the format, name it and proceed with the format for the new partition. Click Next to proceed to the next step.
After the process of formatting the new partition is completed, on the Disk Mangagement dialog box, you will see a partition with the full name, format and capacity as set above.
Install Windows XP on the new partition
After initializing a new partition, the next step is to install Windows XP into this newly created partition.
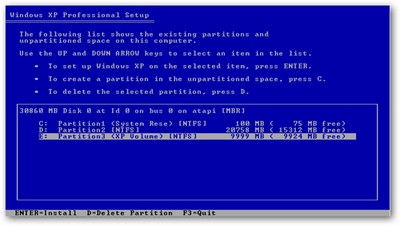
The steps to boot from the installation disk, settings . will not be instructed here. However, note, during the installation process, at the step of requesting to select the partition, you must select the correct newly created partition to install Windows XP onto it.
Finally, proceed with the usual installation steps.
Create Dual-boot menu
After Windows XP installation has finished, the computer will automatically boot and use Windows XP as the main operating system, and you have no way to boot into Windows Vista / 7 that was previously available. That's why we need to initialize the dual-boot menu.
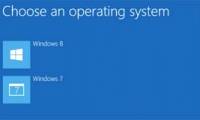
The dual-boot menu is the interface that appears during the boot process, allowing users to choose the Windows version to use in case the computer has two different operating systems installed.
As mentioned above, if you install Windows Vista / 7 on an existing Windows XP computer, the dual-boot menu will automatically be initialized. In the opposite case, you must manually start by following the steps below:
- First, download the free EasyBCD software here (Program requires .NET Framework to install, download here)
- After installation and activation, at the main interface of the program, click the Add / Remove Entries item. In the section below, enter Windows XP in the Name field ( this is the name that will appear on the dual-boot menu, you can enter whatever name you want, however, it is recommended to set a specific name to avoid confusion ), part Type Select Windows NT / 2k / XP / 2k3 , the Drive section selects the drive partition on which Windows 7 installs (usually C:) , press the Add Entry button and finally click Save to save.

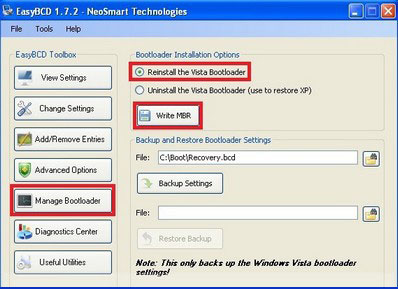
- Next, click the Manager Bootloader button on the program menu, select the option to Reinstall the Vista Bootloader and click the Write MBR button.
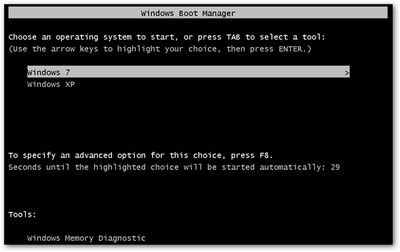
Finally, restart the computer, you will see the boot process appear under the dual-boot menu, allowing you to choose one of the two versions installed on your computer to use.
Fix the missing Windows XP partition on Windows 7:
After booting and using Windows 7, you may experience the partition used to install Windows XP will not be displayed and visible on Windows 7. If you encounter this error, follow the steps below. to fix:
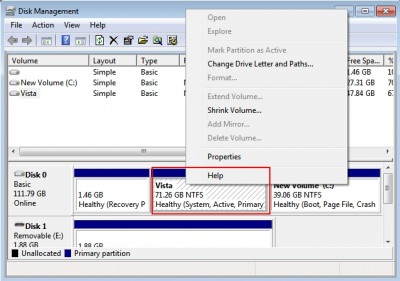
- First, perform the steps at the beginning of the article to open the Disk Management window.
- In the list of partitions of the listed drive, you will see there is a wildcard partition, which is the Windows XP installation partition. Right-click on this partition and select Change Drive Letter and Paths .
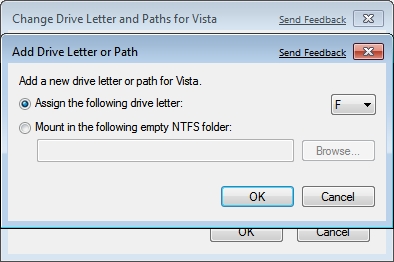
- Click the Add button in the next dialog box. Select the Assign the following driver letter option, select the wildcard for the partition and click OK to confirm.
Now, the Windows XP installation partition appears normally on Windows 7.
Was this article helpful?
Your feedback helps us improve.
Related Articles
 Set up dual - boot system Windows 7 and Windows 84 minutes read
 How to install Kali Linux dual boot Windows4 minutes read
 Use parallel Windows 7 and Windows 8 on PC3 minutes read
 How to install dual boot Windows 10 and Windows Server7 minutes read
 How to create dual boot Linux and Windows 10 on Linux7 minutes read
 7 risks when booting dual operating systems Windows and Linux8 minutes read
Reader Comments 0
Sign in with email or Google to join the discussion.