Does iTunes not work on Windows 10? This is how to fix it
Many people don't like iTunes because it's messy, it takes a long time to boot and everything becomes slow. However, they still have to continue using it for simple tasks such as transferring files. When operating on Windows 10, iTunes often stops working and here are some fixes.
1. Run iTunes as admin
There are many reasons, such as operating system updates, that can change the default permissions of many files and folders that iTunes uses. This makes iTunes restricted from being able to access certain areas of the computer and stop launching. However, providing admin rights to iTunes will allow it to bypass those restrictions and open as usual.
Step 1: Right-click the iTunes shortcut and select Run as Administrator .

Step 2: On the User Account Control dialog box, click Yes .

iTunes will launch correctly and users only need to do this once to fix the problem. If the application does not open as usual the next time you need to continue granting it. To avoid having to give iTunes permission every time, you can configure iTunes to always open with admin rights with the next steps.
Step 3: Right click on the shortcut and select Properties in the context menu.

Step 4: In the Compatibility tab, check the box next to Run this Program as an Administrator . Next, click the Apply button and click the OK button to save the changes.

Now, you can launch iTunes without right clicking and select the Run as Administrator option every time you open.
- How to assign Administrator permissions on a Windows 7 computer?
2. Stop forced iTunes
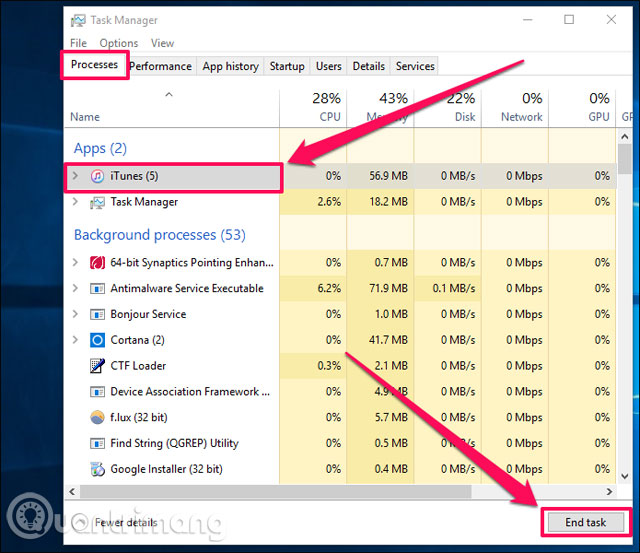
Sometimes, iTunes freezes at startup, which is quite normal when you try to restart the application immediately after turning it off. Usually, users just need to restart the computer to fix this problem. However, instead of wasting time, you can remove the freezing iTunes process directly through Task Manager .
- 8 unexpected uses of Task Manager
Step 1: Right-click on the taskbar and select Task Manager . If your entire computer freezes, press Ctrl + Alt + Del to start Task Manager .

Step 2: In the Processes tab, select iTunes and click End Task .
3. Update iTunes
Windows 10 often receives automatic updates and this can cause many changes that make iTunes not work properly. However, updating iTunes to the latest version can fix these problems. Please update the application as soon as possible.
Launch Apple Software Update , this is an update program that comes with iTunes and you can access it from the Start menu. When the update is launched, wait a while to check for available updates. If you have an iTunes update, select it and click Install to update. In addition, users should also choose updates for related Apple software.
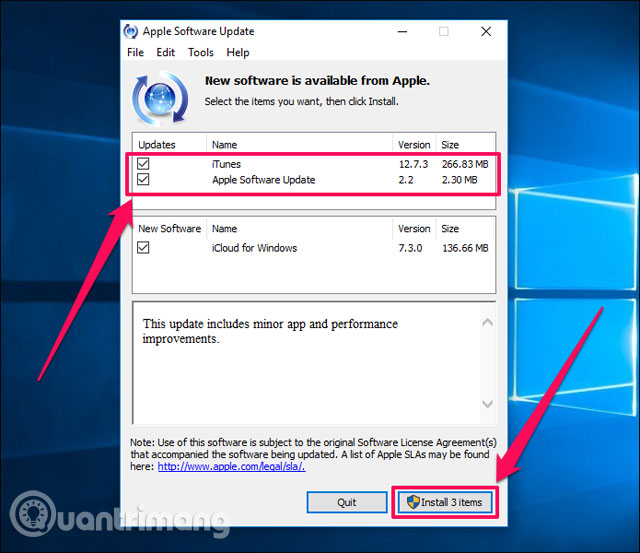
After the update process, open iTunes to check. If Windows 10 updates are caused, iTunes will work normally right after the update.
4. Use Compatibility mode
Compatibility Mode is another quick solution that can cause iTunes to run normally in the absence of an update to fix the Windows 10 update problem.
Access Properties from the iTunes shortcut, in the Compatibility tab, check the box next to the Run This Program in Compatibility Mode for and select Windows 8 . Click Apply and then click OK to save the changes.
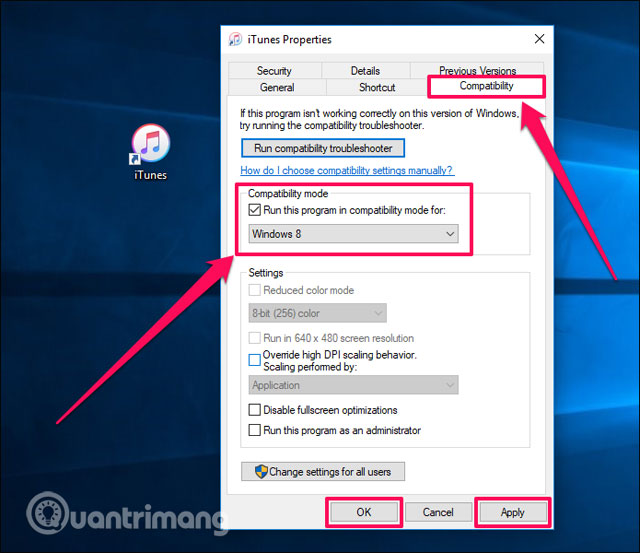
If iTunes still doesn't start, select an older version of Windows like Windows 7 or Windows Vista and try again. Also, try to run it with admin rights if unsuccessful.
Note: When a new iTunes update is available, you should disable Compatibility Mode before updating.
- How to run old software on Windows 10 using Compatibility Mode
5. Launch in Safe mode
If there are any third-party plugins installed on iTunes, this could cause iTunes to hang when booting. To determine if this is the cause, you need to run iTunes in Safe mode.
- All problems with starting Windows in Safe Mode
Note : Even if you don't install any plugin, launching iTunes in Safe Mode can fix the problem with the configuration due to a sudden application error.
Step 1 : Press Ctrl + Shift and then try to start iTunes. On the pop-up box, click Continue to accept to open the application in Safe Mode .

If iTunes loads after running in Safe mode, the problem may be due to an outdated plugin. Now, try to "isolate" the problematic plugin. Before continuing, exit the iTunes application.
Step 2: Go to the location to store the iTunes plugin. To do so, press Windows + R to start Run . Now enter % appdata% in the Run box and click OK .

Step 3: Roaming folder opens, open the folder in sequence after Apple Computer> iTunes> Plug-in iTunes .
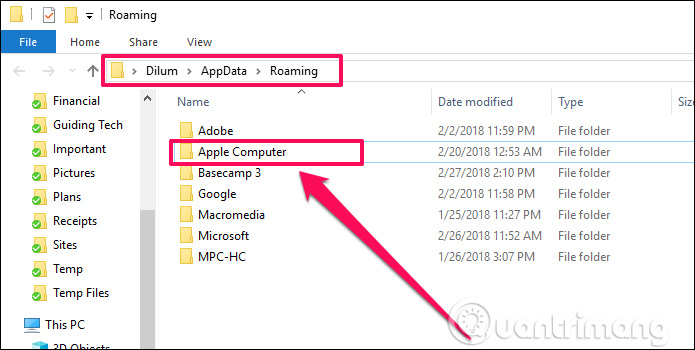
Step 4: Copy the plugin files inside the folder to another location such as the desktop.
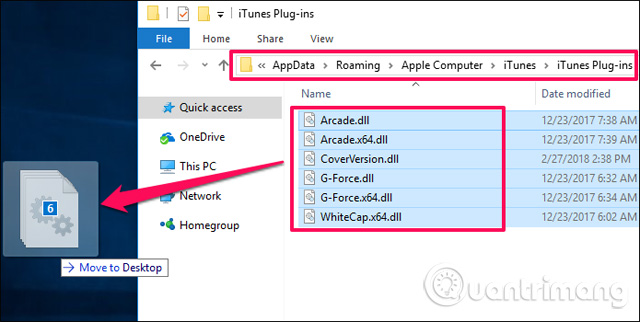
Now, just copy and paste each file once, then go back to the iTunes Plugin folder and start iTunes to determine the problematic plugin. After finding a problematic plugin, you can contact the plugin's publisher to update or remove it permanently from the iTunes Plugin folder.
6. Perform "fix" iTunes
If you run iTunes as an administrator, launch it in Safe Mode or update to the latest version still can't fix the problem, you should fix the iTunes installation. The process is very simple, it only takes a few minutes.
Step 1: Delete the shortcut of iTunes on the screen or taskbar.
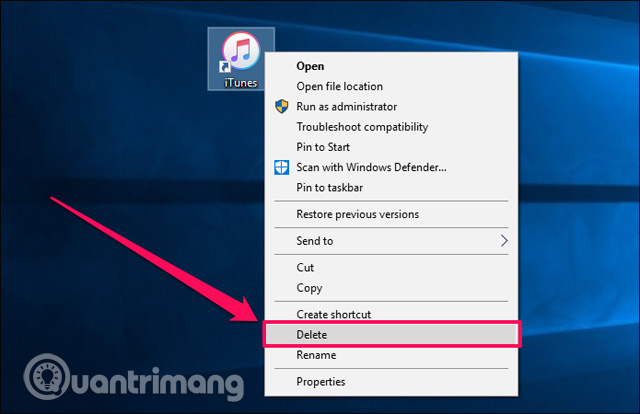
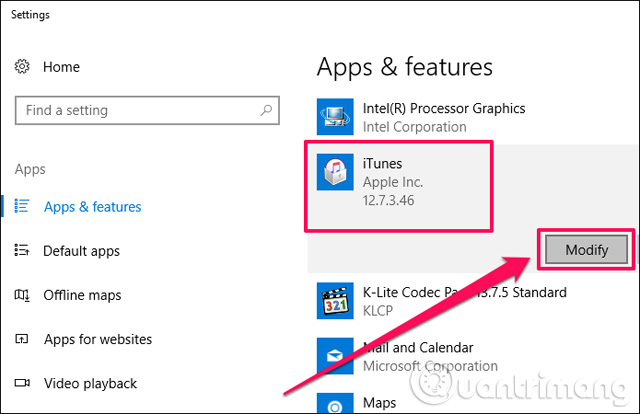
Step 2: Open the Start menu, search for Apps & Features , and press Enter . From the application list, select iTunes and click Modify .
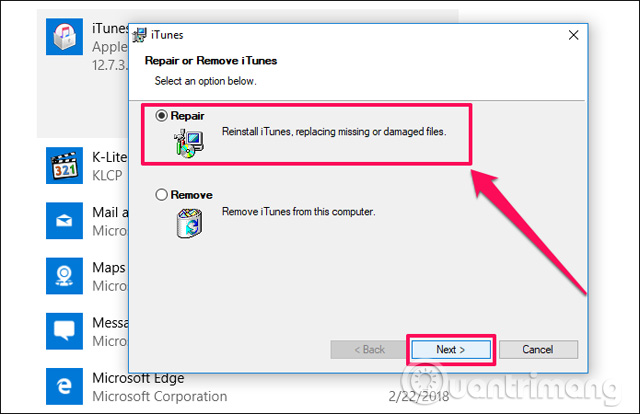
Step 3: On the iTunes installer, click Repair and then click Next .
Step 4: Click Finish when the iTunes installer completes the repair process.
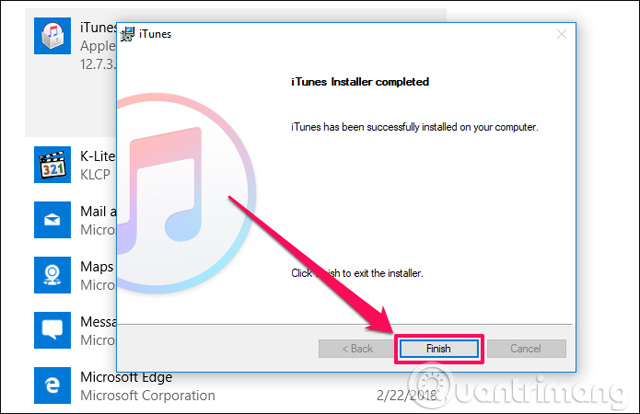
Hopefully, iTunes will work normally after performing iTunes repair. If not, continue with other error correction methods.
7. Restore the old iTunes library
Sometimes, some corrupted files in iTunes music library can prevent it from working properly.
Step 1: Open iTunes while holding Shift, on the pop-up window, click Create Library.
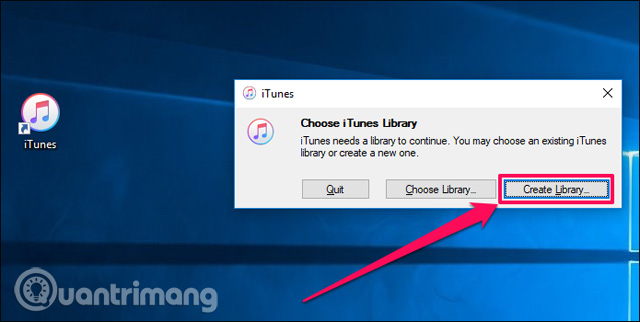
Step 2 : Your default library is in the iTunes folder. To create a new library, enter the file name such as iTunes New and click Save .
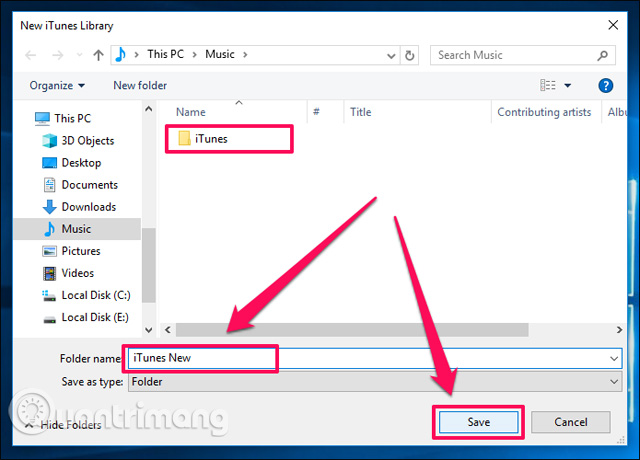
If iTunes opens after creating a new library, the problem is caused by a broken item in the library. To solve this problem, we can restore the old version of the library or manually re-add the files to the new library.
Note: Before continuing, exit the iTunes application.
Step 3: Open the original iTunes library folder and move the iTunes Library files to the computer screen. Then, open the Previous iTunes Libraries folder.
Note: The original iTunes library folder is in the Music folder of the Windows 10 user account.
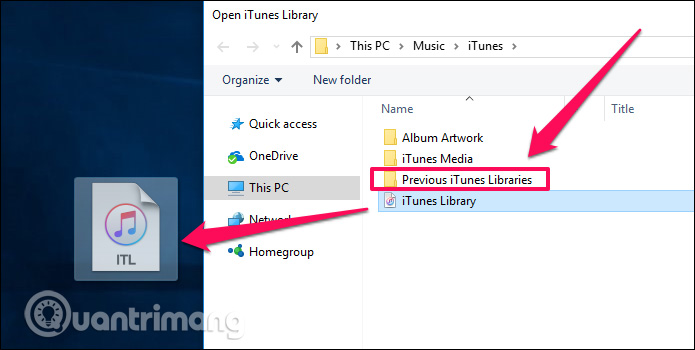
Step 4: This folder has older versions of the library that have been backed up in previous iTunes updates. You can distinguish each file by the date tags at the end of the file name. Now copy the most recent version of the iTunes library to the iTunes folder by going back to the previous folder and renaming it to iTunes Library.
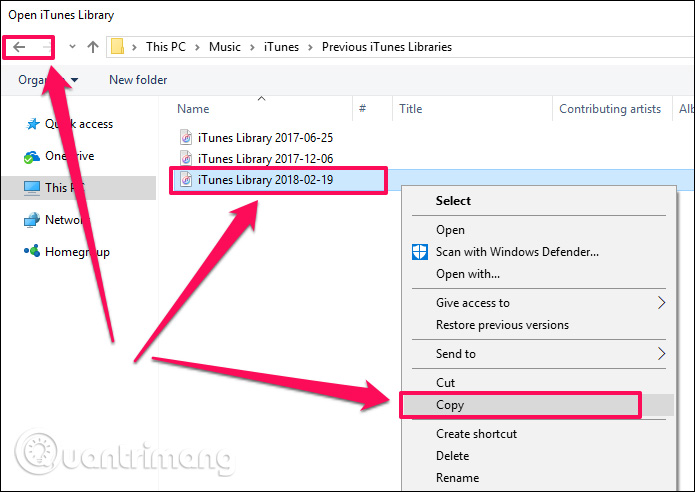
Step 5: Configure iTunes to switch back to the default library. To do so, restart iTunes while pressing the Shift key, click Choose Library , select the iTunes folder and then select the iTunes Library file renamed inside.
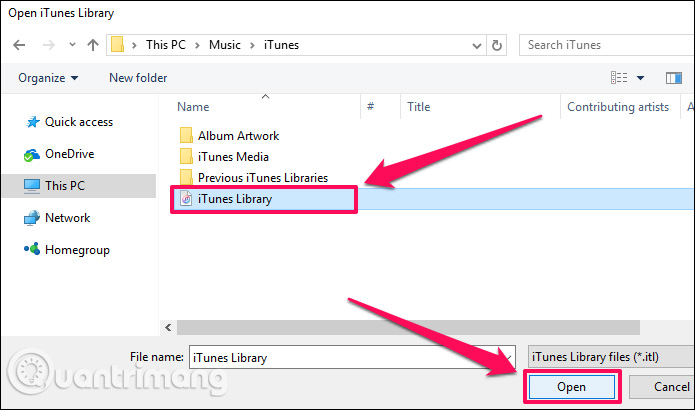
Now, open iTunes. If everything works perfectly, you can continue using iTunes as usual. If it still doesn't work, you can continue to restore previous iTunes library versions to find an active program. Finally, you can choose to re-add the file to the new library.
Step 6 : Open iTunes while holding down the Shift key and create a new iTunes library or use the Choose Library option to select the new library you created in Steps 1 and 2 .
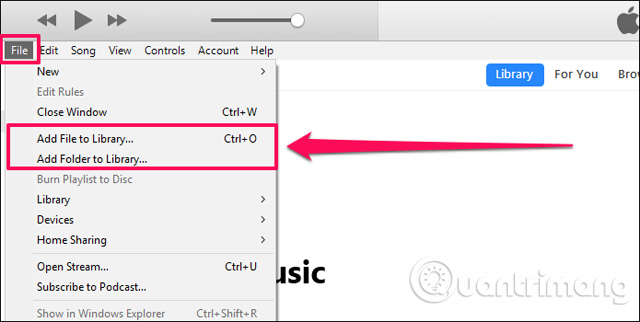
After launching iTunes, click File and then use the Add File to Library option or Add Folder to Library to add music from different locations of the computer back to the library. Your task is to separate problematic music files, so make sure not to add them all at once. Because, whenever you add any problem file or folder, iTunes crashes or an error message appears.
Note: This may be a time-consuming process but problems caused by corrupted or unrelated music files will be resolved.
8. Configure the firewall
Windows 10 firewall may prevent iTunes from connecting to the Internet properly. Usually, this happens after updating Windows or iTunes. However, you can fix this problem by allowing iTunes to "communicate" on both private and public networks.
Step 1: Open the Run box, enter firewall.cpl and click Run .

Step 2: Click the Allow an App or Feature Through option, Windows Firewall.
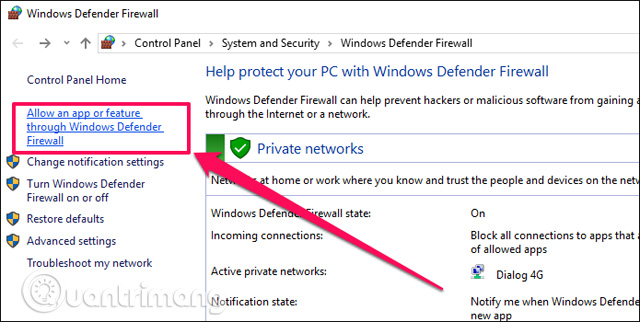
Step 3: Click on Change Settings button to be able to modify the firewall. Now, scroll down and make sure to include both Private and Public boxes. If there are network problems, you will find one of these boxes not disabled. Once completed, click OK to save the changes.
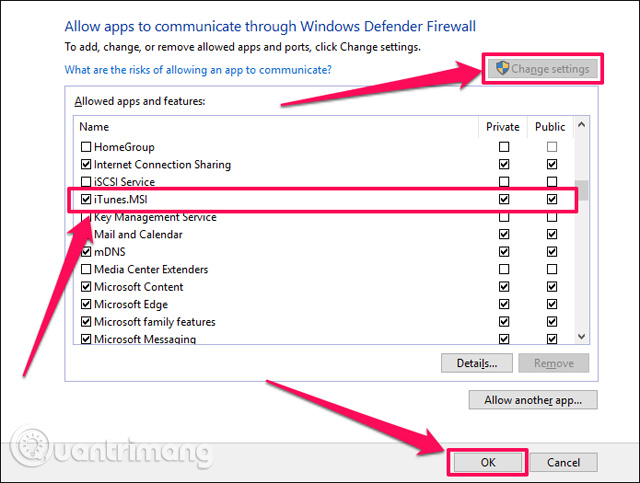
Also, if you don't see the iTunes item listed inside the firewall. Follow these steps.
Step 4: Click the Allow Another App button and find the iTunes executable file by default, it is located in the C: / Program Files / iTunes folder .
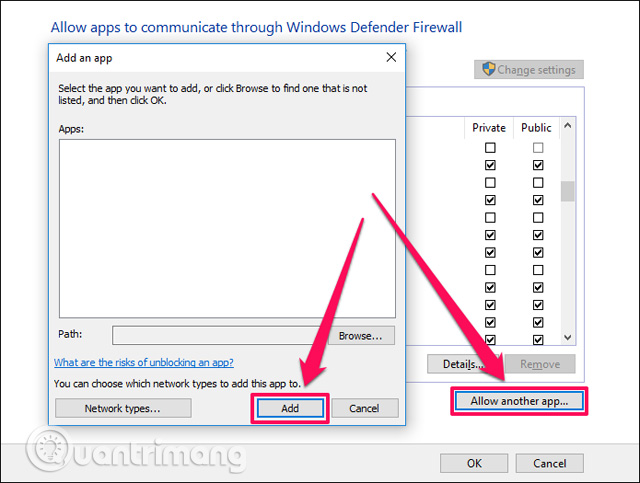
Step 5: Select the iTunes.exe file and click Add .

After adding it to the programs in the firewall, save both Private and Public networks, and save the changes. iTunes will connect to the Internet and work without problems.
- How to block or unblock programs on Windows Firewall?
9. Disconnect from the Internet
Sometimes outdated or faulty network drivers can prevent iTunes from starting and you can solve this problem by simply disconnecting from the Internet. If connecting via Wi-Fi, simply disable the connection and if using a wired network, remove the Ethernet cable. After disconnecting from the Internet, iTunes launches, the problem is due to network drivers. Before continuing, reconnect the Internet.
Step 1: Open Device Manager by typing Device Manager into the Start menu and pressing Enter .
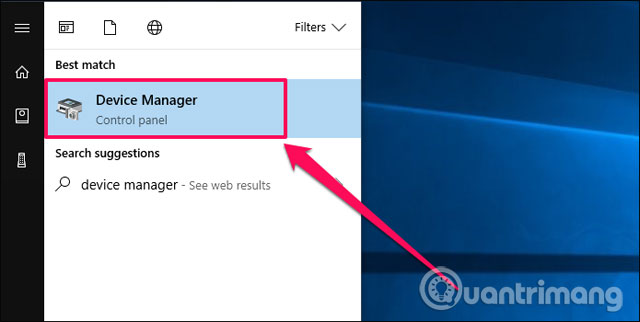
Step 2: Expand the Network Adapters section to see the items listed below, right-click an item and select Update Driver .
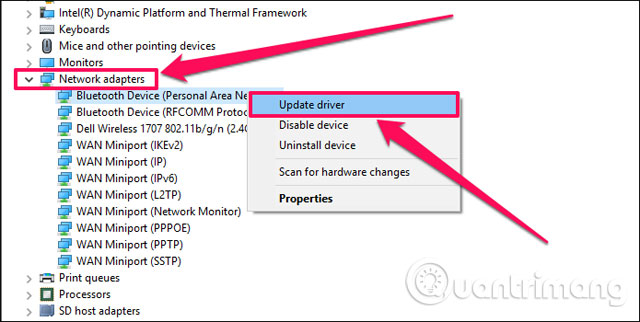
Step 3: On the pop-up box, click Search Automatically for Updated Drivers .
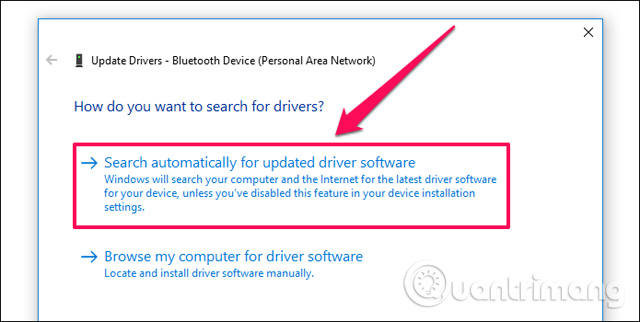
Repeat the process for each item listed in Network Adapters. Windows 10 will download and install the appropriate drivers via the Internet. If the driver cannot be updated automatically, users will have to download the drivers from the manufacturer's website and select them via the option Browse My Computer for Driver Software.
10. Reinstall iTunes
If you've tried all the above methods and iTunes still doesn't open, then maybe a corrupted file is the cause. You should perform a complete reinstallation and do not need to worry because this process is not time-consuming.
Note : Removing iTunes does not delete your music library, you can still access it again after reinstalling.
Step 1: Open Apps & Features , select iTunes and then click Uninstall to uninstall.
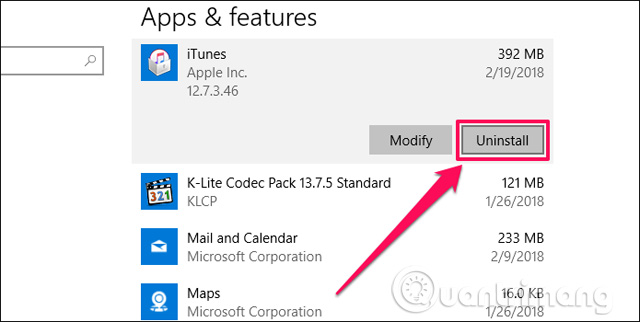
Step 2: After deleting iTunes, continue to uninstall iTunes-related programs in the following order:
- Apple Software Update
- Apple Mobile Device Support
- Bonjour
- Apple Application Support 32-bit
- Apple Application Support 64-bit
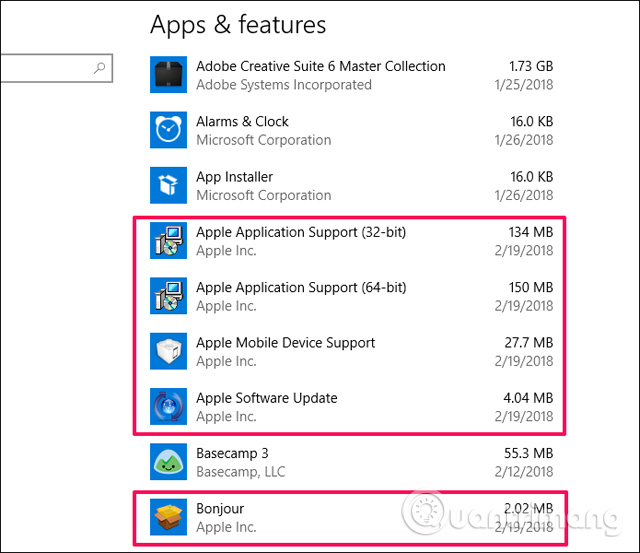
After uninstalling, restart the computer.
Step 3: Download the latest version of iTunes, then double-click and file and follow the on-screen instructions to reinstall iTunes.
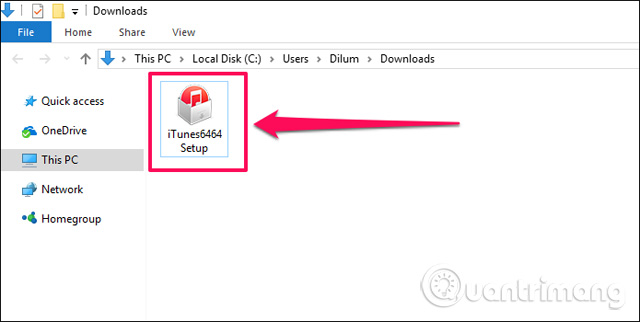
Now, try launching it. If not open, try running it with admin rights. If it still doesn't work, try the final method.
11. Install the old version of iTunes
Finally, iTunes doesn't work properly because of incompatibilities between some older hardware components and new versions of iTunes. If updating or reinstalling doesn't fix the problem, let's do the opposite and downgrade iTunes to the previous version.
Completely uninstall iTunes (Follow the steps in iTunes Reinstall). Then download an old version of iTunes from Apple.
- How to completely remove iTunes on your computer?

If the old version of iTunes works normally on the computer after installation, you should turn off the automatic update notification when launching.
Many problems and workarounds, hopefully you don't have to try the last way to fix the problem iTunes doesn't work on Windows 10.
I wish you all success!
See more:
- 10 common problems in iTunes
- Prevent iTunes from working when connecting an iPhone or iPod
- Error cannot connect to iTunes Store, this is a fix