Table of Contents
Total Video Converter can convert supported audio files to Windows Media Audio (WMA). Use WMA when a Windows application, legacy player, or device specifically requires it. For general sharing across phones, browsers, and non-Windows systems, MP3 or AAC is usually easier to play.
Converting a file to WMA does not improve its sound quality. A high-quality output setting can reduce additional loss, but it cannot recover detail removed from a low-bitrate MP3, AAC, or other compressed source.
Before converting
- Download the trial or licensed installer from the official EffectMatrix Total Video Converter page.
- Confirm that the current version supports your Windows or macOS release.
- Keep the source audio. Export to a separate folder until you have tested the WMA files.
- Check that the destination device accepts WMA and which WMA profile it supports.
Convert audio files to WMA
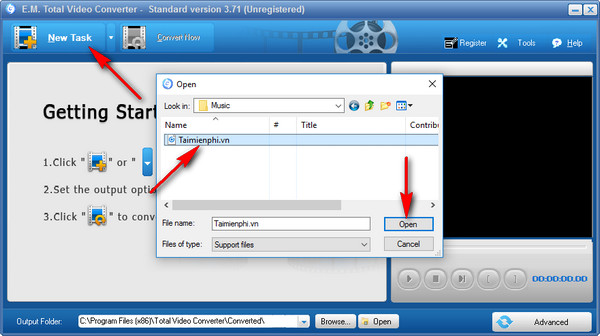
- Open Total Video Converter. Click New Task, select one or more audio files, and click Open.
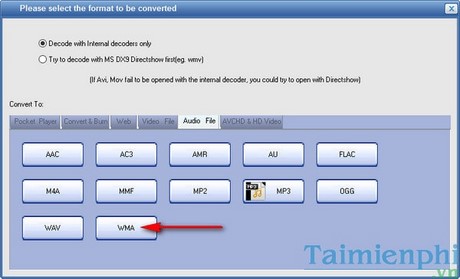
- In the output-format window, open the Audio File tab and choose WMA.
- Open the profile menu and choose a WMA preset compatible with the target device. The “high quality” profile shown in this version produces a larger file than lower-quality profiles.
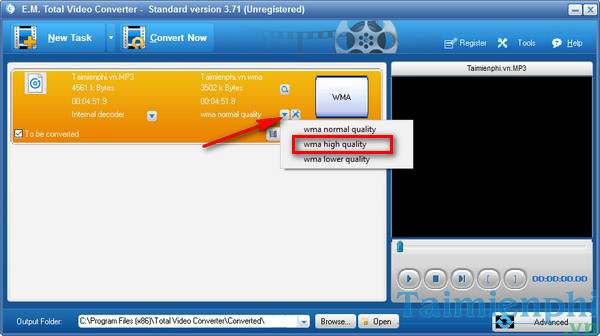
Do not automatically select the highest setting for every job. Spoken audio may not need as much data as music, and an older portable player may accept only certain sample rates, channel layouts, or WMA variants. When the destination provides specifications, follow them.
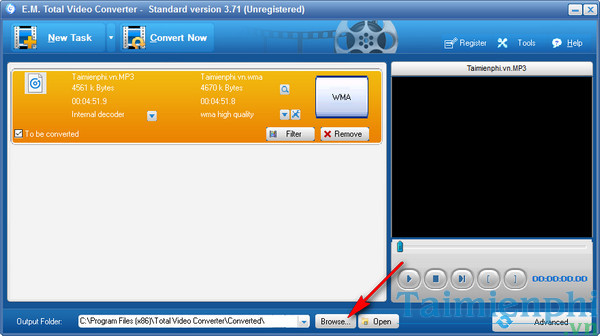
- Click Browse and select a dedicated output folder.
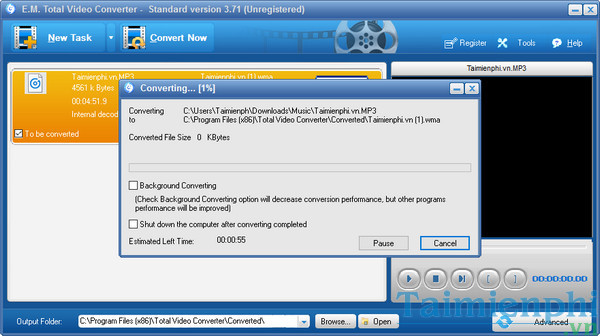
- Review the task list and click Convert Now.
- Monitor progress until every task is complete.
Background conversion and automatic shutdown
Background Converting lowers the conversion task's priority so you can continue using other applications. It may take longer when the computer is busy.
Use Shut down the computer after conversion only after you have tested the workflow with a short file and confirmed the queue and destination. Save work in other applications first. Automatic shutdown is unnecessary for a small job and can hide an error message you would otherwise see.
Check the output
- Play each WMA in the application or device that required it.
- Compare its duration with the source.
- Listen to the beginning, middle, and end for distortion, silence, or missing channels.
- Confirm that artist, title, album, and other tags were preserved or add them afterward.
- Keep the original files until the results pass every check.
When not to choose WMA
| Need | Better starting format |
|---|---|
| Broad playback and sharing | MP3 or AAC |
| Uncompressed editing interchange | PCM WAV |
| Lossless library storage | FLAC, if the player supports it |
| A specific Windows or legacy-device requirement | WMA with the documented compatible profile |
If the source is already in a format accepted by the destination, avoid converting it. Every unnecessary lossy conversion can reduce quality.
For a free alternative on Windows, see how to convert audio with Format Factory. You can also compare these audio converter programs and review ways to reduce audio file size.
Related Articles
 Guide to Convert Video to MP4 by Total Video Converter3 minutes read
 6 Tools to Convert Audio to Video Online7 minutes read
 How to Convert Video to Mp3 Using Free Video to MP3 WMA Converter8 minutes read
 How to Use Media Converter to Convert Video and Audio3 minutes read
 How to Split Video Audio on Video Converter5 minutes read
 5 Best Applications to Convert Audio and Video Files on Linux8 minutes read
Reader Comments 0
Sign in with email or Google to join the discussion.