How to convert Excel files to PDF in Office 2016
If you want to convert your Excel file to PDF in Office 2016 for easier use but don't know how, please refer to the following guide on how to convert the file format while preserving the original formatting.
Table of Contents
You probably know that PDF files are now widely used because computers and mobile devices like smartphones all support reading PDF files. Opening a PDF file after converting Excel to PDF will preserve the formatting when users open it on different devices. Others will not be able to edit the content in the file, nor will they be able to modify the formulas in the spreadsheet, unlike editing the original Excel file. This helps ensure copyright protection and data security.

Convert Excel files to PDF in Office 2016
Instructions on converting Excel files to PDF in Office 2016
To convert an Excel file to PDF format, you can follow one of these two methods:
Method 1: Save the Excel file as a PDF in Office 2016
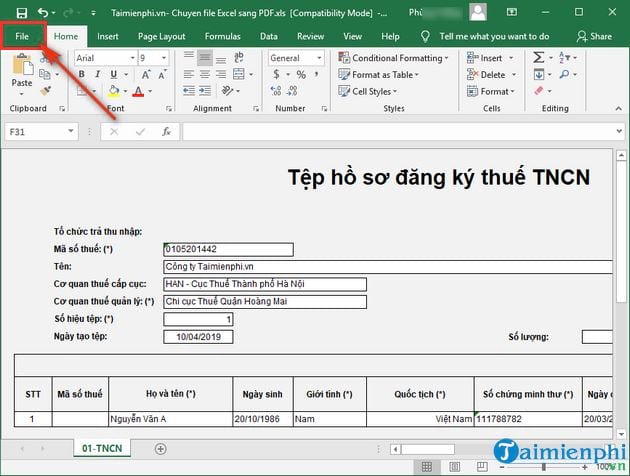
Step 1: Open the Excel file you want to convert to PDF. On the interface, click on the File menu .
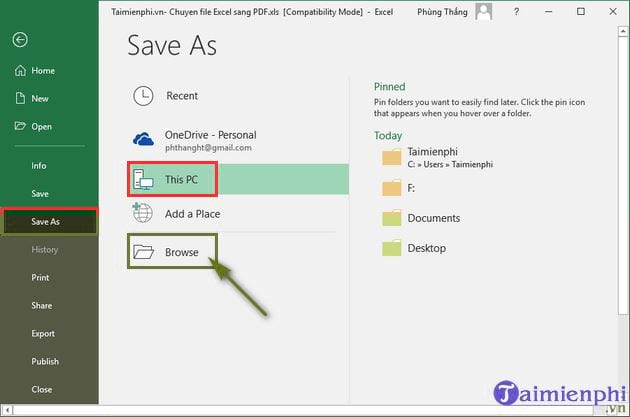
Step 2: Select Save As -> then choose a location/folder to save the file after you save it. If saving on your computer, select This PC / Computer or select Browse to open the Save As window.
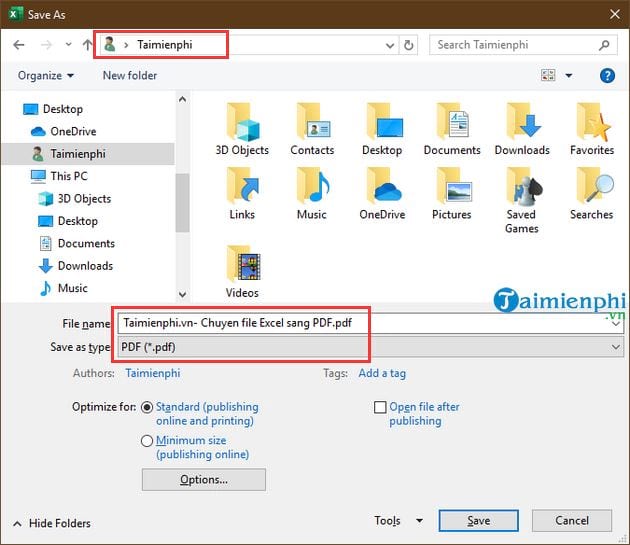
Step 3: In the Save As interface, proceed as follows:
- Choose a folder to save the file .
- Enter a name for the file in the File name field .
- In the Save as type field , select PDF (*.pdf) as the format.
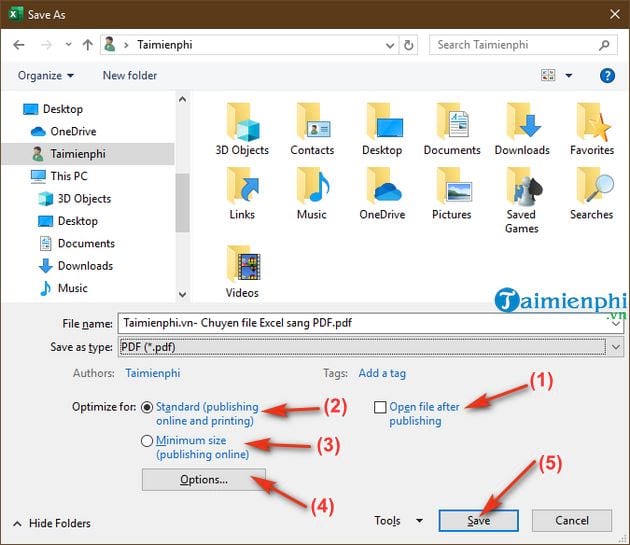
Step 4: You will see some additional customization options appear -> you can proceed as follows:
- Check the Open file after publishing checkbox (1) if you want to open the file in PDF format immediately after saving it.
- Select Standard (publishing online and printing ) (2) if your document requires high print quality.
- Select Minimum size (publishing online) (3) if the file size is more important than print quality.
- Select Options (4) to set some other customizations for the file if you want (e.g., set a password for the PDF file.).
- Press Save (5) to save the Excel file -> as PDF format.
Step 5: The process of converting the Excel file to PDF is complete. You can now open the PDF file to check and use it.
Method 2: Use the Export feature to generate a PDF file in Windows 2016.
This method follows similar steps to converting a Word file to PDF in Office 2016 (see here). Below, we will briefly describe the steps for Excel 2016 .
Step 1 : Open the Excel file you want to convert to PDF. On the main interface, click on the File menu in the upper left corner.
Step 2: In the left-hand menu of the interface -> click Export -> select Create PDF/XPS Document -> then Create PDF/XPS .
Step 3: You will see the "Publish as PDF or XPS" interfaceappear -> select the folder to save the converted PDF file. If you want to set a password for the PDF file -> click on the " Options ." option at the bottom to set the password.
Step 4: Finally, click on Publish to convert the Excel file to PDF.
Above are two quick ways to convert Excel files to PDF in Office 2016 while preserving the original data formatting. Basically, both methods can also be applied to Word, so converting Word to PDF is done in much the same way as instructed above.
Good luck!
Was this article helpful?
Your feedback helps us improve.
Related Articles
 Simple way to convert Excel files to PDF7 minutes read
 How to convert Excel files to PDF online using Google Drive2 minutes read
 Simple way to convert Excel files to PDF - Convert directly or use software8 minutes read
 How to convert CSV files to Excel in bulk6 minutes read
 Instructions to save Excel files as PDFs in Office 2010, 2013, 20161 minutes read
 Use Google Docs to convert MS Office files into PDF3 minutes read
Reader Comments 0
Sign in with email or Google to join the discussion.