Table of Contents
This guide covers access exchange 2007 from an Apple macintosh computer (part 1) with practical context and easy-to-follow details. Use it to understand the subject and apply the information confidently.
Nathan Winters
-
Basic email function
-
Access folders other than Inbox
-
Schedule
-
Access personal mailbox contacts
-
Looking for GAL
-
Offline access
-
PST Import / Export
-
Mail filter
-
SSL security
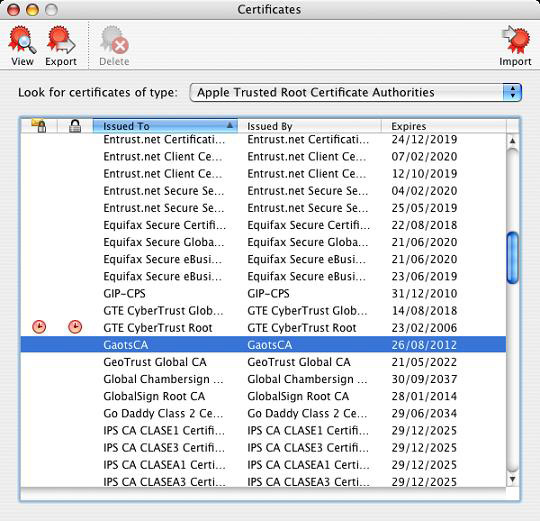 Figure 1: Use Microsoft Cert Manager to see trusted Root Cas
Note Obviously, if you create a commercial CA, there is no need to add to the list of trusted Root CAs. Here we are ready to open Mac Mail from the apps folder. To do so, a wizard appears and you need to select ' Continue ' to enter the necessary settings. In the first window, select the account type and enter the details of the name and address as shown in Figure 2.
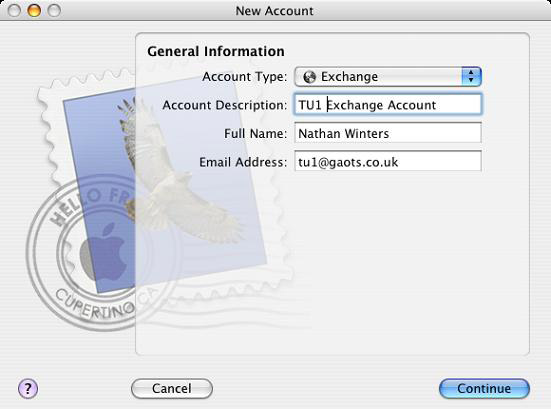 Figure 2: The first page of the account setup wizard
Select ' Continue ' again to move to the next page and enter details about your incoming mail server, including your username and password. Although you are not prompted for a domain name, I find that entering a user name with a domain name in front of 'domainuser' will not work, so just enter the username. In this page, you also need to enter the OWA server in the FQDN format (without the specified HTTP or virtual directory). These settings are clearly shown in Figure 3.
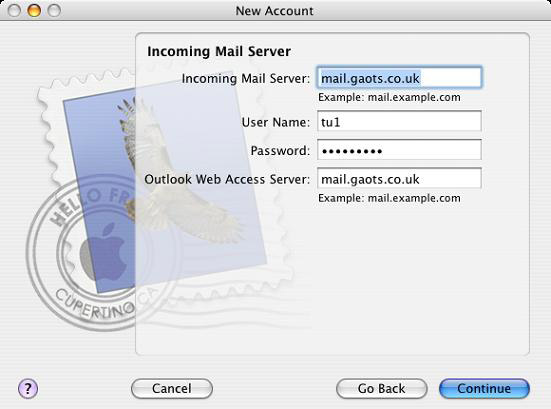 Figure 3: Set incoming mail server properties
Next we set up outgoing mail settings. Enter your outgoing SMTP server, in this case also have the same CAS server for incoming as the previous section and enter the authentication details, and not include the domain name before the username as shown in the figure. 4.
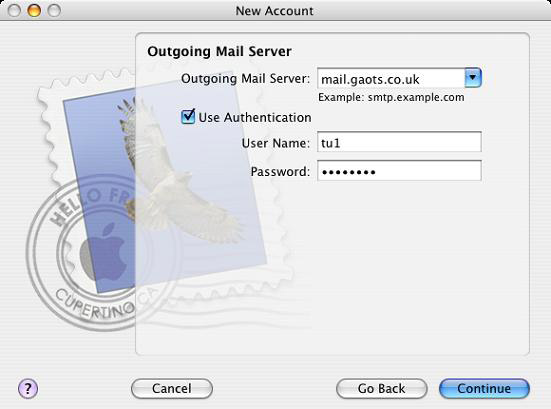 Figure 4: Set the outgoing mail server properties
When you select ' Continue ' as on the incoming mail server section, Mac Mail will check to make sure your login information is correct. You will now receive an account summary, where you can see that SSL is enabled for both incoming and outgoing mail. Continue to select ' Continue ', then on the next page select ' Done ' to start using the new account. You will see that any mail in the account is downloaded to the client and you can now send mail. The basic installation has completed several adjustments that you can perform to enable some useful functions such as viewing other folders in the mailbox and can create GAL (Global Address List). To make those changes you need to access the properties of the account, access is done by selecting the ' Mail ' menu and selecting " Preferences ". Select the " Account " tab, and you will see the screen shown in Figure 5.
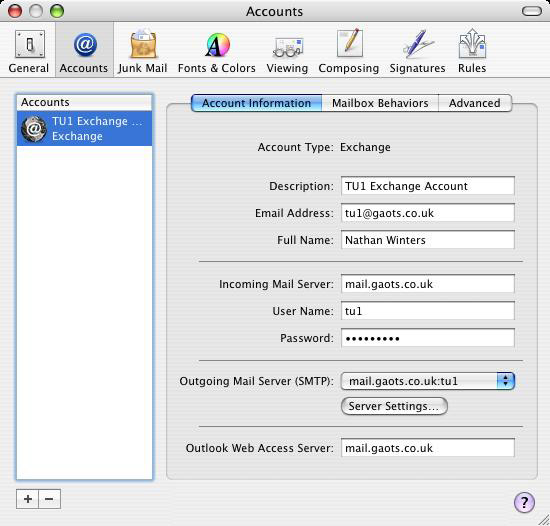 Figure 5: Account information screen
To set up access to other folders in the mailbox, you need to open the " Advanced " area in the " Accounts " tab. In the lower half of the window, as in our case "GAOTS" is shown in Figure 6. The IMAP Path section Prefix mainly informs the INBOX client that is the root of maibox and then shows it to You see all the folders down there. This is to avoid viewing the Junk Mail folder as the mailbox root at the same level. We have tried a number of other settings but have not found a way to display both the Root level directory and the subdirectory of the Inbox. Note : Before closing the Preferences window, you must move out of the editing section and when prompted, select ' Save ' to save the settings.
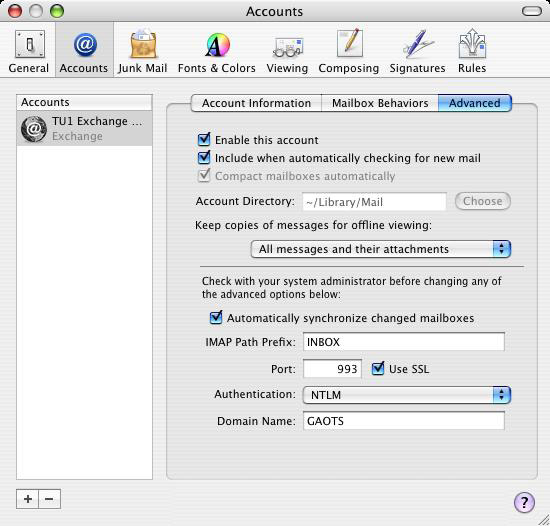 Figure 6: Advanced mailbox settings area
The final stage of the configuration we can do in Mac Mail is to allow GAL access. This is done on the " Composing " tab of the Preferences window. In the Addressing Section next to " Automatically complete addresses ", select " Configure LDAP ". On the next page select the + sign to add a new LDAP server. Enter the GC / DC name in your forest, then set up the basic search - Search Base. The Search Base is entered as the generic name of LDAP (CN), the component specified in the area where user folders will be searched. In this case I have specified an OU named ' Testusers '. The Search Base string is complete below:
Ou = testusers, dc = gaots, dc = co, dc = uk
To finish, enter the verification details and select ' Save ' then select ' Done '. The settings are shown in Figure 7.
 Figure 7: LDAP server settings
Conclude We hope this introduction and configuration can give you a good start on how to set up access to Exchange from the Mac. In the last part of this article, we will complete the configuration section by discussing Entourage 2004 setup and ending with introducing the experts and researchers' discussions in each solution.
(There's more)
FAQ
What should I check before following these steps?
Confirm device and software compatibility, save important data, and make sure you have the required permissions, files, and account access.
Why might the process not work?
Common causes include outdated software, missing permissions, incompatible hardware, an unstable connection, or completing a step in the wrong order.
Can I undo the changes if necessary?
That depends on the tool or setting. Use built-in restore options when available, keep a backup, and record the original configuration first.
Related Articles
 Access Exchange 2007 from Apple Macintosh (Part 2)12 minutes read
 Exchange 2007: Security Features of Owa (Part 2)9 minutes read
 Dissecting Apple Macintosh Computers3 minutes read
 Exchange Server: Transfer Exchange 2003 to Exchange 2007 (Part 2)9 minutes read
 Managing Resource Mailboxes in Exchange Server 2007 (Part 2)10 minutes read
 Exchange Server: Transfer Exchange 2003 to Exchange 2007 (Part 3)11 minutes read
Reader Comments 0
Sign in with email or Google to join the discussion.