Common wifi errors, wifi network errors and how to fix them
All common wifi errors, wifi network errors and how to fix them are compiled and shared by TipsMake. If you are encountering errors, please refer to this article to handle errors promptly..
Is your home Wifi weak or error-prone? You have tried a number of ways such as: using SiStr WIFI software to check Wifi signal or managing Wifi with software, but it still cannot help you solve all common errors when using wifi.
Common Wifi errors and how to fix them
Of course, in case the computer loses connection or Wifi does not work, you cannot download and install those supporting software. This article will summarize some common wifi errors and give solutions to fix them. they are direct.
Article content:
1. Fix basic wifi errors.
2. Handle wifi access errors according to each specific case.
1. Summary of basic ways to fix Wifi errors
Method 1: Restart the Wifi Router
The simplest way to fix common Wifi errors is to restart the Wifi Router. First turn off the Wifi Router and wait about 60 seconds then turn it back on. Then try connecting your device and computer to see if the Wifi error persists or not.
Method 2: Perform Wifi error diagnosis
Step 1: Click Start => Control Panel => Network and Internet => Network and Sharing Center .
Step 2: Next click Change Adapter Settings .

Step 3: Right-click on the Wifi network card, select Diagnose .
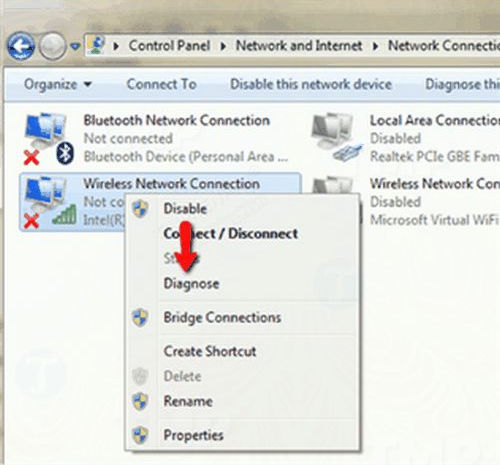
Step 4: The process will diagnose and repair Wifi errors.
Method 3: Delete and re-add Wifi network
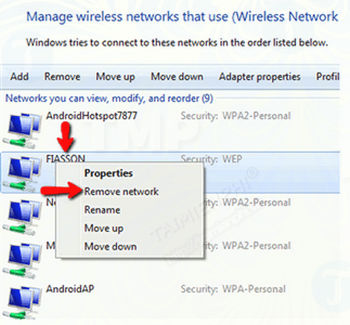
Step 1: On the Network and Sharing Center window, find and click Manage wireless networks .

Step 2: Right click on your Wifi network, select Remove network as shown below.
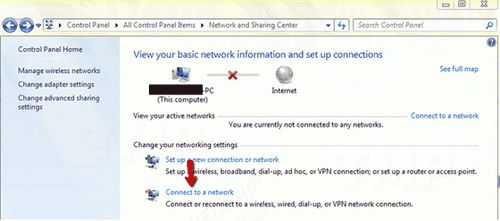
Step 3: Return to the Network and Sharing Center window, find and click Connect to a network . Then select your Wifi network connection from the list.
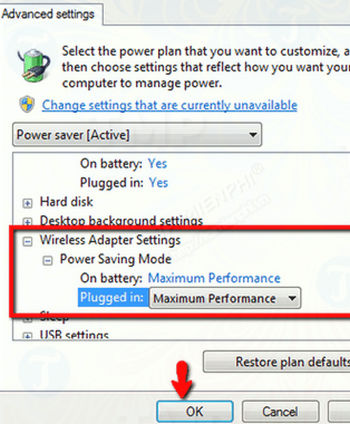
Method 4: Configure Power Management
Step 1: If the problem occurs after starting the computer from hibernate or sleep mode, or is facing intermittent problems. In this case you must configure the Power Management profile to set the Wireless Adapter Settings to Maximum Performance.
Step 2: Click Start => Control Panel => Hardware and Sound => Power Options => Change plan Settings .
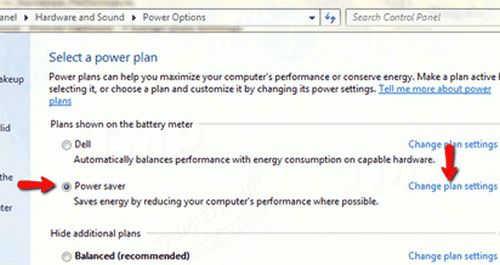
Step 3: Select Change advanced power settings .

Step 4: Scroll down to Wireless Adapter Settings and change the battery or charger configuration to Maximum Performance . Then click OK to save the changes.
Method 5: Check Wifi Router settings
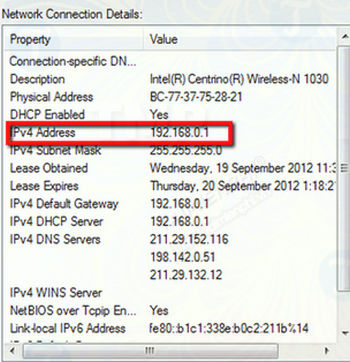
Step 1: On the Network and Sharing Center window, find and select Change Adapter settings. Next right-click on the network device you use to connect to the Internet, select Status. The Wireless Network Connection Settings dialog box will appear on the screen, where you click the Details button.
Step 2: The Network Connection Details dialog box will appear on the screen, where you find and save the IPv4 default address.
Note: The above steps cannot be performed without using a wired network connection. In case you know the router's IP address, you can use it to perform the next steps. If not, try the addresses 10.1.1.1, 192.168.0.1, 192.168.1.1, 192.168.2.1. Or you can use another computer or laptop connected to the Internet to check this information.
Step 3: Open any browser on your computer and enter the IPv4 address there.
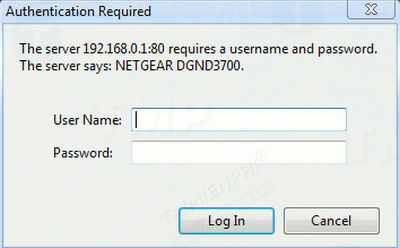
Step 4: The Wifi Router login page will appear on the screen, asking you to enter your username and password. Unless you have saved a password before, the login and password are usually admin/admin, admin/password, admin/blank.
Step 5: Browse through all the settings and check if the router is set to broadcast as the network name (SSID), make sure you are connecting to the correct wireless network (SSID) and are using the WEP key / WPA / WPA2 on both devices.

Taimienphi.vn recommends that you use Windows Connect Now or Wi-Fi Protected Setup (if available) on the Wifi Router to ensure the connection is established correctly.
Step 6: If you are trying to use WPA or WPA2, make sure both the network card and wifi router support this protocol. If you encounter problems using WPA or WPA2, try reconfiguring the router to use WEP instead and check if you can connect.
If it is possible to connect to the Internet via WEP, it is likely that the network hardware requires a firmware upgrade. If not, you should contact the hardware/router manufacturer directly for support.
Note: Must change WEP / WPA / WPA2 on both the Wifi Router and your computer.
Step 7: After reviewing your Wifi Router settings and making the necessary changes, log out of your router configuration page. Then turn the router off and on again to apply the changes.
Method 6: Reinstall the network card driver
Step 1: Enter Device Manager in the Search box on the Start Menu, on the search results list, click Device Manager to open.
Step 2: On the Device Manager window, navigate to Network Adapters , then find and right-click the wireless network device, select Uninstall .
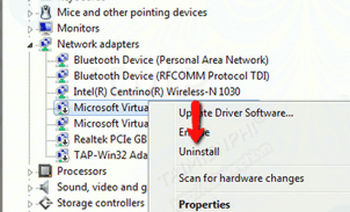
Step 3: A warning window will appear on the screen asking for confirmation to uninstall the wireless network device. You just need to click OK to continue.

Step 4: Exit the Device Manager window and restart your computer.
Step 5: During the boot process, a notification window will appear on the screen stating that new hardware has been detected and installed. Then display a message detecting one or more wireless networks, click on it to display more options. The Available Wireless Networks window displays a list of all networks in range. Select the access point you want to connect to, and try accessing the Internet to check if the error persists.
Method 7: Reset TCP / IP stack
One of the main Windows components of an Internet connection, the TCP/IP stack, can become corrupted or corrupted. In this case, simply reset the TCP/IP stack using the Netshell (Netsh) utility to fix the problem.
Step 1: Open Command Prompt under Admin by entering cmd in the Search box on the Start Menu, on the search results list, right-click and select Run as Administrator .
Step 2: Enter the commands below into the Command Prompt window:
netsh int ip reset reset.log
netsh winsock reset catalog
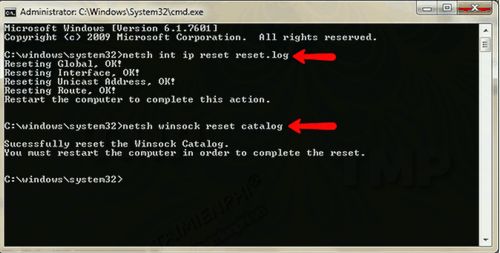
Step 3: Finally, restart your computer and see if the network error has been resolved.
2. Handle Wifi errors for each specific case
Case 1: Modem loses connection to the Internet
If you encounter this situation, do the following:
- Unplug the Internet cable from the router and turn off the power, wait about 30-40 seconds then turn it back on.
- Re-plug the cable jack into the router, check the connectors to see if they are broken.
- Restart the modem and wait for the signal lights to light up.
-Finally, use your browser to open a website to see the results.
Case 2: Wifi name not found
In case you cannot detect the wifi name, do the following:
- Create a required connection for the computer, do the following in Control Panel/Network and Internet/Network and Sharing/Manage Wireless Networks. Here there are 2 cases:
+ If there is a network name listed in the list, right-click on that icon and select Properties. Check the box "Connect even if the network is not broadcasting its name (SSID)"
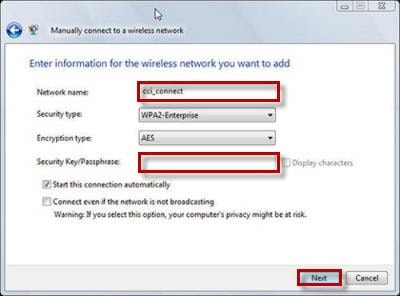
+ If you do not see the network name listed, click on "Add" then select "Manually connect to a wireless network" and fill in Add required information to it.
- Finally check the router and restart the device to ensure a good and stable signal.
Case 3: The computer cannot find the Router
Reasons for this situation:
- The router has just been replaced, leading to inappropriate settings.
Solution:
- First, plug the Ethernet cable connecting the computer to the router's LAN port.
+ Access your computer's Network Settings.
+ Go to Control Panel/Network and Internet/Network Sharing Center/Change Adapter Settings.
+ Right-click and select Properties of Local Area Connection.
- The Internet Protocol Version 4 (TCP/IP v4) dialog box opens. Select "Use the following IP address", in the "IP address" box, enter the router's default number range: 192.168.1.1. This number sequence has the form 192.168.1.x so to avoid conflicts you can change it to 192.168.1.2, 192.168.1.3.
- Under "Subnet mask" enter the number sequence 255.255.255.0 — the code to use Used for private home networks. At "Gateway" enter the default router IP address as above: 192.168.1.1
Case 4: Network drops.
The network drop causes the Wifi signal to be affected. The sign to recognize this is the modem cable indicator light flashing continuously. How to fix this problem:
- Replace the adapter if you share the same line with a landline phone line.
- If you are using more than 2 splitters causing redundancy, replace them with 2-way splitters to increase the connection signal.
Case 5: Wi-Fi signal weakens
If your home wifi transmitter is located under the living room, when moving to the upper floors or to another room, do you find that the signal is noticeably weaker? This is not strange, they are completely reasonable.
Solution:
- Check the router's antenna.
- Install additional transmitters in rooms far away from the router.
- Update firmware for router.

Using a can of beer helps increase wifi signal
Case 6: Router turns off suddenly
The router must operate continuously for many days, leading to damage and sudden shutdown. You should place the router in a cool place, and check to make sure the vents on it are not obscured by dust or dirt. Unplug the router's power outlet and plug it back in for a while. When not in use, turn them off.
Nowadays, there are newer routers that allow you to specify when to turn off or after 30 minutes of not being used, the system automatically switches to sleep mode, so you can use them to replace old devices.
The wifi error may be due to a faulty wifi transmitter. While configuring the Wireless Router, for example, you need to fix the Wireless Router error to regain wifi signal for your devices. For detailed instructions, see how to fix it. Wireless Router error here.
Those are common causes and solutions when your home wifi fails. If your home wifi is still in use and shows signs of weakness, it could also be because you did not set a password for it, leading to too many devices. are accessing the same device, you can refer to how to change wifi password to set a password to protect your home's signal to always be stable.
WiFi can't connect to the network, what should you do now? Don't think about calling the switchboard to ask for help fixing wifi that can't access the network because you can do this yourself. There are many ways to help you test to see what is the cause of WiFi inaccessibility. And when we identify the problem, we can know the next step: whether to restart the modem, review the connection, IP address or call for help from the network operator.
Wifi 6 is a new generation of wifi network, capable of improving speed compared to wireless network connections with phones, tablets. If you don't know and want to learn about wifi 6 , let's go. Read TipsMake's previous article.