Build your own simple NAS system: Part 2: Installation
After we have finished preparing the NAS system, in this second article, we will go through the steps of installing NAS4Free (FreeNAS 7) on our old system.
Table of Contents
After we have finished preparing the NAS system, in this second article, we will go through the steps of installing NAS4Free (FreeNAS 7) on our old system.
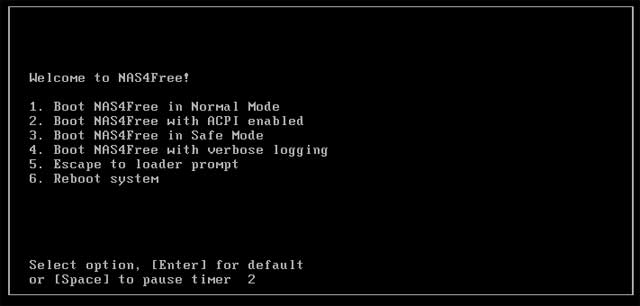
You can use any burning software you like to burn the .iso file you downloaded to a CD / DVD. Or if you want to install from USB, you should format it as FAT32 before using software like Win32 Disk Imager to write the contents of the .iso file to USB (note whether the mainboard supports booting from USB or not. ). So we have the means to install. Connecting to the computer, tweaking the BIOS to CD / USB drive is the first boot option if needed and waiting for the installation process to complete, similar to when waiting for the Windows / Linux installation disks to load the file. Leave the default for NAS4Free boot in Normal Mode (option 1).
Notice two things:
- If you want to install NAS4Free on a USB / Memory Card, the USB / Memory Card needs to be prepared separately, it is not possible to leave the source and the installation destination with the same USB.
- Do not plug in the second USB / Memory card from the beginning, this will cause initial loading to fail. Connect this USB / Memory card only to the setting screen and the following message appears.

As you can see, we can immediately use NAS4Free in LiveCD / LiveUSB mode without the need to install it.
LiveCD / LiveUSB mode:
The entire NAS4Free operating system is loaded from USB / CD installation to RAM for use, similar to the Windows portable versions you usually see on HirenbootCD rescue discs or LiveCD mode of some Linux distros like Ubuntu. The basic configuration will be saved in a config.xml file containing the same USB / LiveCD installed.
No loss of installation. Easily update the new version (just remove the USB / CD and burn the new version on it). Easily restore the original state due to changes not recorded on CD / USB.
In return for the changes, the configuration is only stored on RAM so after every situation such as reboot, turn off the machine to rest or power out, you will have to reconfigure (or reload the recent config.xml configuration file The most you save on usb / cd). The functions that you added through the plugin will not be saved. In general, saving the configuration / changes will be more difficult. Boot speed may be slow on old mainboards (if using USB).
Suitable for first-time trial needs or for users who are already familiar with the basic configuration that wants to test NAS4Free on different machines.
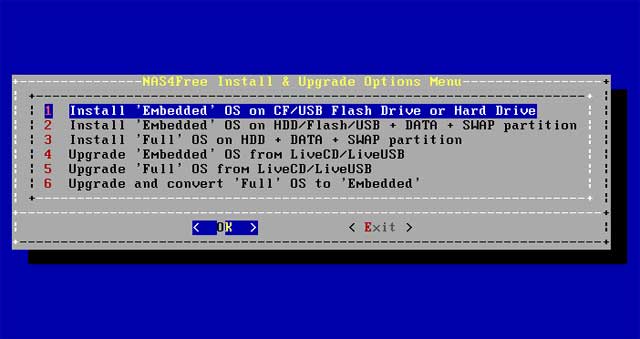
However, if you want to use for a long time and perform many customizations, you should choose the 9th option to install NAS4Free completely on the hard drive, memory card. Here we have 3 options to install, corresponding to 2 modes of use.
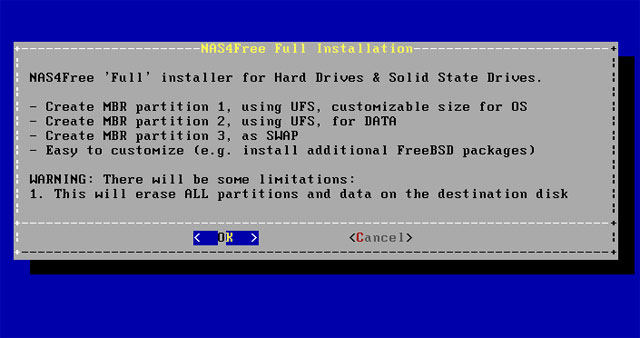
Full Installation:
Install directly on HDD / SSD / USB / Memory card. All necessary components of the operating system will be written to it, changes to the operating system will be recorded directly on those storage devices. In short, NAS4Free will be installed like when you install Windows, Linux or Mac according to common rules.
Save memory, at any time, there are a number of essential components of the operating system loaded on RAM to serve tasks at that time. The change, configuration is also more flexible because every change you make whether on the file system or through the web interface is saved. Additional installation of new functions and plug-ins is also quick and convenient.
However, in exchange for this flexibility is the risk of operating system failure due to improper operation from inexperienced users. Any changes will be immediately saved on the hard disk and cannot be recovered, so it requires users to have a self-backup every time they want to try a plugin or add a new feature that has a great influence. In addition, the continuous read / write of system files will have a negative impact on the life of USB / memory cards or low-range SSDs. The process of updating and repairing a full Installation version is also a bit longer.
Suitable for experienced users (especially working with configuration files) and want to regularly perform customization and functionality for your NASbox. It is also important to have a USB / SSD good enough to not worry about longevity.
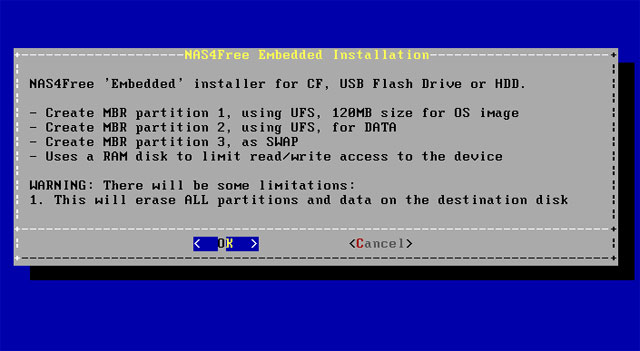
Embedded Installation
Installation mode is recommended. NAS4Free will still be installed directly on the HDD / USB / Memory Card but when launching the entire operating system will be loaded onto the same RAM as the LiveCD. Any configuration made through the web interface will still be saved and users will not have to worry about losing these tweaks. But every other form of impact on system files (edit, delete with tools such as text editors, for example) will only exist on RAM, not recorded on the hard disk, ie will be lost after reboot / break electricity.
Quick and easy updates. If for the LiveCD we still have to download the new version in full form and manually write to USB / CD, with Embedded mode, the update can be done directly via the Web interface (or use the file. iso is created specifically for the Embedded version, much more compact. System files are securely protected from the hands of experienced novices, so there are no problems such as 'ntldr is missing' on Windows just because you or someone else has missed a deleted hand. file number.
However, because of this protection mechanism, of course, the ability to customize when running in this mode is still inferior to the Full Installation mode.
Suitable for those who want to make the most of the functions of NAS4Free in the long term but not too much complicated customization needs. Note also about RAM when running in this mode, if the amount of RAM on your old machine is too low, you should still consider using Full mode.
The first option will install NAS4Free as Embedded on the drive of your choice. Note that with this installation the entire drive will be formatted and used only as an operating system location and cannot be used to store data. So do not choose 1 / if you want to install on HDD / SSD because it will waste capacity and a valuable SATA port on the mainboard.

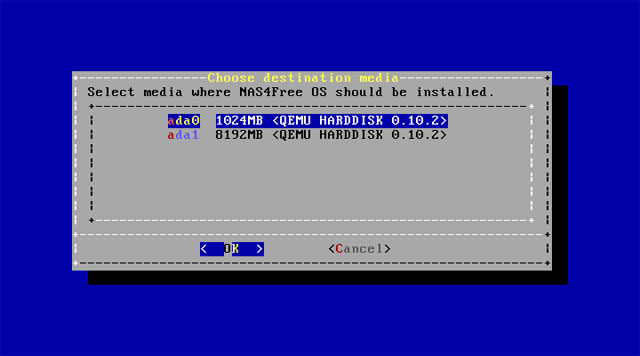
With the second option, the installer will create 2 partitions. A partition has enough capacity to install NAS4Free and the rest can still be used to store data. This is the most suitable option for HDD / SSD.
Option 3, obviously used to set in 'Full' mode .
Options 4 and 5 are used to update OS as Full / Embedded from the USB installation (containing newer versions). With option 6 we can transfer an installed OS in Full to Embed mode at any time.
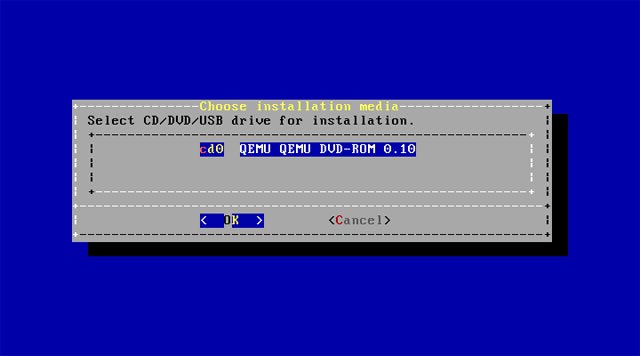
After you've selected the installation mode. Click 'OK' to continue. Note that the next screen is where you choose the installation source, not the destination. Choose the correct CD / DVD or USB drive that contains the driver. The next step is to choose where you want to install NAS4Free OS.
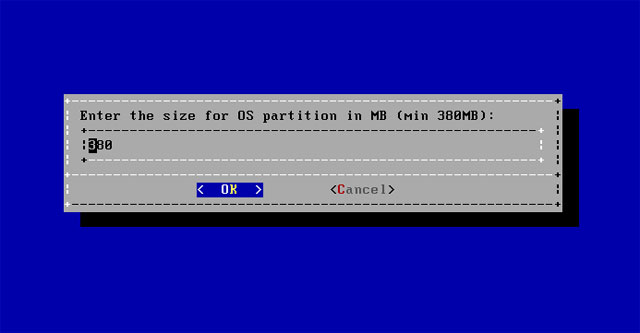
With the ' Full' setting , users are allowed to choose the size of the partition containing NAS4Free OS (minimum 380MB). There is no need to set it too large, especially if you are installing on a USB device with plenty of free space.
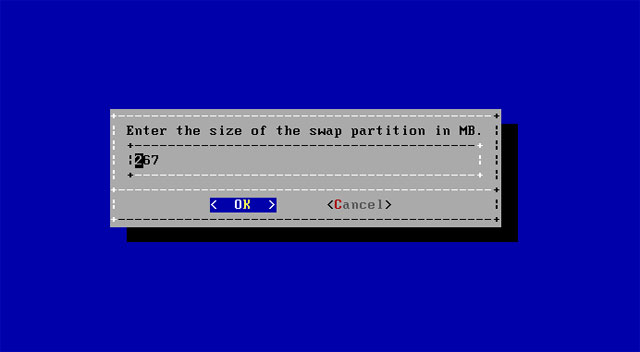
Then select the HDD / USB drive that we want to install. If you choose the 2nd or 3rd installation mode, you will be asked whether to create a swap partition (virtual memory using hard disk support for Linux's RAM, similar to Windowf's virtual pagefile memory). Just agree if your device's RAM is too low (about 512MB). Enter sufficient capacity, usually in Linux and Windows, the recommended amount of virtual memory is twice that of RAM.
After the Swap option has been completed, the installation process will proceed, from this step we do not need to do anything further. Installation time takes less than 1 minute even on weak configuration machines.

Remove the USB / CD to install and reboot the machine after you see the installation message complete. Pay attention to the BIOS and make sure that from now on the mainboard will boot from the HDD / USB that has been installed USB, not elsewhere. As we can see, the number of configuration options at this point is reduced to 8, because you are working with an installed OS and not the LiveCD.

Direct configurations on NAS4Free installation machines are as minimal as possible, all operations related to the OS's service functions will have to be done via the Web Interface (WebUI). Here we are only provided with some very basic options to ensure that the connection to WebUI is successful. (Make sure you understand the concepts of network addresses, DHCP, Network Interface Card, etc. in previous posts before configuring). Note that the IP information and the currently used NIC will be displayed immediately above.
Option 1 allows us to select Network Interface Card (NIC) that NAS4Free will work on. Identifying the name of the NIC is slightly more difficult than the IP address.

Although the old mainboards have two NICs which are quite rare (and those who already have the NIC added may be able to identify their names above), but the users have also been provided with auto options. let the OS know which NIC is active on the local network so you don't need to worry about this step. In case you don't have experience yet, there are too many active NICs on the device, here is a trick:
Make sure the NAS box is connected to the home network (via switch, router). Go back to a computer in the house, turn on the command prompt and type arp -a to display the list of MAC addresses corresponding to each IP in the local network. If there are not too many active devices in the house, you will easily find the NIC's MAC that the NAS box is using via its IP.
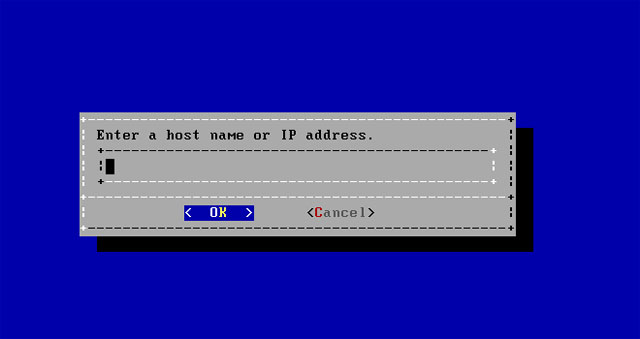
With option 2, users can change IP information, default gateway, DNS server . that NAS Box will use. Similar to Windows, leave all the parameters that the modem / router's DHCP function is for, the most convenient and fastest. Only change them when you really understand what you are doing and if you live in a certain area . cut off regularly.
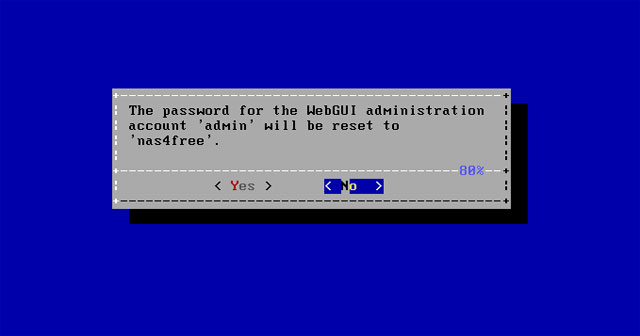
Option 3 is used to reset the password of the Web administration interface to the default 'nas4free' in case of negligence. Similarly, operate hard reset modem to retrieve the default password 'admin ' that many people have to do.

Option 4 is used to reset all NAS4Free OS configurations to default state. Should only be used when an unrepairable error occurs.
Use option 5 to ping other machines in the house from NASBox, make sure the connection is smooth.
You should only use Shell (option 6) if you are not afraid to work with the command line. Most of the necessary configuration operations have been placed on the Web interface, where we will proceed further in the next article.
Was this article helpful?
Your feedback helps us improve.
Related Articles
 Build your own simple NAS system, part 3: Basic storage configuration14 minutes read
 Download the demo version of Windows 8 to explore2 minutes read
 Should I install or upgrade the operating system?6 minutes read
 How to Build the Perfect, Cheap Streaming System in a Tiny Dorm Room5 minutes read
 How to build your own sync system without Google Drive or OneDrive6 minutes read
 Build your own simple NAS system for storage needs11 minutes read
Reader Comments 0
Sign in with email or Google to join the discussion.