PKI Tutorial - Part 3: Installation
 Part 1: Planning
 Part 2: Design
Martin Kiaer
We went to the third part of the PKI tutorial series. In the first section, we have introduced you to an overview of PKI preparation and planning. Next in the second part, go into design mode and consider some of the best practice settings. In this article, I will go over the technical issue and show you how to install PKI based on Microsoft Certificate Services in Windows Server 2003.
PKI settings
Based on some design results from the previous two parts, now let's start the PKI installation. Since this is a quick tutorial, we will only cover a few steps. At the end of this article, we will show you how to install a two-level architecture that includes an offline root CA and an online issuing CA in the same PKI using best practices. However, before starting the set, get used to some things.
In Figure 1, we have given a valid period for best practice for each CA at each level (based on the 3-level architecture for the complete master model). The advantage of this model is that it will ensure you always have consistency with the issued certificates at each level. If you only want to deploy the two-level architecture, simply delete the level 3 CA. The model will still be applied.
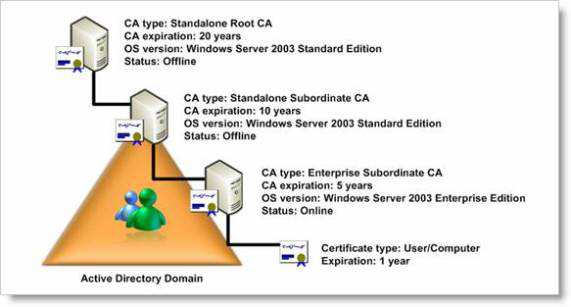
Figure 1: The most practical validity period for each CA at each level
Another thing that you should prepare before starting the installation is a text file called CAPolicy.inf. This file is used to customize your Windows Certificates Services configuration. In this file, you will find very important things like:
- CDP statement
- Certificate refresh settings such as valid period and key size
- Links for CDP and AIA links
- How is CRL frequency published?
Create the file in Notepad and save it to % windir% capolicy.inf (eg C: Windowscapolicy.inf ).
Doing this task is really simple, by following the files in the step-by-step instructions below. With the things we provide below, let's dive into the technicalities of the problem.
Offline root CA installation
To install an offline root CA, you must do all of the following bullets:
- Prepare the file CAPolicy.inf
- Windows Certificate Services installation
- Publish the CRL list
- Run post-Configuration script
This is how it is done.
1. Install the server with Windows Server 2003 Standard Edition incl. SP1 or newer and ensure that it runs as a standalone server (ie not a member in any domain).
2. Create the required parameter replacements in the CAPOlicy.inf file below (marked with red)
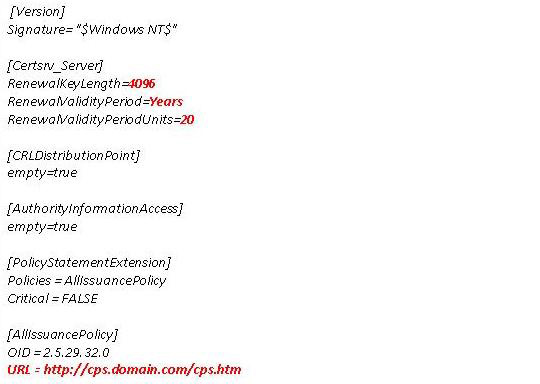
Figure 2: File CAPolicy.inf
3. Copy the CAPolicy.INF file to % windir% capolicy.inf
4. Navigate to Start Menu / Control Panel / Add or Remove Programs | Click Add / Remove Windows Components
5. In the Windows Components Wizard, select Certificates Services and then click Next
6. Notice what is in the dialog box displayed. You should not rename the computer when Windows Certificate Services are installed, click Yes

Figure 3
7 In the CA Type field, click Stand-alone root CA , check the ' Use custom settings to generate the pair and CA certificate ' checkbox and click Next.
Note :
Usually the root CAs of the enterprise and the subordinate CA options cannot be selected because this server is not a member in a domain.
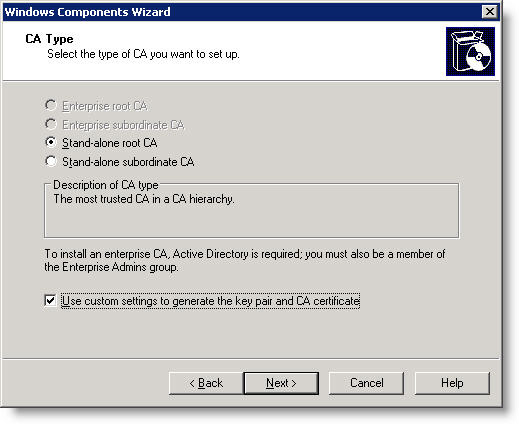
Figure 4
8. Select the CSP you want to use for the offline root CA. For simplicity, let's choose Microsoft Strong Cryptographic Provider v1.0 , although another CSP can be selected, for example, if you have installed Hardware Security Module (HSM) and connected the server to an HSM solution, before catching early CA installation procedure.
Select the default SHA-1 hash algorithm
Set the key length to 4096
Make sure that both ' Allow this CSP to interact with the desktop ' and ' Use an existing key ' options are not selected. Click Next .
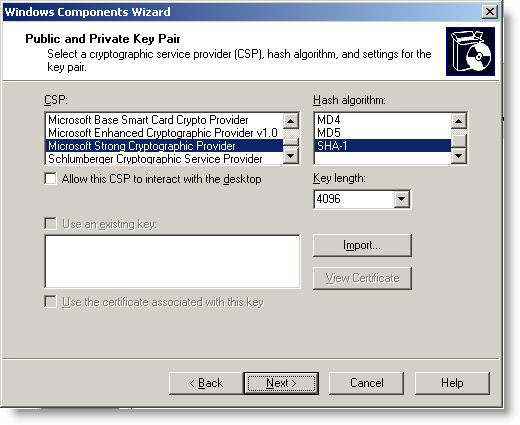
Figure 5
9. Enter the generic name for your root CA, configure the distinguished name suffix ( O = domain, C = local ) and set the validity period to 20 years , then click Next .
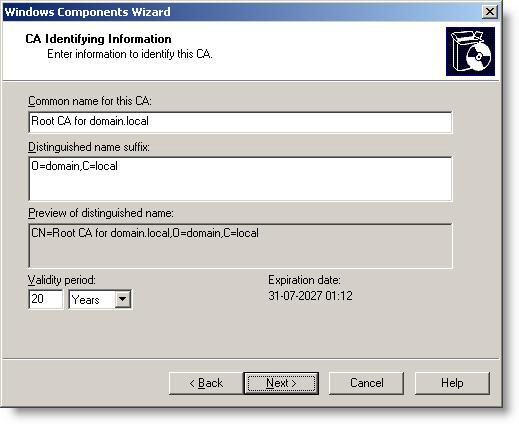
Figure 6
10. Accept the default proposal for the certificate database and log files, then click Next .
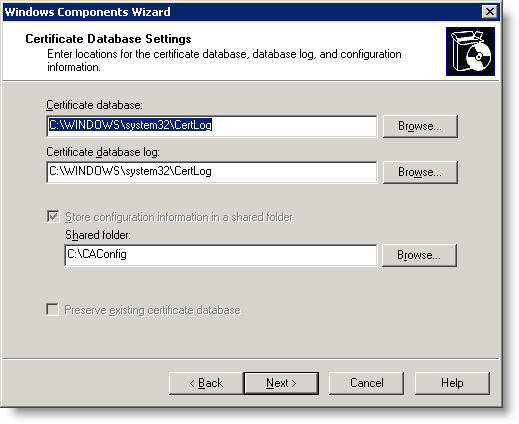
Figure 7
11. If this is an offline root CA, you do not need to install IIS (Internet Information Services) and that is why this dialog box is displayed. Click OK .

Figure 8
12. Click Finish
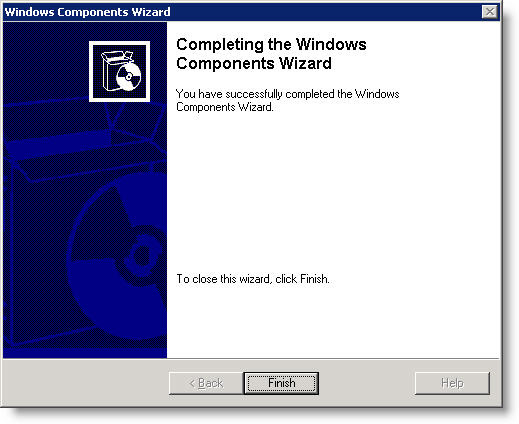
Figure 9
13. Click Start / Programs / Administrative Tools / Certificate Authority
14. Open your CA server panel, then right-click Revoked Certificates and select All tasks / Publish
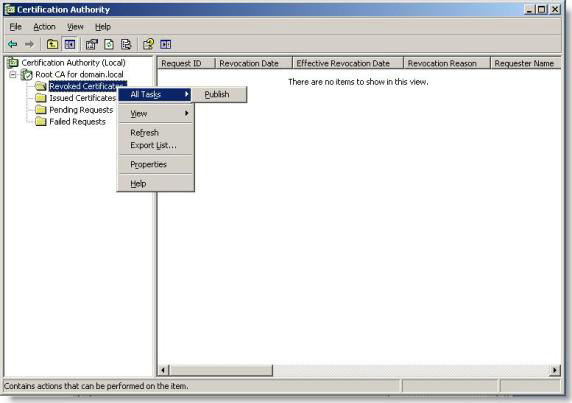
Figure 10
15. Select New CRL and click OK
16. Copy % windir% system32certsrvcertenroll * .crt and * .crl to the USB key. You will need these files for the next secondary CA to be installed.
17. You should also copy these files to the HTTP CDP location as indicated in the caconfig.inf file listed earlier.
18. Create the replacement of the required parameters in the file below (the part is red) and run the file from the command prompt.
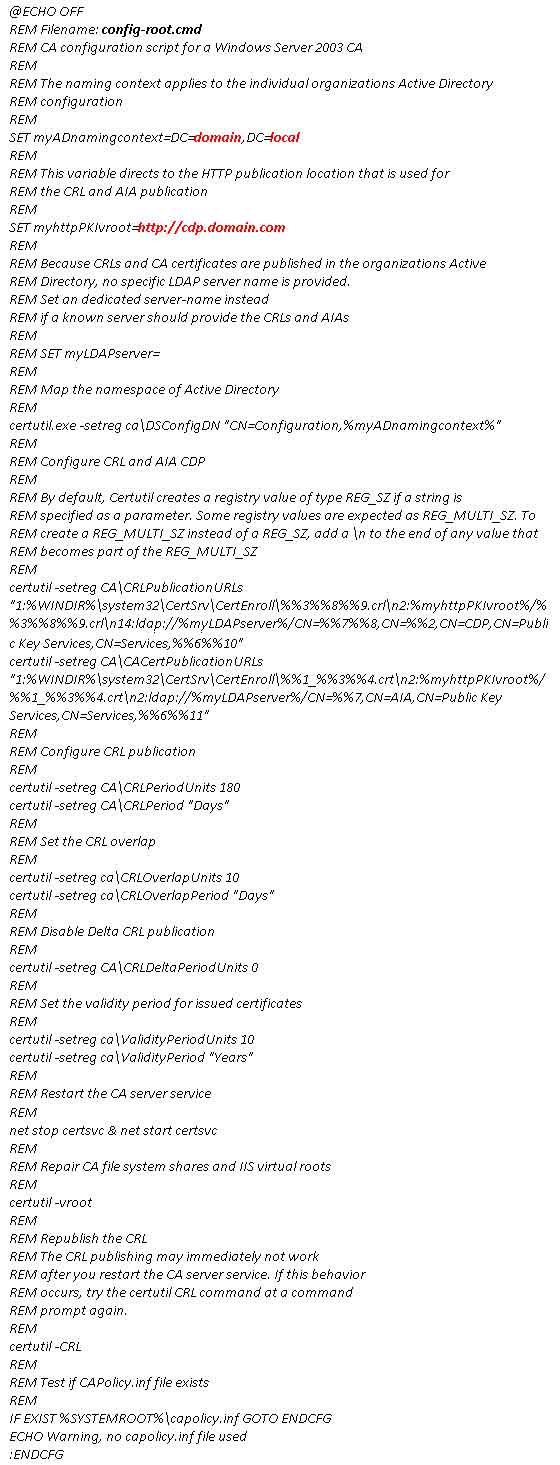
Figure 11
19. You are now done installing the root CA.
We mentioned earlier that there are many security reasons to keep root CAs and policy CAs offline. Only between issuing CAs in online mode. This is because policy and root CAs are kept offline, they are not members of a domain.
Install the enterprise CA that is publishing online
To install the enterprise CA that is online, you need to follow these steps:
- Prepare the file CAPolicy.inf
- Installing IIS (Internet Information Services)
- Windows Certificate Services installation
- Submit the CA child certificate request to the parent CA
- Release the CA CA certificate
- Install the CA CA certificate at the enterprise subordinate CA
- Run post-Configuration script (configuration)
- Publish the CRL list
Here's how to do it:
1. Install a server with Windows Server 2003 Enterprise Edition incl. SP1 or newer and make sure it is a member of the domain
2. Ensure that IIS is installed. However, there is also a note for this step. If you really want to do it simply, skip the IIS section. Such a caveat is so that you must correctly understand the PKI before ignoring the IIS component. The advantage of this approach is to make installation simpler and reduce the attack direction.
3. Replace the necessary parameters in the CAPOlicy.inf file below (the section marked with red).
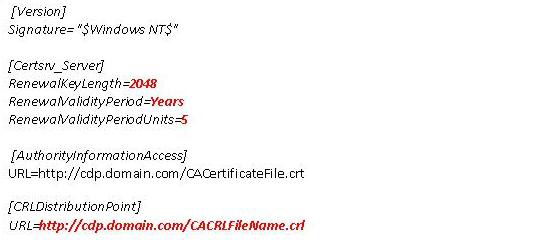
Figure 12: File CAPolicy.inf
4. Copy the CAPolicy.INF file to% windir% capolicy.inf
5. Navigate to Start Menu / Control Panel / Add or Remove Programs / click Add / Remove Windows Components
6. In the Windows Components Wizard, select Certificates Services and click Next
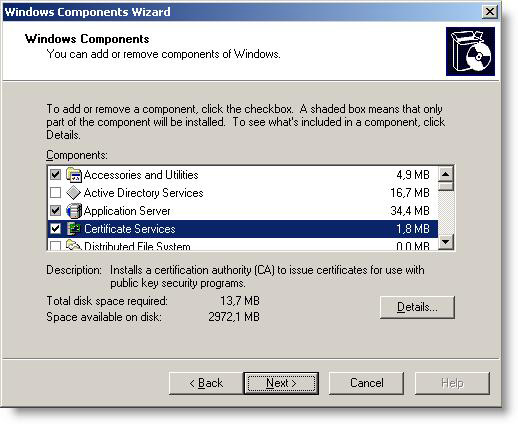
Figure 13
7. Note with what dialog box is displayed. You should not rename the computer when Windows Certificate Services are installed. Click Yes
8. In the CA Type field, click the Enterprise subordinate CA, and check the ' Use custom settings to generate the pair and CA key' checkbox, and then click Next.
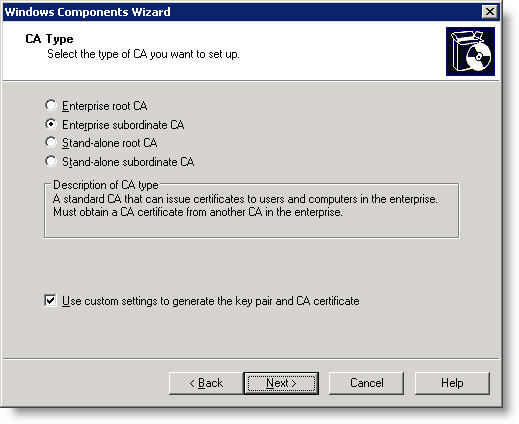
Figure 14
9. Select CSP to use for the issuing CA. For simplicity, we choose Microsoft Strong Cryptographic Provider v1.0 , though you can also choose another CSP if you want, for example installing Hardware Security Module (HSM) and connecting the server to an HSM solution before start the CA installation procedure.
Select the default SHA-1 hash algorithm
Set the key length to 2048
Make sure that both the ' Allow this CSP to interact with the desktop ' and ' Use an existing key ' options are not checked . Click Next .

Figure 15
10. Enter a name for the issuing CA and set the validity period to 5 years , then click Next
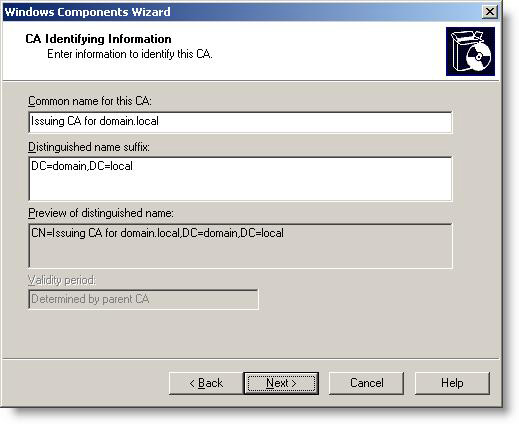
Figure 16
11. Accept the default offer for the certificate database and log files and click Next
12. The CA certificate request window is displayed. Choose Save the request to a file and enter the path and file name (the utility will automatically add the .req extension of the file). Copy the file to a USB key for later use. Click Next . We will use this required file in the following section.
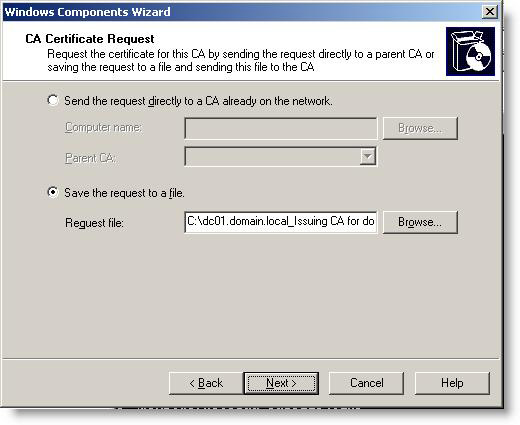
Figure 17
13. Some IIS application components will be added. Click Yes

Figure 18
14. (Optional) If you do not have ASP support in IIS, follow what the dialog box displays. Click Yes

Figure 19
15. This is not done here, when a dialog box appears, you need to create a private key for your new issuing CA.
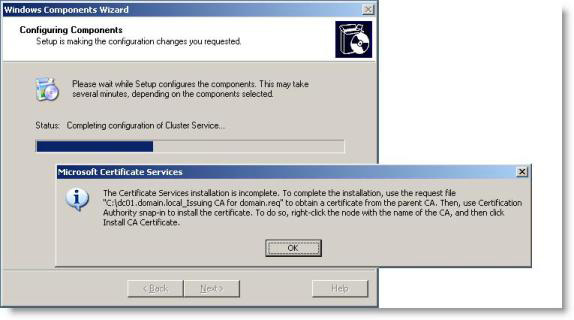
Figure 20
Click OK and continue
16. Click Finish
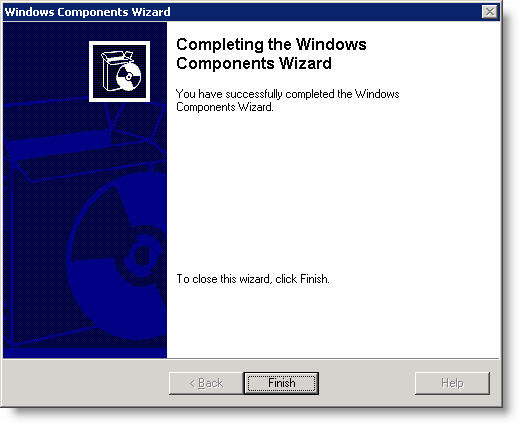
Figure 21
17. Before continuing, you should publish the certificate and revocation list for the root CA for Active Directory. This is done easily by following the steps below:
a) Copy both the * .crt and * .crl files generated during the installation of the root CA to the directory % systemroot% system32certsrvcertenroll on the issuing CA server.
b) Run the following script from the command window in the same directory on the issuing CA. You must run the script as a member user of Cert Publishers Group in Active Directory (usually a domain administrator).

Figure 22
The script will automatically handle the entire file name and complete the necessary commands
18. Make sure you have the certificate request file created in step 12. Log in to the root CA server
19. From the root CA server, click Start / Programs / Administrative Tools / Certificate Authority
20. Open the CA server panel, right-click the server name. Click All tasks / Submit new request .
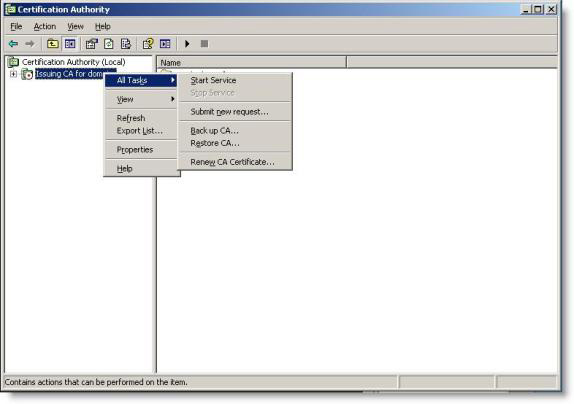
Figure 23
21. Locate the required file created in step 12 and click OK
22. In the left pane, click Pending Requests . Locate the certificate request in the right pane / right-click the certificate request and select All Tasks / Issue
23. Next, we need to export the certificate. In the left pane, click Issued Certificates . In the right pane, right-click the certificate, and then click Open
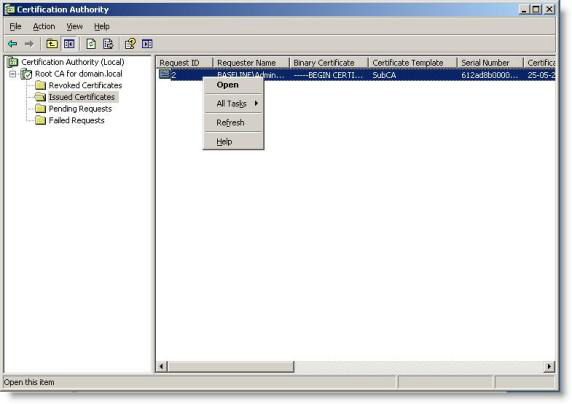
Figure 24
24. Click the Details tab and click Copy to file .
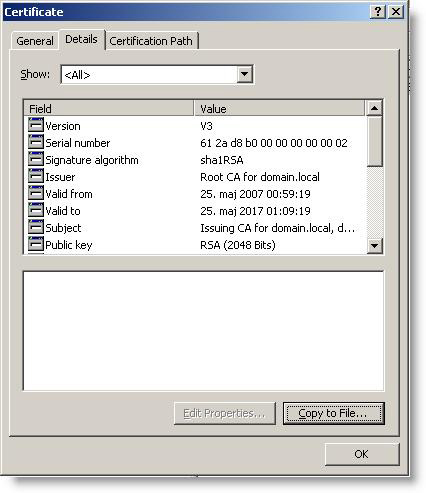
Figure 25
25. Certificate Export Wizard is displayed. Click Next
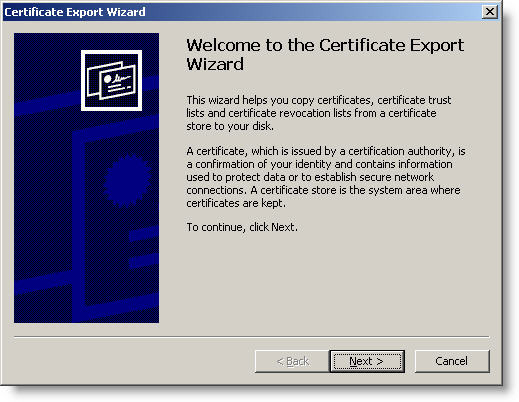
Figure 26
26. Select ' Cryptografic Message Syntax Standard . ' and ' Include all certificates in path certification if possible '. Click Next
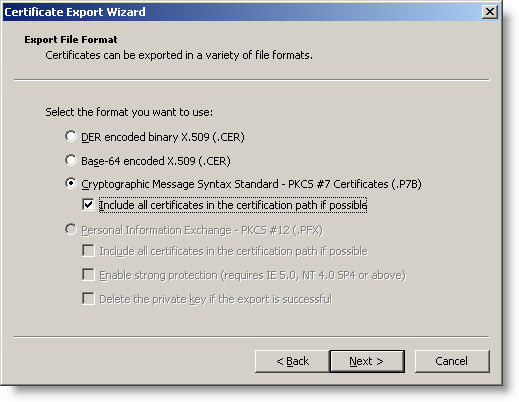
Figure 27
27. Save the certificate to the same USB key used in step 12. Click Next
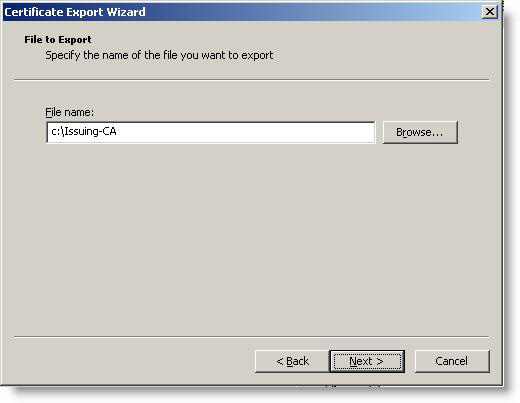
Figure 28
28. Click Finish and click OK
29. Now go back to the CA release and click Start / Programs / Administrative Tools / Certificate Authority
30. Open the CA server panel and right-click the server name. Click All tasks / Install CA certificate .

Figure 29
31. Locate the issued certificate in step 27 and click OK
32. Open the CA server panel and right-click the server name. Click Start service
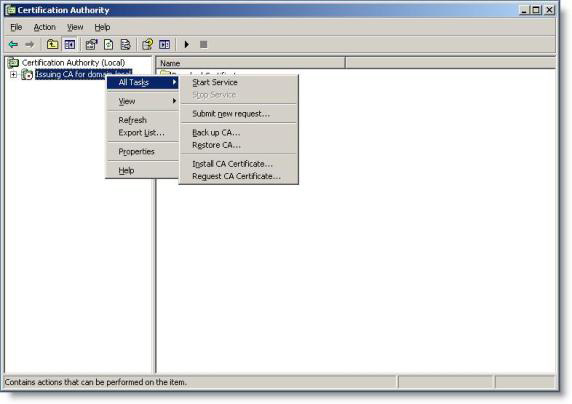
Figure 30
33. Copy % windir% system32certsrvcertenroll * .crt and * .crl to the USB key. You need to copy these files to the web server that is being used as distribution points for Certificate Distribution Points (CDP) certificates using the HTTP protocol. This is the CDP URL based on HTTP that you defined in the issuing CAs.
Note :
This task should be scheduled and run automatically
34. Make the necessary changes to the parameters in the file below (highlighted in red) and run the file from the command prompt
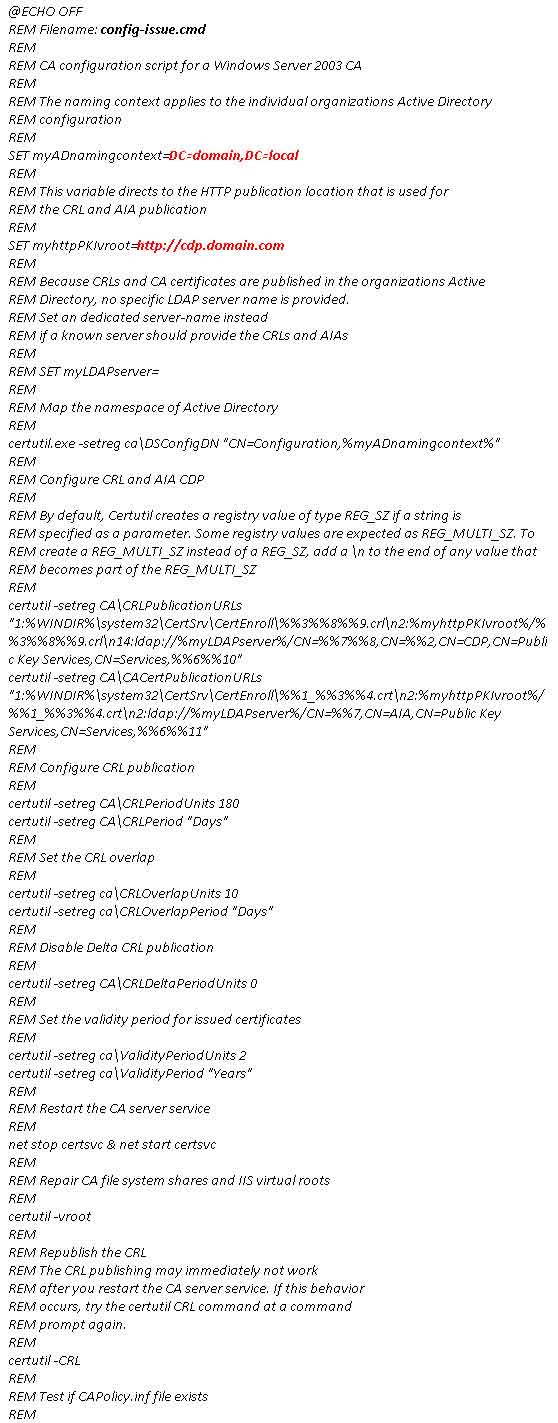
Figure 31
35. Open your CA server panel and right-click Revoked Certificates . Then click All tasks / Publish
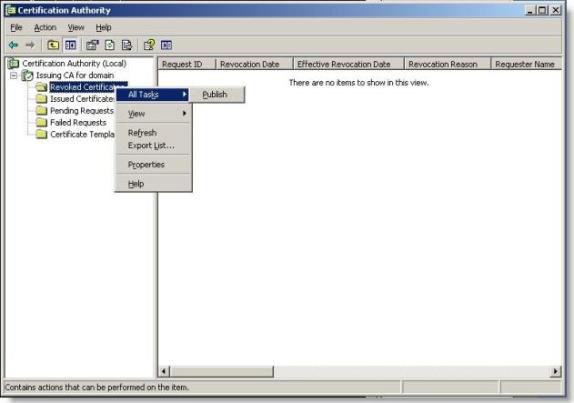
Figure 32
36. Select New CRL and click OK
37. Finally, complete
Conclude
In this article, I have discussed some brief tutorials on best practices for implementing PKI with a combination of both CA application offline and CA publishing online for businesses. . You should understand that the script used for publishing the root CA certificate and CRL file for the local storage of the issuing CA and Active Directory requires a change if you use the 3-level architecture. This is because the policy CA also needs to be published for the local certificate store of the issuing CA for the business and also needs to be published for Active Directory.
To some extent, you might think this third part is too cumbersome, especially in executing an online issuing CA. But when you follow the instructions, you will see that it is really necessary to implement a complete PKI that is scalable and secure. In the final part of this series, I will show you how to verify the settings and maintain and troubleshoot a PKI with a few simple steps.
 Part 4: Troubleshooting
You should read it
- How to back up the EFS file encryption key and certificate in Windows 10
- Secure the installation of ISPConfig 3 with Certificate Class1 SSL of StartSSL
- What is a Certificate Authority? What is CA?
- From today, owning Linux LPI certificate will be easier!
- Apache 2 supports SSL / TLS: Step-by-step instructions (continued Part II)
- What is Root Certificate? How is it used for online monitoring?
 Prepare to face MPACK
 PKI Tutorial - Part 4: Troubleshooting
 Configure advanced firewall in Windows Server 2008 using the MMC snap-in
 Configure advanced firewall in Windows 2008 using NETSH CLI
 Control of resource terms
 10 ways to reduce enterprise security risk