How to build Android TV Box with Raspberry Pi
Want to create a media center based on a Raspberry Pi, but find that the basic Kodi installation doesn't provide enough functionality? Don't worry, there's a tested alternative: Android TV!
Table of Contents
Want to create a media center based on a Raspberry Pi, but find that the basic Kodi installation doesn't provide enough functionality? Don't worry, there's a tested alternative: Android TV!
Here's how to install Android TV and enjoy the benefits of every popular streaming application running on Android with the Raspberry Pi.
Android in a Box
This is a relatively simple project, requiring you to:
1. Install a dedicated Android ROM on the Raspberry Pi.
2. Install some specific Android TV software.
3. Start watching TV.
Everything is really simple. If you know how to install an operating system for your Raspberry Pi, you won't have any trouble.
Before getting started, make sure you have:
- Raspberry Pi 3 (currently not supported for Pi 3 B + or Pi 4)
- Good quality microSD card
- Reliable Raspberry Pi power adapter
- USB keyboard and mouse
- USB flash drive
- HDMI cable
- Ethernet cable (optional)
You will also need to download the following software:
- LineageOS 15.1 (Android 8.1) for Raspberry Pi 3
- Pico Open GApps package from opengapps.org
- Etcher SD card recording software
Steps to build Android TV Box with Raspberry Pi
Step 1: Extract and install Android
Installing LineageOS on your Raspberry Pi gives you the benefit of an Android operating system. This means better support for media software, such as YouTube and Kodi. However, with properly installed Google apps, the Raspberry Pi supports Android, making it a great Android TV.
This can happen with different versions of Android for the Raspberry Pi, but for best results, use LineageOS version. Before proceeding, make sure the ZIP file is extracted.
Install Android on Raspberry Pi with Etcher
To install, first insert the Raspberry Pi's microSD card into the PC card reader and run Etcher.
Here, click on Select image and browse to the extracted image file. Select this item, then make sure SD card is selected in Select drive. When you're satisfied, click on Flash to start burning Android drive images.

Wait for the recording to finish - Etcher will notify you when the process is complete - then remove the SD card. Insert it into the Raspberry Pi, then boot.
At first run, it may take some time to load Android. After running, if you have a keyboard and mouse in your hand, set up WiFi. If not, connect the Raspberry Pi to the network using an Ethernet cable connected to the router.
After successful installation and launch, LineageOS will require basic configuration. These will just be common things like country setting, time zone, etc.
Step 2: Prepare Android TV for Google apps
Raspberry Pi is currently running Android. This is an AOSP-based version, meaning that no Google application has been installed. Instead, you will need to do this manually.
You have downloaded the GApps package to your PC. Go to opengapps.org and select:
- ARM
- 8.1
- Pico
(It's better to choose the Android TV option instead of Pico. This is simply a larger file and doesn't really do anything other than causing a problem in the future.)
Select Download, then when the GApps file is saved to your PC, copy it to the USB stick. Safely remove it and insert it into the Raspberry Pi.
Next, on LineageOS, open the app drawer and select Settings> System> About tablet . Here, scroll down to Build number and click on it multiple times. Finally, this will add the Developer options menu to the previous screen.
Click back until you exit the Settings app , then reopen it and navigate to System> Developer options . Select Root access and click on Apps and ADB options , click OK when the warning is displayed.
Next, scroll down to Local terminal and activate the application. This gives you local shell access, meaning you can enter commands via the keyboard.
Return to the application drawer, where you'll find the Terminal application . Click to open and press Allow to allow the application to access the device.
Next, enter the superuser command :
su
A Privacy Guard alert box will appear. Check Remember my choice (to ensure future permission for what you are about to do) and then select Allow.
Next, enter the command:
rpi3-recovery.sh
This step loads the recovery script. Enter the reboot command to launch it.
reboot
The Raspberry Pi will boot into the TWRP recovery control panel. Here, select Install, then click Select Storage to select the USB device.

Select GApps file, then click Install Zip and in the next screen, check Reboot after installation , then select Swipe to confirm Flash .
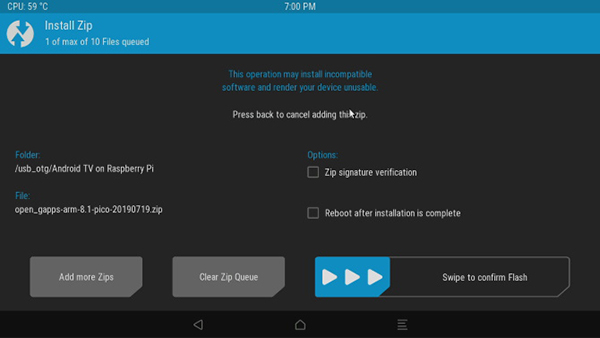
When the device restarts, you will be able to access the Play Store.
Step 3: Configure the Android TV interface
By this point, you'll notice that the LineageOS interface on the Raspberry Pi basically looks like Android rather than Android TV. To change this, you will need a launcher.
Several launchers are available. The article used an ad supported launcher, ATV Launcher Free from Play Store. Just log in with your regular Google account, search for it and install. (Note that initial login to the Play Store will take a few minutes to complete due to verification steps.)

With the interface organized, you'll need to add some useful media applications. Things like YouTube, Plex, Amazon Prime Video, Kodi and many other applications are available on Google Play. Just install these as usual to get the benefit of the current subscription.
Note : The performance of these applications has been shown to give good results. For best results, choose YouTube. If you are looking for other apps, do your research to find the best version before installing it.
Step 4: Control Android TV on Raspberry Pi
With everything ready, you'll probably want to disconnect the mouse and keyboard for a lightweight. A number of remote options are available for the Raspberry Pi, which works with Android TV.
One option is the Mini Wireless Keyboard / Air Remote Control, which incorporates a configurable LED backlight. Alternatively, you may prefer the iPazzPort Wireless Mini Keyboard with Touchpad, which combines a keyboard and touchpad along with the D-pad and media controller in one product.


Both devices are wireless and come with a dedicated WiFi dongle specifically designed for remote controls.
As of now, you should have a Raspberry Pi 3 or newer model to play videos and music using LineageOS with the Android TV user interface. For all intents and purposes, you need an Android TV Box!
Admittedly, you might have trouble with performance, so make sure the microSD card is eligible. Also, check if you are using an appropriate Raspberry Pi power source. This will ensure that the Pi gets the power it needs without the risk of voltage shortages and microSD card malfunctions.
If you feel Android TV doesn't get the best results, consider the list of best Android TV Box that TipsMake.com has suggested.
Wish you find yourself a suitable choice!
Was this article helpful?
Your feedback helps us improve.
Related Articles
 How to build an Android tablet with a Raspberry Pi8 minutes read
 How to build Android TV Box with Raspberry Pi 47 minutes read
 How to install Android on a Raspberry Pi4 minutes read
 How to build GameBoy Raspberry Pi8 minutes read
 The 5 best options to run Android on Raspberry Pi6 minutes read
 How to add an ADC to Raspberry Pi: What you need to know9 minutes read
Reader Comments 0
Sign in with email or Google to join the discussion.