Table of Contents
This article examines Tutorial and explains the main developments, practical implications, and context readers should understand.
Tutorial Overview

If your system already has DNS services like DynDNS. Com, use the DNS URL directly instead of the IP address above. Next, find out exactly which port on the computer is used to accept incoming connections, whether those ports are open or not. Start uTorrent and select Options> Preferences> Connections:

Next to the Port used for incoming connections text is the value of the port, save this information, then use uTorrent Port Checker, enter the address and click Submit, if all goes well will receive the following message (keep uTorrent active):

If it doesn't work, you need to reset some information in the router. And finally, enable uTorrent's built-in tracker feature. Also in the Preferences section, you select the Advanced tab:
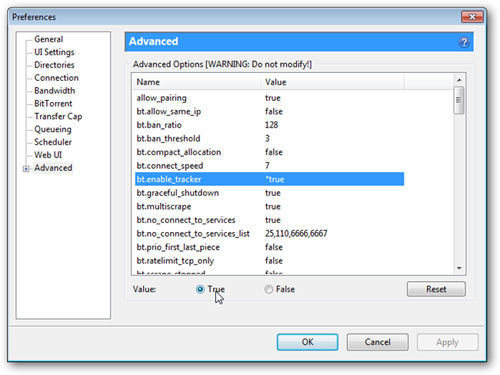
At LINE bt. Enable_tracker, you change the value to True, click OK and restart uTorrent to apply the change. Create Private Torrent file: When the basic steps are complete, we will embark on creating the necessary torrent file. Open uTorrent> File> Create New Torrent, fill in the correct IP address, port and tracker information with the system, as shown below:
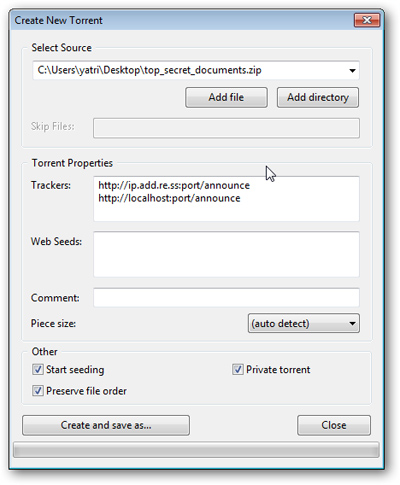
As you can see, we fill in the information in the Trackers section as follows: http:/// ipaddress: port / announce http:/// localhost: port / announce The part of localhost with technical specifications is responsible for notifying uTorrent that all the active computers connected to it are valid trackers, make sure that the Private torrent feature has been thoroughly checked - prevent preventing torrent file sharing using other methods such as PEX and DHT. For added security, it is possible to add an outgoing connection encryption method. At Options> Preferences> BitTorrent:
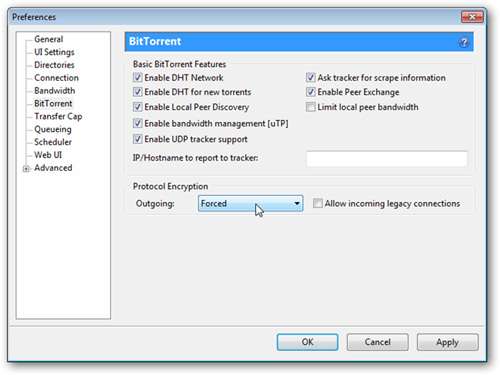
Next to the Outgoing item, select Forced and uncheck the box at Allow incoming legacy connections. Some important things to note are the following: - Always keep uTorrent active - IP address cannot be changed during seeding - Port value cannot be changed - If you apply the connection encryption method, the client program used on the remaining computers must also be set accordingly. Although uTorrent is not a program capable of creating a comprehensive sharing system that meets the needs of many people, but with a closed model of about 10 seeders, the whole operation is very stable. It is suitable to share data between users and their friends without the need for a public tracker system as well as privacy on Windows and Mac OS X platforms. While Transmission has this function, if applicable Use uTorrent with WINE, Linux users do not need to worry too much.
FAQ
What happened in Bittorrent: Sharing Large Data Using Private Tracker:: Tutorial?
This article examines Tutorial and explains the main developments, practical implications, and context readers should understand.
What factors influenced Tutorial?
Tutorial Overview If your system already has DNS services like DynDNS.
What was the practical impact on users?
Com, use the DNS URL directly instead of the IP address above.
Related Articles
 Things You May Not Know About Bittorrent10 minutes read
 Instructions to Encrypt and 'Hide' Bittorrent Traffic Data9 minutes read
 Instructions for Syncing Multiple Devices with Bittorrent Sync3 minutes read
 Learn About Bittorrent: Tim5 minutes read
 How to Download Movies Online Using Bittorrent4 minutes read
 Link Download Bittorrent 7.10.5.457858 minutes read
Reader Comments 0
Sign in with email or Google to join the discussion.