6 ways to fix Media Creation Tool not working error
However, this tool is also prone to annoying errors, especially if they happen right before the installation process.
If you find yourself in a situation like this, the following article lists some effective fixes that you can try to get the Media Creation Tool working as before.
1. Run Media Creation Tool with admin rights
One of the most common problems preventing the Media Creation Tool from working correctly is lack of permissions. In some cases, applications require admin rights to run, and when that access is missing, they generate errors.
The fix in this case is very simple, because all you need to do is run the Media Creation Tool with admin rights. Here's how to do it:
Step 1: Plug in the bootable USB and right-click on the Media Creation Tool icon on the desktop.
Step 2: Select Run as administrator from the context menu.

Step 3: Click Yes in the User Account Control prompt to continue.

If insufficient permissions are preventing you from using the Media Creation Tool, running it with admin rights should fix the problem.
2. Modify Windows Registry
You may also need to tweak the Registry Editor slightly to run the Media Creation Tool successfully.
The Windows Registry is an administrative tool that stores information about programs and processes in Windows. Most, if not all, of the changes (like installing an application or granting additional permissions to a program) that you make in Windows are logged in the Registry.
Since the Registry is an important utility that is usually only used by administrators, make sure you make a backup of the Registry before making any kind of edits to it. Also, keep in mind that you need to be logged into Windows with admin rights to perform the steps below:
Step 1: Press Win + R to open Run.
Step 2: Type regedit in Run and click Enter.
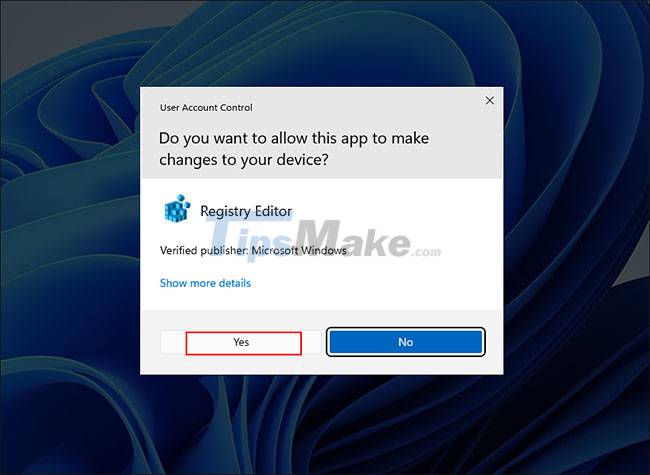
Step 3: Click Yes in the confirmation prompt.
Step 4: Inside the Registry Editor , go to the location mentioned below:
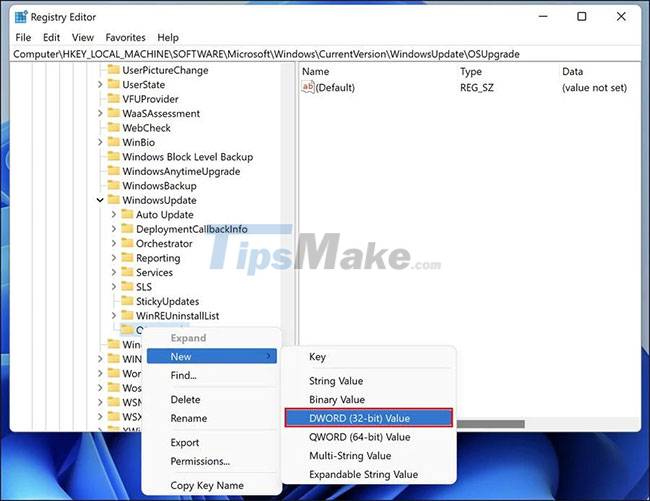
HKEY_LOCAL_MACHINE//SOFTWARE//Microsoft//Windows//Current Version//WindowsUpdate//OSUpgradeStep 5: Right-click the OSUpgrade key and select the option New > DWORD (32-bit) Value .
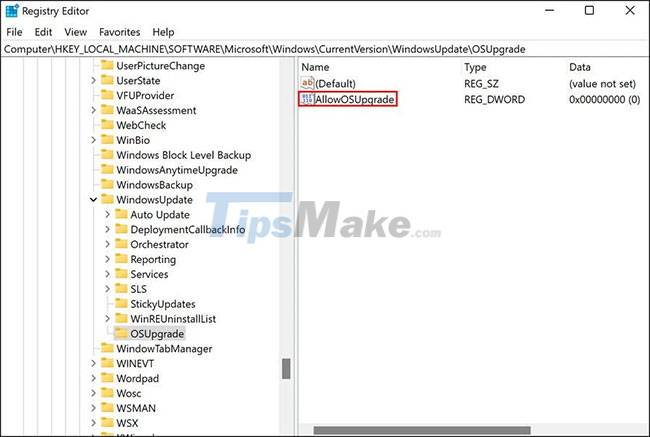
Step 6: Name this value AllowOSUpgrade.
Step 7: Double click on AllowOSUpgrade and in Value data enter 1 .
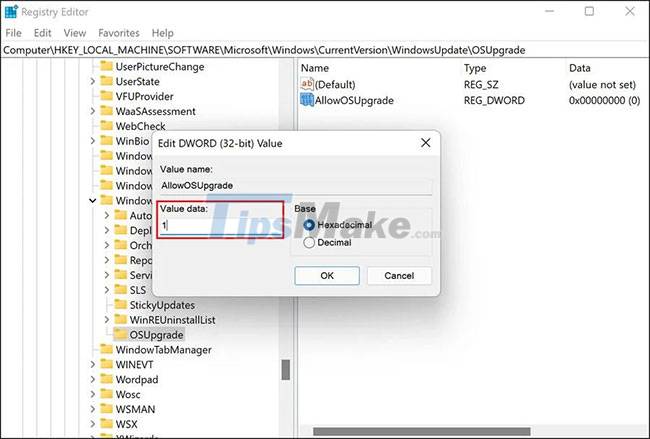
Step 8: Click OK and close Registry Editor.
Now you can restart your computer and check if you can use the Media Creation Tool now.
3. Enable relevant services
Some programs on Windows need related services to work properly. In order for the Media Creation Tool to run without any problems, the following services must be enabled:
- Background Intelligent Transfer Service (BITS)
- Server
- TCP/IP NetBIOS Helper
- Workstation
- IKE and AuthIP IPsec Keying Modules
- Windows Update or Automatic Updates
If one or more of these services are disabled, you may experience problems using the Media Creation Tool. Follow the steps below to enable these services:
Step 1: Press Win + R together to open Run.
Step 2: Type services.msc into Run and click Enter .
Step 3: In the following window, find Background Intelligent Transfer Service (BITS) and right click on it.
Step 4: Select Properties from the context menu.
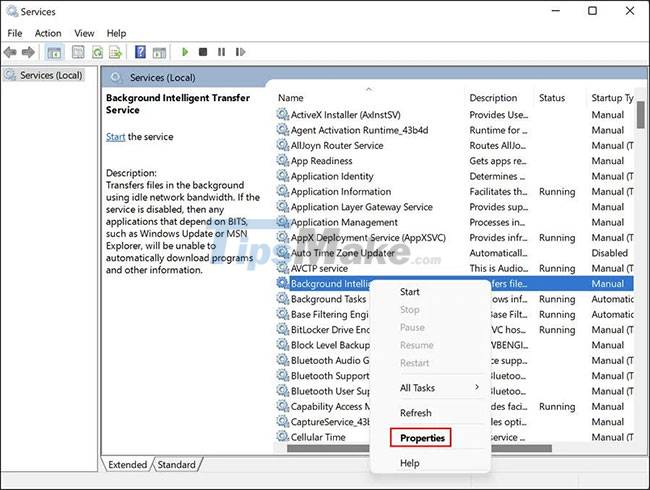
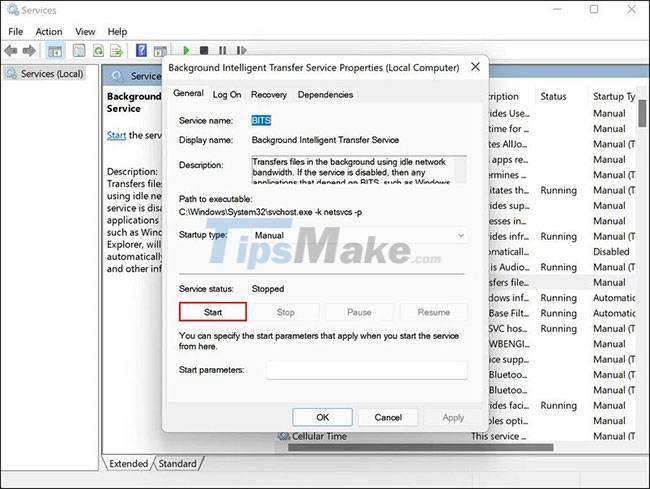
Step 5: In the Properties dialog box , click the Start button. In case the service is already working, you can restart it by stopping the service first and then restarting it.
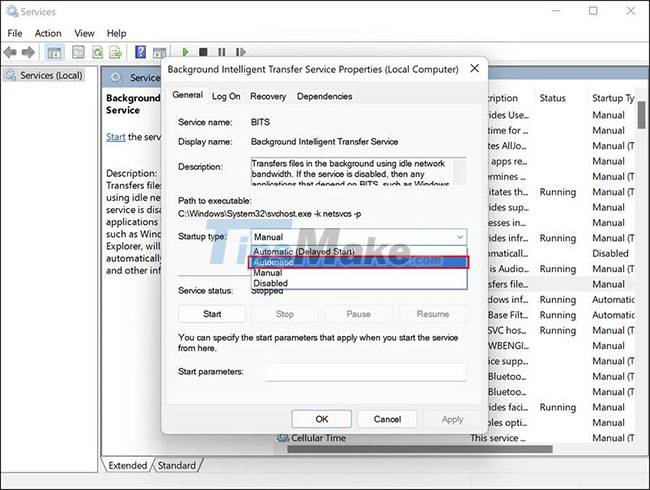
Step 6: Set Startup type to Automatic.
Step 7: Perform the same steps with other services that the article mentioned above.
Step 8: Once done, close the Services window and check if you can use the Media Creation Tool without any problems now.
4. Make sure you are running the latest version of Windows
Keeping your Windows up to date is important. The latest updates provide many new features and ensure that your system and its applications are always compatible with each other. Most updates also come with security patches and bug fixes that can help you solve many problems in Windows without providing much input.
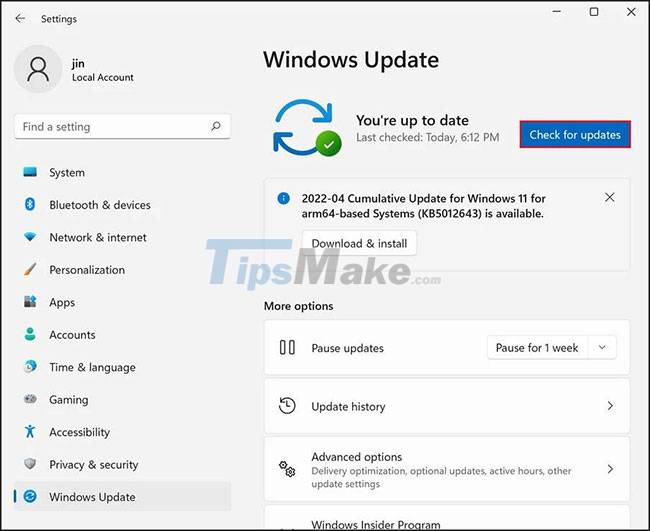
You may have problems with the Media Creation tool if your version of Windows is out of date. If that's the case, install the latest updates to fix the problem.
5. Check system memory
You should have at least 8GB of free space on your computer's hard drive to use the Media Creation Tool. Also, your USB should also have the same amount of free space to avoid any storage problems in the process.
If the storage space is less than the recommended free space, you can delete some unimportant Windows files and folders to free up computer space.
6. Reinstall the Media Creation Tool
Finally, if the troubleshooting methods mentioned above don't help, then it's likely that the problem is with the Media Creation Tool itself, and not with the system.
In this case, the only possible solution is to uninstall the Media Creation Tool and reinstall it from scratch. You can uninstall the current version from the USB and then reinstall it from the official Microsoft website.
Installing Windows on a USB or disk can be quite useful in cases of errors that the operating system cannot repair on its own. However, a faulty Media Creation Tool itself can lead to a slightly more complicated situation.
The methods mentioned above will hopefully be of help to you if you face any such problems along the way. If you are still having problems even after trying the troubleshooting techniques above, the article recommends that you contact Microsoft support and report the problem to them.