5 steps to install Windows 10 on a Mac
Step 1: Check the required requirements
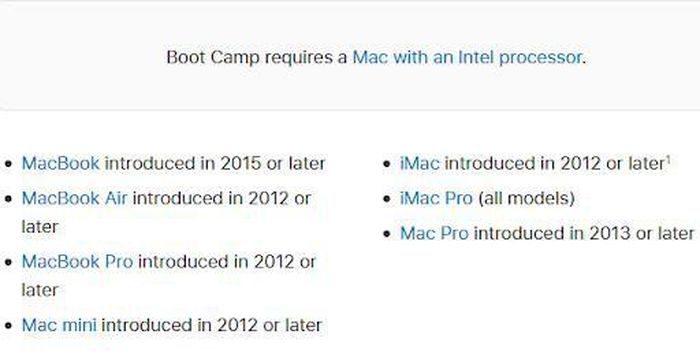
Before you begin, you need to make sure your Mac is up to date, has compatible hardware and enough free memory to install Windows 10. Below is a list of possible Mac models. running Windows 10.
Currently, Boot Camp does not support Macs using Apple Silicon M1 processor. In other words, only Mac users using Intel 2012-2015 or higher chips can run Windows through Boot Camp. However, some third parties like Parallels are developing software that allows Mac M1 users to run Windows through a virtual machine.

Besides, the process of installing Windows 10 on some Macs requires at least 16GB of USB storage. Most Macs released after 2015 don't need USB to install Windows, but you'll need to update to MacOS 10.11 or later.
Next, your Mac needs at least 64 GB of free space to install Windows (though Apple recommends 128 GB for the best experience). Remember that Boot Camp Assistant will create special partitions on Mac main drive dedicated to Windows 10 and related files. That means the MacBook Air with a 128GB SSD is not the ideal candidate.
Step 2: Find and buy a copy of Windows 10
Owning Windows 10 is also relatively simple. Just surf the Windows Store, choose to buy a 'digital copy' and download it.
You continue to download this tool to create a Windows 10 disk image on a USB of at least 16 GB mentioned above. Alternatively, another way is to order a physical copy of Windows 10 and wait for Microsoft to ship it to you.
When downloading, you should take note of choosing the ISO format (this file is available even if you have purchased a physical copy). This is because the flash drive option is often more time consuming and only necessary, unless you have problems loading Windows 10.
Step 3: Start Boot Camp

After you have ready the USB or DVD containing Windows 10, start Boot Camp Assistant by clicking Go> Utilities on the Mac menu bar and then open Boot Camp Assistant from the list.

The introduction of Boot Camp Assistant will provide information about the application and suggest that you create a data backup before installing Windows. Click Continue to move to the next screen.
Now is the time to install Windows 10. Click Choose to find the Windows ISO file you just downloaded. You should also consider carefully when deciding on the size of the Windows partition on the Mac's drive because its capacity cannot be changed after this process is completed. Remember that you need a minimum of 64 GB, while Apple recommends 128 GB.

Finally, click Install and wait for Boot Camp to create a new partition and download the Windows support software.
Step 4: Format the Windows partition
After Boot Camp Assistant successfully created Windows partition, the application will ask you to set an administrator password. Next, you need to restart your Mac and download Windows Installer. Follow the instructions in the installation step by step, enter 'Product Key' and select the desired Windows version.
If asked where to install Windows, select the BOOTCAMP partition and click Format. However, Apple says the correct partition will be selected and formatted automatically in most cases. In addition, you need to disconnect any devices that are not needed for the installation such as external hard drives, monitors .
Step 5: Install Windows and select the boot drive
When the Windows Installer completes, the Mac will open Windows 10 and Boot Camp Assistant simultaneously. Click Next> Install and then wait for Boot Camp Assistant to download and install the necessary software for Windows. Then, click Finish to reboot.

You should also check if your Windows version is the latest by clicking on the Windows 10 search bar, typing 'Check for updates' and selecting the first result. In the Windows Updates window, continue to click Check for updates to update all. This step is very important, but it will take some time.
Every time you turn it on, your Mac will boot to macOS by default. If you want to switch to Windows, you must restart your computer and press and hold the Option key (or Alt on some Mac models). The system will display a screen that allows you to choose to use MacOS or Windows. At this point, select the Windows partition and click the arrow icon below or press the Return key.

On the other hand, if you want your Mac to boot into Windows by default, change the desired partitioning option in Startup Disk (you can search using Spotlight or in System Preferences).
Some important notes
According to Apple, many Mac features may not work correctly when using the Windows partition, including the Touch Bar on some newer MacBook Pro.
Although not as rich as on MacOS, the Touch Bar still does some basic tasks including adjusting brightness, volume, music player and quickly switching to the standard F-key row with one touch. Furthermore, you will notice a stark difference in performance.
Like iPhone (iOS) and iPad (iPadOS), Apple optimized macOS to work with certain configurations, while Windows evolved to work with a multitude of different types of hardware. As a result, the MacBook's touchpad may be less sensitive or the TouchID sensor is disabled on Windows 10.