How to install Windows 10 on the MacBook Pro (2016 and newer versions)?
Finally Apple has refreshed its 'MacBook Pro' lineup at the end of 2016, with the new design, the new Touch Bar and many controversial features. If you own a new MacBook Pro, and want to experience some Windows 10 features on your MacBook, you can do this.
Table of Contents
Finally Apple has refreshed its 'MacBook Pro' lineup at the end of 2016, with the new design, the new Touch Bar and many controversial features. If you own a new MacBook Pro, and want to experience some Windows 10 features on your MacBook, you can still do this.
In the article below, Network Administrator will guide you how to install Windows 10 on the MacBook Pro (2016 and newer versions).
Part 1. Prepare
To install Windows 10 on a Mac, you must have:
- Mac for you to install Windows 10.
- A USB flash drive with at least 5GB of free space.
- A computer running Windows operating system.
- Finally, Internet connection is stable and fast.
One point to note is that you cannot install Windows 10 copyright. However, if you want to continue using Windows 10, you can still buy after ending the 30-day trial on your Mac.
Follow the steps below to install Windows 10 on your Mac. And your Mac will be configured with dual-boot configuration, which means you can choose an operating system (Windows 10 or Mac OS) to use each time you start your computer. mine.
Part 2: Install Windows 10 on the MacBook Pro
1. Why Windows?
Apple knows Windows 'charm', and that's why they built and integrated Boot Camp into their operating system. Boot Camp allows macOS users to create a partition and install Windows directly on the dual-boot system.

One of the main reasons Mac users want to use Windows is to have a better gaming experience. There are still many Windows-only apps that some Mac users may want to run and play on their Macs. Apple provides a solution to install Windows 10 on its operating system quite easily.
In this case, we are using the MacBook Pro13-inch, which was released at the end of 2016, with 512 GB of storage, Touch Bar, and Intel Iris Graphics 550 graphics card. I am using the 15-inch MacBook Pro launched in mid-2015 with Intel HD graphics card. However, the same principles apply.
Installing Windows 10 on the new MacBook Pro is quite easy. To get started, you need to prepare: 1 USB drive with 4 GB of free space and Windows 10 ISO.
Of course, you should also backup macOS in this case to avoid bad cases from happening.
2. How to download Windows 10 ISO?
1. Plug the USB drive into your MacBook.
2. On macOS, open Safari or any browser you want.
3. Visit the Microsoft homepage to download Windows 10 ISO.
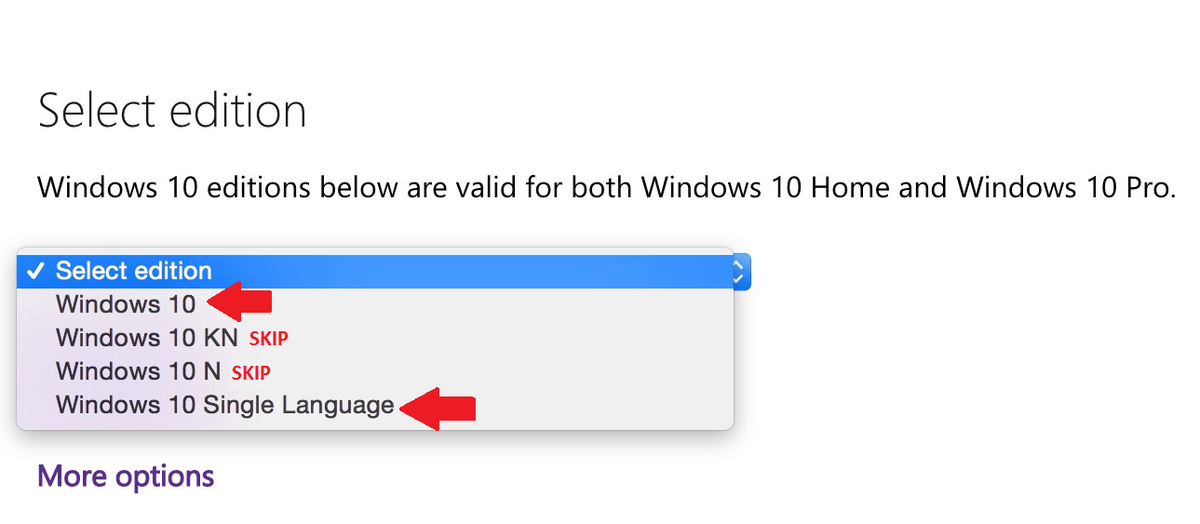
4. Select the version of Windows 10 you want.
Most users choose Windows 10 or Windows 10 Single Language ISO .
5. Click Confirm .
6. Select a language you want.
7. Click Confirm .
8. Click on 64-bit download .
9. Save the ISO file to your USB drive.
ISO is a large file (about 4GB), so downloading ISO may take a long time, depending on your Internet connection speed.
3. Set up Boot Camp and install Windows 10 on your Mac
Before proceeding, take steps to save everything you're working on, back up all Macs and exit all running applications. Leave the USB drive with the ISO you downloaded.
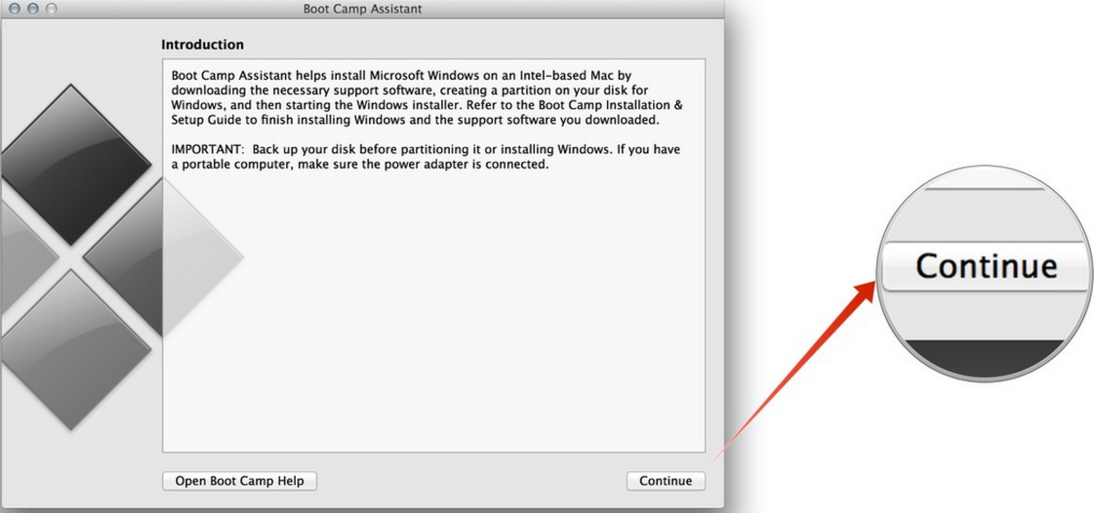
1. Open the Boot Camp Assistant application. You will find Boot Camp Assistant in Utilities on Applications folder.
2. Click Continue . Boot Camp Assistant will automatically navigate to the ISO file on your USB drive.
3. Click and drag the partition slider to adjust the amount of free space allocated to the Windows partition.
By default the Windows partition is set to 49GB.
You can set up a larger macOS partition if it is the main operating system on your Mac, or leave it all for Windows 10. However, you cannot change the size of the Windows 10 partition later. If you want to change the Windows 10 partition again, you will have to delete the entire Windows 10 installation, then start again.
4. Click Install to begin the process of partitioning and installing Windows 10.
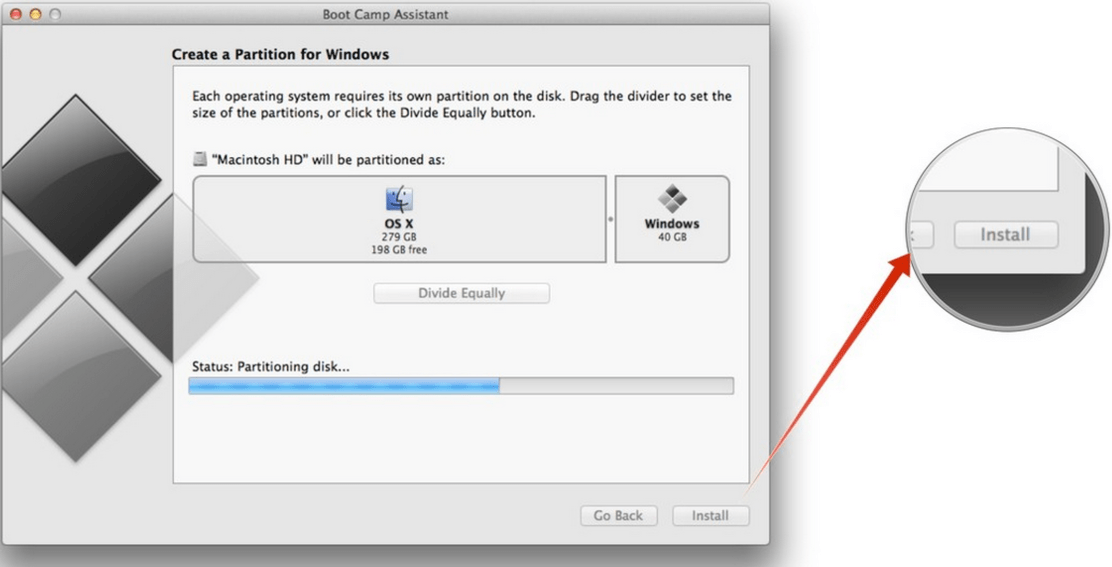
Your computer will automatically reboot without any warning. You may see a black screen for a few seconds during the partitioning process. After the partitioning process is set up, the Windows 10 installation process will begin.
5. Select language, number formats and keyboard when required.
6. Click Next .
7. Click Install Now .
8. Enter Product Key to activate Windows 10. Without Product Key, click Skip to skip this step.
9. Select the version of Windows 10 you want to install. Most users rate using the Home version better than the Pro version.
10. Click Next .
11. Agree to the terms.
12. Click Next .
13. Select the partition named Drive 0 Partition X: BOOTCAMP and its size to match the size you previously set with Boot Camp Assistant. Do not select any other partitions, because you can override your macOS operating system installation.
14. Double click on the partition of your choice.
15. Note, only select Drive 0 Partition X: BOOTCAMP .
16. Click Select Format . Windows 10 Installer will reformat the partition.
17. Click Next to begin the Windows 10 installation process.
18. Follow the on-screen instructions to install Windows 10. The process takes a few minutes to copy Windows files from the USB drive and install the operating system.
19. The computer will reboot after completing the installation process and ask you to enter the activation key again.
If there is no activation key, you can click Do this later to activate it later.

4. How to set up Windows 10 on Mac?
1. Set up a Windows account 10. Enter the username (username), password and password hint.
Windows 10 will set up an account and install some additional files, the process will take about a few minutes.
2. On the first window, the Boot Camp Installer will open on Windows 10, click Next.
3. Accept the terms.
4. Click Install. This will install various drivers and software bits to ensure compatibility with the MacBook Pro hardware, including display, Trackpad, and WiFi.
5. After the installation has finished, click Finish .
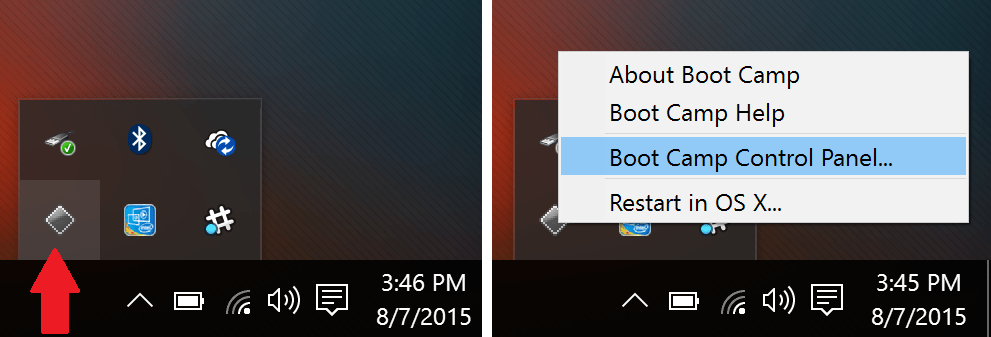
A Boot Camp application will appear in the Windows 10 Taskbar. With this application you can reboot into macOS and change some settings for the keyboard (keyboard) and Trackpad.
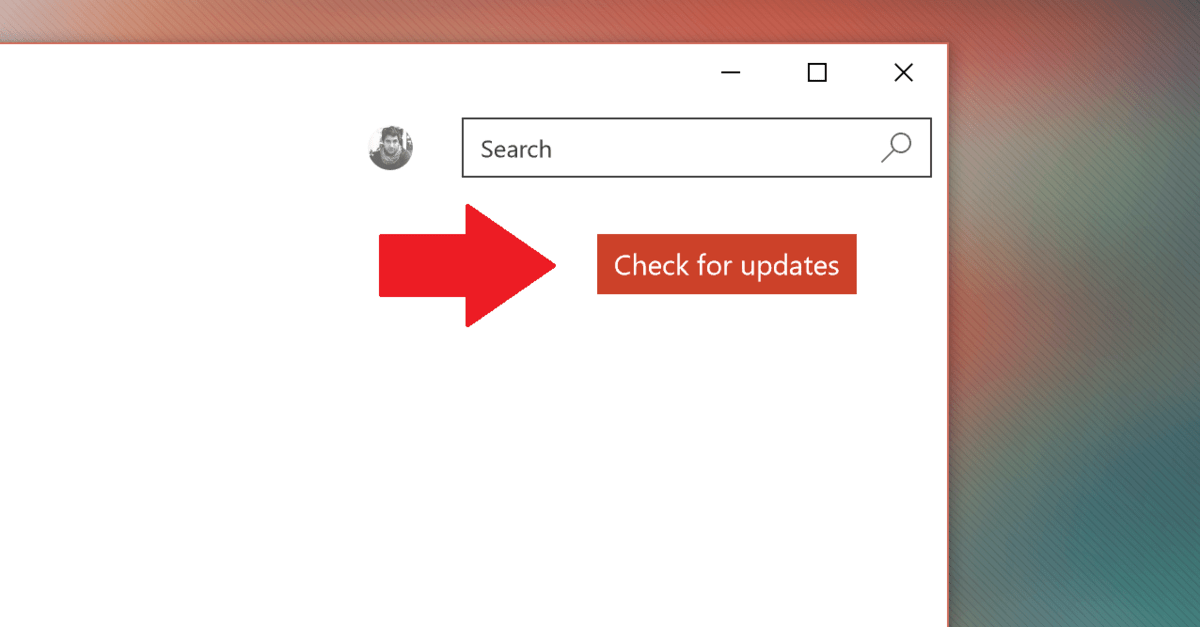
5. How to update Windows 10 on Mac?
1. Click Start Menu .
2. Click Settings . The serrated icon in the left column.
3. Click on Update & Security .
4. Click Windows Update .
5. Click to select Check for updates . Windows will automatically search, download and install any available updates. And you will have to restart your computer to complete the installation process.
6. Update Windows applications on Mac
Windows 10 has many major applications such as Groove Music, MSN News, Weather, and some other applications on the Windows Store. These applications need to be updated via the Windows Store.
1. Click Start Menu .
2. Click the Store button.
3. Click on the user icon in the top right corner.
4. Click Downloads and updates .
5. Click to select Check for updates . The Store application will automatically download and install any available updates.
Note:
The Store app can automatically receive an update, and it will automatically close the application to install the updates. If this happens, you only need to reopen the Store application and it will continue to install the remaining updates.
7. Convert Trackpad and scroll of mouse wheel on Windows 10 on MacBook
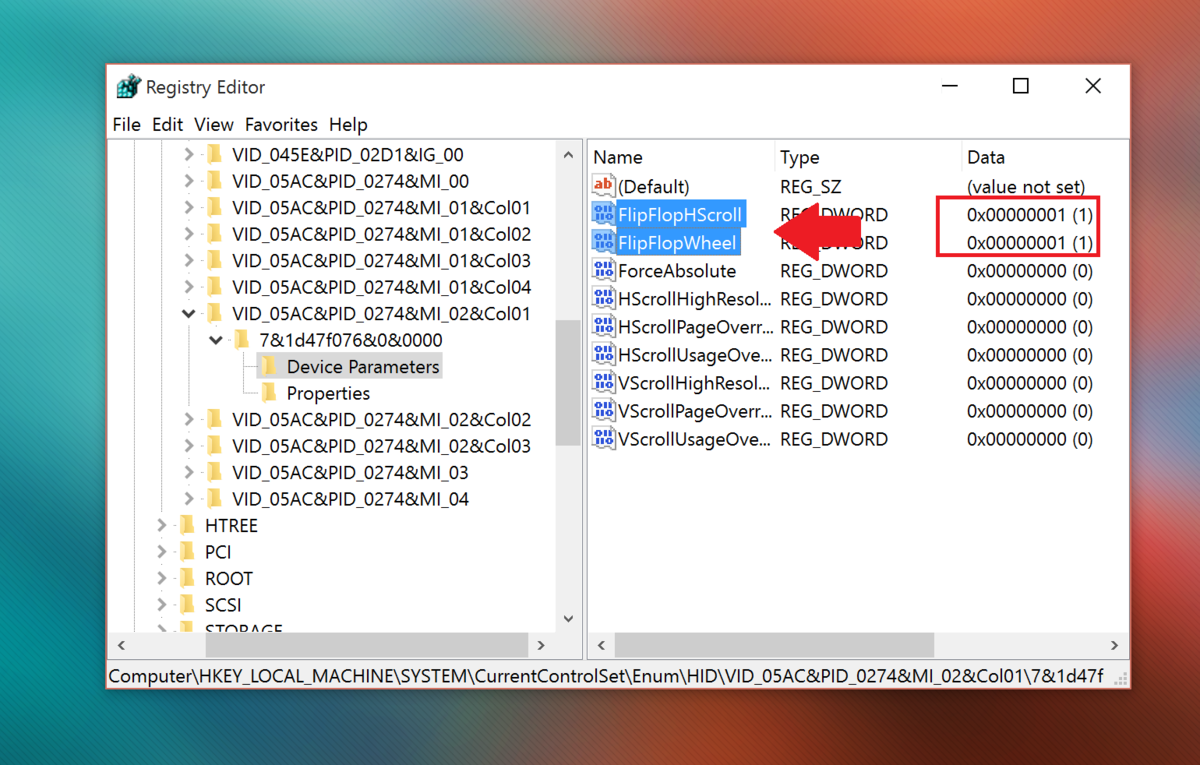
1. Click the Search frame in the top left corner of the Taskbar.
2. Enter regedit there.
3. Press Enter to open the Registry Editor window.
4. Select Yes if the UAC window appears.
5. On the Registry window you navigate to the key:
HKEY_LOCAL_MACHINE SYSTEM CurrentControlSet Enum HID
6. At HID you will see some folders starting with VID . Expand each VID folder to find Device Parameters .
Note, only one VID folder has Device Parameters, so you will have to expand each VID folder to find Device Parameters.
7. Click each Device Parameters until you find a Device Parameters containing FlipFlopWheel in the right frame.
8. Double click on FlipFlopWheel .
9. Change the value in the Value Data frame from 0 to 1 .
10. Click OK .
11. Follow steps 5-8 for FlipFlopHScroll .
12. Close the Registry Editor window.
13. Restart Windows.
Alternatively, you can download the free Flipflop-Windows-Wheel application from GitHub to automatically manipulate this task. Just download the file, then run the file and click Flip . Restart your computer after the operation is complete.
Download Flipflop-Windows-Well to your device and install it here.
8. Use Trackpad ++ for real Trackpad Windows

Although you can switch scrolling again using the above methods, but you won't get Microsoft's trackpad gestures like pressing 3 and 4 fingers. These are the default gestures used to call Cortana and Action Center respectively.
However, you can use a 3rd party application called Trackpad ++. Trackpad ++ allows you to add gestures and more through an easy user interface. Trackpad ++ has been updated to support the 2016 MacBook Pro, allowing users to do some of the following:
-2, 3 and 4 fingers to perform some operations such as pinch-to-zoom (zoom in with 2 fingers), go back / move to the next page, middle mouse button, gesture Windows 10 new, and more.
- 3 finger drags (3 finger drag) to speed up the cursor when dragging.
- Users customize the options to skip some cases when entering, and many more useful customizations.
- Trackpad ++ control module to adjust trackpad settings.
- Full support for Microsoft Windows 7 (32-bit / 64-bit) versions, Windows 8 / 8.1 (32-bit / 64-bit), and Windows 10 (64-bit).
Download Trackpad ++ to your device and install it here.
Part 3. Uninstall Windows 10
If for some reason you don't want to use Windows 10 on your Mac, you can completely remove Windows 10 installation to free up free space on Mac OS X. To do this:
1. Boot into Mac operating system, then run Boot Camp Assistant and then click Continue.

2. Find and tick the option named Remove Windows 7 or later version , then click Continue.
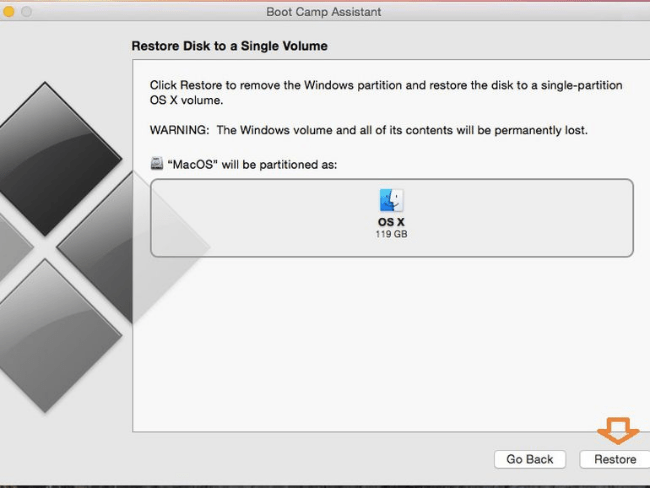
3. In the previous step, simply click Restore and you will be asked to enter the Admin password on the Mac to confirm.
Once done, the Windows installation will be completely removed. All data, including software and files, will be completely erased from Windows.
Refer to some of the following articles:
- Here's how to create a Virtual Hard Disk on Windows 10
- How to create Restore Point on Windows 10 with just 1 double click
- Summary of some ways to fix Windows 10 crash, BSOD error and restart error
Good luck!
Was this article helpful?
Your feedback helps us improve.
Related Articles
 6 things to know when choosing 32-bit or 64-bit Windows 7?5 minutes read
 Instructions to install Windows 10 on Macbook5 minutes read
 Upgrade MacBook with SSD5 minutes read
 Microsoft patch prevents Windows 10 1903 and 1090 users from updating to newer versions2 minutes read
 How to install Windows 11 on Macbook with Parallels Desktop 183 minutes read
 How to Install Titanium Studio on Linux/Ubuntu4 minutes read
Reader Comments 0
Sign in with email or Google to join the discussion.