Table of Contents
This updated guide explains how to Installing Windows on a Mac with Boot Camp through clear steps, practical examples, and important checks that help prevent common errors.
Boot Camp installs Windows in a dual-boot configuration. Both operating systems will be installed, which operating system you can use when you want.
What You Need
You will need a 64-bit installation of Windows 8.1, Windows 8, or Windows 7, not the Enterprise version . This applies to Mac computers done over the years - if you have an old Mac from 2009 or earlier, you won't be able to install Windows 8.
Quick Adsense WordPress Plugin: http://quickadsense. com/Windows does not come with Mac OS X , so you will need a full version of Windows - not an upgraded version - to install it on your Mac.
- You can download Windows installations for free. You will need the installation media in the ISO file or the DVD format.
- You will also need a USB drive of at least 8 GB. This will be used to install Windows and the appropriate drivers on your Mac.
Apple recommends backing up your files before partitioning or installing Windows. It's always good to have backups before doing something potentially potentially destructive. If you make a mistake, or the partitioning process fails due to an error, you may lose your files. If you are careful, this should not happen.
How to Install Windows on Your Mac
You will be using the Boot Camp Assistant application that comes on your Mac for this. Open it by pressing Ctrl + Space, typing Boot Camp , and pressing Enter.
Boot Camp Assistant will copy Windows installation files from an ISO file or physical disc to a USB drive. Windows will install itself on your Mac from this USB drive. The latest Windows drivers will also be downloaded from Apple and placed on this drive, and they will install automatically after you install Windows. This application will also guide you through the process of resizing your Mac's existing system partition and creating a Windows partition.
First, choose what you may need to do. Maybe you should leave all the options checked. However, if you already have a USB Boot Camp drive or you have partitioned your Mac, you can uncheck these options to speed up the process. This is useful if you are installing Windows on multiple Mac computers and you have created a USB drive.

Next, Choose to ISO file or USB. Insert a USB flash drive and select it. This drive will be erased, so make sure you have a backup of any important files stored on it.
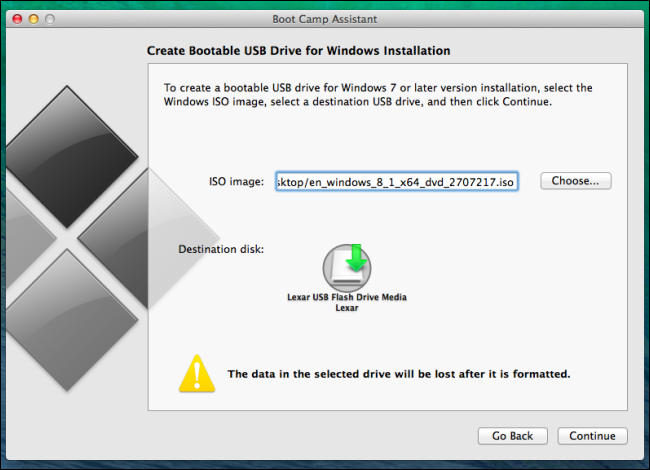
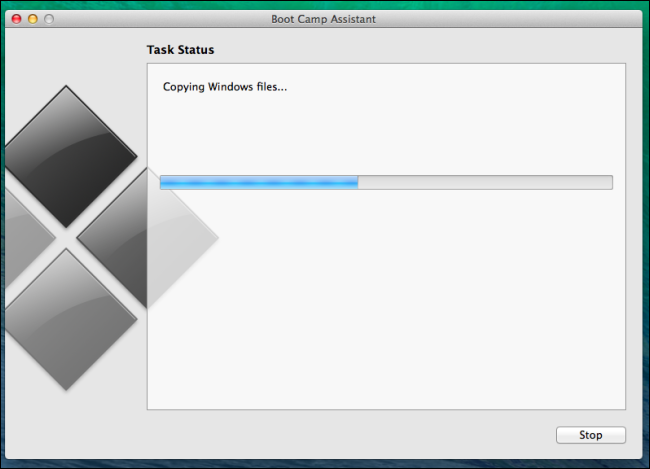
The screen will read ' Copy Windows file ' as your Mac creates the Windows installation drive it will need. This process can take a long time, depending on the speed of your drive. It's normal for progress bars to appear stuck in a location - just be patient.
After your Mac finishes creating an installation USB drive, you'll see the Create a Partition screen. You can now divide your Mac's system drive into two separate partitions - one for Mac OS X and the other for Windows. How you should allocate space depends on how much space you want for your Windows system and how much space you want for your operating system X system. If you have multiple hard drives in your Mac, you can use them specifically for Windows.
Quick Adsense WordPress Plugin: http://quickadsense. com/If you may need to resize your partition after this process, you will need to use a third party tool. Boot Camp Assistant cannot help you with that.
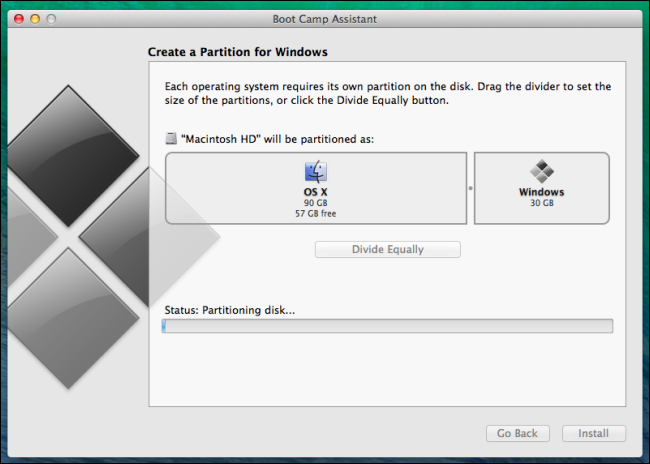
Click the Install button and Boot Camp Assistant will resize your Mac OS X partition and create new partitions for Windows. Your Mac will then restart and boot the Windows installer from the USB drive. Go through the settings and install Windows on your Mac as you may need to install it on any other computer.
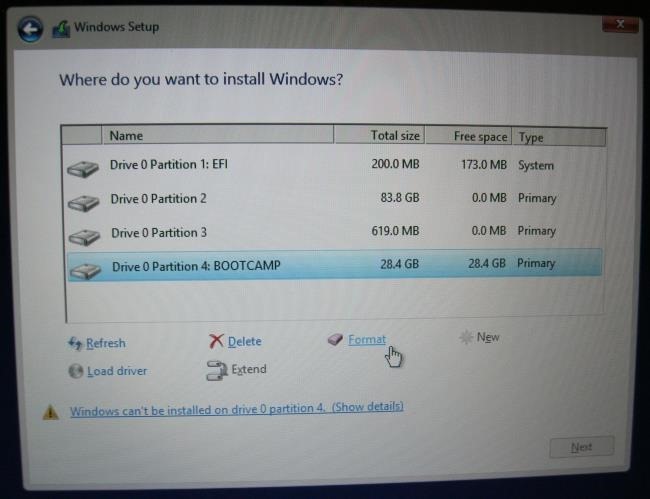
Select the partition labeled BOOTCAMP when you reach where you may need to install Windows? screen. Click the Format option to format the partition as NTFS, and then click Continue.
Warning : Check that you are formulating the correct partition. You will wipe your Mac OS X system if you incorrectly formatted the partition.
Windows will finish installing normally. The Boot Camp installer will appear after you finish installing Windows, installing the hardware drivers and utilities you need in your Windows system.
After Boot Camp installation is finished, you are free to remove the USB drive and do whatever you want with it. If you do not plan on installing Windows on a Mac, you can format the drive and put your personal files on it again.
The Boot Camp Control Panel
You will find Apple's Boot Camp Control Panel running in your system tray after installing Windows. Click the up arrow in your system tray to see more icons, click the Boot Camp icon, and select Boot Camp Control Panel to open it.
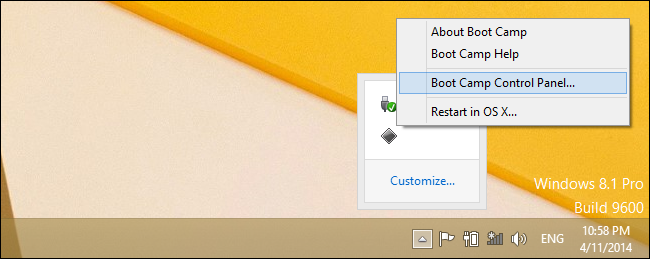
This panel allows you to select the default operating system that boots your Mac, as well as the keyboard and trackpad to tweak settings.
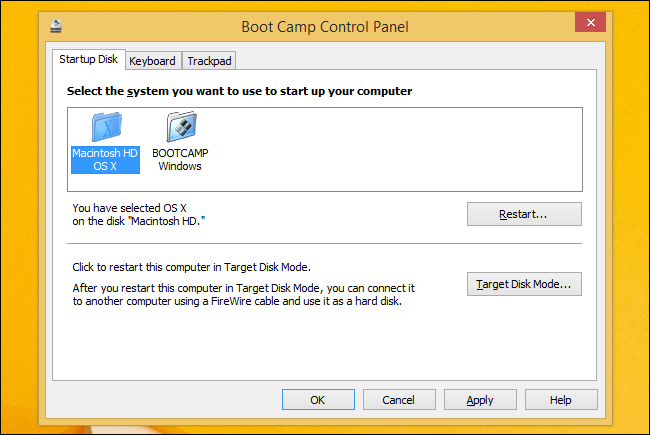
While in Windows, theMac's Commandkey functions like the Windows key , while selecting key functions like the Alt key.
How to Remove Windows from Your Mac
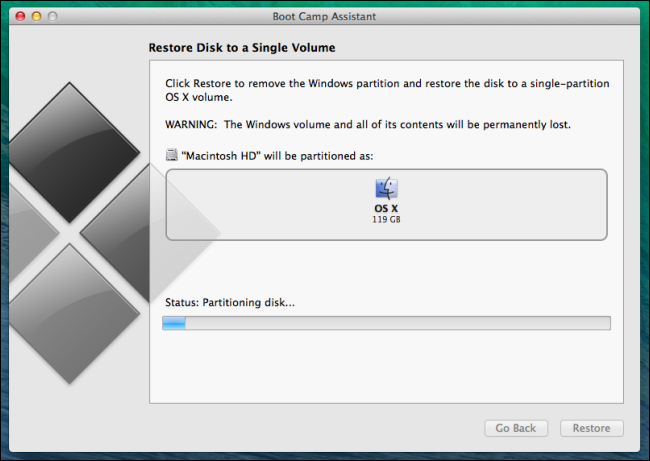
If you may need to remove Windows from your Mac and free up space, reboot into Mac OS X and open Boot Camp Assistant again. You will see Remove Windows 7 or the following version option if Windows is installed.

Boot Camp Assistant will automatically remove Windows and expand Mac OS X partitions for you, reclaiming all that space.
Warning : This will delete all the files on your Windows partition, so make sure you have the backups first!
Windows should only work well on your Mac hardware. This is not PowerPC day anymore - your Mac has standard hardware components. In fact, many of the hardware drivers provided by Apple are the same people you will get on a typical Windows computer.
ShareitFAQ
What is the easiest way to Installing Windows on a Mac with Boot Camp?
Start with the requirements in this guide, then follow each step in order. Check the result after every major change so problems are easier to identify.
Can beginners follow these instructions?
Yes. The process is organized into practical steps, and you can repeat any step before moving forward.
What should I check if the method does not work?
Confirm your software or device version, permissions, settings, file format, and internet connection when the task depends on online services.
Related Articles
 Boot Camp Brings XP to a Mac4 minutes read
 How to Install Windows 10 on the MacBook Pro (2016 and Newer Versions)?13 minutes read
 OS X Upgrade Version 10.8.3 Supports Windows 8 Installation3 minutes read
 5 Steps to Install Windows 10 on a Mac8 minutes read
 Instructions for Installing Windows 8.1 on Mac5 minutes read
 How to Run Windows Programs on Mac7 minutes read
Reader Comments 0
Sign in with email or Google to join the discussion.