3 ways to limit Windows Defender CPU usage in Windows 10
To prevent Windows Defender from using your CPU too much, you can use the following methods to limit the use of Windows Defender CPU in Windows 10.
Table of Contents
Is the Windows Defender Service using high CPU at all times?
If you have real-time protection turned on, Windows Defender will perform a background scan and this can cause high CPU usage.
To prevent Windows Defender from using your CPU too much, you can use the following methods to limit the use of Windows Defender CPU in Windows 10.
Restrict Windows Defender CPU usage through PowerShell
1. Open Windows PowerShell as an administrator and issue the following command. It will display the current maximum CPU usage limit for Windows Defender.
Get-MpPreference | select ScanAvgCPULoadFactor2. When you need to reduce CPU usage, type the following command and press Enter. Windows Defender will not use more than 30% of the CPU.
Set-MpPreference -ScanAvgCPULoadFactor 30Limit Windows Defender CPU usage through Group Policy
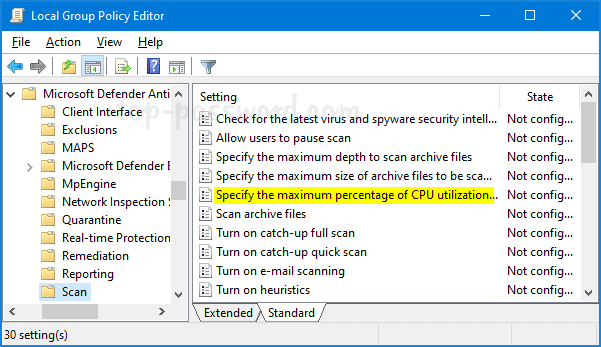
1. Open Local Group Policy Editor and browse to:
Computer Configuration > Administrative Templates > Windows Components > Microsoft Defender Antivirus > ScanOn the right, double-click the policy Specify the maximum percentage of CPU utilization during a scan .
 Double click the policy Specify the maximum percentage of CPU utilization during a scan
2. Select the Enabled option and limit the Windows Defender's CPU usage to 30% or whatever percentage you prefer. Click Apply and then click OK.
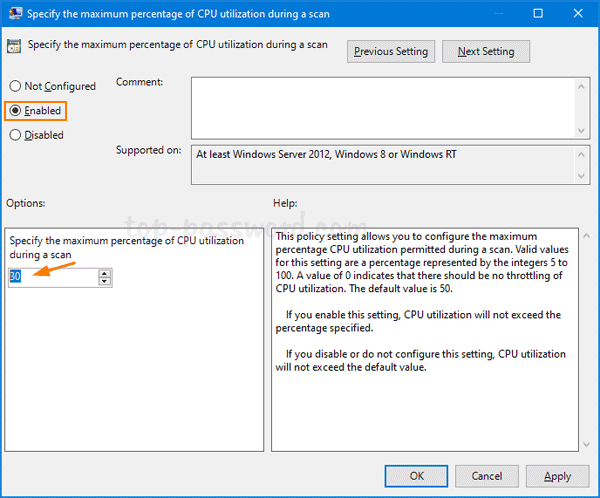 Select the Enabled option and limit the CPU usage of Windows Defender
3. Restart the computer to apply the changes.
Restrict Windows Defender CPU usage through Registry Editor
1. Open Registry Editor and navigate to:
HKEY_LOCAL_MACHINESOFTWAREPoliciesMicrosoftWindows DefenderRight-click on the Windows Defender key and select New> Key . Name it Scan.
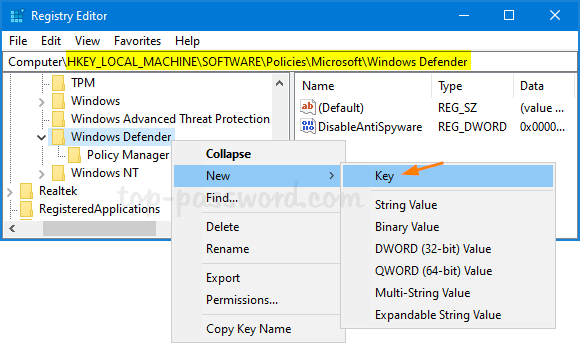 Create a new key and name it Scan
2. Next, right-click the newly created Scan sub-key and select New> DWORD (32-bit) Value .
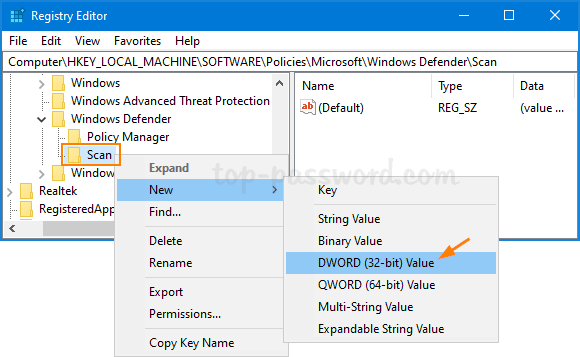 Select New> DWORD (32-bit) Value
3. Name DWORD AvgCPULoadFactor, then double-click it to specify the maximum CPU percentage for Windows Defender.
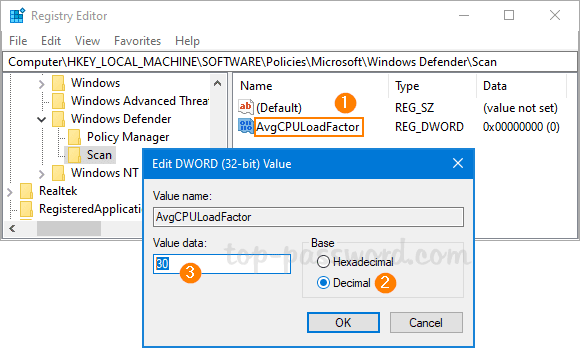 Name DWORD as AvgCPULoadFactor
4. Close Registry Editor. Restart the computer and check if Windows Defender is still using the CPU at a high level.
Was this article helpful?
Your feedback helps us improve.
Related Articles
 How to protect files from being mistakenly deleted by Windows Defender5 minutes read
 How to fix errors cannot open Windows Defender on Windows 7/8/1011 minutes read
 Instructions for using Windows Defender13 minutes read
 How to turn off the Windows Defender Summary notification on Windows 103 minutes read
 How to limit your Facebook usage time - Control your Facebook screen time2 minutes read
 How to add exceptions in Windows Defender on Windows 104 minutes read
Reader Comments 0
Sign in with email or Google to join the discussion.