Table of Contents
The options below offer different strengths for users interested in 3 tips for using good virtual keyboard for iPhone, iPad. Review the key details and consider which choice best matches your needs.
Here are 3 helpful tips that will help you make better use of the iPhone and iPad virtual keyboard.

1. Turn on / off Emoji
With iOS 5, Apple makes Emoji a standard choice in the virtual keyboard of iPhone and iPad, so users do not need separate Emoji application anymore. Previously, Emoji app was the only way to create cute icons on iOS device.
To turn on Emoji, open the Settings App of iOS, click the General Item, then scroll down to find and click ' Keyboard', Then click ' Add New Keyboard'.
Scroll down the list to find ' Emoji' And click it so that Emoji appears in the list of activated keyboards. You will see the globe icon on the iOS screen. Click this icon to access funny Emoji characters.
To turn off Emoji in the virtual keyboard, open the Settings App, go to General> Keyboard> Keyboards Settings, Then click the ' Edit' Button in the top right corner. The keyboards that you have the right to turn off will be marked with a red circle on the left. click the red circle next to ' Emoji', a 'Delete' button Appears on the right, click this button to turn off Emoji.

2. 'Undock', separate the keyboard

It's not easy when needed to hold your iPad in both hands, in landscape mode, and type virtual keys with two thumbs, especially on a large 9.7-inch iPad. From iOS 5, Apple provides the ability to split the keyboard and put the keyboard halfway across the screen (as above). This feature is especially handy on iPad mini.
The steps to use this feature are as follows:
Open the app you want to edit, such as Notes , then open a new draft. When the virtual keyboard appears, you have 2 ways to split the keyboard:
Method 1: Press and hold the button normally used to show / hide the keyboard, there are two options 'Undock ' or 'Split' As shown below:

Choose 'Split' To separate the keyboard, bring the keys closer to the iPad, making it easier to type with your thumb.
Method 2: You can also split the keyboard by placing a left finger and a right finger in the middle of the keyboard, then swipe out.
If you select 'Undock', The keyboard will move from the bottom of the iPad to the middle. If you press and swipe the show / hide button above the keyboard, both phenomena will occur: The keyboard will slide up above the screen, and then split to the sides.
3. Easily add icons
Sometimes, you may want to use the symbol £ (pound) or type accented characters like 'é'.
In those cases, you don't need to use the Emoji keyboard (unless you need the icon ©). To create a bookmarked icon, simply press and hold a key on the virtual keyboard. For example, to create an accented 'e ' character, press and hold the 'E' Key, then swipe through the specific accented letter you want.
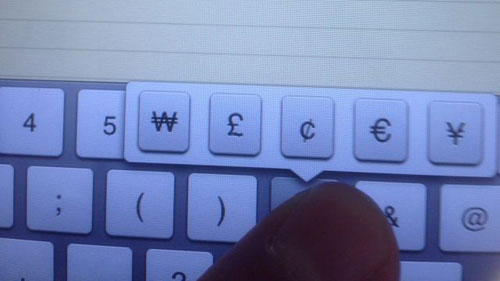
For more special symbols, press 123 To open the extra iOS keyboard, and press and hold the keys simultaneously to get other results. For example, pressing and holding the key carries the dollar symbol ($) To display other currency symbols.
FAQ
How were the 3 tips for using good virtual keyboard for iPhone, iPad options selected?
The options are compared by usefulness, ease of use, core features, and their fit for the situations described in the article.
Which option is best for beginners?
Choose the option with the simplest setup, clear documentation, and the features you actually need. A more advanced option is not always the better starting point.
What should I check before choosing?
Check compatibility, current availability, pricing or licensing, privacy requirements, and whether the product still receives updates and support.
Related Articles
 Good Tip for the Magic Keyboard of iPad Pro7 minutes read
 How to Control the Keyboard on the Ipad's Screen1 minutes read
 Good Tips on iOS 11 Cannot Be Ignored When Using iPhone, iPad7 minutes read
 Summary of Several Ways to Open Virtual Keyboard on Windows XP //8 minutes read
 6 Ways to Open Virtual Keyboard on Windows 109 minutes read
 12 Best Keyboard Apps for iPhone / iPad You Should Not Miss11 minutes read
Reader Comments 0
Sign in with email or Google to join the discussion.