Use VirtualBox to install Windows 7 on Ubuntu
This article will show you how to install Windows 7 on an Ubuntu 9.04 server using VirtualBox.
Network Administration - This article will show you how to install Windows 7 on an Ubuntu 9.04 server using VirtualBox. Then perform the configuration for Windows 7 to run in an accurate resolution and allow users to launch this Windows 7 virtual machine remotely.
1. Install VirtualBox
First we will perform the installation of a closed source version of VirtualBox. VirtualBox has an open source version called OSE, but this open version does not support some of the features needed for enterprise environments such as VRDB (remote connection execution) and USB connection support.
To install VirtualBox on Ubuntu, you will have to add the necessary containers for the application management system. To do this, open the terminal window and enter the following command:
First you need to check the ID number of vboxusers with the following command:
Note:
You can apply changes in the / etc / fstab file without restarting the system with the following command:
1. Install VirtualBox
First we will perform the installation of a closed source version of VirtualBox. VirtualBox has an open source version called OSE, but this open version does not support some of the features needed for enterprise environments such as VRDB (remote connection execution) and USB connection support.
To install VirtualBox on Ubuntu, you will have to add the necessary containers for the application management system. To do this, open the terminal window and enter the following command:
sudo nano /etc/apt/sources.listAfter entering the administrator password, the sources.list file will be opened and you need to add the following command at the end of this file:
deb http://download.virtualbox.org/virtualbox/debian jaunty non-freeThen save this file. Before updating apt, you must add the VirtualBox storage key. First download the key of VirtualBox here and save this key to the ~ / directory . Then use the following command to add the key:
sudo apt-key add ~ / sun_vbox.ascOnce you have run the apt-key command successfully, you can start executing the apt update with the following command:
sudo apt-get updateThen run the command to install VirtualBox. Since the goal is to install the closed version of VirtualBox, use the following syntax:
sudo apt-get install virtualbox-2.2During this installation process you will have to approve the installation of the kernel module for the currently running kernel. If you do not install this kernel module VirtualBox will not work. When the installation is complete you will have to create users in the vboxusers group. Please use the following command:
sudo gpasswd -a USERNAME vboxusers
Where USERNAME is the username you want to add.Before launching VirtualBox you need to configure VirtualBox. To enable USB connection support, you must add the vboxusers user ID to a new line in the / etc / fstab file .
First you need to check the ID number of vboxusers with the following command:
grep vboxusers / etc / groupThis command will display information with the following form:
vboxusers: x: XXX:Where XXX is the ID of the vboxusers user group . Next add a new line to the / etc / fstab file , the additional line looks like this:
none / proc / bus / usb usbfs devgid = XXX, devmode = 664 0 0
Where XXX is the ID of the vboxusers user group .Since you have installed a new kernel module, and adding a line to the / etc / fstab file, you may have to restart the system.
Note:
You can apply changes in the / etc / fstab file without restarting the system with the following command:
sudo mount -aHowever, since you have installed the kernel module, you still have to restart the system. You can then use VirtualBox.
2. Run VirtualBox
You will see this version of VirtualBox in the System Tools submenu of the Application menu of GNOME . The first time you launch VirtualBox you will not have any virtual machines displayed (Figure 1). Therefore, the first step is to create a Virtual Machine.

Figure 1: VirtualBox interface.
In addition to creating new Virtual Machines, you can also check all information and make configuration for the virtual machines created.
To create a new Virtual machine, click the New button to launch the C reate New Virtual Machine wizard. On the Welcome page click the Next button. You should see the VM Name and OS Type page , where you can enter the required information (Figure 2).
In the Name field, we will enter the operating system name using the virtual machine as Windows 7 . In the OS Type area, select Microsoft Windows for the Operating System , and Windows 7 for Version .
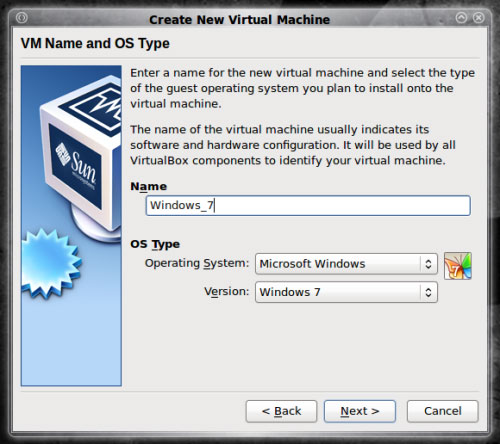
Figure 2: Enter information for Virtual Machine.
After entering the information, click the Next button. Next you will have to configure the base memory to be allocated to this virtual machine on the Memory page. Windows 7 requires a minimum of 1GB of memory, so you need to choose the 1GB of RAM for the virtual machine (although the VirtualBox only requires 512MB, but this is not enough for Windows 7). Then click Next .
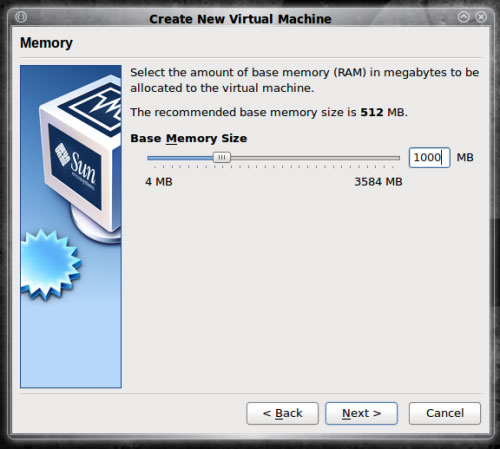
Figure 3: Installing RAM memory for Virtual Machine.
On the Virtual Hard Disk page you will have to create a hard disk. If no hard disk has been created yet, the Hard Disk Wizard will automatically turn on. If you already have a hard disk, you will have to select the Create new hard disk option (recommended) or optionally Use existing hard disk . If you choose the Use existing hard disk option, you will delete everything on the hard disk of Virtual Machine.
Note: You must select the box to select Boot Hard Disk (Primary Master) (Figure 4).
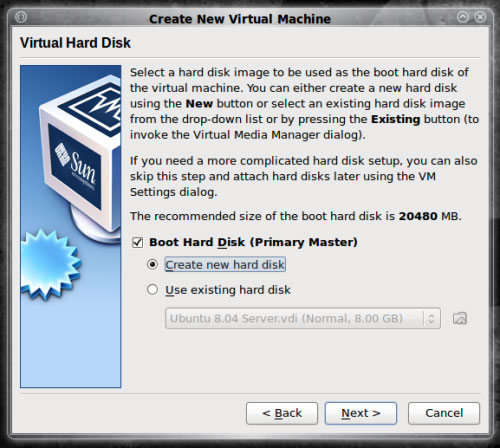
Figure 4: Creating a virtual drive for Virtual Machine
If you select the Create new hard disk option and click Next , the Create New Virtual Disk wizard will appear. On the Welcome page click the Next button. On the next page you will be asked if you want to create a disk that can change the size or capacity, select the Dynamic option to expand the drive when needed. Then click Next .
In the next page (Figure 5) you will have to configure the location and capacity of the hard disk being created. Usually the selected location is available (the name of the virtual machine). You only need to change the capacity by moving the slider. Then click Next .
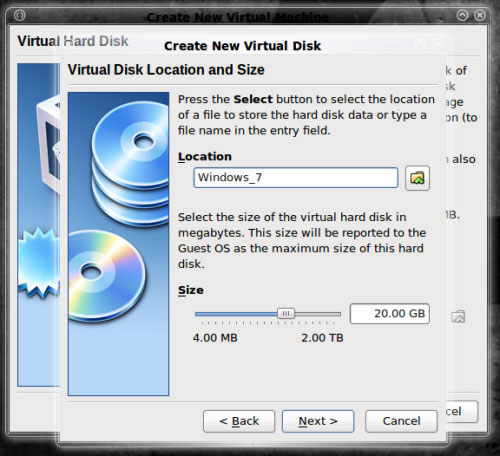
Figure 5: Determining the location and virtual disk capacity of Virtual Machine
The last page will appear with all the information you have selected, click the Finish button to complete. After finishing creating the disc, you will return to the last page of the Virtual Machine wizard. Here you just need to click on the Finish button. You will then see the Virtual Machine you just created displayed on the main window of VirtualBox (Figure 6).
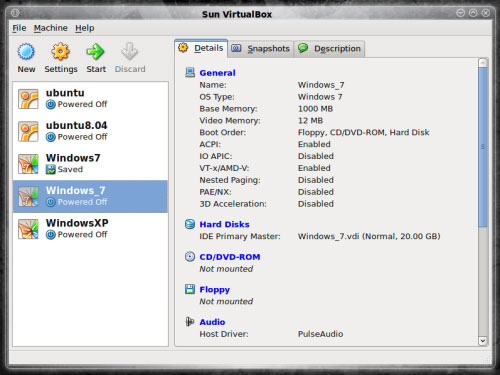
Figure 6: Virtual machine information just created.
As you can see, on the left panel of the VirtualBox window displays two Windows 7 virtual machines. They can be useful in case of testing or can be used to install another version of the operating system.
3. Install Windows 7
The process of installing Windows 7 in a Virtual Machine is the same as the standard installation process. You just need to insert the installation disc into the CD / DVD drive, select the Virtual Machine you just created and click the Start button on the main window of VirtualBox .
You only see one error at the end of the installation process: Virtual Machine cannot install the appropriate resolution. You must install Guest Additions for VirtualBox . This operation is very simple. While the Virtual Machine is running, go to the Devices menu and select Install Guest Additions (Figure 7).
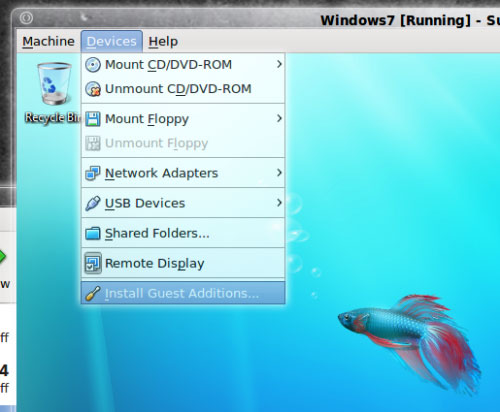
Figure 7: Installing Guest Additions for Virtual Machine.
Note: You can only install Guest Additions when Virtual Machine is running .
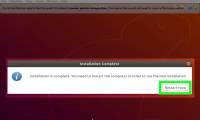
After clicking on Install Guest Additions, you will receive the message that the content of Guest Additions CD can not be found (Do not see the Guest Additions installation CD). And the installation process will ask if you want to download the Guest Addition Image . Please click Yes and then click Download to download this file. When the download is completed, you will have to confirm the size of the Guest Addition Image , then the Guest Addition installation process will begin. The process of installing this tool will be a typical Windows application installation process.
After the installation process is complete, you need to restart Virtual Machine by restarting Windows 7. When Windows 7 has finished booting, you will see:
- Accurate resolution.
- No need to hold or release the mouse by pressing the right Ctrl key.
- Launch Windows in smooth mode.
- Copy and Paste between server and client.
4. Install Windows 7 remotely
Another feature of VirtualBox is the ability to operate Virtual Machine remotely. Usually, all operations need to be done to install remote access to the Virtual Machine in VirtualBox. Windows 7 (and Vista) is another case. In addition to configuring VirtualBox to allow remote access to Virtual Machine, you must also configure the Windows 7 operating system to allow remote access. First we will perform configuration for VirtualBox.
You will have to close the Virtual Machine. There is no need to save the status of Virtual Machine because of doing so you will not be able to change the configuration. Instead you need to close the Virtual Machine, then go to the main window of VirtualBox and select your Virtual Machine and then click the Settings button. In the installation window, click the Remote Display tab and select the Enable the VRDP Server check box (Figure H).
If necessary, you can change the port number for the VRDP server at this tab.
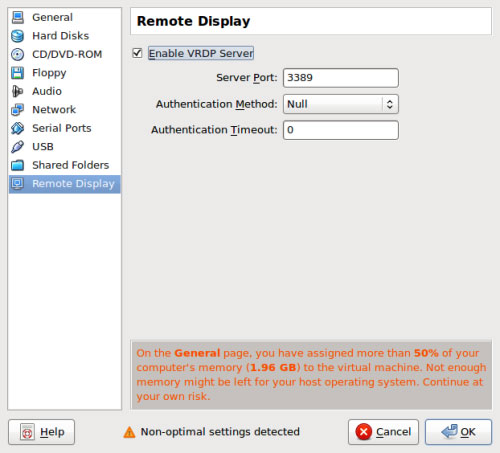
Figure 8: Configuring Remote Display for Virtual Machine.
Now click OK and start Windows 7 Virtual Machine. Next we will configure Windows 7 to allow remote access.
When Windows 7 started and operated, click on the Start menu and enter the remote into the Search box, you will see some items appear in the results section.
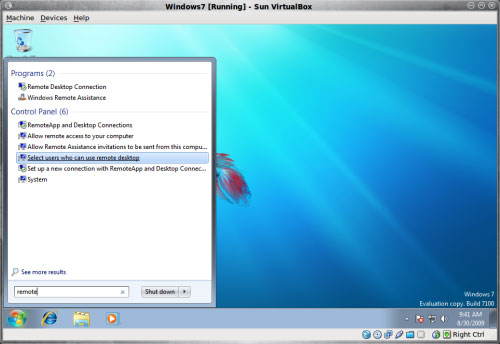
Figure 9: Search result for remote key word.
From these items click on the Allow remote access to your computer section to open the System Properties Window in the Remote window (Figure 10). You must click on the two boxes to select Allow remote assistance connections to this computer (Allow connecting remote support to this system) and Allow connections from computers running any version of Remote Desktop (Allow connections from user systems Use all versions of Remote Desktop). 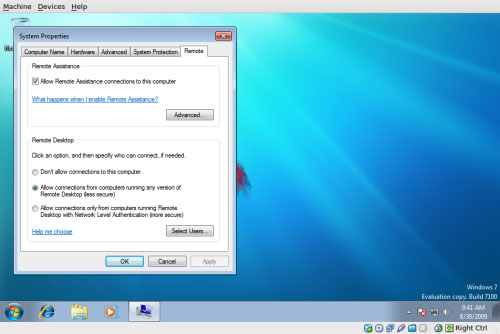
Figure 10: Windows 7 configuration allows remote access.
Then click OK and you have enabled all systems to use Remote Desktop access to Virtual Machine .
Was this article helpful?
Your feedback helps us improve.
Related Articles
 Instructions on how to install Ubuntu on VirtualBox virtual machine10 minutes read
 How to Install Ubuntu in Windows7 minutes read
 How to Install Ubuntu on VirtualBox8 minutes read
 Installing Ubuntu in VirtualBox does not need DVD or USB5 minutes read
 How to Install Ubuntu on VirtualBox8 minutes read
 Virtualbox - Download Virtualbox here.4 minutes read
Reader Comments 0
Sign in with email or Google to join the discussion.