How to Create an Ubuntu Virtual Machine with VirtualBox (Mac)
The following instructions will enable you to create an Ubuntu virtual machine. They have been created specifically for a Mac computer, but are essentially the same for Windows. As you follow the instructions, you will see they have been...
Table of Contents
Part 1 of 2:
Downloading What You Need
-
 Download VirtualBox from their [www.virtualbox.org/wiki/Downloads downloads page]. Under VirtualBox binaries and VirtualBox platform packages, select the most current VirtualBox for OS X hosts. Upon selection, it will trigger the download of a .dmg file. Download the file and follow the install wizard to finish installing it onto the computer. Install all defaults and click on next to go from step to step.
 -
 Go to the Ubuntu downloads page and click the Download button. To skip the donation page, scroll down and click, 'Not now, take me to the download.' Save the file to the place of your choosing. Keep in mind that once this file is saved, it cannot be moved. Note that the file type is '.iso.' Click 'Save.'
Part 2 of 2:
Setting Up
-
 Select the VirtualBox icon to open the program.
 -
 Click the 'New' button. Select the type as 'Linux.' Type your name and select the Ubuntu (64 bit) option. Next, click 'Continue.'
 -
 Select the 512 MB memory size for everyday use. If you plan on downloading additional applications within the machine, select 2048 MB. For large projects, select 4096 MB. Click 'Continue.'
 -
 On the next page, select the 'Create a virtual hard drive now' radio button. Select 'Create.'
 -
 Select the 'VDI (VirtualBox Disk Image)' option as the hard drive file type. Click 'Continue.'
 -
 On the 'Storage and physical hard drive' page, leave the option on 'Dynamically Allocated' and click 'Continue.'
 -
 To choose the file location and size, type in the name of the new virtual hard drive and keep the 8 GB option.
 -
 Select the name of the machine that you just created, and then click the green 'Start' arrow.
 -
 On the next page, click the yellow folder icon.
 -
 Search for the .iso file that you downloaded previously. Open the file.
 -
 Click on 'Install Ubuntu.'
 -
 Do not select either of the two options to 'Download updates while installing' and 'Install this third-party software.' Click 'Continue.'
 -
 Make sure 'Erase disk and install Ubuntu' is selected. Click 'Continue.'
 -
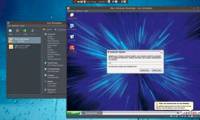
 Follow instructions to select the region where you live, language preferences, and your username and password. Finally, select 'Log in later.' The computer will now install the Ubuntu Operating System. This process could take up to 20 minutes, but requires no effort on your part. When it is done you will have a fully-function Ubuntu Virtual Machine.
Was this article helpful?
Your feedback helps us improve.
Related Articles
 Instructions on how to install Ubuntu on VirtualBox virtual machine10 minutes read
 Installing Ubuntu in VirtualBox does not need DVD or USB5 minutes read
 How to create a Windows 10 virtual machine with VMware Player and VirtualBox10 minutes read
 Virtualbox - Download Virtualbox here.4 minutes read
 Instructions for installing Ubuntu Maverick in Mac Virtualbox4 minutes read
 VirtualBox and VMware Player: Which virtual machine should you choose?8 minutes read
Reader Comments 0
Sign in with email or Google to join the discussion.