Table of Contents
This guide explains how to blur Photos with Paint Simple and Fast, with clear steps, practical tips, and important checks before you begin.

In today's article, TipsMake. com will guide you how to blur photos with Paint quickly and simply, please follow the following instructions.
Method 1: Use the key combination Ctrl and +/-
Step 1: You open the image to be blurred with Paint. Then select the Select tool (1) and select the image area to be blurred (2) .

Step 2: You use the key combination Ctrl and + / - keys on the keyboard to blur the selected image area.

If your laptop doesn't have a +/- keyboard, we can open a virtual keyboard (On Screen Keybooad). After opening the virtual keyboard and we do not see the +/- number key, click the Options button on the virtual key.

And tick the Turn on numeric key pad and click OK to save it.

Step 3: After fading, our image area will be displayed as shown below. Click on any point on the image to make the selection disappear.

Method 2: Use the mouse and the Select tool.
This way we will blur the image by cutting and stitching the images and then overlapping them to create a new image that is different from the old one.
Step 1: Open the image to be blurred and click on the menu Image (1) => Select (2) . Then you localize the image to be blurred (3) .
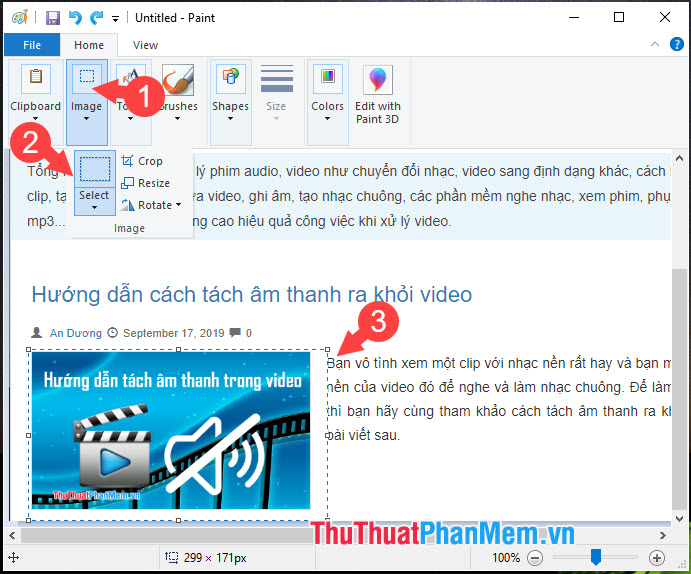
Step 2: You continue to move the image area back and forth as shown below. Then you repeat Step 1 by going to Image => Select => Zoning image to be blurred .

Step 3: You repeat the above two steps and move the image area so that the new image is distorted and the information to be blurred disappears.

As a result, we have a new distorted image that hides the information we need to delete.

With instructions to blur the image with Microsoft Paint software, we can quickly handle the areas of the image that we want to blur without any other professional image editing software. Good luck!
FAQ
What should I know about Blur Photos with Paint Simple and Fast?
Focus on the key features, requirements, limitations, and practical use cases explained in this guide.
How do I get the best results with Blur Photos with Paint Simple and Fast?
Follow the recommended steps, use current software or information, confirm compatibility, and review settings before major changes.
Are there any risks or limitations?
Potential limitations depend on compatibility, data quality, cost, privacy, support, and how the product or method is used.
Related Articles
 How to Blur Photos on Paint 3D3 minutes read
 How to Blur Photos in Paint4 minutes read
 Instructions for Blurring Photos on Canva Are Very Simple4 minutes read
 Learn How to Use Paint to Edit Photos on Windows23 minutes read
 Cut Circle Images with Paint Simple and Fast3 minutes read
 How to Merge Photos into the Frame on Paint4 minutes read
Reader Comments 0
Sign in with email or Google to join the discussion.