Turn your Raspberry Pi into a media server with Emby
Easy to set up and set up, Emby is a smart media server alternative. Here's how to install Emby Server and Emby Theater on Raspberry Pi..
If you're looking for a smart, easy-to-use Raspberry Pi media server solution with a wide selection of clients, you might have looked at Plex or Kodi but found them not very suitable. If so, give Emby a chance.
Easy to set up and set up, Emby is a smart media server alternative. Here's how to install Emby Server and Emby Theater on Raspberry Pi.
What is Emby?
Emby is a media server. Although it is not as well known as other solutions (such as Plex or Kodi), Emby is open source with client and server software. This means you can install the server module on the computer with your media in it, and then share it with other devices using a client application.
Many other plugins can expand Emby's features. You can find IPTV plugins for Internet TV for example. Emby also offers built-in parental controls, to help protect your family from sensitive content. Although Emby is less popular than its competitors, the user base of the application is still growing.
What it takes to turn a Raspberry Pi into a media server with Emby
To build an Emby media server, you will need:
- Raspberry Pi 2 and above (articles already using Raspberry Pi 4)
- MicroSD memory card (16GB or higher for best results)
- PC has a card reader
- Keyboard and mouse
- HDMI cable and monitor fit
Make sure you have a suitable power connector for the Raspberry Pi.
The process is simple: Install Emby, connect it to the network, then use Emby as a media server. Media stored on the USB hard drive can be added to Emby, then made available to devices on your network.
For example, the Raspberry Pi Emby box can provide favorite movies and family photos to a TV or mobile phone.
Install Emby media server on Raspberry Pi
Installing Emby Server on the Raspbian default Raspbian Buster is very simple. Open a terminal, update and upgrade to get started:
sudo rpi-update sudo apt dist-upgrade
Next, use wget to download the ARMHF version from the Linux download page; This version is compatible with Raspberry Pi.
wget https://github.com/MediaBrowser/Emby.Release/release/doad/4.2.1.0/emby-server-deb_4.2.1.0_armhf.deb
Install with command:
dpkg -i emby-server-deb_4.2.1.0_armhf.deb
Wait while this command completes. The Emby server running on a Raspberry Pi is already installed. All you need to do now is configure it.
Configure the Emby media server
Access Emby Server through the browser. The easiest way is to use a Raspberry Pi, using the address http:/// localhost: 8096.
You will be taken to the server setup section. You need to set your preferred language, username, password and other options. Setup also gives you the option to link your Emby Connect account . This is a great way to connect to the server from any Emby account without an IP address. However, that is not necessary.
Accordingly, you will see the Setup your media libraries screen . Here, click Add Media Library .

Just browse for the location, then set descriptive information according to the menus.
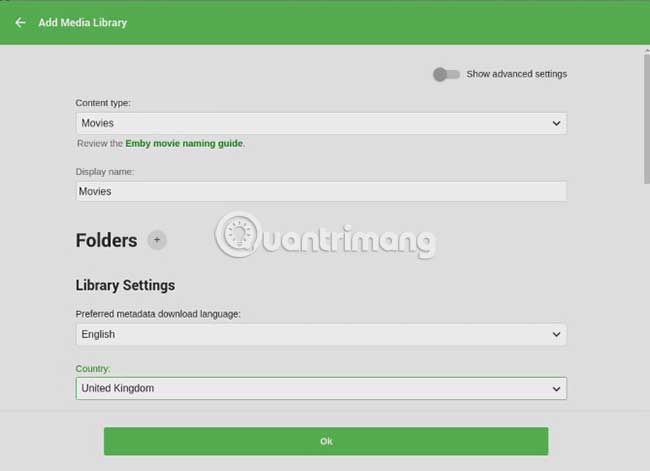
This step is mostly language-based and does not take much time.

When you have finished adding media locations, click Save. Time to start watching content on Emby media server!
Connect any device to the Emby server
An impressive collection of applications available for Emby. If you want to watch on smart TV, you can do so! You will also find apps for Android TV and Amazon Fire TV, along with Xbox One and PS4. If using Kodi, there is an Emby add-on available.
In addition, Emby creates an application for Android and iOS mobile devices. There is even a version for Windows 10 and Windows 10 Mobile, as well as an HTML5 web client.
To enjoy content on the Emby server, simply install the application and proceed to setup. You will be asked for the server or device name and Emby account login information, if you set it up.
Once all is configured, you will be ready to enjoy streaming media content from the Raspberry Pi Emby server.
Set up the Raspberry Pi as an Emby client
Thanks to the Emby Theater for Linux tool, you can view media files on the Raspberry Pi Emby server with a different Pi.

You have two options for installing the Emby Theater client on the Raspberry Pi.
1. Download the DEB file to the Raspberry Pi and install it on Raspbian Buster (or any Debian-based operating system).
2. Or, download the full disk image, write it to the backup SD card and boot.
Use the appropriate download link based on how you plan to install Emby on your Pi.
- Download Emby Theater DEB file for Raspbian Buster.
- Download Emby Theater Disk Image.
Once the download is complete, it's time to install Emby.
How to install Emby Theater on Raspbian Buster
Get started with Emby Theater by downloading the DEB file from GitHub. This file should be downloaded directly to the Raspberry Pi or to a location from which it can be copied to the Pi.
Next, open the terminal, update and upgrade:
sudo rpi-update sudo apt dist-upgrade
Next, run the installation command:
sudo apt install -f ./emby-theater_3.0.9_armhf.deb
Then reboot:
reboot
Finally, run Emby with:
emby-theater
If you want Emby Theater to start automatically when it boots Pi, that's not a problem. In the terminal, edit the autostart file:
sudo nano ~/.config/lxsession/LXDE-pi/autostart
Scroll to the end and add:
@emby-theater
Save and exit ( Ctrl + X , then press Y ) and restart the Raspberry Pi. Emby will automatically start. Of course, if you want this functionality, it is better to install the disk image.
Install Emby Theater from a disk image
To turn a Raspberry Pi into a dedicated Emby client, download the compressed disk image to the main PC.
Next, extract the file. At this point, you should insert the Raspberry Pi SD card into the PC card reader.
Launch Etcher, then click Select image to browse for the IMG file. Make sure the correct drive is selected, then click Flash. Etcher will format the media and write the Emby disk image.
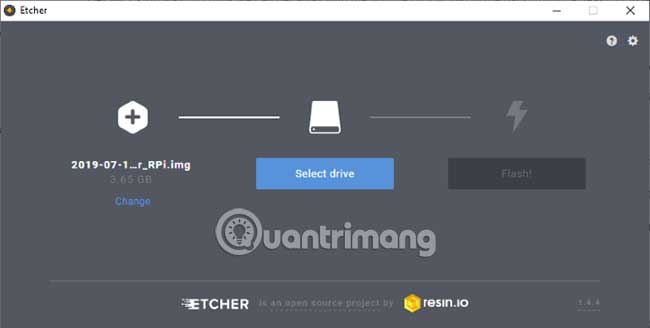
A notification will appear upon completion. Close the software, remove the SD card safely, then replace it in the Raspberry Pi. The computer should boot straight into Emby Theater.
Emby brings a whole new dimension to media delivery on the Raspberry Pi. But Emby has many other things.

If finding streaming content on Kodi isn't as smooth as expected, don't worry! Emby has a clear focus on online media sharing. Sure, you can upgrade to the Emby subscription program for more features, but you probably don't need these.
With apps for almost any device, you'll find Emby fits perfectly into your Raspberry Pi and media.
If you are considering an alternative, here are ways you can set up your Raspberry Pi as a media server.
Hope you are succesful.