How to boot Raspberry Pi 4 from USB or over the network
The Raspberry Pi is a wonderful, flexible piece of software, capable of a wide range of possibilities, from running a media center to using it as a radio.
Table of Contents
In this tutorial, you will learn how to modify the Raspberry Pi 4 bootloader to boot from USB storage media, such as an external SSD , which is faster, more reliable, and provides more storage than a microSD card . You will also learn how to enable Raspberry Pi 4 booting over an Ethernet (Internet) connection.
Why boot Raspberry Pi 4 via SSD or network?
There are some situations where you would want to boot your Raspberry Pi via SSD instead of microSD card.
For example, when you enable USB boot, the Pi will first check for bootable USB devices connected. If no bootable USB devices are detected, the Pi will check the SD card and boot the operating system. This allows you to use the Raspberry Pi to boot, run, or test other operating system releases without formatting or erasing the main operating system from the SD card you use every day.
Also, if you don't have an SD card or have a small sized SD card but require more capacity for a special purpose, then booting from a USB flash drive (such as a USB or SSD) makes a lot of sense.
Flash USB Bootloader Firmware
To enable USB booting, you need to flash the USB bootloader firmware onto your Raspberry Pi 4. To do this, you will need a microSD card of any size (at least 256MB). Then, follow these steps to flash the USB bootloader onto your Raspberry Pi 4.
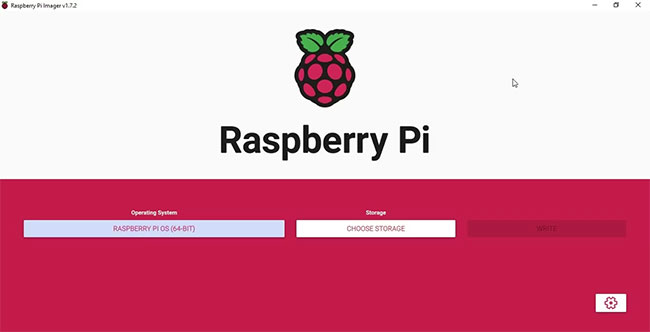
1. Download, install and launch the latest version of the Raspberry Pi Imager tool . Also, connect the microSD card to your computer system.
2. Click Choose OS and select Misc Utility Images > Bootloader > USB Boot .

3. Click Choose Storage and select the microSD card.
4. Click Write. Wait for the process to complete. Once complete, remove/unmount and then unmount the microSD card from the system.
5. Turn off the Raspberry Pi 4 and insert the USB boot microSD card.
6. Connect the power supply to the Raspberry Pi 4. The Pi will turn on and the USB bootloader will flash automatically. This will only take a few seconds. The green LED on the Raspberry Pi will blink steadily once the bootloader has been successfully flashed. If you have connected the HDMI port to a monitor, you will see a green screen after the firmware has been flashed.
7. Now, you can turn off the Raspberry Pi and remove the microSD card.
Create and boot Raspberry Pi 4 using USB boot
Your Raspberry Pi 4 is now ready to boot from external storage media, such as a USB, SSD, or hard drive. However, you need to flash the bootable USB media with the desired operating system that you want to boot through the Raspberry Pi 4. Here are the steps:
1. Launch the Raspberry Pi Imager tool and click Choose OS to select an operating system from the list. If you want to flash a downloaded system image on your local machine, select the Custom option and then select the OS .img file from your system.
2. Click Choose Storage to select the connected USB storage media and click Write.
3. After the operating system is flashed onto a USB bootable media, such as an SSD or external USB drive, remove it and then disconnect the drive from the system.
4. Connect the USB drive to one of the USB 3.0 ports on the Raspberry Pi 4.
5. Connect the power supply to turn on the Raspberry Pi 4. The Pi will check for a USB boot medium first and if found, it will start booting the operating system from the connected USB storage drive.
5. You can now use your Raspberry Pi with an operating system running via a USB drive. This will allow you to try out a variety of operating systems and projects, such as DIY Philips Ambilight for any TV.
Flash network boot firmware
Enabling network boot on the Raspberry Pi 4 is easy and useful when the Raspberry Pi 4 fails to boot from a connected SD card for whatever reason, such as an operating system error. When you flash the network boot firmware, the Raspberry Pi 4 will try to boot from the SD card first. However, if the operating system is not found or is corrupted, the Raspberry Pi 4 will load the Imager tool.
In such cases, you do not need to re-flash the SD card using your computer, which requires you to remove the card from the Raspberry Pi 4. Instead, you can use the automatically loaded Raspberry Pi Imager tool to download and flash the operating system directly from the Internet to the SD card without removing the card from the Raspberry Pi 4.
The steps are as follows:
1. Launch the Raspberry Pi Imager tool on your computer system and mount the SD card.
2. Click Choose OS and select Misc Utility Images > Bootloader > Network Boot .
3. Click Choose Storage , select the SD card and click Write. Wait for this to complete.
4. Plug the network boot SD card into the Raspberry Pi 4 and turn it on.
5. The network boot firmware will be flashed. The green LED will start flashing once complete.
Now you can remove the network boot SD card. If you now insert a blank SD card and connect an Ethernet cable , you can flash the card with the desired operating system directly from the Internet on the Raspberry Pi 4…
Boot Raspberry Pi over network connection (Ethernet)
If you have flashed the network boot bootloader on your Raspberry Pi 4, it will load the Raspberry Pi Imager tool. You will need to follow these steps to install an operating system from the Internet when network boot is enabled.
1. Press and hold the Shift key for a few seconds.
2. Connect the Ethernet cable connected to the router to the Raspberry Pi 4.
3. The installer will start downloading. Once downloaded, you can use the Imager tool to flash the SD card just like on a computer.
This will save time and you won't need to disconnect anything from your Raspberry Pi 4.
With a bootable USB, you can try out multiple operating systems, including beta versions, that are compatible with the Raspberry Pi 4 and test them without having to remove the SD card that is running the stable version. It also helps you increase your storage capacity, which is useful when you use the Raspberry Pi 4 as a MotionEye NVR or Plex server to store video recordings or movies and TV shows. Network booting is a quick rescue when the operating system on the SD card fails to boot due to corruption or any other reason.
See also:
- How to Turn an Old Laptop Screen Into a Magic Mirror
- How to Set Up Wi-Fi and Bluetooth on Raspberry Pi 3
- How to Update Your Raspberry Pi to the Latest Raspbian OS
Was this article helpful?
Your feedback helps us improve.
Related Articles
 7 causes of Raspberry Pi not booting and how to fix it11 minutes read
 6 ways to adjust Raspberry Pi via boot partition11 minutes read
 How to dual-boot Raspberry Pi with BerryBoot9 minutes read
 How to boot Raspberry Pi from SSD11 minutes read
 How to run scripts on boot on the Raspberry Pi6 minutes read
 3 ways to edit file boot / config.txt on Raspberry Pi6 minutes read
Reader Comments 0
Sign in with email or Google to join the discussion.