Top 10 tips for using ProShow Producer
ProShow producer is a unique photo video creation software that is favored by most users around the world alongside ProShow Gold or Windows Live Movie Maker. There are many built-in features in ProShow Producer such as: insert sound into video, create transition effects, insert logo
Table of Contents
ProShow Producer is a video making software that helps you combine personal images in a slideshow video with dynamic background music and unique transition effects. ProShow Producer is often used by wedding photo studios to make souvenir videos for clients, creating works of art to preserve memorable moments.
Here are 10 tips for using the most effective ProShow Producer that I have collected. Hope it will help your work.
- 1. How to rotate Video in ProShow Producer
- 2. Mute Video in ProShow Producer
- 3. How to fast forward a Video in ProShow Producer
- 4. How to cut and merge videos with ProShow Producer
- 5. How to cut music in ProShow Producer
- 6. How to insert 2 overlapping music files in ProShow Producer
- 7. How to insert logo into Video in ProShow Producer
- 8. How to insert Sub into Video with ProShow Producer
- 9. How to resize Video in ProShow Producer
- 10. How to export files in ProShow Producer
1. How to rotate Video in ProShow Producer
For videos that are rotated, not right, or wrong, you need to rotate to work effectively. I will show you how to rotate Video with ProShow Producer.
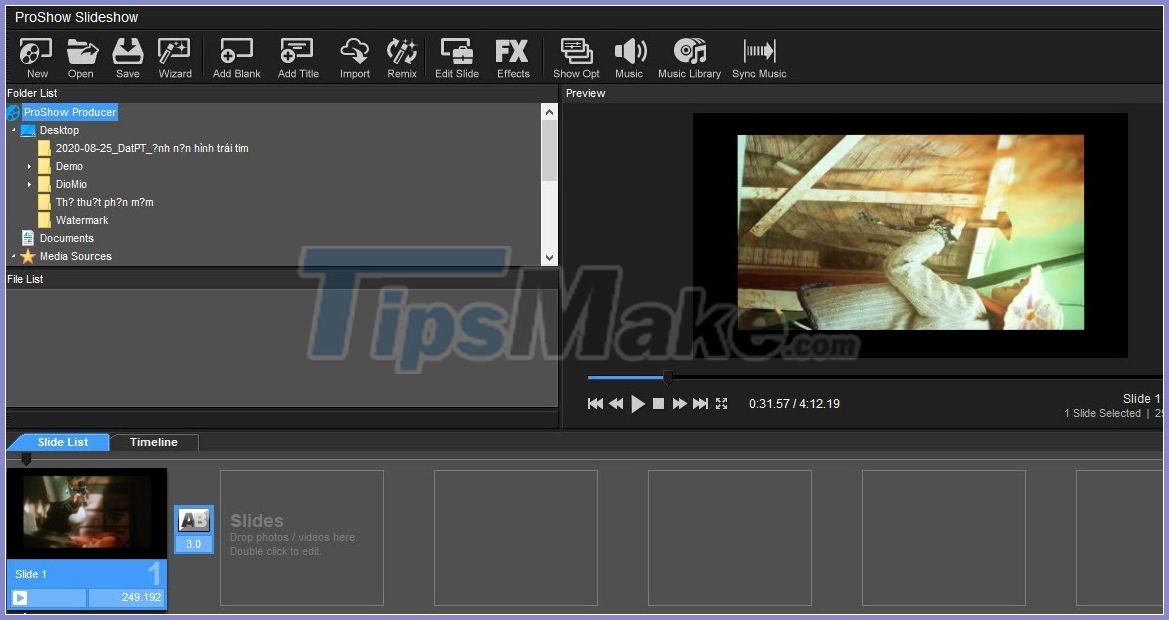
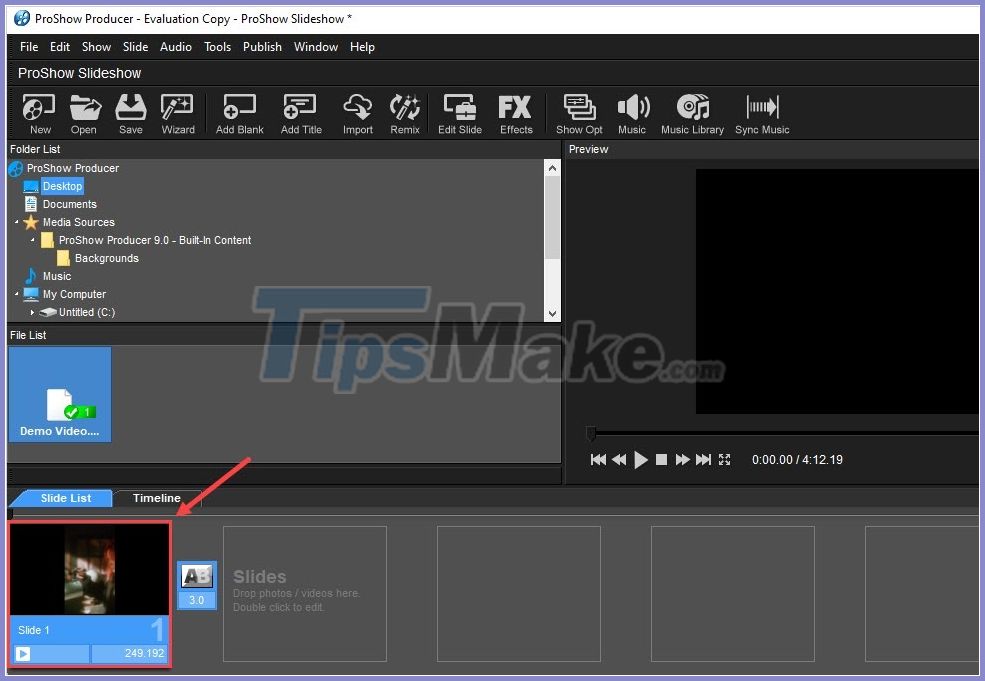
Step 1: First, you need to open ProShow Producer and drag the edited Video down the working Timeline bar.

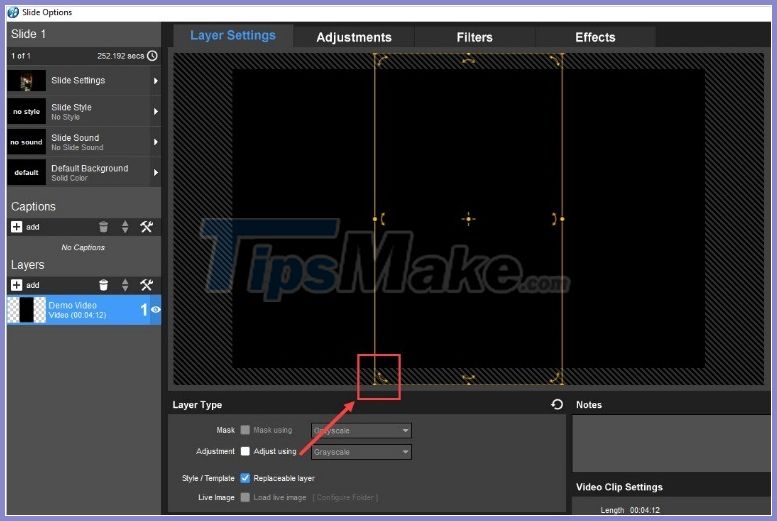
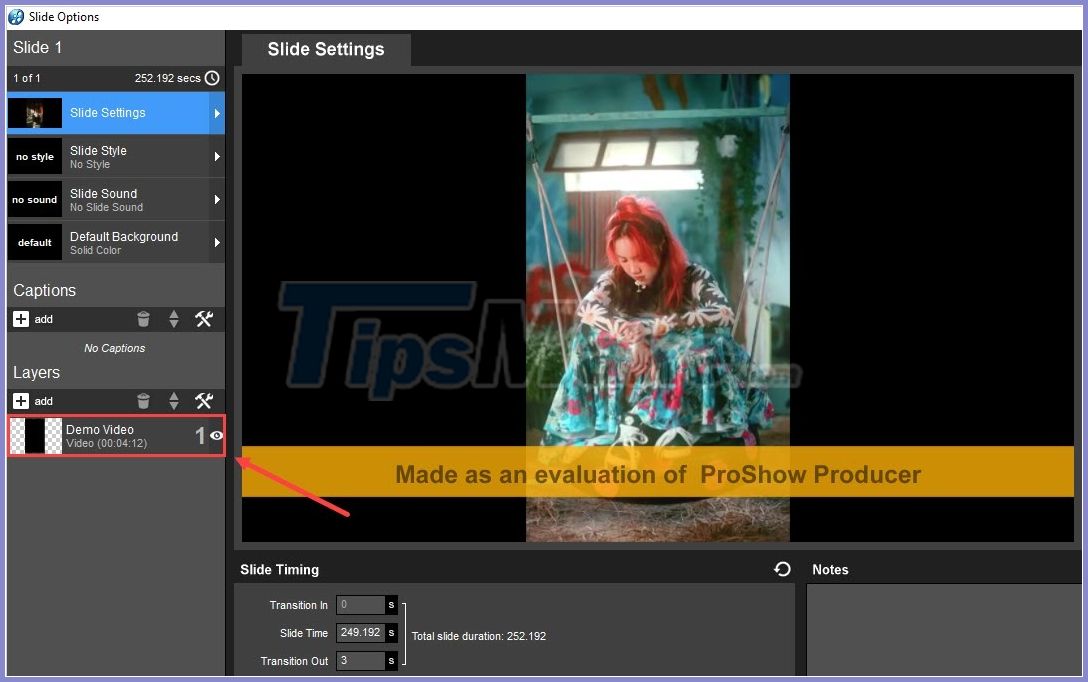
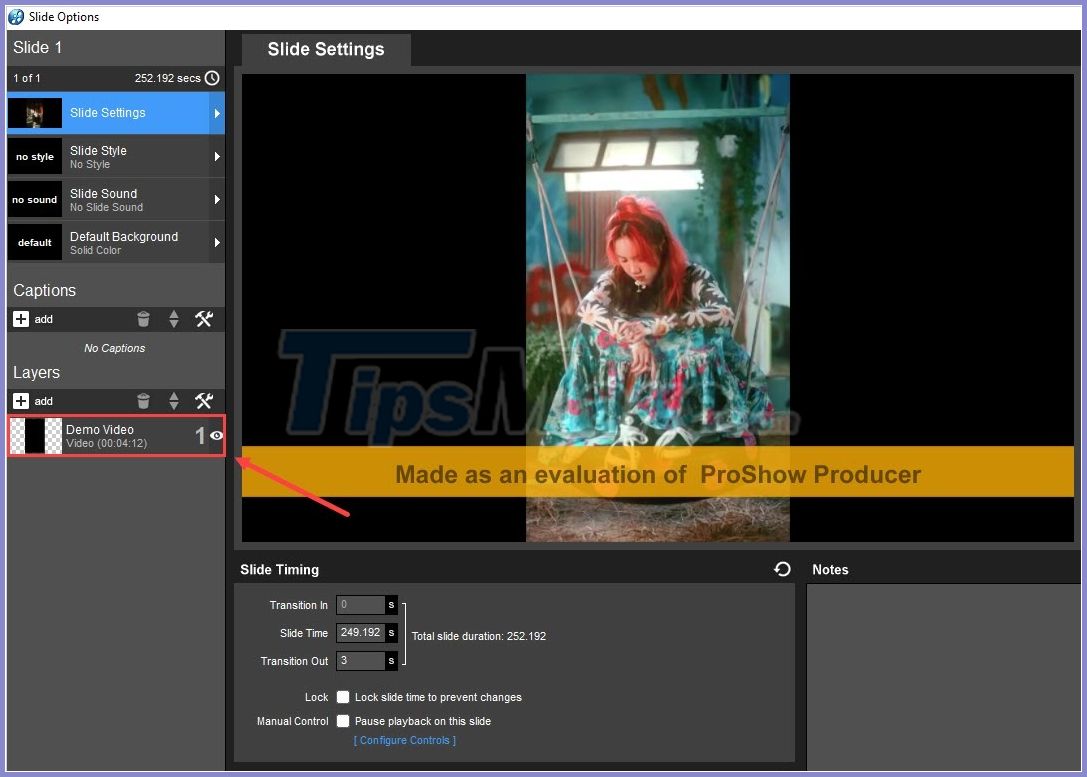
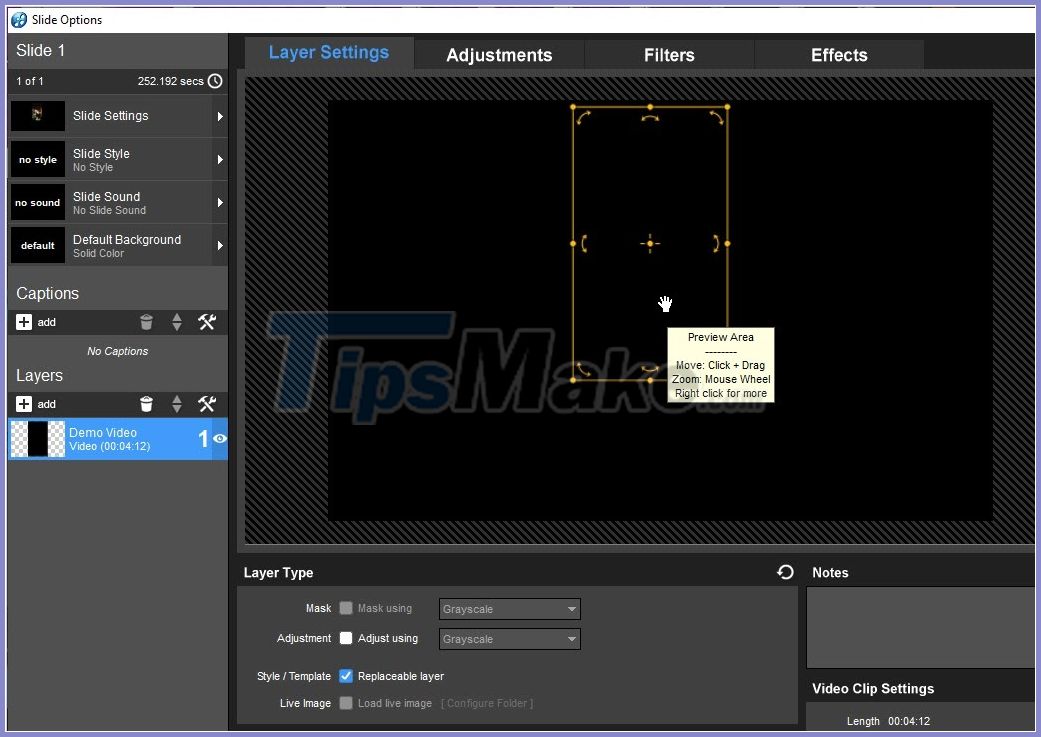
Step 2: Then you double-click on the Video on the Timeline to open Slide Options .

Step 3: When the Slide Options window appears, choose Video in the Layers section to edit them.

Step 4: When the Layer Settings window appears, click the Rotation icon to rotate the Video in your desired direction.
In case you want to rotate the Video in a certain direction or automatically rotate the correct right angle, then hold down the Shift key while rotating.
Step 5: After rotating the Video, you continue to click on the round points in the corner to adjust the size of the Video to fit the best frame possible.

Step 6: After completing the above operations, you proceed to press the button (Space) on the keyboard to see if the video is suitable.
If the Video has been rotated in the right direction and the right size, please select OK to finish rotating the Video.

So you have completed rotating Video on ProShow Producer software.
2. Mute Video in ProShow Producer
In this article, I will guide you how to mute Video in ProShow Producer.
Option 1: Turn off directly on Video Timeline
Step 1: First, you need to open ProShow Producer and drag the Video you want to mute to the working Timeline.
Step 2: Then right click on the Video and in turn choose Audio -> Remove Slide Sound .
For this method, your video will lose sound, only video image content remains.

Method 2: Mute Video in Layer Settings
Step 1: First, you need to open ProShow Producer and drag the Video you want to mute to the working Timeline.
Step 2: After the Video is imported into the Timeline, you need to double click on Video to open the settings.
Step 3: When the Slide Option window is open, select Video in the Layer section to open the Video Layer's Settings.
Step 4: When Layer Settings is open, go to Video Clip Settings to set up. Here you need to set the Volume down to 0% (mute) and press OK to complete.

So you have finished muting Video on ProShow Producer software.
3. How to fast forward a Video in ProShow Producer
Normally, when you edit Video, you will have to interfere a lot with the speed of the Video. I will show you how to fast forward Video in ProShow Producer, please follow the steps below.
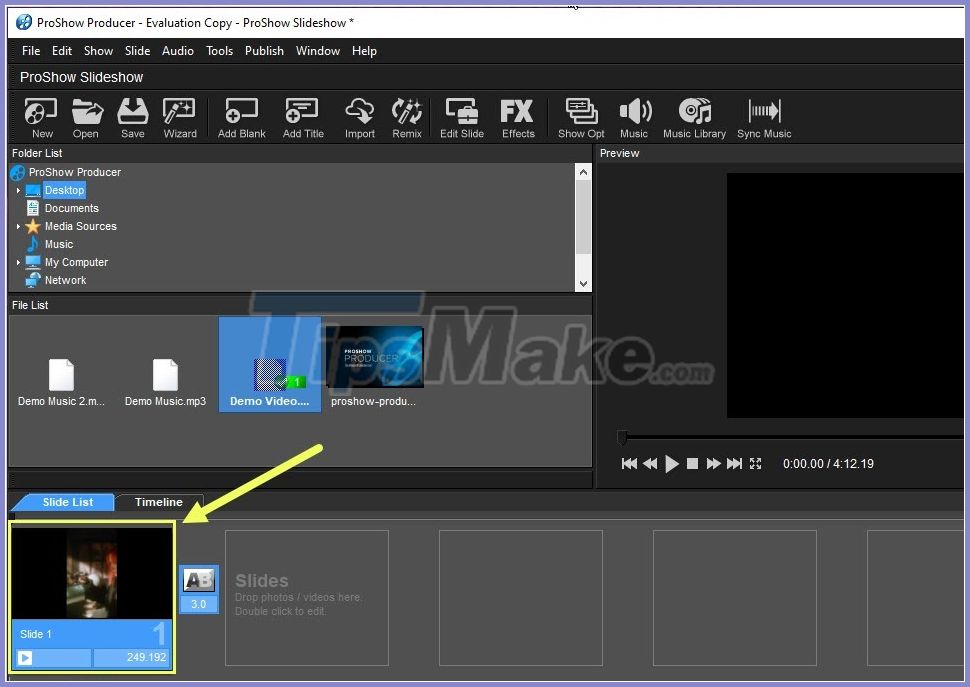
Step 1: First, you need to open ProShow Producer and drag the edited Video down the working Timeline bar.

Step 2: Then you double-click on the Video on the Timeline to open Slide Options .
Step 3: When the Slide Options window appears, choose Video in the Layers section to edit them.
Step 4: Next you choose Layer Settings to set the effects for the currently selected layer.

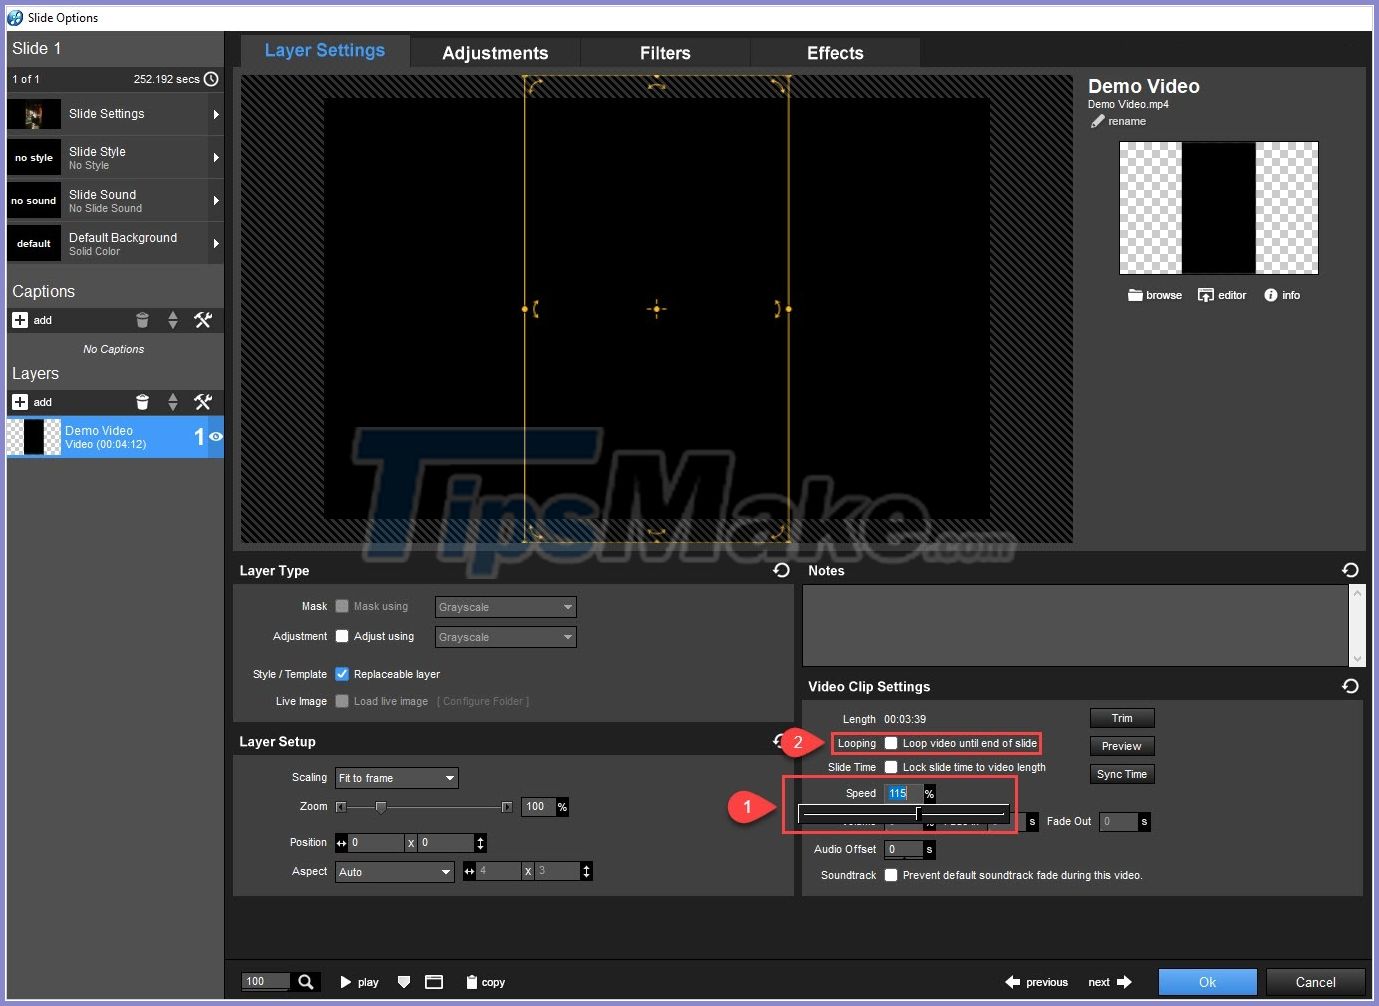
Step 5: In the Layer Settings window , change the Speed (speed) to fast forward / rewind Video. If the number% set as large, it means that the video will fast forward and vice versa.
After adjusting the fast forward speed, you proceed to tick the Loop video until end of slide to automatically adjust the length of the Slide to match the length of the Video after rewinding.
Finally, click OK to complete and save your edits.
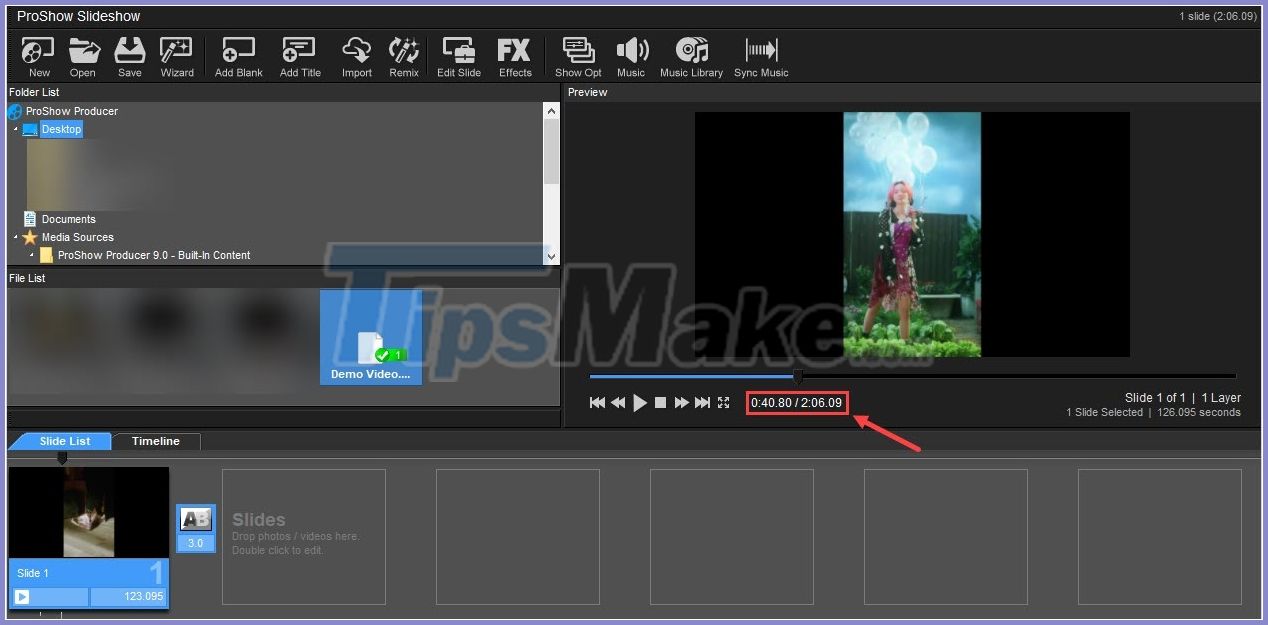
At the main interface of ProShow Producer, you can review Video content after fast forwarding them. The video length will be shorter than the original video because they have been fast forwarded.
4. How to cut and merge videos with ProShow Producer
One of the popular Video collage software is ProShow Producer and they are used by a lot of people because they have intuitive operations. TipsMake will guide you how to cut and merge videos with Proshow Producer.
4.1. Cut Video in ProShow Producer
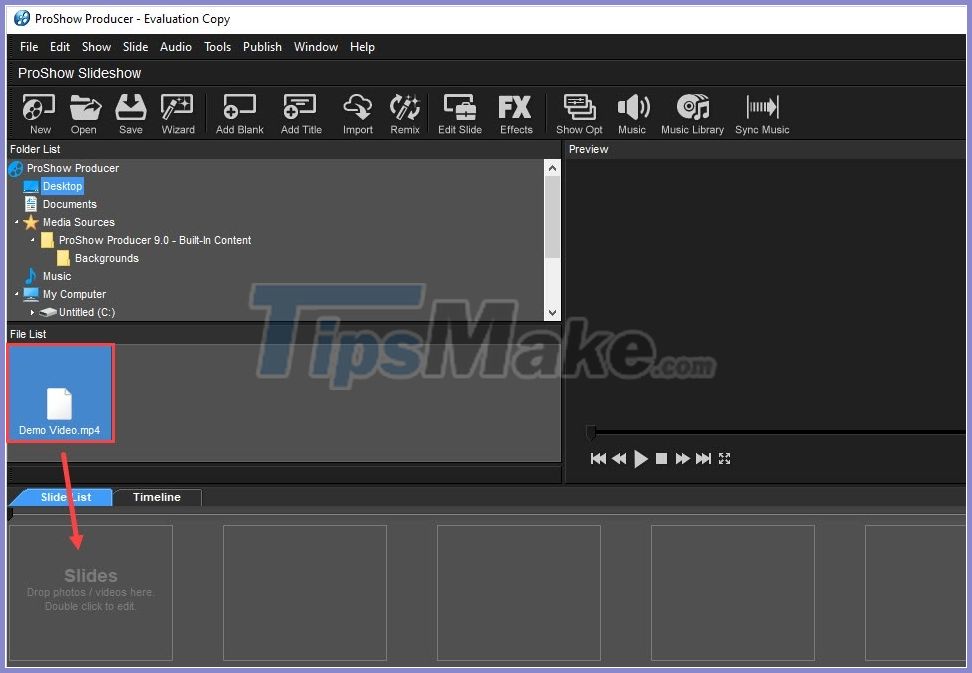
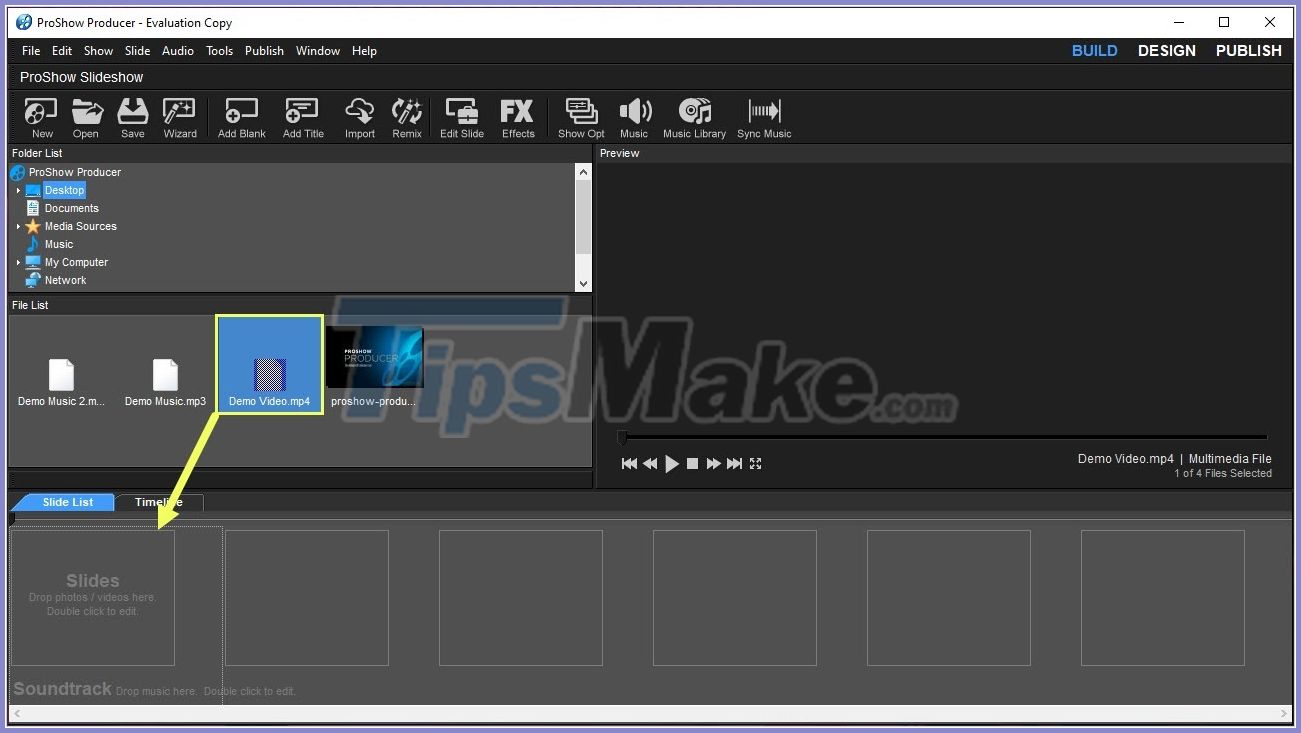
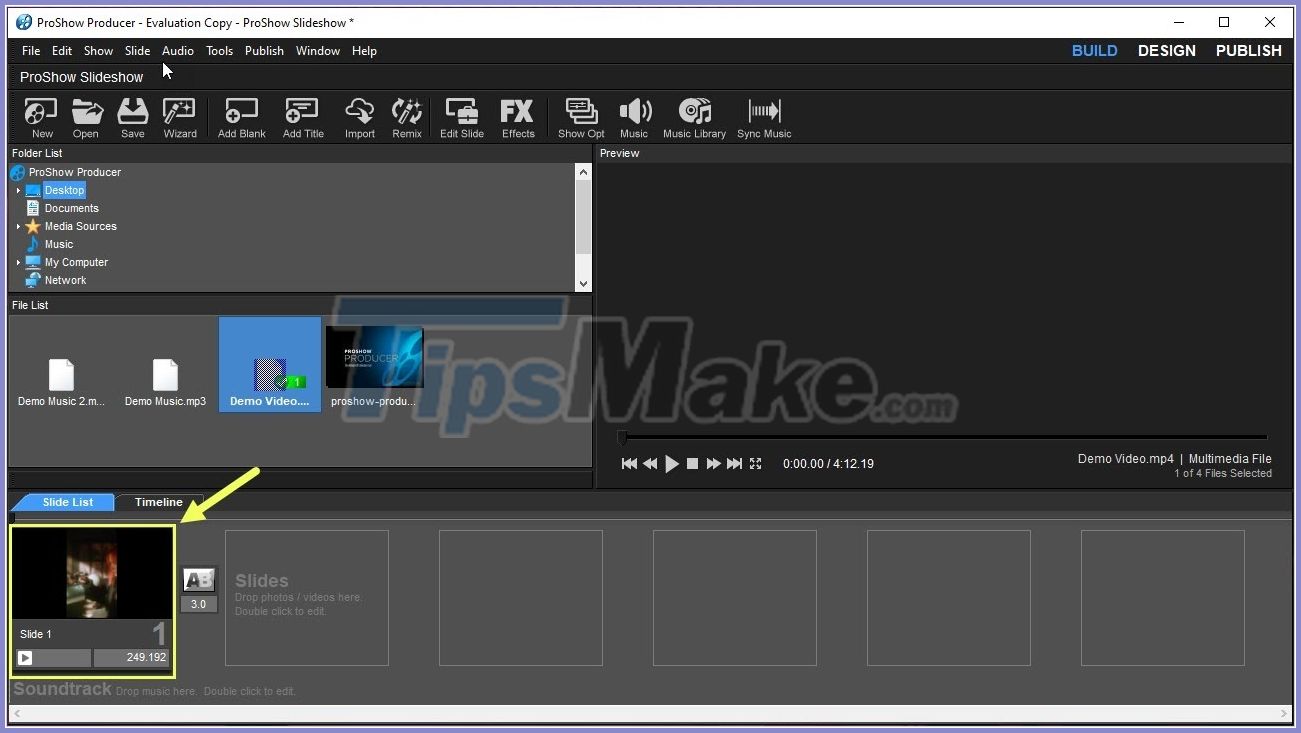
Step 1: First, open ProShow Producer and drag the Video file to edit down Slide List to edit.

Step 2: After the Video file is imported into the system, then double-click the video file to edit.
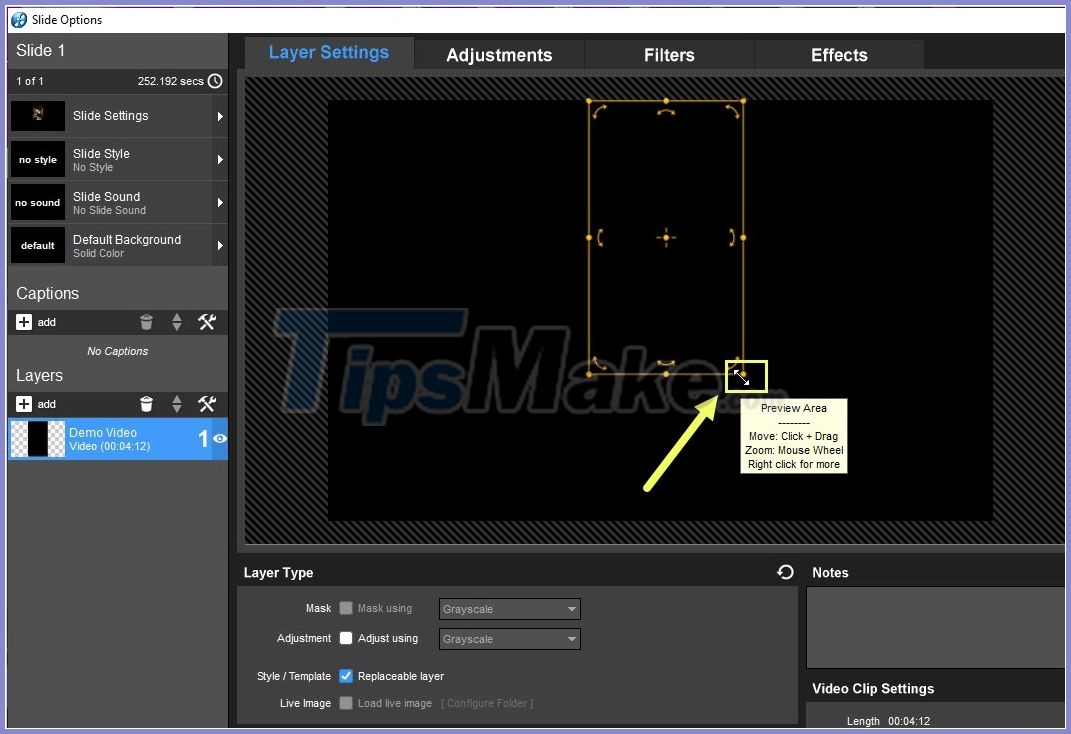
Step 3: When the Slide Options window appears, select Layer Settings (1) and click Trim (2) to open the Video cutter tool.
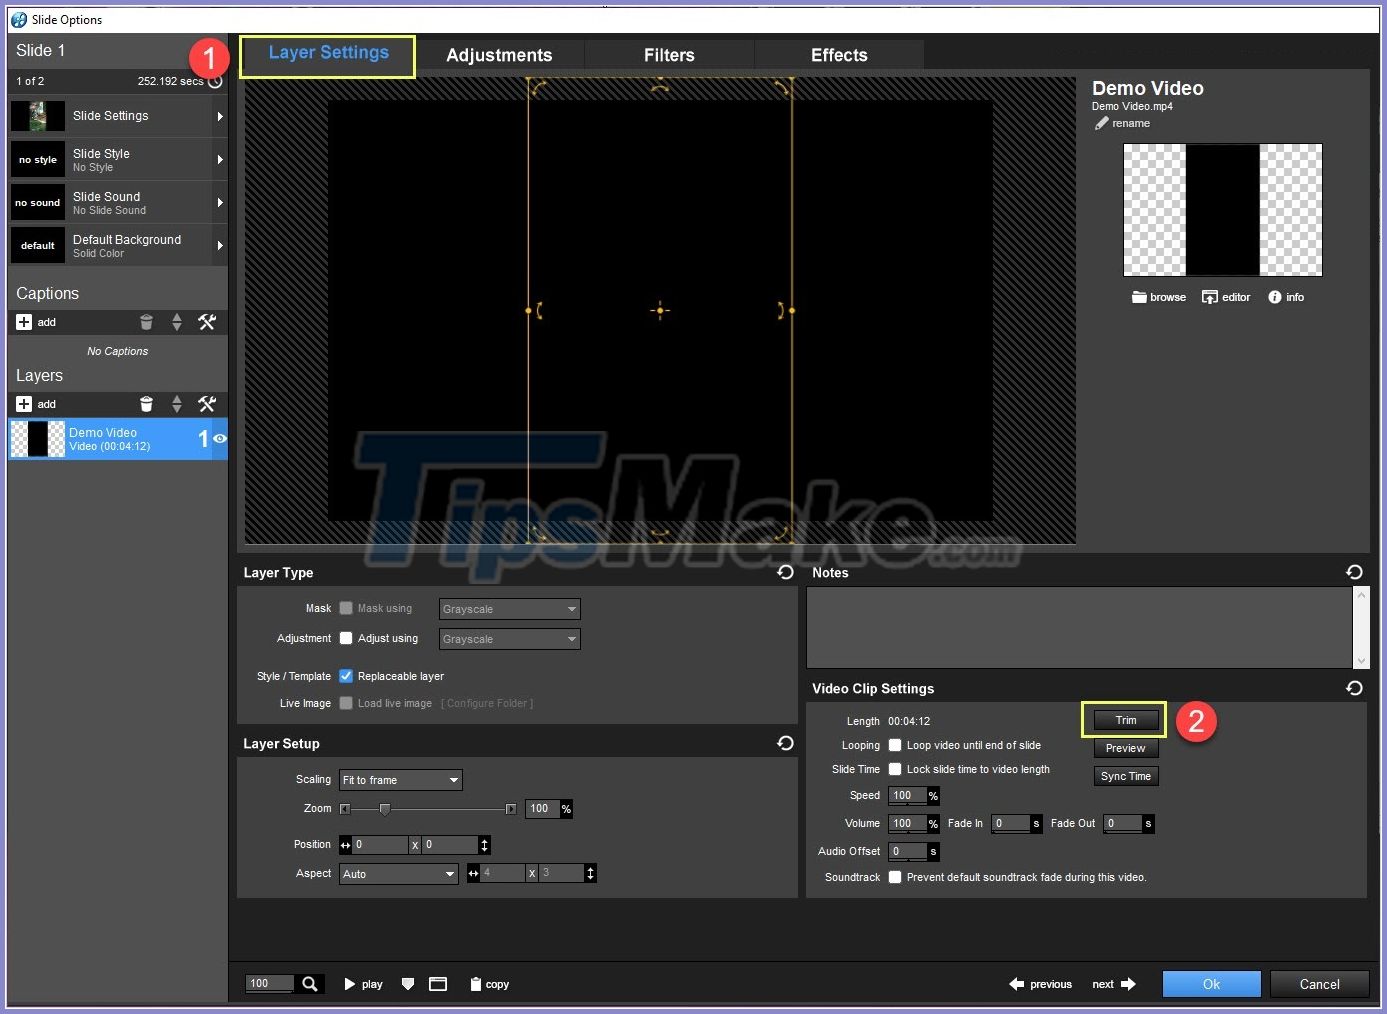
Step 4: At this time, the Trim Video Clip window will appear, drag the first (1) and the last (2) milestones on the Timeline bar to select the video to cut.

In the process of cutting Video, you can drag the Zoom bar to enlarge the selection. When enlarging the selection, you will easily observe the content in the cut and some outstanding frames.

Step 5: After selecting the appropriate cutting area, you need to remember the parameters of the Trimmed to item and click OK to finish.
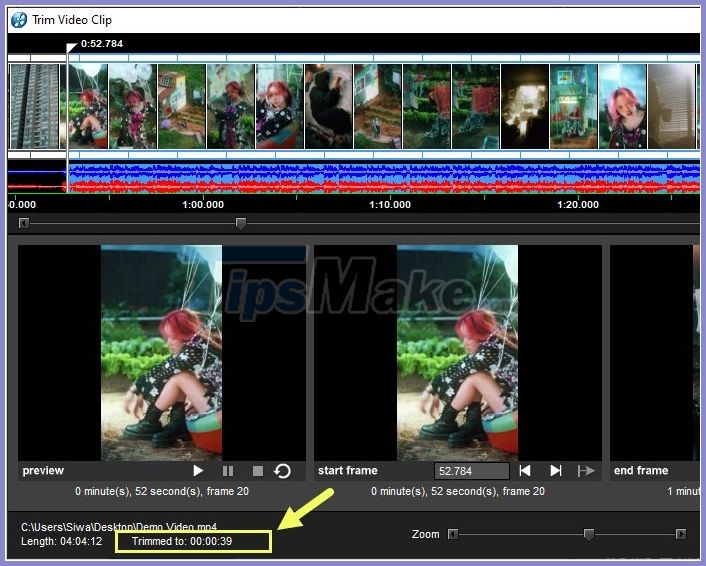
Step 6: After you finish cutting the Video, enter the parameters of Trimmed to (Step 5) into the timeline on the Slide.
The purpose of entering parameters Trimmed to into the time box is to finish the cut video, they will automatically move to the next video (if any).
4.2. How to join Video in ProShow Producer
Merge Video in ProShow Producer is much simpler than cutting Video in software.
To merge Video in ProShow Producer, you just need to drag the Video file to merge into Slide 2 .

In case you need to merge many videos, you just need to drag the next Video files to the next slides.
5. How to cut music in ProShow Producer
Trimming music is another frequently used operation during video editing. TipsMake will guide you how to cut music in Proshow Producer.
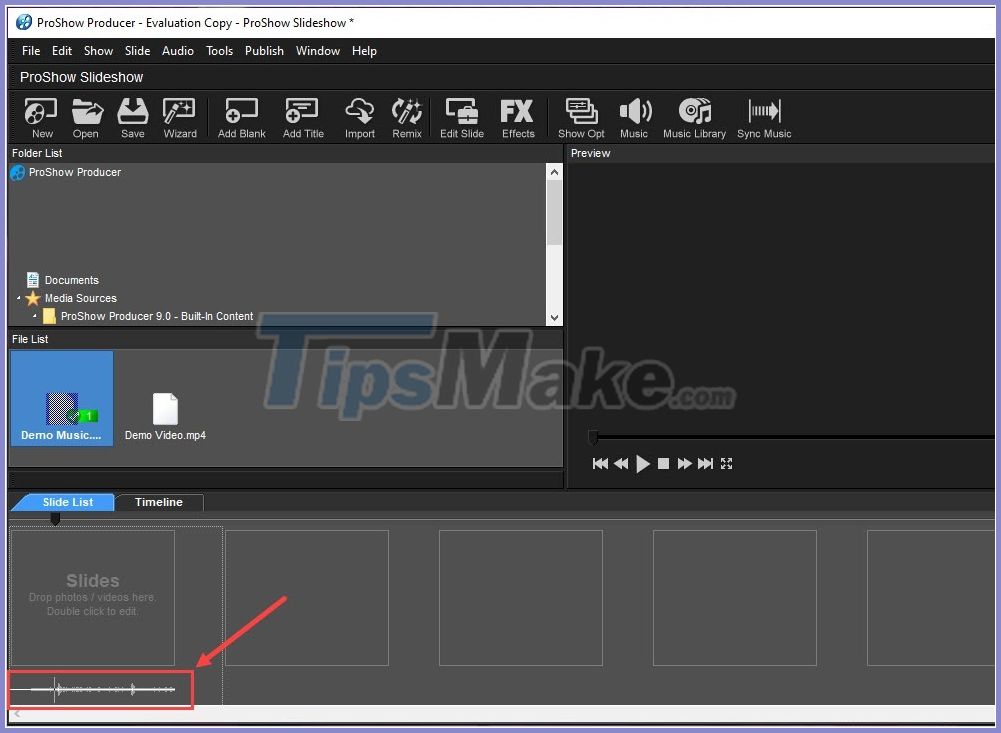
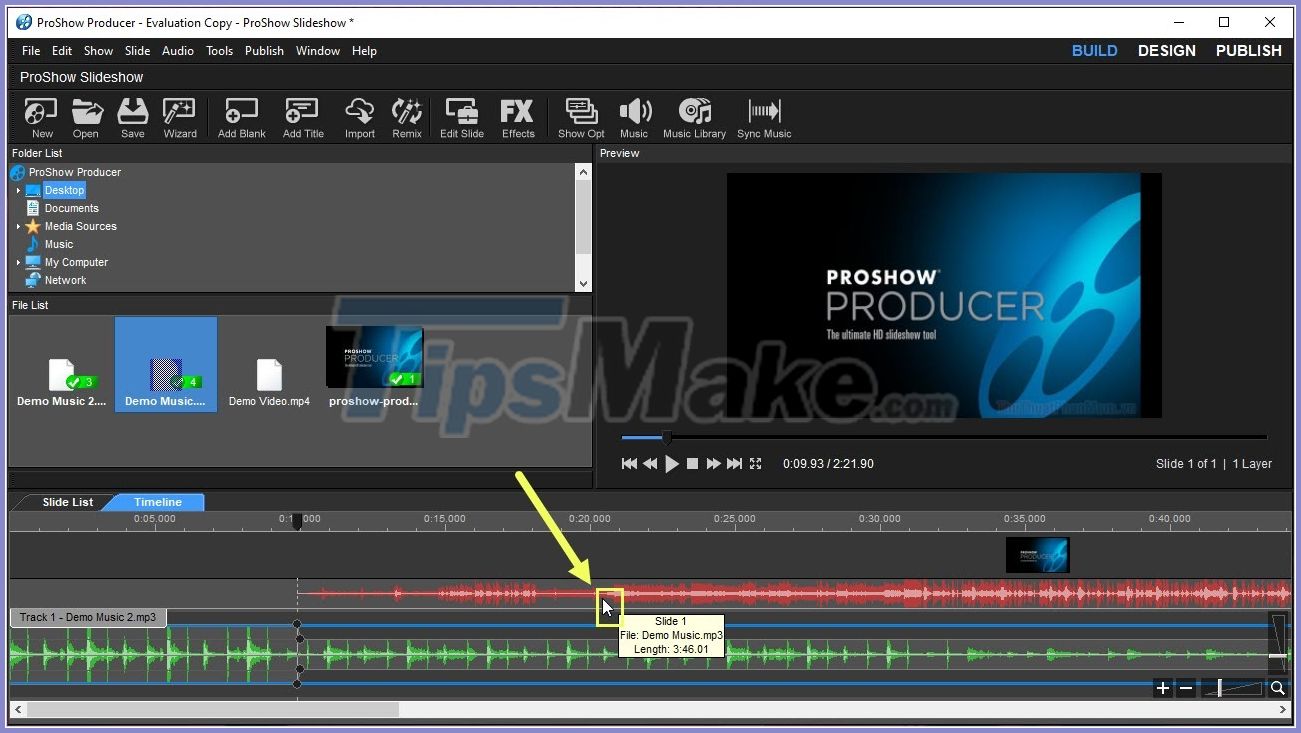
Step 1: First you open ProShow Producer and proceed to drag music files down the Soundtrack bar to work.
Step 2: After the music file has been imported to the Soundtrack bar, the Soundtrack section will display the music waves as shown below.
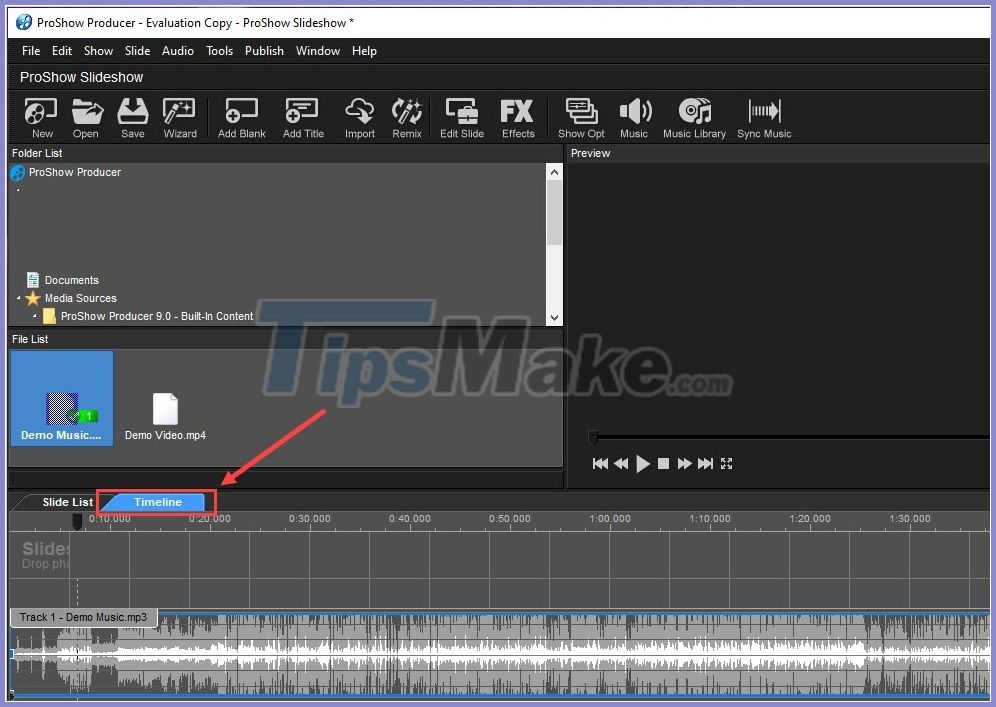
Step 3: Now you need to switch to Time Line to proceed to work with the music files we need to process.
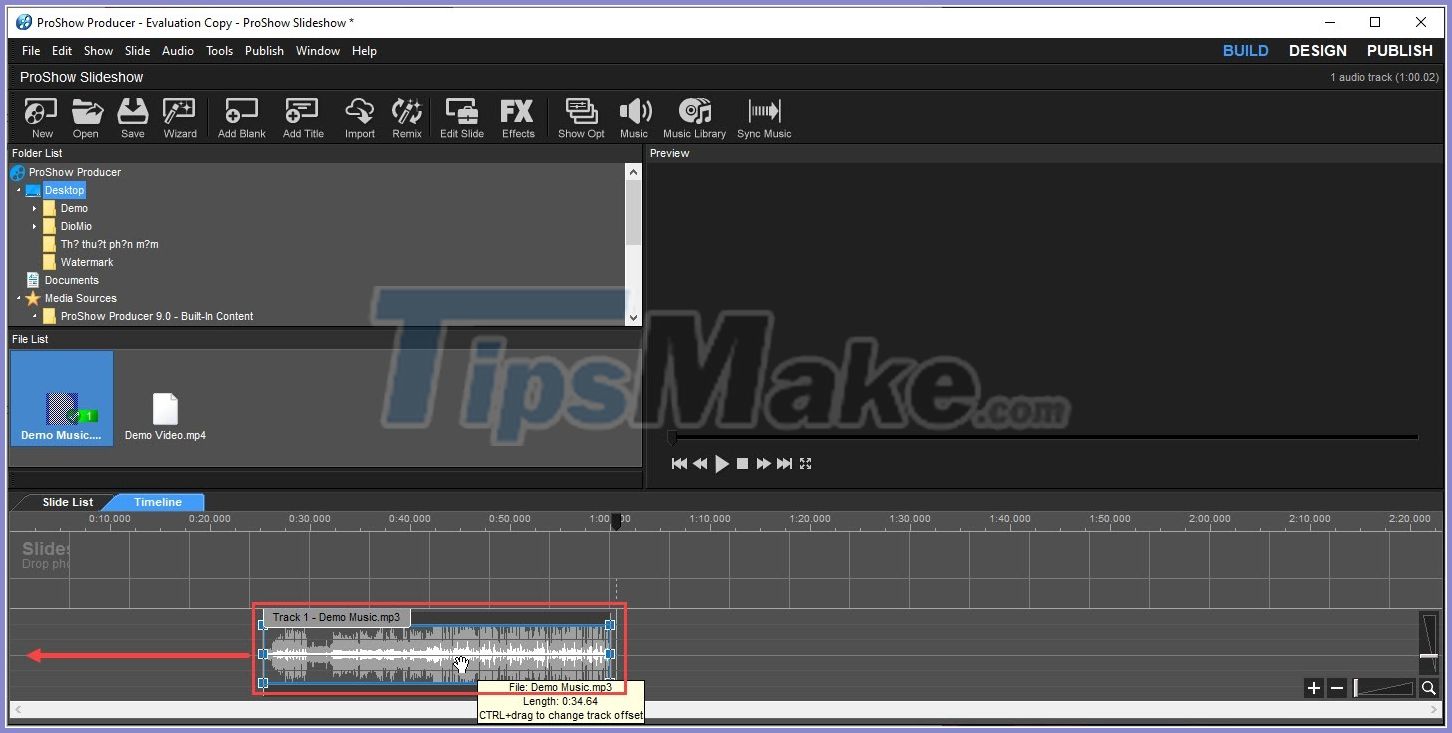
Step 4: In Timeline mode, move the mouse pointer to the bottom of the music file to find the Adjust audio end time point . Now you just need to hold on the End time and drag them to cut the music.
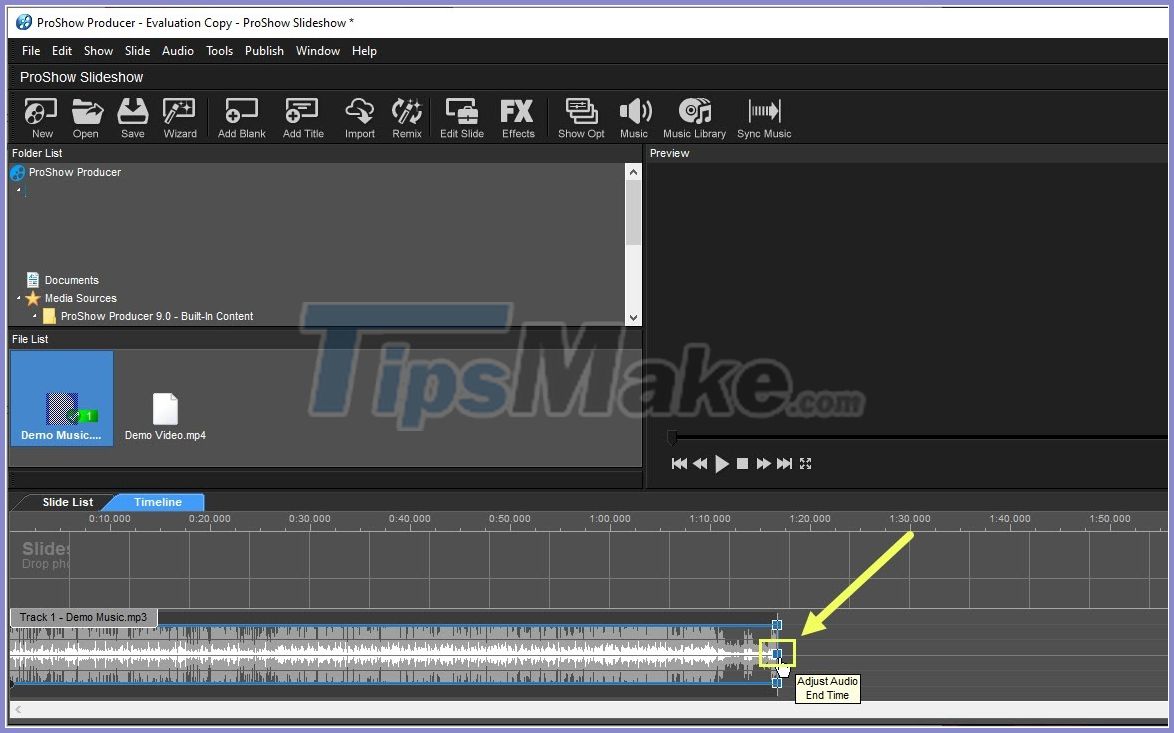
Step 5: Continue to do with Adjust Audio Start Time point to cut music at the beginning.

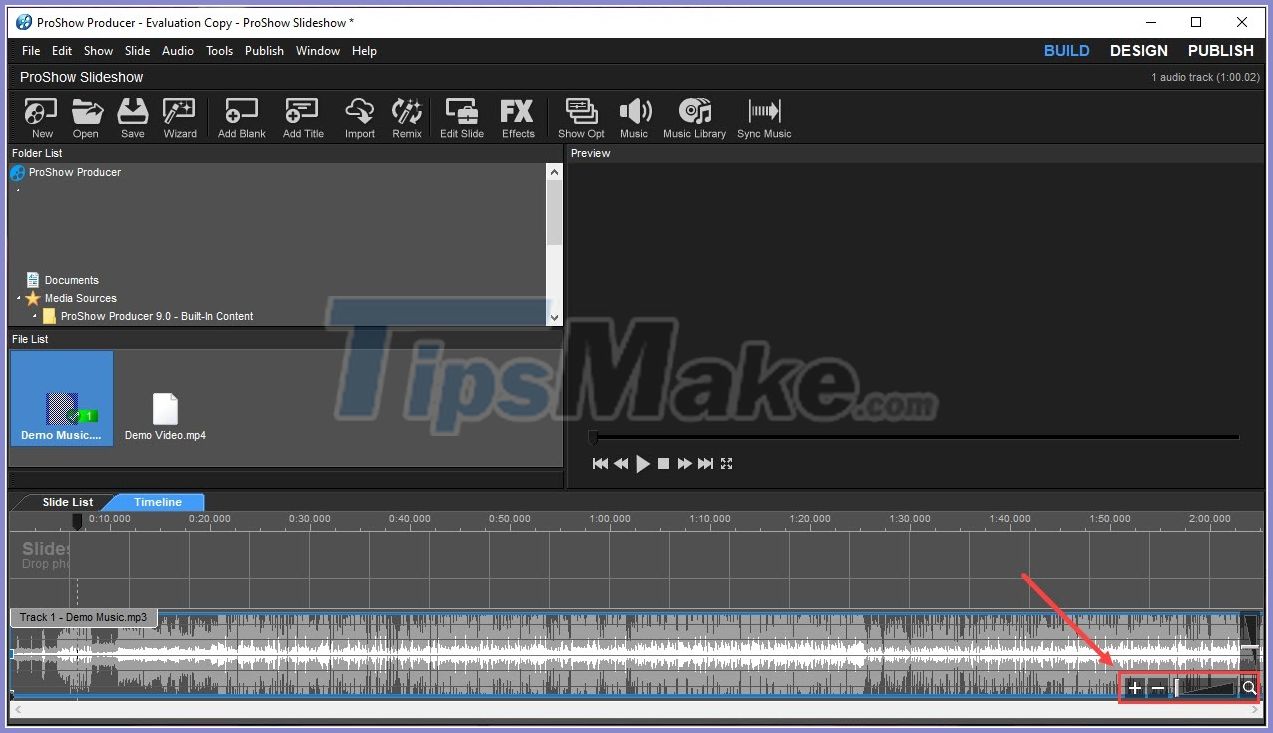
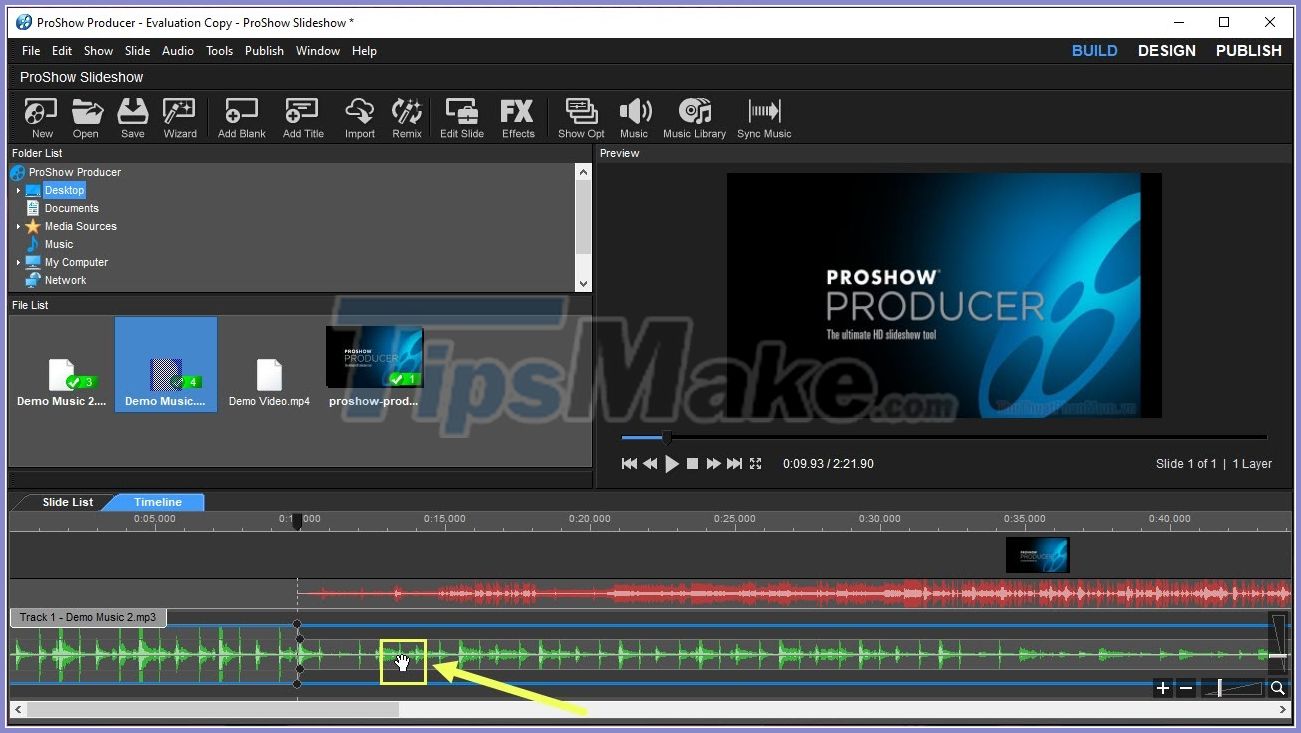
Note: In case the music file is too long and you can not find the Adjust Audio Start Time / Adjust Audio End Time point , please click the (-) or drag the Zoom bar to minimize the sound bar. This way you will see the entire music file, including the starting and ending points.
Step 6: After cutting the music, you will see the music file is located in the middle of the working Timeline and they are being timed out compared to the original. What you need to do is click on the music file and hold Ctrl to show the Drag tool, then you proceed to drag the music file back to the correct starting time .
Step 7: So we have finished cutting music on ProShow Producer software, for other music files you also do the same.

6. How to insert 2 overlapping music files in ProShow Producer
To work with ProShow Producer, users have to get familiar with Timeline and this is also the main interface to work with. I will show you how to insert 2 overlapping music files in ProShow Producer.
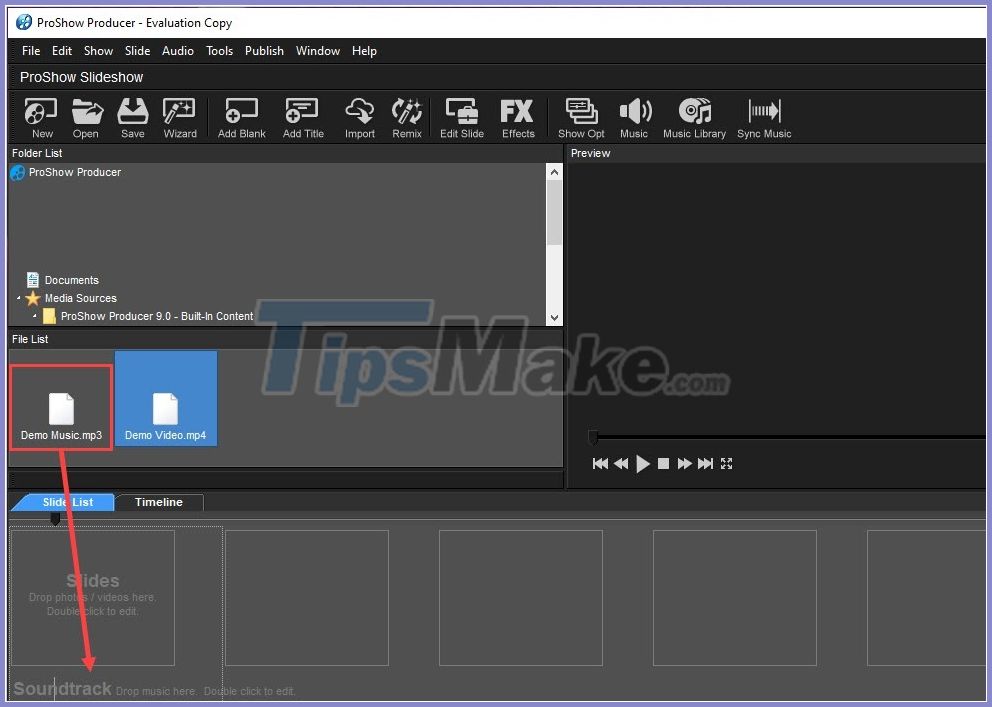
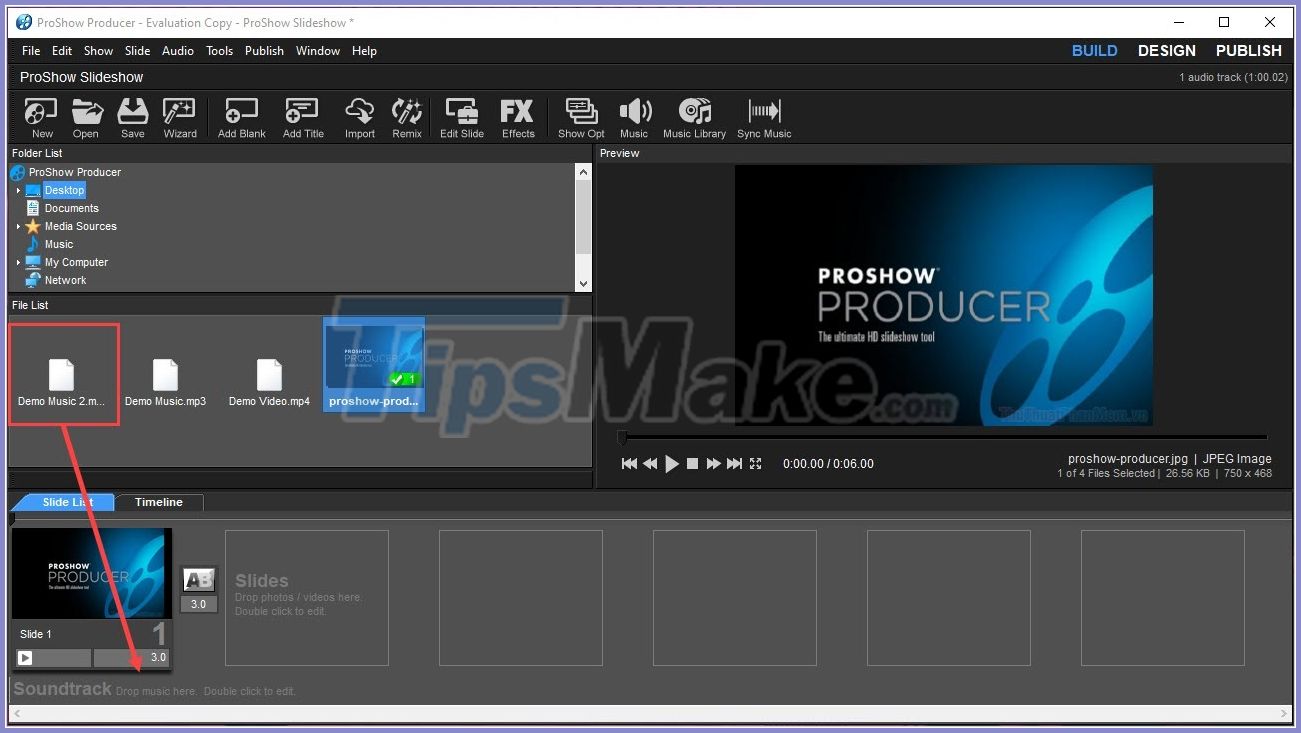
Step 1: First you open ProShow Producer and proceed to add image content, video into Slide List.

Step 2: After adding images and videos to Slide List , you proceed to drag the music file down to the Soundtracks section .
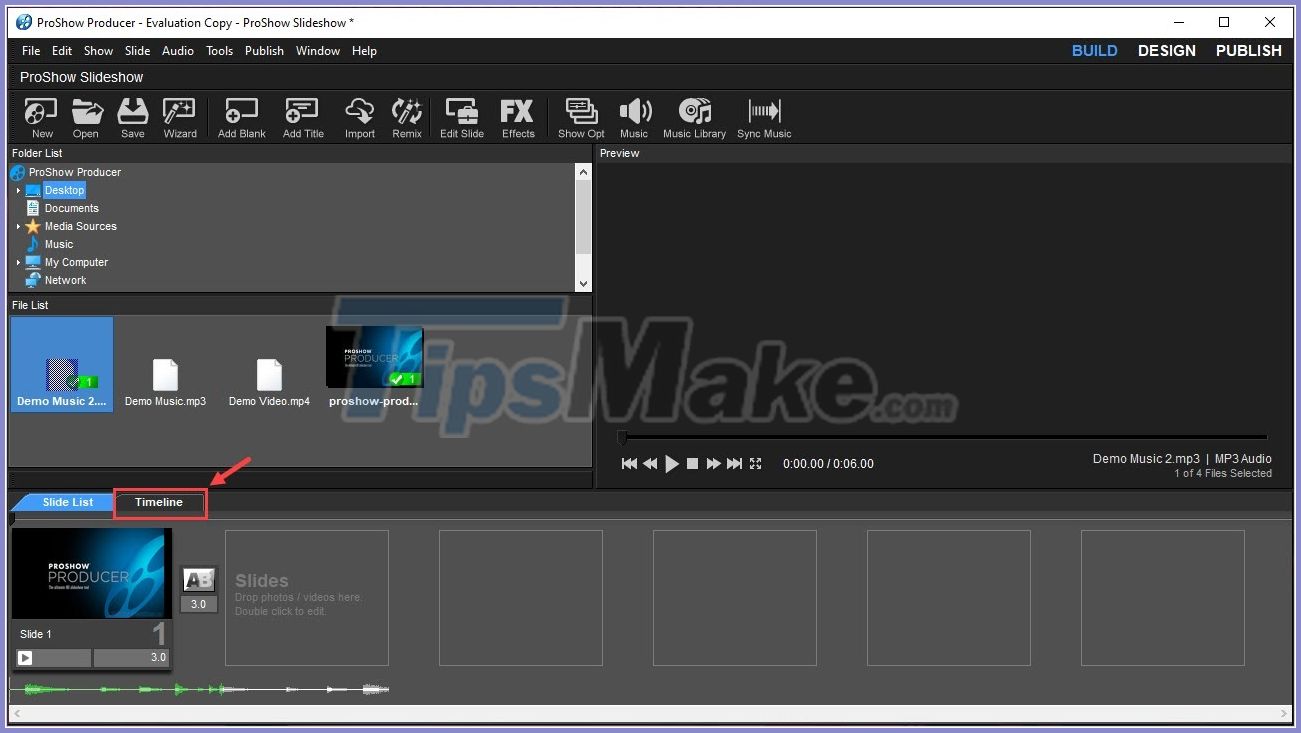
Step 3: On ProShow Producer there is only a part of Soundtracks, so we can only insert one song, to insert the next song you must choose Timeline .
Step 4: In Timeline mode, you proceed to drag the 2nd music file to insert down the Slide bar.

Step 4: So we have inserted 2 overlapping tracks, our rest is to align them so that they match.
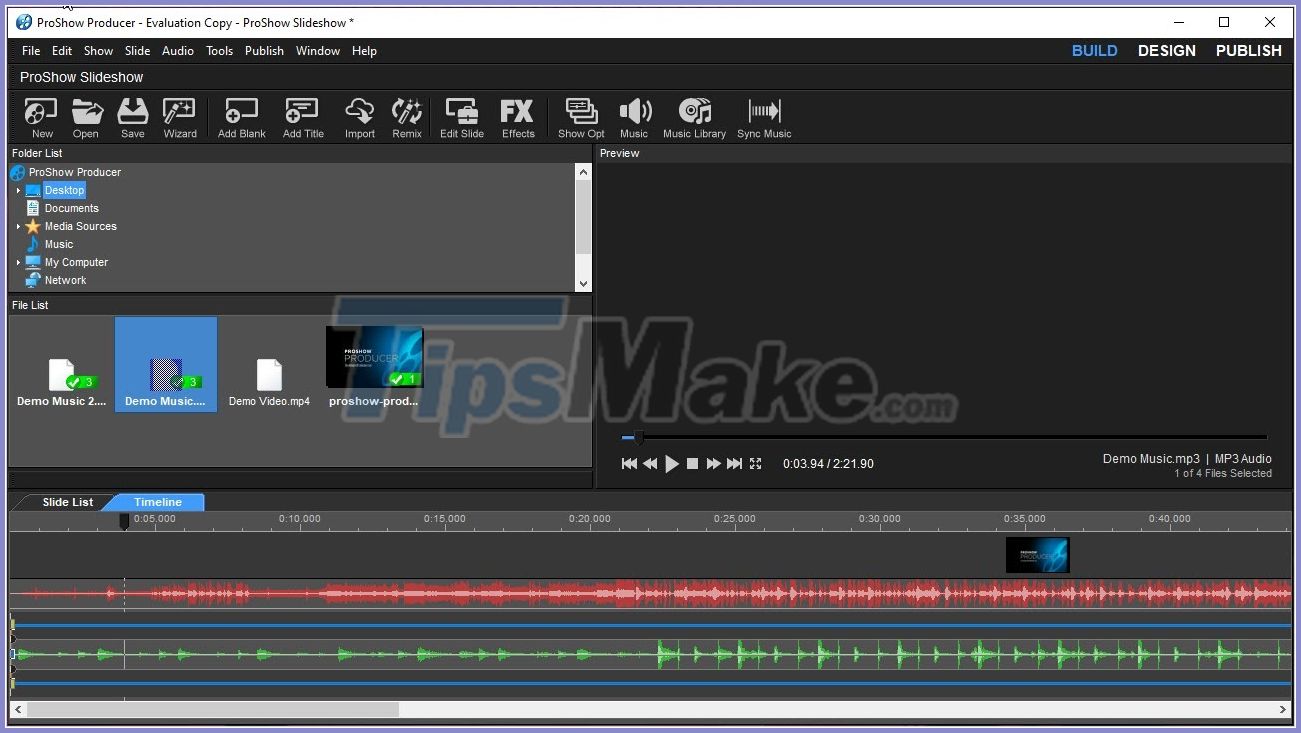
Step 5: Before aligning the music, you press Play (Space) to listen to see what the music will overlap.
Step 6: To move the position of the songs you need to click on the music file and press the Ctrl button , then you drag the music file so that they override the correct paragraph you want.
Step 7: Do the same with the music files below to make the sound as standard and as good as possible.
So you have finished inserting 2 overlapping music files in ProShow Producer.
7. How to insert logo into Video in ProShow Producer
Currently there are many tools to support inserting Logo into Video, but ProShow Producer is always the perfect choice thanks to its simplicity and ease of use.
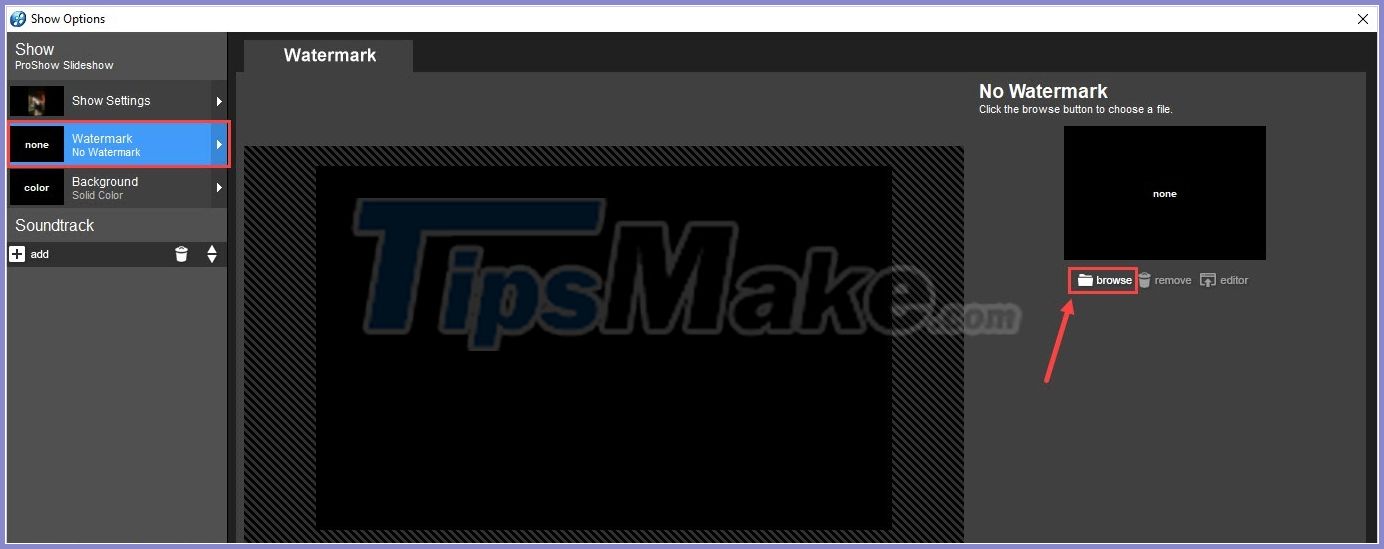
Step 1: First, you need to open ProShow Producer and add Video to Slide List to process the content. Next you choose Show -> Watermark (Ctrl + Shift + Alt + W) to proceed to add the Logo file in the Video.

Step 2: When the Show Options window appears, select Watermark and click Browse to open the watermark file.
Step 3: Next, select the Logo file and click Open to open.
Note: To enhance the aesthetics, you should use the Logo file without background (.PNG format).
Step 4: After selecting the Logo file, the system will automatically process and add the Video for you.
Step 5: In the process of editing the contents of the Logo, you can click the corners to enlarge / reduce the Logo to suit the Video.
Step 6: To move the Logo, you just need to press and hold on them and drag.
Step 7: After adjusting the basic content, you can adjust the color parameters in the Adjustments section . In this section, you only need to care about Opacity - light weight of the Logo.
Step 8: After editing is complete, click OK to save the Logo file content. Now you will see the Logo inside the Video we are working on.
8. How to insert Sub into Video with ProShow Producer
Inserting Sub into Video, most Video editing software support it because this is a very basic feature and all software must have. However, many people work with ProShow Producer so they want to use this software to insert Sub instead of having to download other specialized software. TipsMake will guide you how to insert Sub into Video with Proshow Producer.
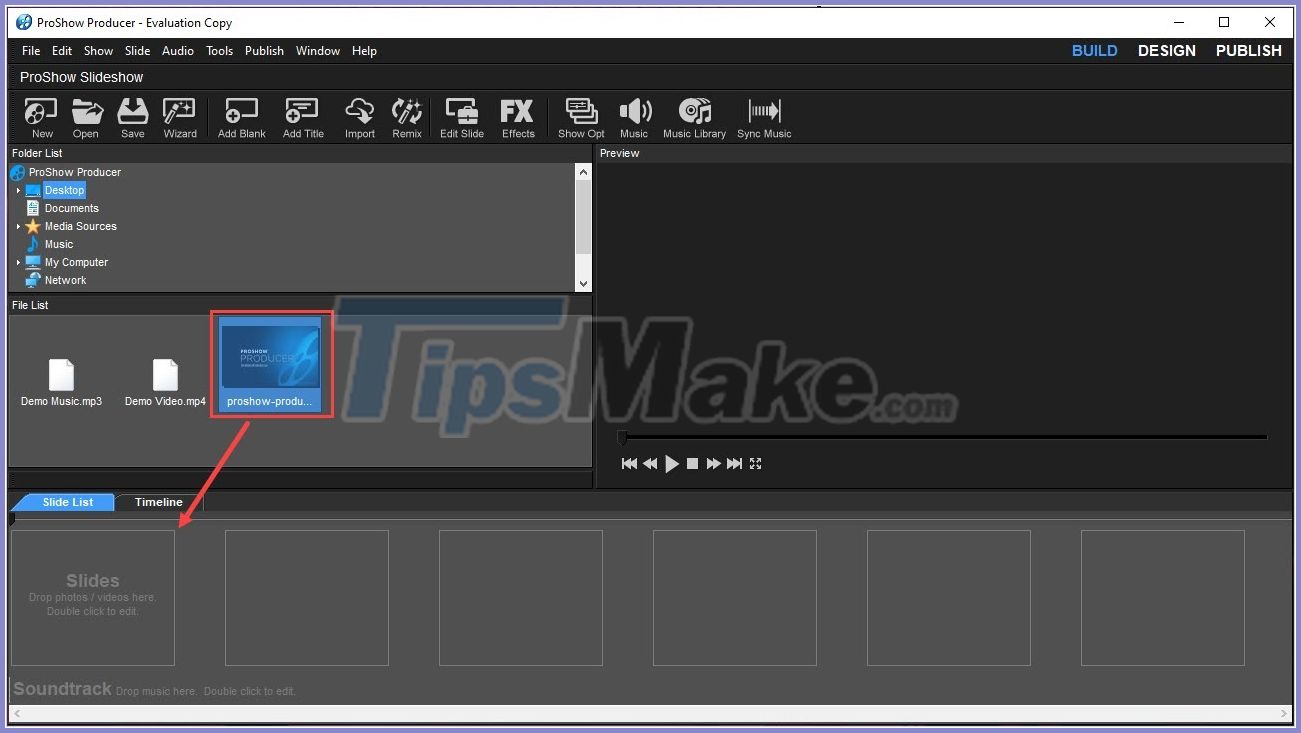
Step 1: First, you need to open ProShow Producer and add images / videos you want to insert Sub into Slide List to work.
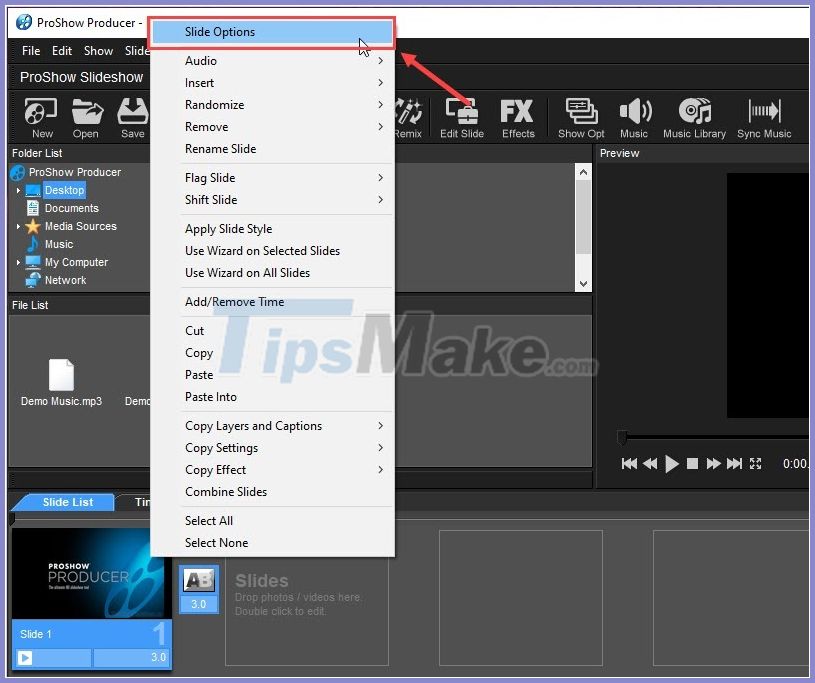
Step 2: Then right-click the Slide to insert Sub and select Slide Options .
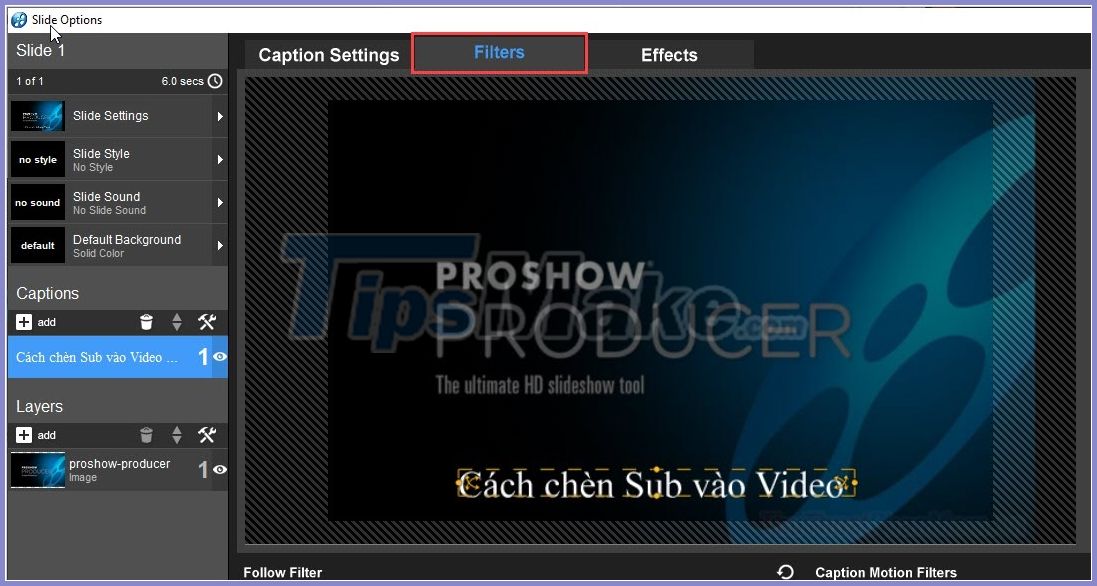
Step 3: When the Slide Options window appears, choose Add at Captions to add text content.

Step 4: At this time, the interface will switch to inserting text, on the right hand, you will have Caption Text window (1) to write text, Sub content and Caption Format window (2) to format text.
In the Caption Format window, you have the following important contents:
- Style: Typography
- Font: Font of Sub
- Case: Text border
- Size: Font size
- Color: Text color
- B / I / T Macro, symbols: Bold, italic, capitalization and special characters

Step 5: Next, you need to switch to Caption Placement to format the text content. Here you will have features such as: Vertical alignment, horizontal alignment, Opacity (light bold), Rotate (rotate text), .
Please choose the formats to suit your Sub content.

Step 6: After formatting is complete, choose Filters to add effects to Sub content.
Step 7: In the Filter section, you have the following important contents:
- Fly in: Text effect when appearing
- Nornal: Text effect when displaying
- Flyout: Text effect when finished
If you have downloaded text effects online, select Browse to open them.

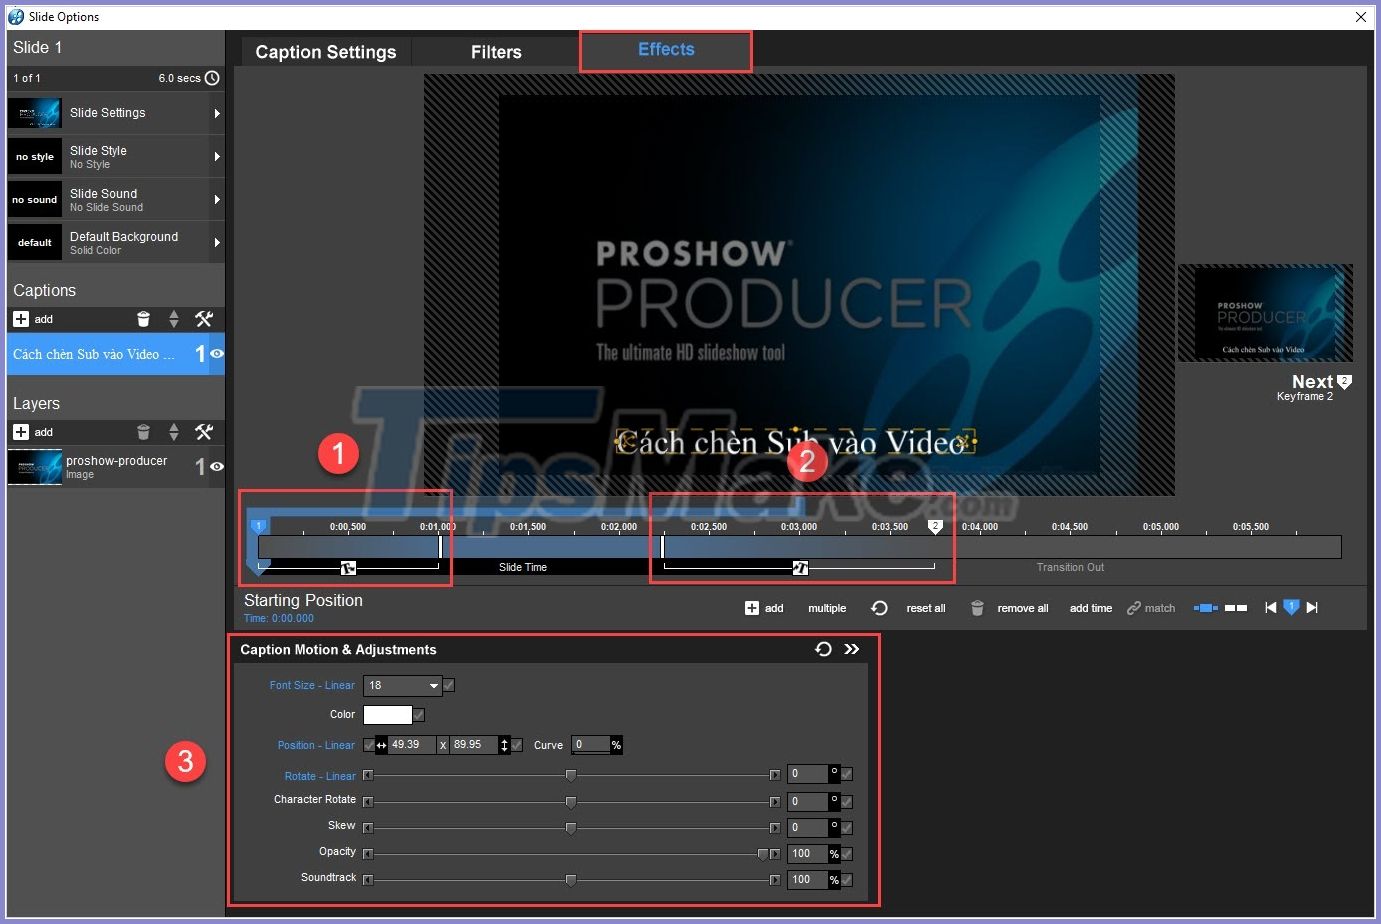
Step 8: Finally, you select the Effects section to edit text effects, here you need the following important things:
- Text effects when appearing: Adjust the time for text when appearing
- Ending text effects: Adjust the time for text when finished
- Caption Motion & Adjustment: Some advanced text formats.
After completing, you click OK to return to the working interface of ProShow Producer, here you click Play to see the Sub we just added.
9. How to resize Video in ProShow Producer
When working with Video content, we cannot avoid the size deviation due to different Video sources. To solve the problem of size deviation, perhaps there is only way to enlarge / reduce the Video to fit a common size on the screen.
ProShow Producer tool is chosen by many people to edit Videos and that includes Video resizing. I will guide you how to resize Video in ProShow Producer.
Step 1: First, you need to open ProShow Producer and drag files / images / videos down Slide List to work.
Step 2: After the file is imported into the software, double-click the Slide to adjust the size.
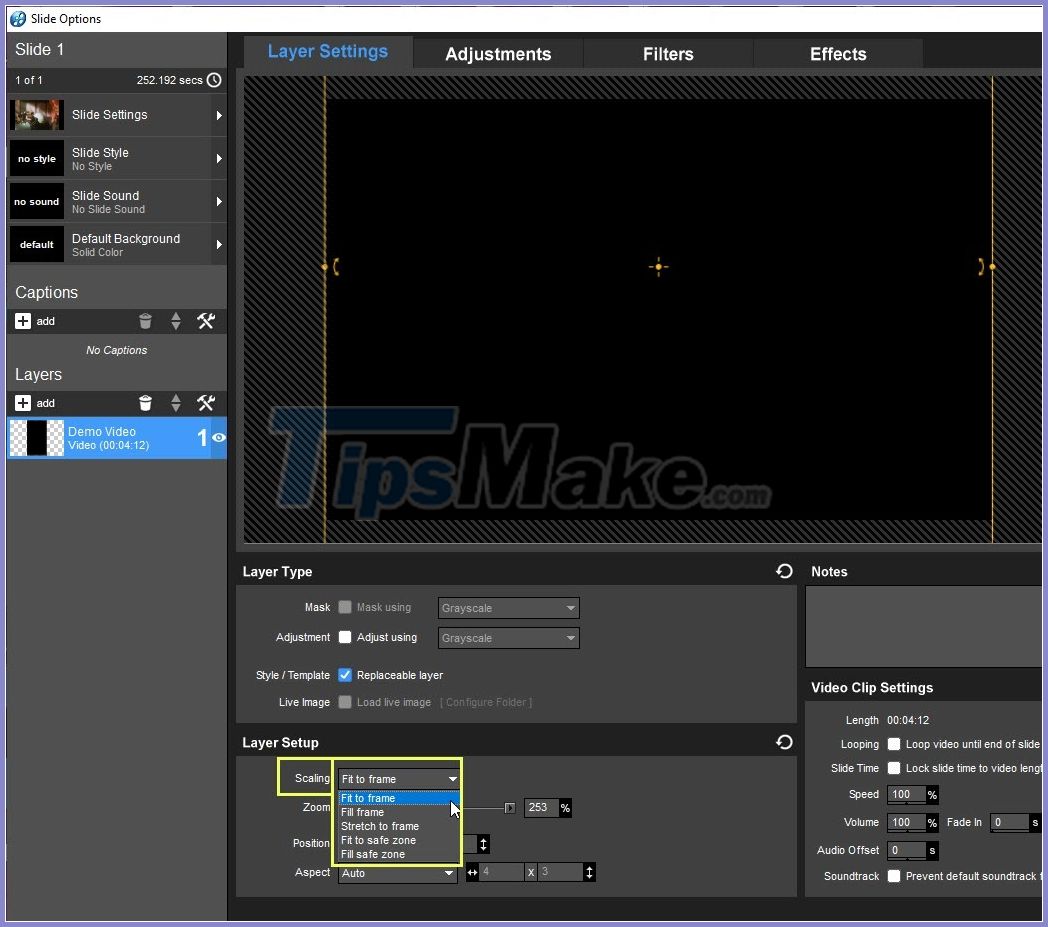
Step 3: When the Slide Options window appears, choose Layer Settings to adjust the Slide-related parameters.

Step 4: At the interface of Layer Settings, we will have 04 ways to adjust the video's size. The ways to adjust the size of the Video in turn are as follows:
Method 1: Adjust the size with the parameter ruler
To adjust the video size with the parameter ruler, you need to adjust the Zoom ruler in the Layer Setup section. In addition to dragging the ruler, you can also enter the% you want to enlarge / reduce right in the next box.

Method 2: Intuitive size adjustment
In some cases you need flexible and precise adjustments, you should adjust through icons on the corners of the Video. You just need to click and hold on the 'circle' at the corners and drag them.
Method 3: Adjust the size by roller
To adjust the size of Videos quickly, you can use the scroll wheel to enlarge / reduce them.
Operation: You just need to scroll up or down to zoom in / out Video.
Method 4: Adjust size visually
In addition to the above methods, you can also choose the pre-equipped zoom in / out modes for the most accurate content.
In the Sacling section , you have the following parameters:
- Fit to frame: Automatically adjusts to fit the frame (both horizontally, vertically)
- Fill frame: Automatically fills the frame (applies to the missing dimension)
- Stretch to frame: Stretch to fill the frame
- Fit to safe zone: Automatically adjusts to fit the working area
- Fill safe zone: Automatically fills in the working area
10. How to export files in ProShow Producer
After editing videos, you will need to export the files to use them and save them. TipsMake will guide you how to export files in ProShow Producer quickly and effectively.
Step 1: At the main interface of ProShow Producer, you proceed to select Publish to export the file.
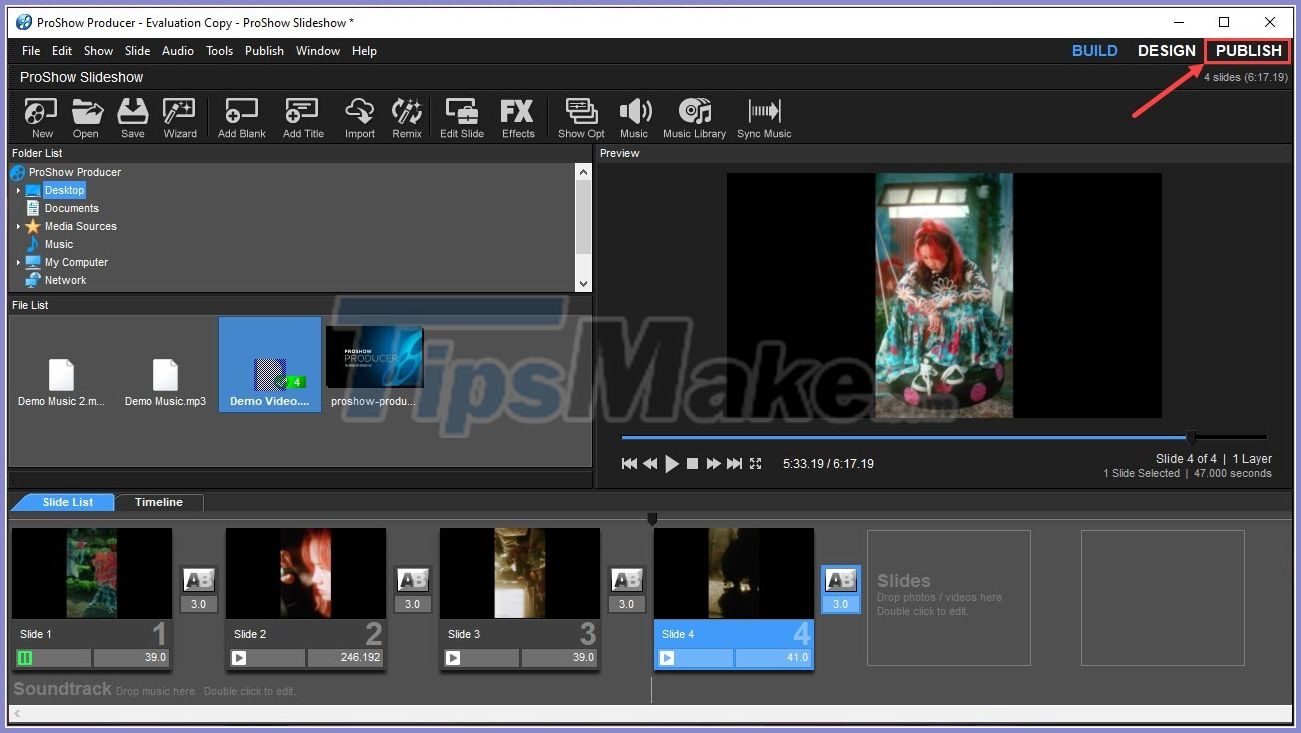
Step 2: At the main interface of the Publish section , you will have many different file export modes such as DVD, USB, MP4, Youtube, Facebook, Vimeo, .

However TipsMake encourages you to only export the file in MP4 format because this is the most basic format of Video and can be used in all different cases.

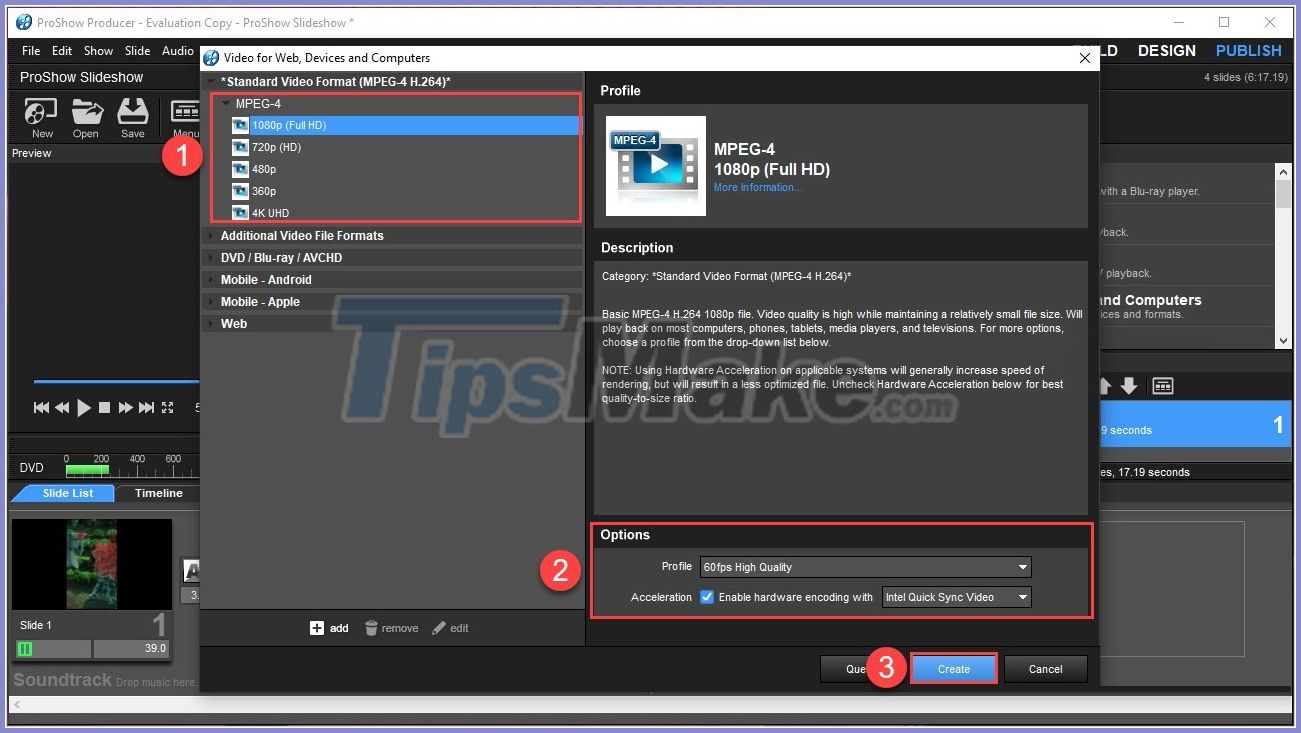
Step 3: After selecting the export mode, an Export window will appear and you need to pay attention to the following information:
1. Video Quality: We export the file in MP4 format so you can choose the quality of Video. ProShow Producer software supports maximum image output under Full HD quality.
2. Options: In the Options window you can set Fps (the number of frames), the higher the number of frames, the higher quality and heavier the video is. Additionally, we will have Intel Quick Sync Video, which is a feature that uses iGPU in Intel CPUs to export files faster.
3. Create: After the setup is complete, you choose Create to export the file.
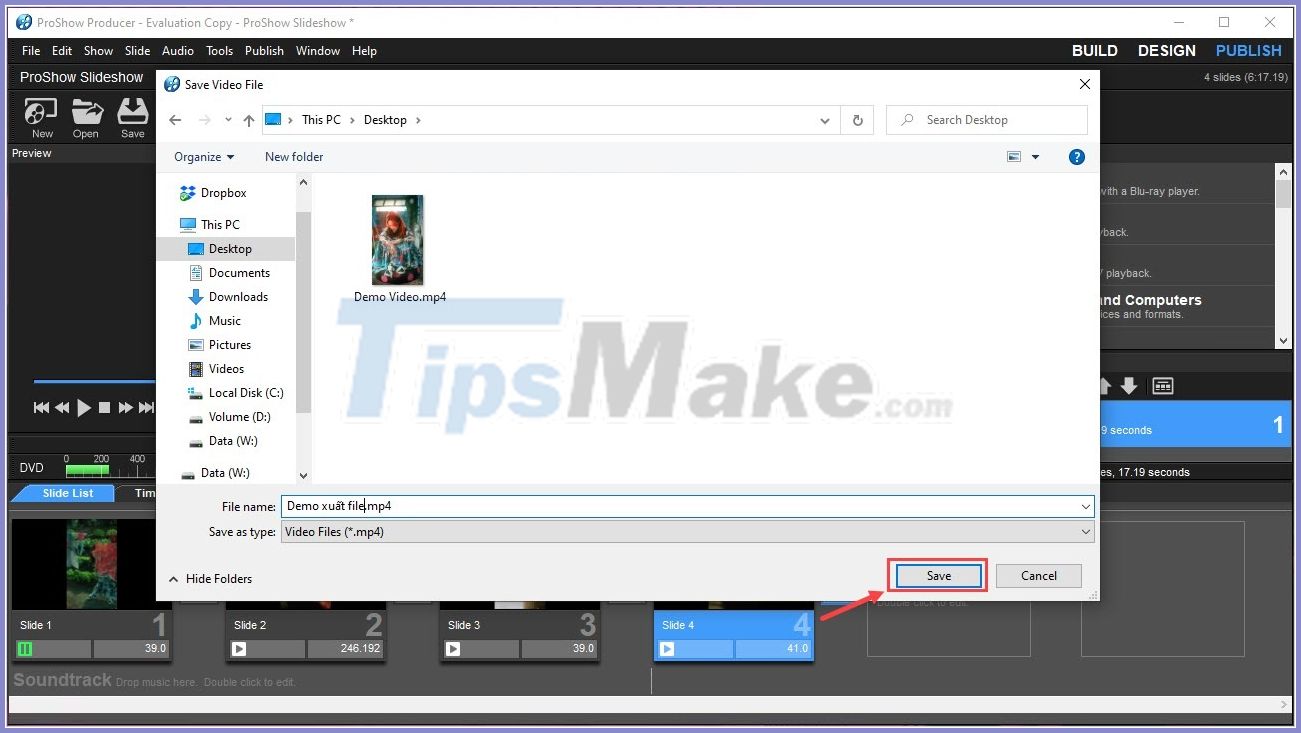
Step 4: Next, you need to name the video and choose a storage folder for the file on your computer.
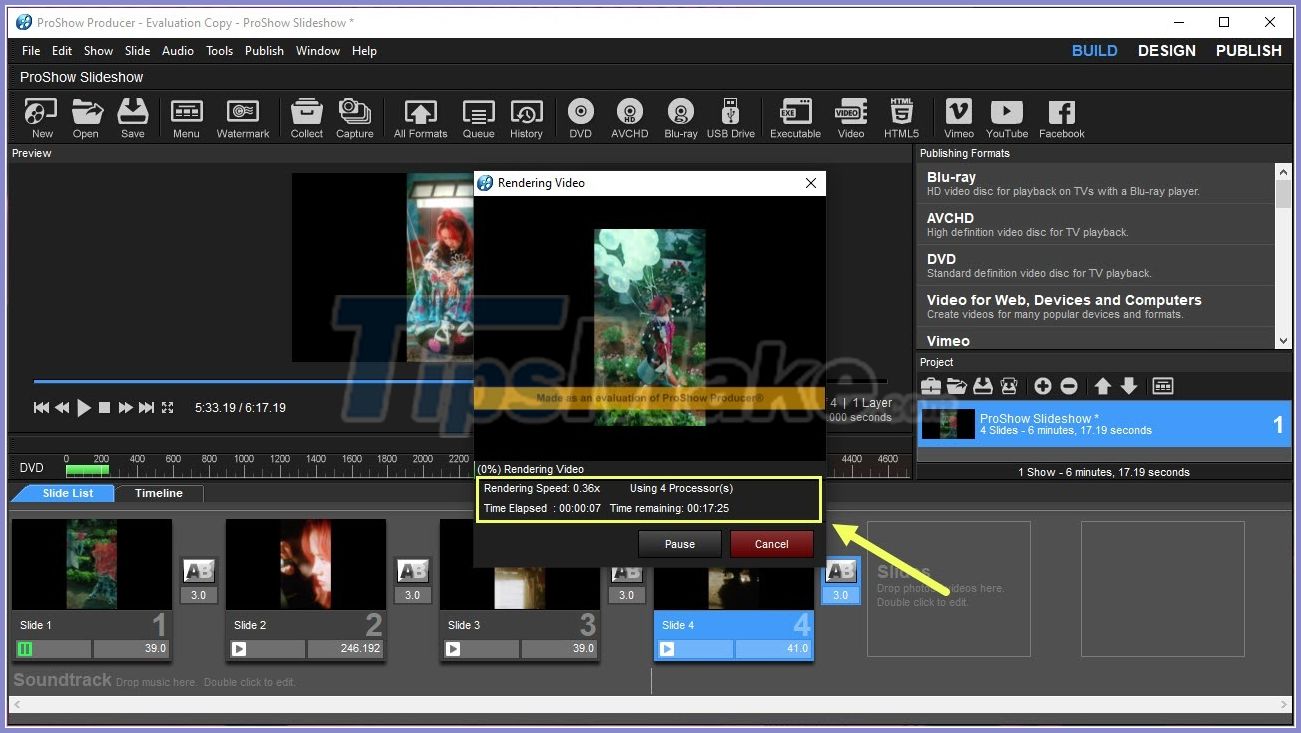
Step 5: The system will automatically export the file for you, in the Video Rendering window you can monitor the information as follows:
- Rendering Speed: Export speed
- Using: The number of CPU cores used to output the file
- Time Elapsed: Time to run the file export
- Time Remaining: Time to export the remaining file (expected)
Was this article helpful?
Your feedback helps us improve.
Related Articles
 How to write Vietnamese in Proshow Producer2 minutes read
 Instructions to use ProShow Producer to make professional videos10 minutes read
 Insert logos into videos with Proshow Producer5 minutes read
 How to use Proshow Producer to create video from photos, create photo slides6 minutes read
 How to create videos from photos with ProShow Producer quickly and professionally5 minutes read
 How to make music waves with Proshow Producer2 minutes read
Reader Comments 0
Sign in with email or Google to join the discussion.