Instructions on how to use Proshow Gold for new users
Instructions on how to use Proshow Gold for new users. ProShow Gold is designed to help users quickly create slideshows from their personal photo and video files to record memorable and wonderful moments. Integrated nh
Currently, there are many people who want to make a video of their own souvenir photos, wedding photos or yearbooks, etc. to share with friends and relatives or save as a souvenir. Of course, in order to create a beautiful video slide show, you will need a dedicated software, image creation software, there are many Proshow Gold software. ProShow Gold is designed to help users quickly create slideshows from their personal photo and video files to record memorable and wonderful moments. Integrated many color editing effects, images, smart fonts, unique bring you spoiled creativity, design on video donations for relatives and friends. In this article, TipsMake.com will guide you through the basic steps to use Proshow Gold software to create stunning video images.Please follow along.

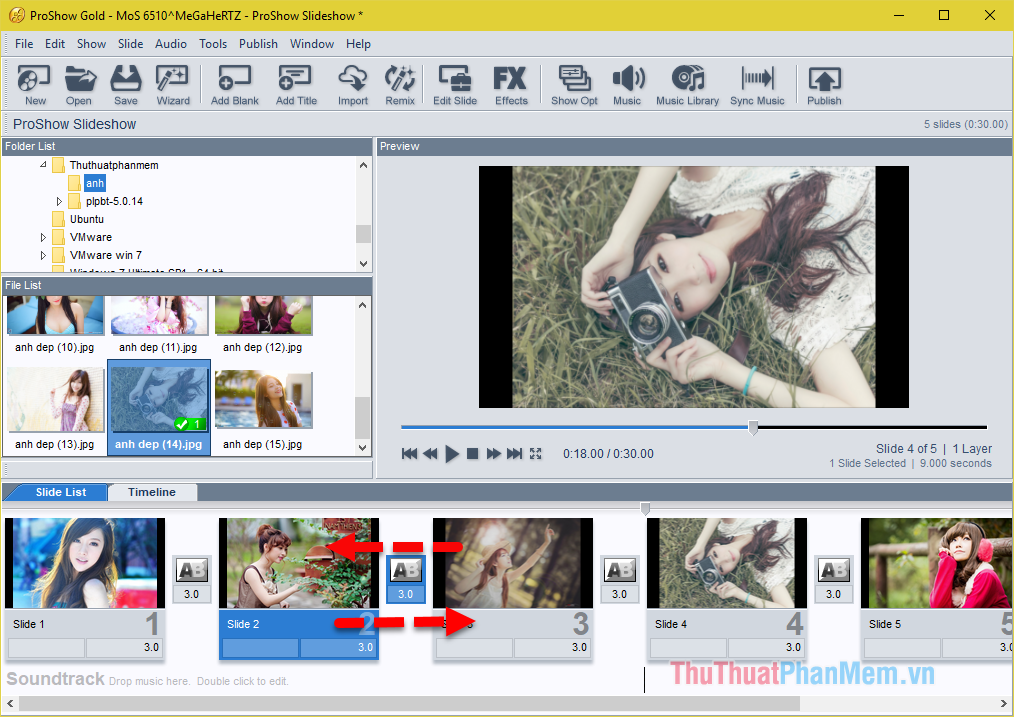
First we will take a look at the interface of Proshow Gold software

- Toolbar : File, Edit, Show.vv. And New, Open, Save buttons, etc.
- Folder List : This is the window that shows the folders in your computer where you can search for images, videos, and tools for making slides. The note you should not put folders with Vietnamese names accented because when making videos prone to errors.
- File List : this is the window that displays the images and videos contained in the folder. When you click on a certain photo or video folder in the Folder List, the files in that folder will show up in this window.
- Slide List : this is our main working area. Here we will create effects, insert photos, sound for video.
- Soundtrack : where we insert audio for the video
- Preview : this is the screen for us to preview the video in the making process.
STEPS TO CREATE PHOTO VIDEOS WITH PROSHOW
Step 1: Find the folder containing the image files to make a video in the Folder List window. Then the images in the folder will appear in the File List window as shown below.

Step 2 : You can drag and drop your favorite photos to the boxes below. Or if you use all the images in that folder, you can press Ctrl + A to select all and drag to the bottom. Normally we do it, the image inserted there.
Note : the names of the photos must be Vietnamese without accents or without special characters, otherwise the software will be defective.

After selecting photos you can change positions between different photos by drag and drop.
After inserting the image, you can click test video, of course the video will be very boring because there is no slideshow effect and no music:

Step 3 : To add a slideshow effect for each photo let's double click on that photo.
A new window appears, select one of the topics in the Slide Style section, then the next section will display a list of effects for you to choose. When choosing a style, it will be demoed on the screen above for you to see, if you like it, then click Apply to apply.

Note that some effects will require multiple images to run, for example the effect below records 5 layers so we will need to insert 5 different images into that effect. To add photos you need to apply that effect first.
Then in the left column you will see the photos are empty, select a blank photo and click the Browse button in the right pane of the screen and then select the photos you want to insert in the photo folder.
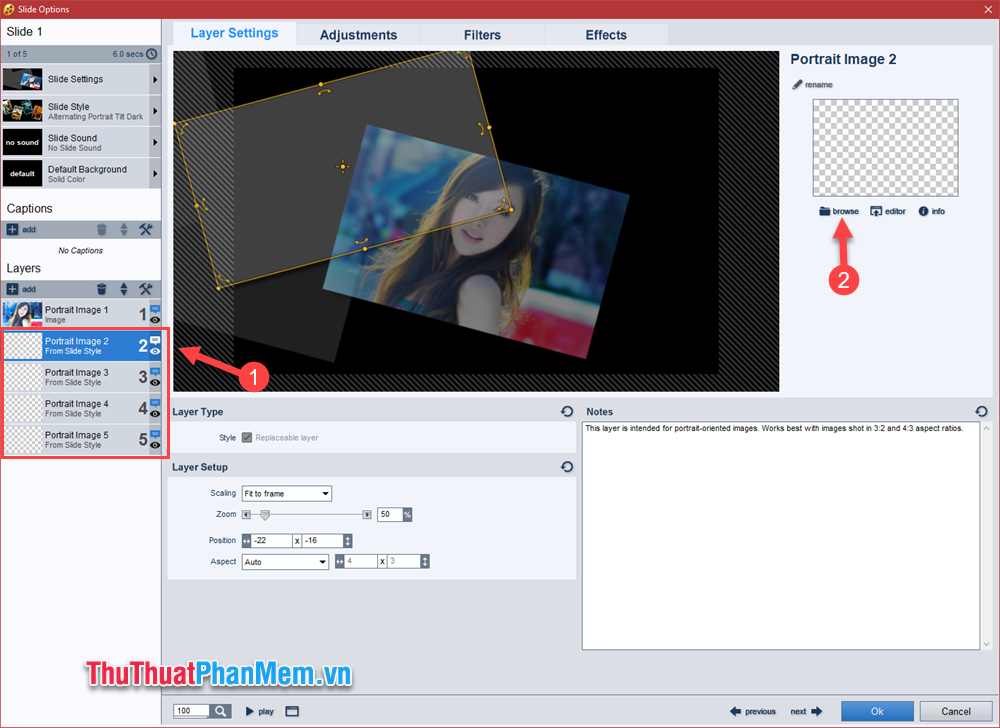
Do so with the other photos until there are no more pictures available and click OK.

You can now test run and see your results

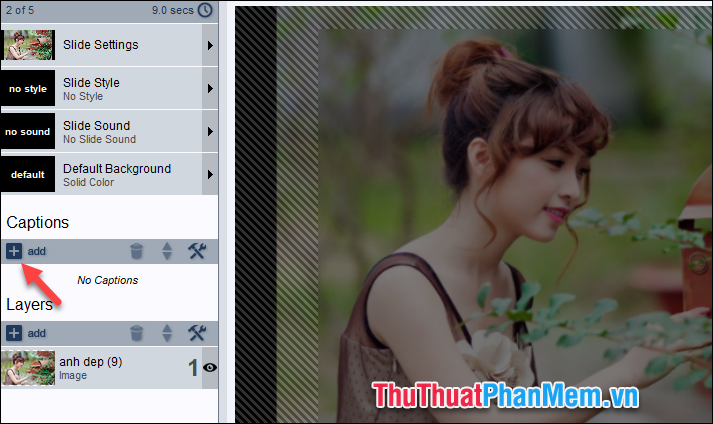
Step 4 : To insert text into the image, you also double-click the picture and then look to the left column with Captions section, click the add button +
Then on the right screen will appear a blank box for you to enter the content you want to write on it and the text will appear on the screen. The area below will be the place for you to customize the font, size, font color.

If you want to write accented Vietnamese, you must install the font .VNI or .VN, then you open the Unikey software and choose the typing method according to one of the following types:
For TELEX + VNI typefaces, use the encoding: VNI Windows
For TELEX + font type .VN, use the encoding: TCVN3 (ABC)
For VNI typing method + VNI font, use the encoding: VNI Windows
For VNI typing method + font .VN, use encoding: TCVN3 (ABC)

Now you can write accented Vietnamese in the software, even though the word box is still font error, the font displayed in the video is not error.
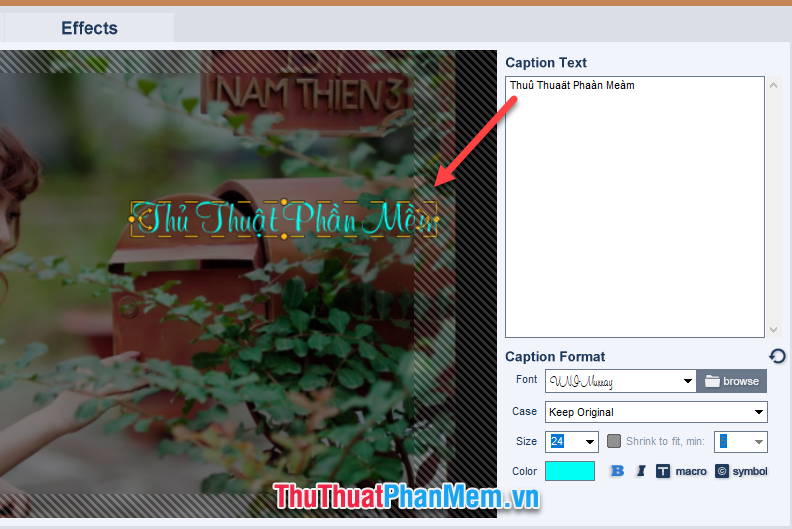
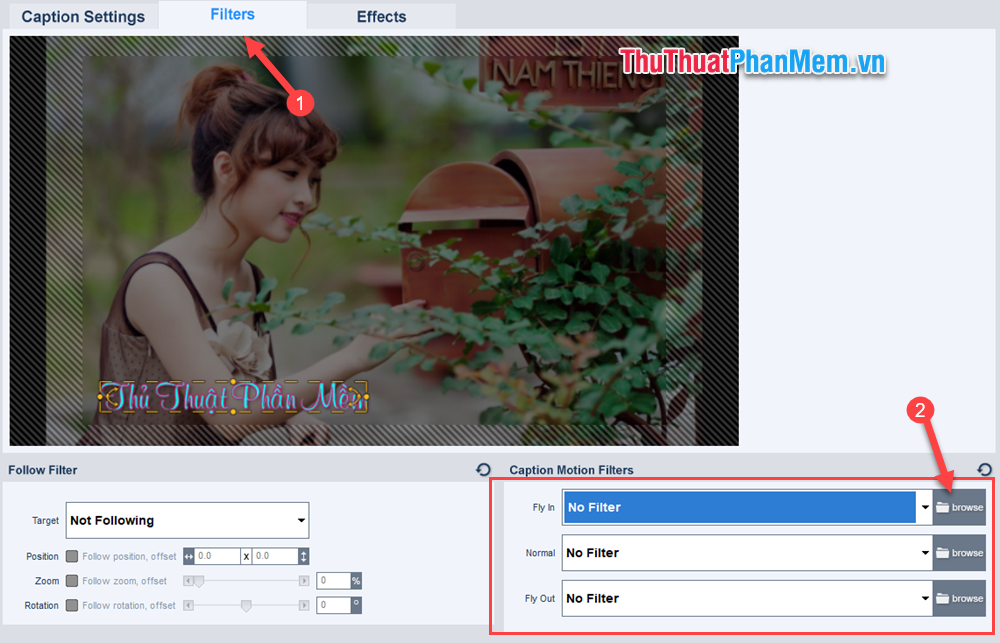
Next, to make the text in the video more vivid, we will adjust the effect for the text by selecting the Filters tab above, then below the video you will see 3 items: Fly in (effects when the text appears) , Normal ( text effect) and Fly Out (effect when text disappears).
You click Browse to select the effect for the text:
A new window appears, select the effects in the left column when satisfied like click OK to confirm:

Step 5 : So we have basically inserted the effects for one photo, you do the same with the other photos.
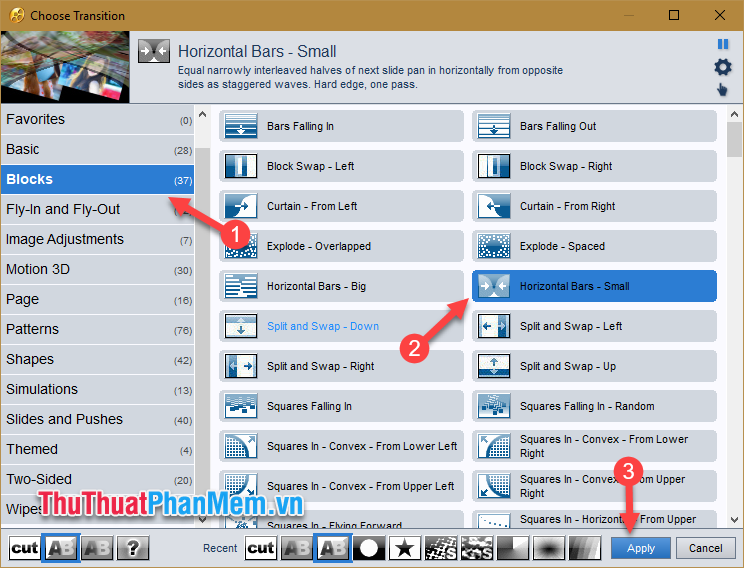
Back to the main screen you'll see between each picture there is an AB button, this is where we adjust the transition effect. This is the effect when you finish running this image and move to the next image, double click the button to change the effect.

A new window appears in the left column which is a list of transition effects, in the middle is the effect you can choose. When choosing a certain effect, you can see that effect performed in the small screen on the upper corner, when you're satisfied, click Apply.
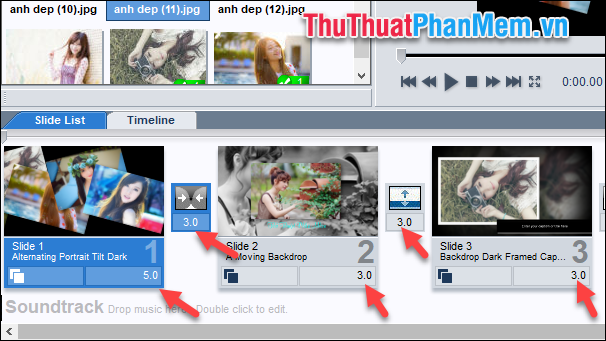
Step 6 : After you have applied the effects for images and transition effects, you notice that under each picture and transition effects, there is a number of 3.0. This is the time when an image appears in the video and the time to show the transition effect. Default every photo is 3 seconds appears, you can click on it to change the time.
Step 7 : A video image wants to be perfect, of course, it is indispensable for the background music, select your favorite music and drag down the Soundtrack , just like when you drag and drop photos.
Note : The name of your music files must not be hidden.

You can double click on the music to adjust the volume or effects at the beginning and the end for the music:

Note : Please adjust the number of photos and the length of time each photo appears so that it matches the length of the music so that when the music runs out, it will be the end of the image.
And experience for you to make videos with images and music match, then you scale and calculate as follows:
Let's say your song is 3 minutes and 30 seconds long, which is 210 seconds.
Meanwhile as before, I set the time to run one side of the image for 5 seconds + the effect when transferring photos is 3 seconds. So the total time to switch to the second photo is 8 seconds.
==> 210/8 = 26. So with a 3'30s long song you will need 26 photos, which means that the music runs out, it also fits the whole picture.
At this point, you can check out your video:

After you are satisfied with your video, you can export the video and save to your computer, how to do the following:
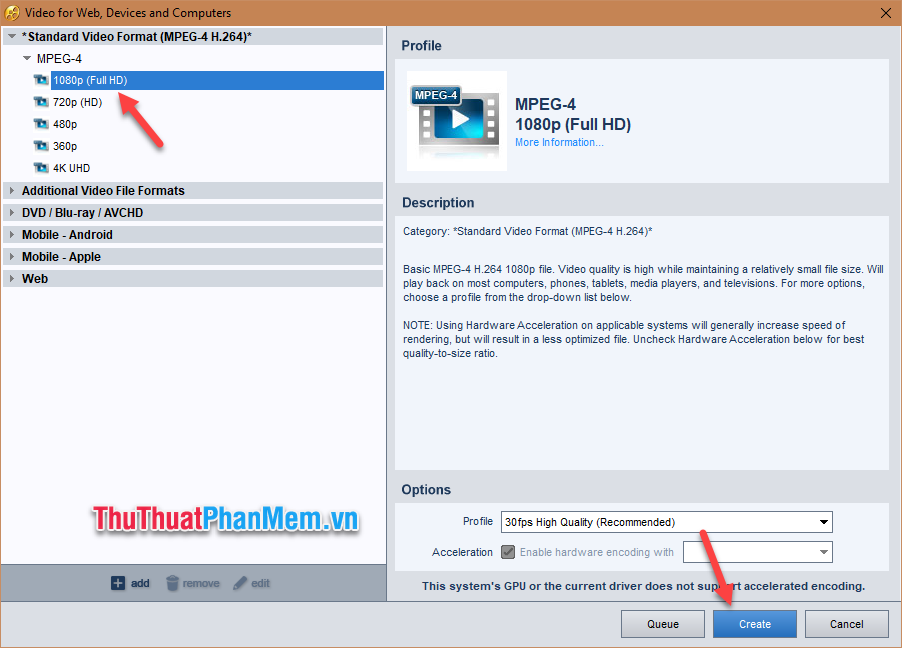
In the main interface of the software you select the Publish button

A new window will appear, you have quite a few different options, but to save the video to your computer, we will choose Video File
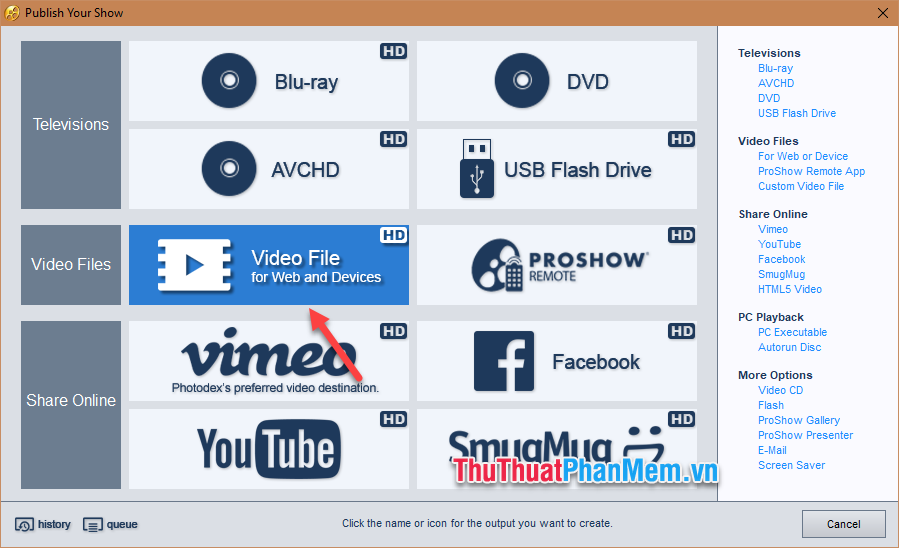
Next we choose the video format and resolution, the most popular is MPEG-4 format, also known as MP4 and 1080p resolution is beautiful, finally click Create.
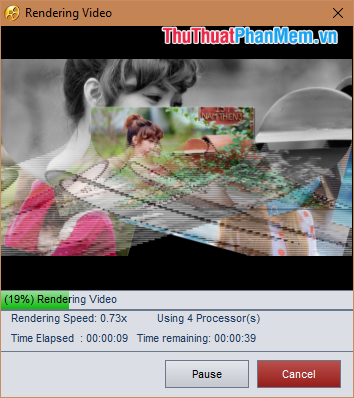
After that, a window will appear for you to choose where to save the video and click Save , now we wait for the video rendering software to finish.
And here is our result:

Above is a detailed tutorial on the steps to create a video image silde show with Proshow Gold software. The steps above are just basic steps, to have a beautiful and perfect video, it depends on your creativity and tinkering. Thank you for watching the article, wish you success.
Was this article helpful?
Your feedback helps us improve.
Related Articles
 Top 10 tips for using ProShow Producer20 minutes read
 Instructions on how to make video from photos with Proshow Gold is extremely simple4 minutes read
 Instructions to use ProShow Producer to make professional videos10 minutes read
 How to write Vietnamese in Proshow Producer2 minutes read
 Do you know: How many kilograms does 1 tael of gold weigh? What is an ounce of gold?6 minutes read
 Did you know: how many kilograms does a gold tree (gold) weigh?2 minutes read
Reader Comments 0
Sign in with email or Google to join the discussion.