Table of Contents
TRIM lets Windows tell an SSD which blocks no longer contain live data, allowing the drive to manage future writes efficiently. Windows normally enables delete notifications automatically for supported SSDs. TRIM is not traditional defragmentation, and you should not disable Windows drive optimization simply because the volume is on an SSD.
Check the Windows TRIM setting
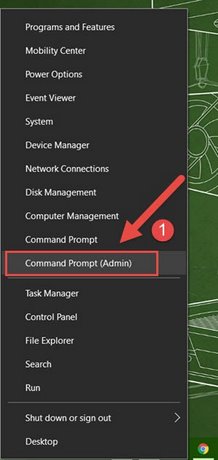
- Right-click Start and open Terminal (Admin).
- Run:
fsutil behavior query DisableDeleteNotify
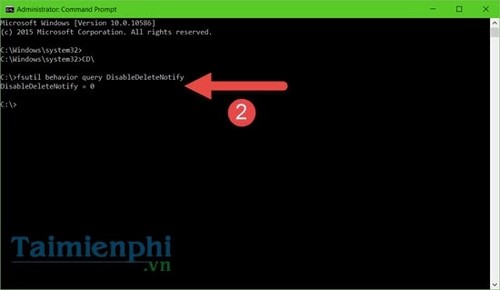
Interpret the relevant file-system result:
NTFS DisableDeleteNotify = 0means NTFS delete notifications are enabled.NTFS DisableDeleteNotify = 1means they are disabled.- A ReFS line applies only to ReFS volumes.
A zero result confirms that Windows is configured to send the notification. It does not by itself prove that every storage controller, virtual disk, USB bridge, or RAID path passes TRIM to the physical device.
Enable TRIM if it is disabled
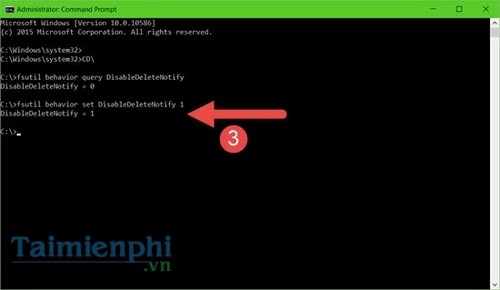
In Terminal (Admin), run:
fsutil behavior set DisableDeleteNotify 0Query the setting again to confirm the change. The corresponding command with a value of 1 disables delete notifications; do not use it unless a storage vendor or administrator documents a specific reason.
Microsoft documents the current syntax in its fsutil behavior reference.
Keep Windows Optimize Drives enabled
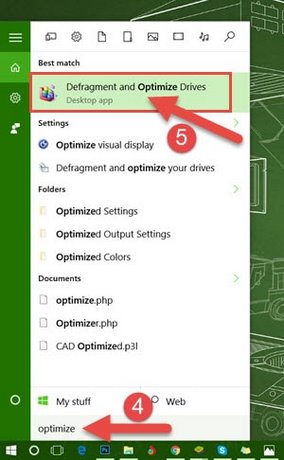
Search Start for Defragment and Optimize Drives. Windows recognizes the media type and applies an appropriate operation: HDD optimization consolidates fragmented files, while SSD optimization includes storage-aware tasks such as retrim.
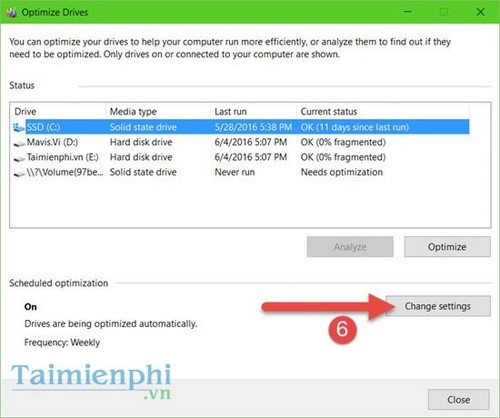
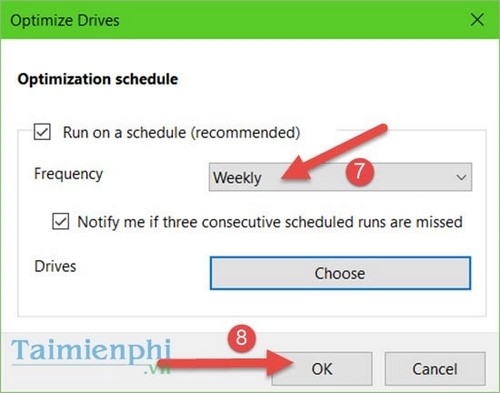
Leave the normal schedule enabled for SSD volumes unless the device manufacturer or an administrator provides different instructions. The original advice to exclude SSDs from the Windows schedule is outdated.
Run a manual retrim when troubleshooting
Select the SSD in Optimize Drives and choose Optimize. Alternatively, in PowerShell as administrator, replace C with the intended drive letter and run:
Optimize-Volume -DriveLetter C -ReTrim -VerboseConfirm the drive letter first. A successful command does not measure SSD health or guarantee a performance change.
If TRIM still appears unavailable
- Confirm Windows identifies the device as an SSD.
- Update storage-controller and chipset drivers from the PC or motherboard manufacturer.
- Check whether a RAID controller, USB enclosure, virtual disk, or storage pool supports passing TRIM.
- Use the SSD manufacturer's supported utility to check firmware and health.
Do not repeatedly benchmark or overwrite an SSD to “activate” TRIM. For background, see how fragmentation differs between HDDs and SSDs. For errors or warnings, use drive-health checks.
Related Articles
 How to Enable / Disable TRIM Support for SSDs in Windows 105 minutes read
 Check the TRIM Command Status of the SSD, and Check the Read and Write Speeds6 minutes read
 The TRIM Hard Drive Error on Windows Defrag Has Not Been3 minutes read
 Instructions to Enable Hey Copilot Command Windows 113 minutes read
 How to Use the Chrome Extension Trim to Make Netflix Better7 minutes read
 How to Enable Telnet on Windows 7: Complete Guide4 minutes read
Reader Comments 0
Sign in with email or Google to join the discussion.