Table of Contents
You can create a new partition in Windows 8 or 8.1 with the built-in Disk Management tool. The safe sequence is to back up important files, shrink an existing NTFS volume, turn the resulting unallocated space into a new simple volume, assign a drive letter, and format it.
Important: partition changes can cause data loss if you select the wrong disk or the process is interrupted. Back up irreplaceable files first, keep a laptop connected to power, and do not alter partitions labeled System Reserved, EFI System, Recovery, or OEM.
Before you begin
- Sign in with an administrator account.
- Check that the volume you plan to shrink has enough free space for both Windows and your files.
- If device encryption or BitLocker is enabled, make sure you have the recovery key before changing the disk layout.
- Confirm the target by its disk number, drive letter, label, and capacity. Do not rely on position alone.
Partitioning does not add storage. It divides the available capacity of one physical drive into separate volumes. If you are using a newer Windows release, see the Windows 11, 10, 8, and 7 partitioning guide for interface-specific notes.
Windows 8 and 8.1 are no longer supported. Microsoft records Windows 8.1's end of support as January 10, 2023, so a computer still running it should be kept offline where practical or upgraded to a supported operating system. See the Windows 8.1 lifecycle page.
1. Open Disk Management
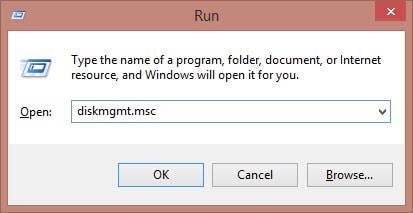
Press Windows + R, type diskmgmt.msc, and select OK. Approve the administrator prompt if one appears.
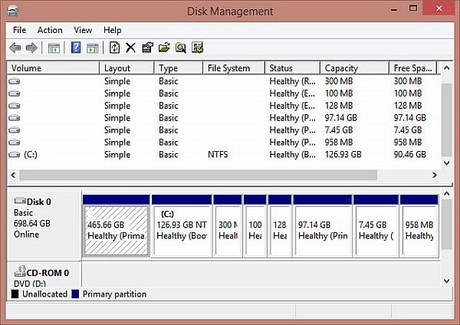
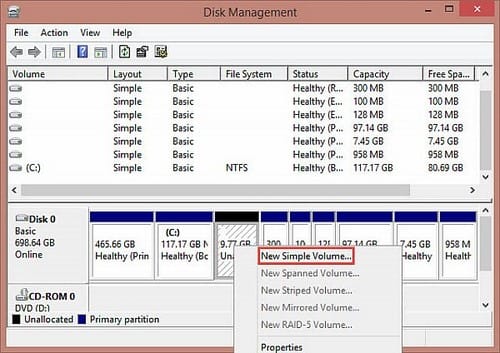
Wait for Disk Management to read the disks. The upper pane lists volumes; the lower pane shows each physical disk and its partition layout. Check the capacity and labels before continuing.
2. Shrink the existing volume
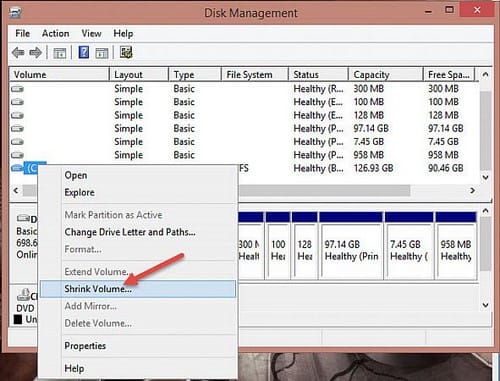
Right-click the NTFS volume that has the free space you want to use, then select Shrink Volume. Windows analyzes how much space it can release without moving unmovable files.
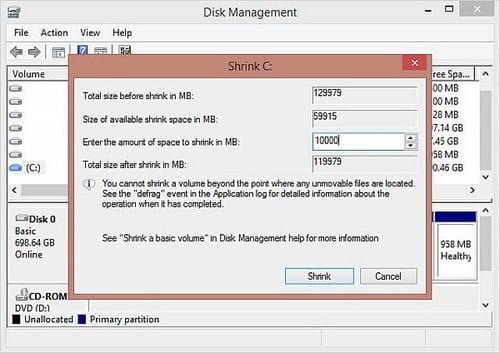
In Enter the amount of space to shrink in MB, enter how much space to take from the existing volume. Disk Management uses MB; for roughly 10 GiB, enter 10240 MB. Do not exceed the displayed maximum, and leave enough capacity for Windows, applications, updates, and personal files. Select Shrink.
The released area appears as Unallocated. It is not usable for normal file storage until you create and format a volume. Microsoft's current documentation also notes that Disk Management can shrink basic volumes only when they have no file system or use NTFS; see Shrink a basic volume.
3. Create a new simple volume
Right-click the new unallocated area and select New Simple Volume.
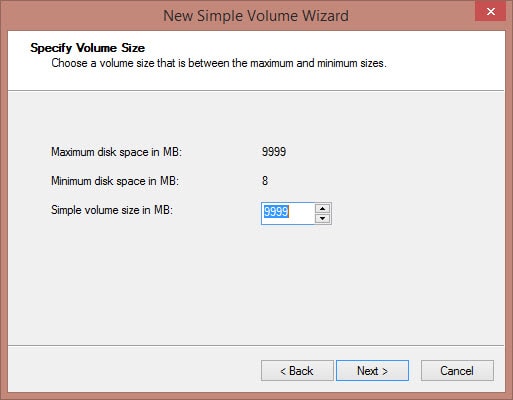
In the wizard, specify the volume size. Use the maximum value to make one partition from all of the unallocated space, or enter a smaller value if you deliberately want to leave space for another volume.
4. Assign a drive letter
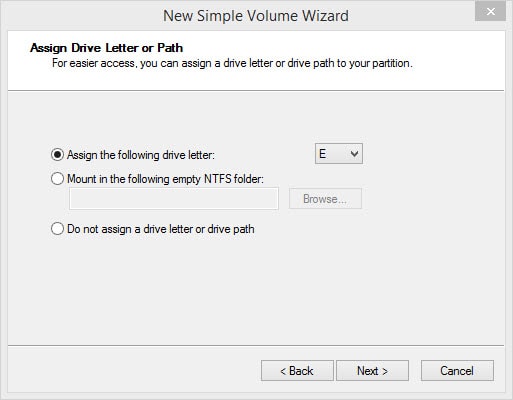
Select Assign the following drive letter and choose an unused letter. Windows normally suggests one automatically. You can change it later in Disk Management, but changing a letter after installing applications on the volume may break saved paths or shortcuts.
5. Format the new partition
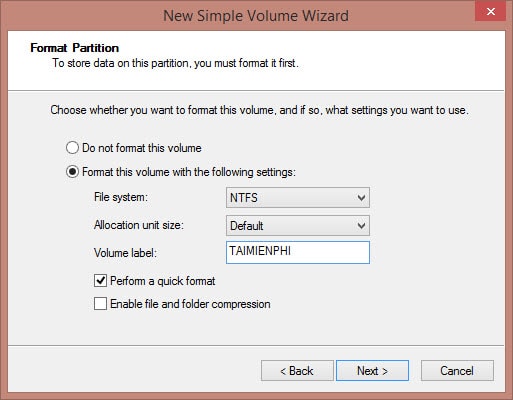
For a Windows internal data volume, choose NTFS and keep the default allocation unit size unless you have a specific requirement. Enter a descriptive volume label such as Data. A quick format is appropriate for a new, healthy volume; it creates the file-system structures but does not perform a full sector scan. Leave file and folder compression off unless you understand its performance and compatibility tradeoffs.
Review the summary carefully, then select Finish. Formatting erases any existing content in the selected volume, so stop if the wizard shows the wrong disk or capacity.
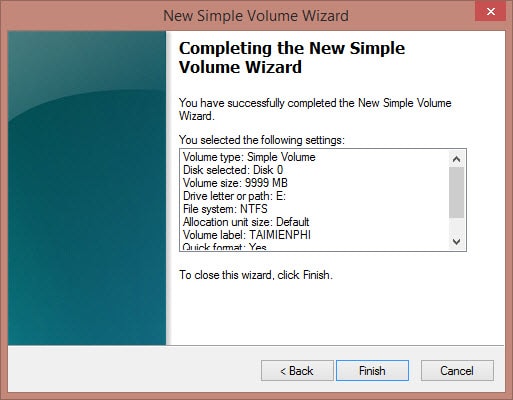
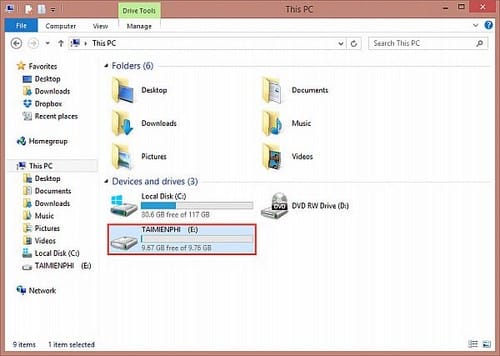
When formatting completes, the volume should show a healthy status and appear in File Explorer with its assigned letter.
If Disk Management cannot shrink or create the volume
- Shrink Volume is unavailable: verify that the selected item is a basic NTFS volume and that you have administrator rights. Do not experiment on EFI, recovery, or OEM partitions.
- The available shrink amount is smaller than the free space: unmovable system files can limit where Windows can shorten the volume. Use the maximum Disk Management offers, or make a verified full backup before considering a repartitioning tool.
- The new volume does not appear in File Explorer: return to Disk Management and check whether it is formatted, online, and assigned a drive letter.
- Extend Volume is greyed out: Windows generally needs suitable unallocated space adjacent to the volume. The separate guide to increasing C drive capacity in Windows 10, 8, and 7 explains the layout constraint.
After the new volume appears, copy a small test file to it and open the file again. Keep the backup until you have confirmed that both the original and new volumes work normally.
Related Articles
 How to Partition a Hard Drive in Windows 86 minutes read
 Instructions to Divide and Merge Drives Right in Windows 75 minutes read
 Extended Fdisk: Partitioning for the Hard Drive15 minutes read
 How to Partition a Hard Drive on Windows 11 And 104 minutes read
 How to Partition a Hard Drive in Windows 11, 10, 8, and 7 Without Losing Data6 minutes read
 Why Is Hard Drive Partitioning Pointless on Modern Storage Devices?8 minutes read
Reader Comments 0
Sign in with email or Google to join the discussion.