The fastest and simplest way to turn on Auto HDR on Windows 11
Auto HDR feature is considered one of the biggest improvements on Windows 11, giving players a gaming experience with sharper and more realistic images. Here are detailed instructions on how to turn on Auto HDR on Windows 11 quickly and simply.

Instructions to turn on Auto HDR on Windows 11
Article Table of Contents:
1. Auto HDR feature on Windows 11.
2. Requirements when activating Auto HDR on Windows 11.
3. How to enable Auto HDR on Windows 11.
Auto HDR feature and how to enable it on Windows 11
1. Auto HDR feature on Windows 11
HDR stands for High-dynamic Range or wide contrast range, giving players a more vivid and realistic gaming experience than the normal SDR standard.

Auto HDR is simply a setting on certain devices and platforms that automatically improves HDR-compatible content, including Windows 11 devices.
The Auto HDR feature on Windows 11 can automatically calculate SDR content and adjust it to "close" to HDR content quality. Basically, this feature is of great benefit to gamers, allowing them to play and experience non-HDR titles in HDR quality.
2. Requirements when activating Auto HDR on Windows 11
By default, the Auto HDR feature on Windows 11 will be disabled / disabled because this technology requires the device to be equipped with compatible hardware. According to Microsoft's recommendations, to use this feature, the user's hardware must meet the following requirements:
- Video card UHD Graphics 600 series/Nvidia 10 series/AMD Radeon RX 400 series or higher.
- DisplayPort 1.4 or HDMI 2.0 standard monitor connection cable or higher.
- HDR display supports HDR10.
Readers can refer to how to check and see the latest Windows computer configuration here to see if their computer has met the requirements.
- See also: How to check computer configuration
In addition, the image content also needs to meet HDR standards, the Auto HDR feature on Windows 11 will give the best results.
3. How to enable Auto HDR on Windows 11
The process or steps to turn on Auto HDR on Windows 11 takes only a few seconds and with just a few simple mouse clicks. All you need to do is follow the steps below:
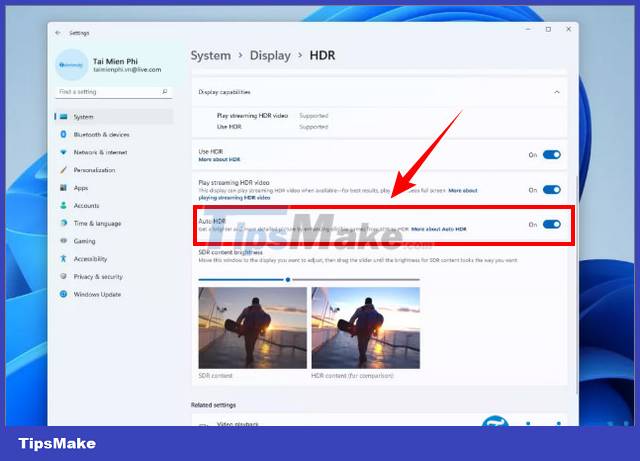
Step 1: Right-click any empty space on the desktop, select Display Settings.
Step 2: On the window displayed on the screen, make sure the Use HDR option is enabled.
Step 3: Next find and click User HDR to open the HDR settings menu.
Step 4: Finally find and activate the slider next to Auto HDR to enable the feature.

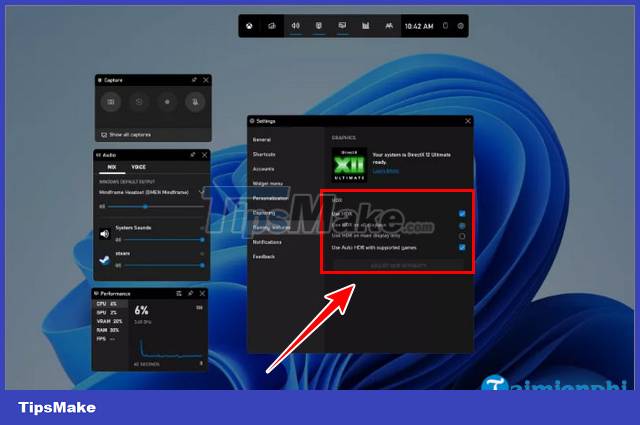
In addition to turning on Auto HDR on Windows 11 above, you can also do the same right on Xbox Game Bar. To get started, follow the steps below:
Step 1: Open Xbox Game Bar by using Windows + G key combination .
Step 2: Find and click on the Settings icon, which is a cog icon.
Step 3 : Select Gaming Features from the sidebar.
Step 4 : Check both boxes next to options for HDR settings.

Step 5 : Finally close the Xbox Game Bar window to complete the process.
Also, when you follow the way to turn on Auto HDR on Windows 11 from the Xbox Game Bar, you will have access to and adjust the Auto HDR intensity slider for each game.
https://thuthuat.taimienphi.vn/cach-bat-auto-hdr-tren-windows-11-va-su-dung-74442n.aspx
So Taimienphi.vn just showed you how to turn on the Auto HDR feature on Windows 11 is the simplest and easiest to implement. Wish you have enjoyable gaming and movie watching experiences with this feature.