Synthesis of useful commands to code the Arduino
If you are new to Arduino, you may be interested in the list of commands that are useful for the most important operations. You need them to control the Arduino board and define simple logic maths..
The good thing about Arduino is that you don't really have to learn too many programming realities. Just invest in an Arduino board and install the IDE.
Most of the command examples are available in the Examples library. If you want to follow the existing reference examples, all you have to do is modify the code a bit and create your own sketches.
The goal of this article is not to present a complete list of Arduino tricks, but to understand the logic behind the code. It is important to know how to apply them in all situations.
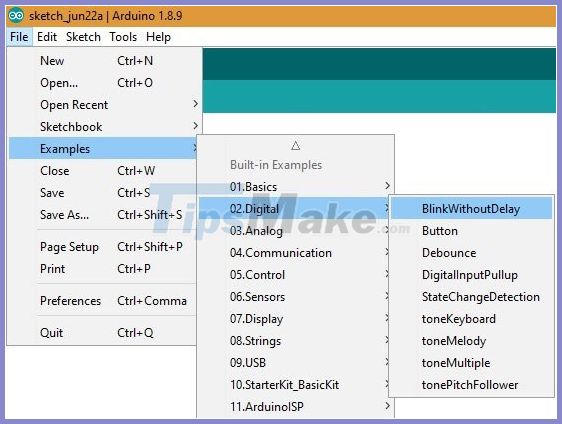
Arduino IDE toolbar
Verify Scan code and report any errors Upload Compile the code and upload it to Arduino board via USB New Open a blank Arduino sketch (program written by Arduino IDE) Open Open list of saved sketches in file browser Save the current sketch. Serial Monitor Open Serial Monitor in a new window
Basic Arduino IDE commands
As soon as you open the Arduino IDE, you will be greeted by the command setup () and loop (). These are the only two sketch examples that you will find in almost all Arduino code.

- Setup (): Every time the sketch starts, the setup command will help you initialize the variables and start using libraries. Refer to an example of a digital LED that blinks with no lag in the Arduino IDE installation.
void setup () {// set digital pin as output: pinMode (ledPin, OUTPUT); }
- Loop (): A loop follows setup and is truly the heart of the program, making it respond infinitely to any logic. For example, the code above is an example of an LED that blinks infinitely, without delay.
void loop () {// this is where you put the code to run at all times. // check if it's time to blink the LED .}
After familiarizing yourself with sketches, you need to know the control commands. The most important commands are:
- Break: If you want to exit a command, you need to press break.
if (sens> threshold) {// bail out on sensor detect x = 0; break; }
- If or else: Logical statements initiate an action each time a condition is satisfied. Again, let's go back to the example of a flashing digital LED. Remember the loop () command in which the code must run indefinitely.
Other useful control commands can provide certain logic. Commands you can use include:
- return: Returns a certain value.
- while: Another loop that occurs continuously under a certain condition. For example:
while (dist
- goto: As the name implies, this command allows you to go to a certain line of code.
Boolean and arithmetic operators
Besides sketch and control commands, you must know some Booleans and arithmetic operators to command programs.
- Operands: Equal (=), addition (+), subtraction (-), multiplication (*), and division (/).
- Advanced operands: Not equal (! =), Less than or equal (<=), greater than or equal to (> =), remainder (%).
Important variables
In some cases, you need to give several variables to handle different logic operations. The important variables are:
- HIGH | LOW: This gives the high and low final values for the constants.
// The variables will change: int ledState = LOW;
- LED_BUILTIN: Indicates the number of LED pins (LED pin). In the above example of LED flashing on Uno, the number of LED pins is 13.
Other important variables to remember include True / false, sizeof (), void, int, and string. They are just like any other regular program including Python, C ++, etc .
High-level functions
Finally, you need to know a few advanced functions to control the Arduino board. Advanced functions include:
Built-in Arduino functions
- digitalRead (): Reads the value from a certain digital pin. There is also digitalWrite ().
- pinMode (PIN_NUMBER, INPUT / OUTPUT): Sets the pin at position PIN_NUMBER to INPUT or OUTPUT.
- pinMode (PIN_NUMBER, INPUT_PULLUP): Sets the pin at position PIN_NUMBER to be input using the built-in pull-up resistor of the Arduino board.
- analogRead (PIN_NUMBER): Reads the analog pin number PIN_NUMBER and returns an integer between 0 and 1023.
- analogWrite (PIN_NUMBER, VALUE): Emulate analog output VALUE using PWM on PIN_NUMBER (Note: Only available on pins 3, 5, 6, 9, 10, and 11).
- analogReference (DEFAULT): Uses default reference voltage (5V or 3.3V depending on board voltage).
- analogReference (INTERNAL): Use internal reference voltage (1.1v for ATmega168 / 328p, 2.56 for ATmega 32U4 / 8).
- analogReference (EXTERNAL): Uses voltage applied to AREF pin as reference voltage (Note: 0-5V only).
Time-related functions
- Delay (): Recall the example of flashing LEDs. You can add latency to that.
- millis (): Returns the time in milliseconds since the Arduino sketch started running as an unsigned long integer.
- micros (): Returns the time in microseconds since the Arduino sketch started running as an unsigned long integer.
- delayMicroseconds (integer): Delays program execution in (integer) microseconds.
Mathematical functions
- min (i, j): Returns the lowest value of the two values i and j
- max (i, j): Returns the highest of the two values i and j
- abs (i): Returns the absolute value of i
- sin (angle): Returns the sine of an angle in radians
- cos (angle): Returns the cosine of an angle in radians
- tan (angle): Returns the tangent of an angle in radians
- sqrt (i): Returns the square root of i
- pow (base, exponent): Calculates the power of the order (exponent) of (base). For example: pow (2, 3) == 8
- constrain (i, minval, maxval): Constrain the i-value between minval (minimum value) and maxval (maximum value)
- map (val, fromL, fromH, toL, toH): Convert val from one range to another
- random (i): Returns a long random integer less than i
- random (i, j): Returns a long random integer between i and j
- randomSeed (k): Use the value k to seed the random () function
Serial communication
- Serial.begin (speed): Starts serial communication at the specified speed
- Serial.end (): Serial communication connection
- Serial.print (DATA): Export DATA to the serial port. DATA can be characters, strings, integers, and floating point numbers.
- Serial.available (): Returns the number of characters available to read in the serial buffer
- Serial.read (): Reads first character in serial buffer (returns -1 if no data is available)
- Serial.write (DATA): Writes DATA to the serial buffer. DATA can be a character, an integer, or an array.
- Serial.flush (): Clear the serial buffer after outbound communication is completed
Servo
- Servo myServo: Create variable myServo of Servo type
- myServo.attach (PIN_NUMBER): myServo is associated with the pin at position PIN_NUMBER
- myServo.write (angle): Write an angle from 0 to 180 for the servo attached to myServo
- myServo.writeMicroseconds (uS): Writes a value in microseconds to the servo attached to myServo (typically 1000 to 2000 with 1500 as the midpoint)
- myServo.read (): Returns an integer containing the current angle of the servo in the range 0 - 180
- myServo.attached (): Returns true if the servo is attached to the pin
- myServo.detach (): Separate myServo with an attached pin
There are also:
- random (): This function helps to generate random numbers.
- Tone () and notone (): Do you want a sound to appear in your battery? The tone () function takes care of that, while notone () keeps everything quiet.
The above commands are some of the most useful in handling Arduino boards on IDE. This list is very limited and not exhaustive, but it can help get you started on your projects.
For the details, you need to research the sketches of other Arduino enthusiasts and find out what you can learn from them.
Good luck.