How to Use Ultrasonic Sensors in Arduino Project
Arduino is an open-source microcontroller platform used in many applications. Arduino boards are able to read inputs such as light on a sensor or the press of a button and turn it into an output. This wikiHow teaches you how to create an....
Part 1 of 2:
Building the Circuit
-
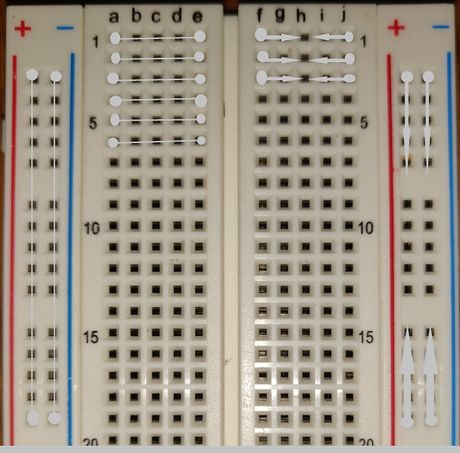 Understand how breadboards work. Breadboards are often used in temporary circuits, prototypes and small circuit projects, such as this one. Breadboards are very useful and easy to understand.
- Breadboards have holes called pins which could be used to insert wires or components. Inside the breadboard, the pins are soldered together, meaning they are connected to each other. These pins, however, are soldered in vertical or horizontal patterns. So you can only connect them in straight lines.
- The pins next to the red and blue lines going down the long side of the board are usually called power rails, these pins are connected vertically to each other inside the board.
- The terminals near the middle of the board are connected horizontally.
-
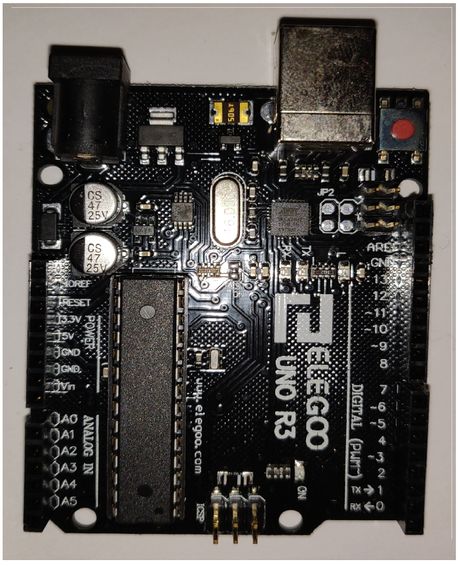 Understand how microcontrollers work. For this project, you will only learn the basics of microcontrollers such as Arduino. An Arduino can be programmed to output signals depending on some inputs signals. All other components will be connected and controlled by the Arduino.
- For this project you will only use the 3, 5, 6, and any GND pins on the Arduino for the LED. Note that some have the number these numbers have a line next to it, this those not mean it is negative.
- You will also use the 5V, 11, 12, and again any GND pins for the ultrasonic sensor.
-
 Start with the resistors. The LED needs some resistance so that less current flows through it. Without a resistor, you might end up damaging LED. We're going to use a 220-ohm resistor.
- Place the 220-ohm resistors near the center side by side horizontally bridging one side of the center breadboard to the other. Make sure not to connect both ends of the resistor to the same side of the breadboard. This would create a short making the current jump past the resistor making it useless. Add one end to the left and one end to the right side of the center.
-
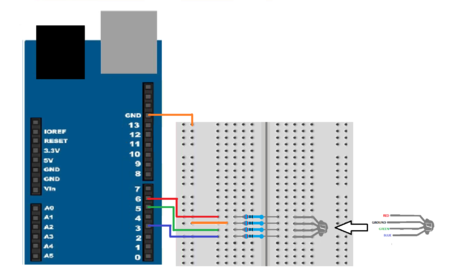 Add the LED. Place an RGB LED onto the breadboard. You could also attach an LED strip instead.
- RGB LEDs have four pin inputs; red which is the pin at the edge next to the longest pin, green which is the center pin next the longest pin, and blue which is the shortest pin furthest from the longest pin as well as GND which is the longest. These pins will be connected to the number pin 3 for red, 5 for blue, 6 for green and GND on the Arduino.
- Most LED strips come with an adapter and you can fit your wires into this adapter.
- LED strips could also be cut and soldered.
-
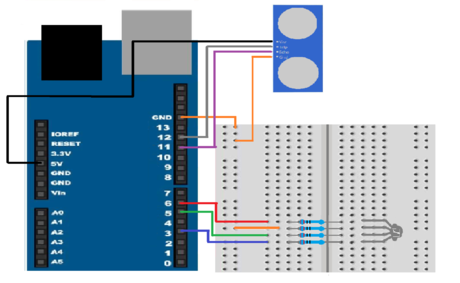 Connect the sensor. An ultrasonic sensor uses sound to determine distance. This distance, however, becomes less accurate with smaller surfaces in further distances. Connect the necessary pins to the board.
- You will use all 4 pins of the Ultrasonic sensor; VCC, TRIG, ECHO, and GND. Connect these pins to the 5V, 11, 12, and GND pins of the Arduino respectively.
-
 Add a voltage source. This is necessary to run the Arduino and components.
- You can insert a USB type B into the Arduino to then connect it to a computer.
- Batteries could also be used using a Battery adapter.
Part 2 of 2:
Building the Code
-
 Download Arduino IDE and other related libraries. You would need to download the Arduino coding program as well as some needed libraries.
- Head to the official Arduino website. You will find a tab at the top named Software which would have a Download option. This would lead you to the download page where you will be able to download Arduino IDE for Mac, Windows, and Linux.
- Find a good library for your Arduino project. Search for any ultrasonic sensor library online and look at the example to understand how to use it. Repositories like GitHub have lots of open-source Arduino projects that you can use.
-
 Make a new file and folder. This is done to have a designated area to find your code but the Arduino file also requires the file to be in a folder with the same name. Otherwise, an error would pop up.
- Make a new folder in your computer for your project and then open the Arduino program.
- Once the Arduino program is opened, save a new file to the recently made folder with a proper name. You might notice the Arduino file is automatically saved in a new folder with the same name.
-
 Add necessary libraries. This is a necessary step needed to run the code.
- Go to "Sketch" > "Include Library" > "Add .zip Library" and select the libraries needed, for this example it will be "HC - SR04".
- Adjust the settings. On the Arduino program, you would need to adjust some setting so it can communicate with the board.
- You would need to select what type of board you are using. There are different types of Arduino microcontrollers; however, this example will use an Arduino/Genuino uno. Do this by going to the top and selecting "Tools" > "Boards" and selecting.
- You would also need to choose what Port to use. In "Tools" > "Port," choose COM3 or COM4.
-
 Define libraries and variables. This gets the libraries that will be used for the code but also lets you make variables that you will use and change later throughout the code. Variable names could be different.
#include "SR04.h"lets you use the SR04.h library needed to activate and use the ultrasonic sensor.- All definitions that start with
#definejust lets you assign names to pin numbers of the Arduino. For example,#define RED 6defines pin 6 to the RED variable. - You also made variables to store the different values of the different colors which will be integers.
-
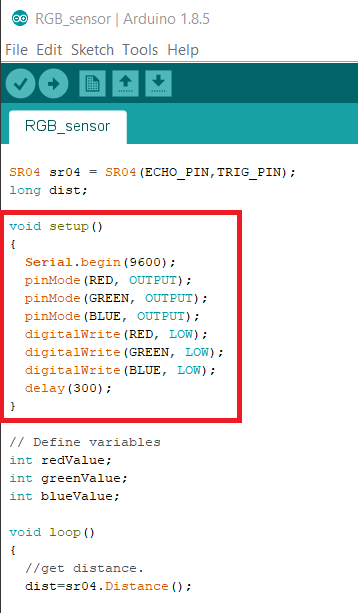 Write the setup. this is to tell the board its initial tasks before the repeating loop is run. In the previous step, you assigned names to pin of the board. Now you will assign what the pins will do.
- The function
pinMode(RED, OUTPUT)gets the first variable, RED and assigns what the pin will do, here RED pin number 6 will be an output. - The function
digitalWrite(RED, LOW)gets the first variable, RED pin 6 and sets a low voltage.
- The function
-
 Add the loop. This is the part of the code that would be looped over and over. This is probably also the hardest part of the programming process while initially writing it and figuring the best approach.
- First you take the distance reading and set the initial voltage of the colors to zero.
- An
ifstatement then checks to see if the distance is between 0 -127.5 or 127.5 - 255. Both if functions then use a formula to determine how strong the brightness of each color should be. Here you made it so the RGB LED is red when a surface or object is close but turns green and then blue the further it gets.