Table of Contents
This guide explains how to install the Arduino IDE on CentOS 8, with clear steps, practical tips, and important checks before you begin.
The Arduino IDE contains an editor that is used to write and upload programs to the Arduino board. Before starting to create projects via Arduino, users need to set up the IDE for the programmable board.
1. Install the Arduino IDE on CentOS 8
You will need to do the following steps on Terminal to install the Arduino IDE on CentOS 8:
- Download the Arduino IDE setup file
- Extract the downloaded archive
- Install the Arduino script
- Launch the Arduino IDE
Details are as follows:
1. Open a command line window with the shortcut Ctrl + Alt + T or click Activities displayed on the left corner of the screen to open Terminal on CentOS 8.0.
2. Login as the root user from the system. Run su command on Terminal.
2. Download the Arduino IDE
To install the Arduino IDE on your system, you will need the Arduino IDE setup file. Open the Arduino download page and select the latest Arduino 1.8.12 version of the Arduino IDE currently available. You will choose the Arduino IDE supported for your Linux system architecture, either 32-bit or 64-bit.
Another alternative is to download it with the wget command on Terminal. Enter the following command on Terminal to download the latest Arduino version 1.8.12:
wget https://downloads.arduino.cc/arduino-1.8.12-linux64.tar.xzAs you can see in the image above, after completing the download, a file named arduino-1.8.12-linux. tar. xz has been saved on the system. This downloaded file will be stored in the main directory of the system.
3. Extract the downloaded archive
Now, you will unzip the archive using the tar command. Execute the following command in Terminal to extract the file:
tar -xvf arduino-1.8.12-linux64.tar.xzAfter executing the above command, you will see the file extraction process taking place in Terminal.

4. Install the Arduino script
Once the file decompression is complete, it's time to run the script to install the Arduino IDE on CentOS 8.0. You will go to unzip arduino-1.8.12 folder and then run the script on Terminal to install the Arduino IDE.
cd arduino-1.8.12/ sudo ./install.sh
5. Launch the Arduino IDE
You will now launch the Arduino IDE from the desktop. Click Activities and choose to display the application form where you will launch the Ardunio IDE to double-click the application icon.
You can also launch with the search bar, clicking Activities where you can see the search bar. Enter Arduino in the search bar.
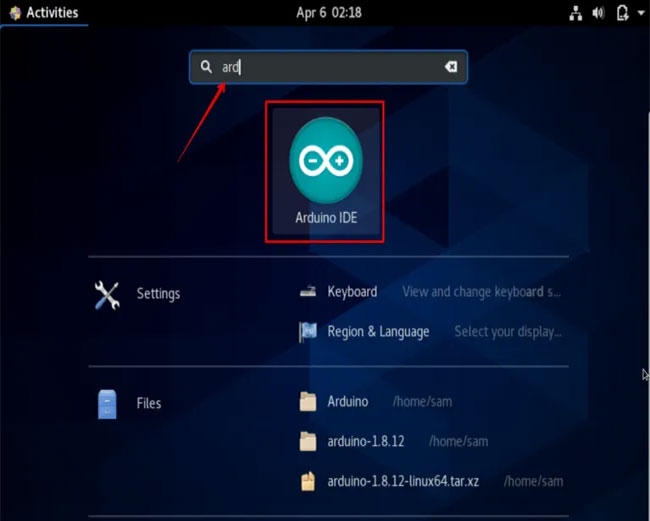
The Arduino IDE will show up on the desktop after you search. Now, you can work on Arduino IDE using CentOS 8.0.
FAQ
What should I know about Install the Arduino IDE on CentOS 8?
Focus on the key features, requirements, limitations, and practical use cases explained in this guide.
How do I get the best results with Install the Arduino IDE on CentOS 8?
Follow the recommended steps, use current software or information, confirm compatibility, and review settings before major changes.
Are there any risks or limitations?
Potential limitations depend on compatibility, data quality, cost, privacy, support, and how the product or method is used.
Related Articles
 Download and Install Arduino on the Computer11 minutes read
 How to Install Arduino Ide on Mac5 minutes read
 How to Install Arduino Ide on Debian 104 minutes read
 How to Install CentOS on a Raspberry Pi5 minutes read
 What Is Arduino and Its Applications in Life4 minutes read
 How to Install Arduino Ide in Ubuntu4 minutes read
Reader Comments 0
Sign in with email or Google to join the discussion.