Table of Contents
This updated guide examines How to Program Arduino with an Android Phone and organizes the essential facts, background, and practical takeaways in clear American English.
In case you don't have a computer available to power the Arduino board, the Android phone is the best available option. Today's article will show you how to program Arduino using your Android phone.
Essential ingredients
You will need the following components to prepare for this setting:
1. OTG cable: Standard OTG cable with USB 2.0 for old Android phones. For the latest smartphone with Type-C port, you will need an OTG cable with Type-C port.

2. Data transmission cable: Data transmission cable with a male USB 2.0 Type A end and a USB 2.0 Type B male head for additional connection.

3. Arduino Uno board: You can use any other Arduino board.
4. LED: This will be used to check the connection. You can also use a servo motor or anything you need to check.
5. Arduino Android application: Although there are many suitable applications, but you will be relatively easy to work with ArduinoDroid. This is a pretty heavy application (210MB), so you need quite a bit of storage in the phone memory. Moreover, the application cannot be written to the SD card.

6. Some other things: You will also need a breadboard and some cables to connect to the Arduino. A few resistors are needed to divide the voltage.
How to assemble
Setting up the Arduino-Android assembly is very simple and doesn't require too many steps.
- Connect the USB Type A male terminal to the USB connector of the OTG cable (directly connected to the smartphone).
- Connect the USB Type-B connector to the Arduino board.
- Use the connecting cables to connect the LED on the breadboard to the Arduino Uno board. The exact location of the connectors on the Arduino Uno is determined by the code provided by the application. (See the next section for more details).
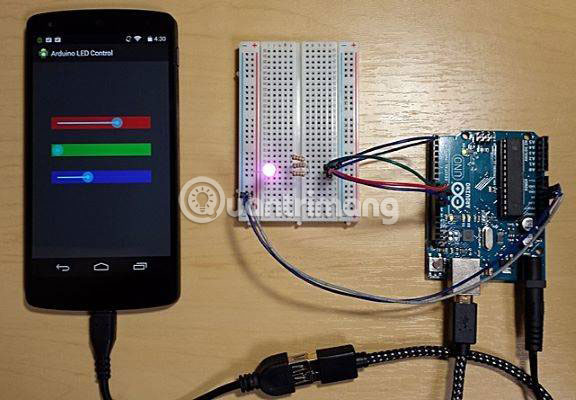
The correct assembly will look like the image above.
Use ArduinoDroid application
After downloading and installing the application on your phone, go to the main screen and click the three dots menu icon.
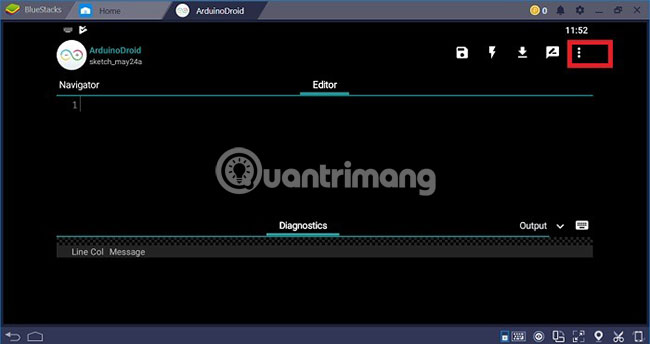
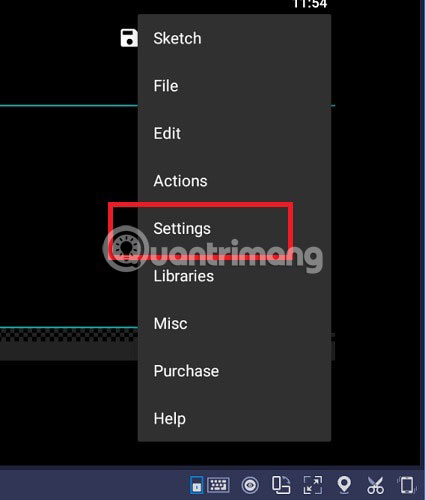
Next, go to Settings> Board Type> Arduino .
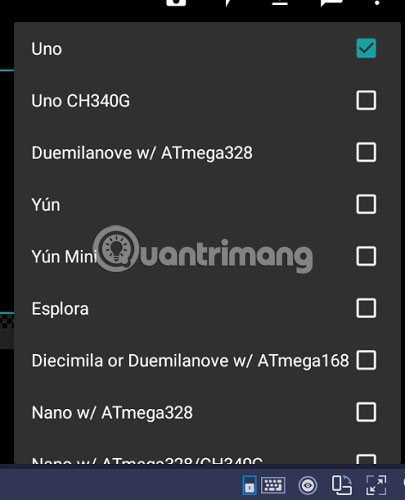
In the next step, you must select the board type as 'Uno'. Depending on the type of Arduino board you use, you can choose one of many other options.
Again, go to the three dots menu and select Sketch> Examples . There are many examples. For LED lights, you just need to access Basics> Blink .
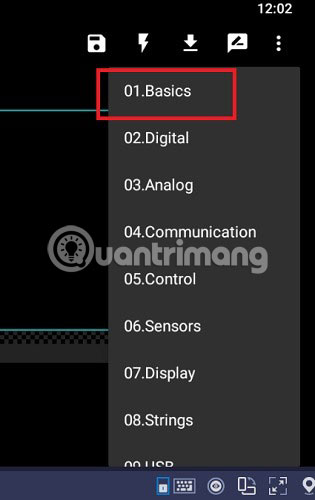
Automatically, the code to make the LED blinking will appear on the Editor screen .

The code indicates that the Uno board should be attached to the digital battery 13. Back to the previous section, 'How to assemble', to plug the cable connecting the LED to pin 13 on the Arduino Uno.
Another connector will go from the grounded battery of the Arduino Uno to the LED on the breadboard, as well as the resistor.
In the picture below, you can see the Flash sign, which is the compiler. Just click on it and the program that makes the LED blinks will start compiling and loading on the Arduino Uno board.
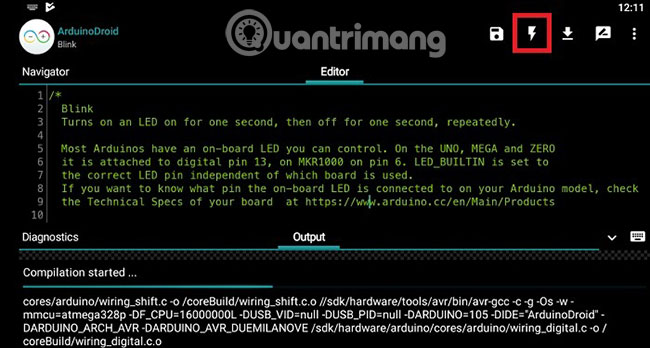
After successful implementation, you can control LED light directly from your Android phone. You can search for many other sample projects in the ArduinoDroid library, including servo motors, temperature and pressure sensors, etc.
Learning how to manage and control Arduino projects from Android phones is easy and just pay a little attention. Of course, you can find further instructions on this topic at the official Arduino forum (link: https://forum.arduino.cc/) and right on TipsMake.com.
Leave any questions or thoughts on this topic in the comment section below!
Hope you are succesful.
FAQ
What is How to Program Arduino with an Android Phone about?
It provides a structured overview of Arduino, explains the main context, and highlights practical takeaways for readers.
Why does this topic matter?
Understanding the main concepts helps readers evaluate the issue, avoid common mistakes, and make better-informed decisions.
How should readers use this information?
Use the guidance as a practical starting point, confirm details that may have changed, and follow current product, safety, or security recommendations.
Related Articles
 What Is Arduino and Its Applications in Life4 minutes read
 How to Program Arduino with Raspberry Pi7 minutes read
 Synthesis of Useful Commands to Code the Arduino9 minutes read
 How to Install Arduino Ide on Mac5 minutes read
 Download and Install Arduino on the Computer11 minutes read
 Why Is the New Arduino Uno R4 a Game Changer for Manufacturers?7 minutes read
Reader Comments 0
Sign in with email or Google to join the discussion.