What is PWM in Arduino?
PWM is a widely used concept in physics, electronics and telecommunications. It is defined as a signal modulation form to obtain analog waveforms from digital inputs..
Pulse Width Modulation (PWM) is a widely used concept in physics, electronics and telecommunications. It is defined as a signal modulation form to obtain analog waveforms from digital inputs.
In Arduino applications, PWM is very useful in changing the signal strength such as the brightness of the LED diode, the sensor's ping time or powering the servo motor.
Why is PWM needed in Arduino?
A major reason why PWM techniques are needed in Arduino projects is because it helps generate continuous waveforms. Consider an example of LED. Any digital signal is on two values: ON or OFF, which can be adjusted with the Arduino 5V and 0 digital batteries, respectively, as shown below.

However, there are apps that you might be interested in a little more, besides turning the device on or off. You need a continuous analog waveform to control the brightness or opacity of LEDs in smart light bulbs.

For example, Philip Hue light bulb has a related PWM feature, which is applied as an Alexa skill: 'Alexa, brighten Kitchen to 60%' (Alexa, kitchen light 60%). This command can control the brightness of your room.
How to use PWM in Arduino projects
The Arduino IDE has some built-in examples to use PWM for different results. To explore the PWM commands in Arduino projects, you can easily install IDE for Windows 10, Linux or Mac.
In addition, you will need to connect the Arduino Uno or Mega board to the LED and control it with the analog function. The necessary components include:
- Potentiometer and resistor 10 kOhm
- Breadboard and cords
- Arduino IDE
The Arduino Project Hub has an instructional example in which the final circuit is displayed (refer to: https://create.arduino.cc/projecthub/muhammad-aqib/arduino-pwm-tutorial-ae9d71), but this is an irrelevant example. Your actual circuit will follow the code and instructions provided in the Arduino IDE.
Code works
Open the Arduino IDE and go to File> Examples> Analog> AnalogWriteMega . This code dims and lights up the LEDs for a while on digital batteries 2 to 13. This code is only for Arduino Mega boards.

Check out the article: Summary of Arduino IDE commands to understand the meaning of basic commands including const (), setup (), loop () and delay ().
Additionally, there is a for command that sets pin 2 to 13 to the lowest to highest level.

Next, a command called analogWrite () is used to control the brightness of the LED, from the lowest values in digital battery 2 (0), to the highest value of digital battery 13 ( 255). A delay of 100 milliseconds is given to record the transition of the LEDs (changing their analog status).
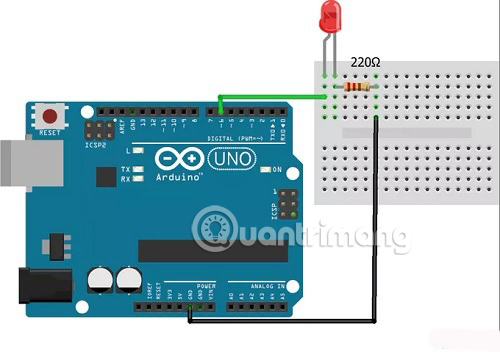
The article will take another example of an LED shaded based on analog output. To do this, go to File> Examples> Analog and select Fading. This code can be used with Arduino Uno boards. LED lights are attached from pin number 9 to the ground.

In this example, an analogWrite command was used to modify the fade values in the range of 0 to 255. The opacity is displayed at a delay of 30 milliseconds for the fade effect.
Pulse Width Modulation (PWM) is an essential method to ensure change and progress in your Arduino projects.
Have you used PWM in your own IoT projects? Did you come across any examples like PWM when using Alexa, similar to the Philip Hue light bulb? Please share in the comments section below!
Hope you are succesful.