Set up Ubuntu centralized management network with LDAP
In the near future, free and open source software will most likely become an indispensable option for organizations / businesses. With the advantages of open source, easy to expand, stable operation ... this field of application is increasingly demonstrating its usability and effectiveness.
1. Introduction
In the near future, free and open source software will most likely become an indispensable option for organizations / businesses. With the advantages of open source, easy to expand, stable operation . this field of application is increasingly demonstrating its usability and effectiveness.
Most organizations need to have an intranet system to support daily work handling, operational operations, work coordination .
This article will guide you through the process of building a centralized Ubuntu management system with LDAP, a solution that can completely replace the Microsoft Windows network with Active Directory.
2. System requirements
We use three computers with the following information:
-
Ubuntu server computer:
-
IP address: 192.168.10.2
-
DNS server: 192.168.10.2
-
Machine name: ubuntu-server
-
-
Ubuntu computer desktop 01:
-
IP address: 192.168.10.12
-
DNS server: 192.168.10.2
-
Computer name: ubuntu-desktop01
-
-
Computer Ubuntu desktop 02:
-
IP address: 192.168.10.14
-
DNS server: 192.168.10.2
-
Computer name: ubuntu-desktop02
-
3. System configuration
3.1. Configuring ubuntu-server
On ubuntu-server machines, we do:
-
Install and configure DNS server with BIND software.
-
Domain name: bits.com.vn
-
Add 02 Host (A) records corresponding to 02 Ubuntu workstations to DNS server:
ubuntu-desktop01.bits.com.vn 192.168.10.12
ubuntu-desktop02.bits.com.vn 192.168.10.14
-
-
Install and configure LDAP server with OpenLDAP software.
-
Add 02 accounts corresponding to 2 Ubuntu workstations to LDAP server:
Account 01 - last: ********
Account 02 - ctbach: ********
-
The steps in turn are as follows:
Install and configure DNS server with BIND software
1. Install Ubuntu server, version 7.10
During the installation process, set the following parameters:
-
IP address: 192.168.10.2
-
DNS server: 192.168.10.2
-
Netmask: 255.255.255.0
-
Machine name: ubuntu-server
-
Software: select installation packages for DNS server
2. Configure DNS server
Software used to build DNS servers on Ubuntu is BIND (Berkeley Internet Name Domain). We will work on BIND files to configure the DNS server. The steps are as follows:
-
Backup copy of BIND files:
thai @ ubuntu-server: ~ $ sudo -i
[sudo] password for comment:
root @ ubuntu-server: ~ #
root @ ubuntu-server: ~ # mkdir / backup
root @ ubuntu-server: ~ # cp -R / etc / bind / backup -
BIND configuration:
Edit BIND's main configuration file - /etc/bind/named.conf - by adding the following lines to the end of the file:
root @ ubuntu-server: ~ # vim /etc/bind/named.conf
.
// The zone definition
zone 'bits.com.vn' {
type master;
file '/etc/bind/zones/bits.com.vn.db';
};
// The zone definition for reverse DNS
zone '10 .168.192.in-addr.arpa '{
type master;
file '/etc/bind/zones/rev.10.168.192.in-addr.arpa';
};
Edit the file /etc/bind/named.conf.options to transfer (forward) the requests that this DNS server cannot resolve:
root @ ubuntu-server: ~ # vim /etc/bind/named.conf.options
options {
.
forwarders {
10.238.200.1;
10,238,200.8;
10,238,200.12;
};
};
Create file zones:-
/etc/bind/zones/bits.com.vn.db: used for storing IP address / machine name pairs to resolve this DNS server.
-
/etc/bind/zones/rev.10.168.192.in-addr.arpa: for reverse resolution purposes.
root @ ubuntu-server: ~ # mkdir / etc / bind / zones
root @ ubuntu-server: ~ # vim /etc/bind/zones/bits.com.vn.db
$ TTL 604800
@ IN SOA ubuntu-server.bits.com.vn. admin.bits.com.vn. (
first ; Serial
604800; Refresh
86400; Retry
2419200; Expire
604800); Negative Cache TTL
;
; Thay thế theo sau dòng như cần:
; ns1 = DNS server name
; mail = Mail server name
; bits.com.vn. IN MX 10 mail.bits.com.vn.
@ IN NS ubuntu-server.bits.com.vn.
@ IN A 192.168.10.2
ubuntu-server.bits.com.vn. IN A 192.168.10.2
root @ ubuntu-server: ~ # vim /etc/bind/zones/rev.10.168.192.in-addr.arpa
; Số số trước IN PTR ubuntu-server.bits.com.vn is
; máy phục vụ địa chỉ của máy phục vụ DNS. In this case, it's
; 2, as my IP address is 192.168.10.2.
$ TTL 604800
@ IN SOA ubuntu-server.bits.com.vn. admin.bits.com.vn. (
first ; Serial
604800; Refresh
86400; Retry
2419200; Expire
604800); Negative Cache TTL
;
@ IN NS ubuntu-server.bits.com.vn.
2 IN PTR ubuntu-server.bits.com.vn.
-
Edit the /etc/resolv.conf file to list the DNS servers in your network:
root @ ubuntu-server: ~ # vim /etc/resolv.conf
search bits.com.vn
nameserver 192.168.10.2
-
Restart the BIND service:
root @ ubuntu-server: ~ # /etc/init.d/bind9 restart -
Check DNS server with dig (domain information groper) utility. dig is a data query utility on DNS server (DNS lookup utility). This utility will search the DNS server and display the information returned by the DNS server.
root @ ubuntu-server: ~ # dig bits.com.vn
Besides, we also need to use the ping utility to check:
root @ ubuntu-server: ~ # ping bits.com.vn
root @ ubuntu-server: ~ # ubuntu-server ping
root @ ubuntu-server: ~ # ping ubuntu-server.bits.com.vn
Install and configure LDAP server with OpenLDAP software
1. Install OpenLDAP
The software used to build LDAP server on Ubuntu is OpenLDAP. We will install the necessary software and utilities to set up LDAP server, including:
- slapd (OpenLDAP Server - OpenLDAP standalone server) : This software is used to create a standalone directory service and include a slurpd replication server.
- ldap-utils (OpenLDAP Utilities) : This package contains utilities to access LDAP server locally or remotely (local or remote). ldap-utils also contains all the necessary programs (required client programs) to access LDAP servers.
- db4.2-util (Berkeley v4.2 Database Utility) : This package contains tools that are used for manipulating with databases formatted as Berkeley v4.2 Database.
The steps are as follows:
- Update the package list on Ubuntu and install OpenLDAP:
thai @ ubuntu-server: ~ $ sudo -i
[sudo] password for comment:
root @ ubuntu-server: ~ #
root @ ubuntu-server: ~ # aptitude update
root @ ubuntu-server: ~ # apt-get install slapd
root @ ubuntu-server: ~ # apt-get install ldap-utils
root @ ubuntu-server: ~ # apt-get install db4.2-util
Note : when installing slapd, ldap-utils, db4.2-util packages, the system needs to use the CD containing Ubuntu server 7.10.
2. Configure LDAP server
We will work on OpenLDAP files to configure LDAP server. The steps are as follows:
- Backup copy of OpenLDAP files:
root @ ubuntu-server: ~ # cp -R / etc / ldap / backup - Use the slappasswd utility to encrypt admin passwords and save the encrypted string at the end of the /etc/ldap/slapd.conf file:
root @ ubuntu-server: ~ # slappasswd >> /etc/ldap/slapd.conf
New password:
Re-enter new password: - OpenLDAP configuration:
Edit the /etc/ldap/slapd.conf file (OpenLDAP's main configuration file) as follows:
root @ ubuntu-server: ~ # vim /etc/ldap/slapd.conf
suffix 'dc = bits, dc = com, dc = vn'
rootdn 'cn = admin, dc = bits, dc = com, dc = vn'
This # password is generated by the ldappasswd utility.
rootpw {SSHA} AwiGYep3HmBbL5rQka4Bchd4g8ofhnXC
directory '/ var / lib / ldap'
# Set change password permission
access to attrs = userPassword, shadowLastChange
by dn = 'cn = admin, dc = bits, dc = com, dc = vn' write
by anonymous auth
bởi self ghi
by * none
# Ensure đọc được truy cập cho cơ bản để làm việc
# supportedSASLMechanisms.
access to dn.base = '' by * read
# Người dùng dn có đủ truy cập được ghi được, ai khác có thể
# read everything.
access to *
by dn = 'cn = admin, dc = bits, dc = com, dc = vn' write
by * read
Note : keeping the default settings of the /etc/ldap/slapd.conf file is not mentioned above. - Launch standalone LDAP server:
root @ ubuntu-server: ~ # /etc/init.d/slapd start
Starting OpenLDAP: slapd
At this step, LDAP server is ready. In order to start bringing this server into operation, we need to add entries (entities - user, group, ou .) initialized on the server. - Add the initial entry:
LDAP server can add entries with a command or from files with ldif format (ldap directory interchange format). Below, we create the init.ldif file and save it to the / etc / ldap directory.
root @ ubuntu-server: ~ # vim /etc/ldap/init.ldif
dn: dc = bits, dc = com, dc = vn
objectClass: dcObject
objectClass: organizationalUnit
dc: bits
ou: bits.com.vn
dn: cn = admin, dc = bits, dc = com, dc = vn
objectClass: simpleSecurityObject
objectClass: organizationalRole
cn: admin
description: LDAP administrator
userPassword: {SSHA} AwiGYep3HmBbL5rQka4Bchd4g8ofhnXC
dn: ou = users, dc = bits, dc = com, dc = vn
objectClass: organizationalUnit
ou: users
dn: ou = groups, dc = bits, dc = com, dc = vn
objectClass: organizationalUnit
ou: groups
dn: cn = ktm, ou = groups, dc = bits, dc = com, dc = vn
objectClass: posixGroup
cn: ktm
gidNumber: 5000
Note : The UID / GID in this article is set as follows:
- System account: UID <500
- Real People in LDAP: 499
- Local users, groups (not in LDAP): UID> 10,000
Follow the steps below to add entry to LDAP server:
Stop LDAP service:
root @ ubuntu-server: ~ # /etc/init.d/slapd stop
Delete content that was automatically created while installing OpenLDAP:
root @ ubuntu-server: ~ # rm -rf / var / lib / ldap / *
Add new entry:
root @ ubuntu-server: ~ # slapadd -l init.ldif
Edit permissions on the database:
root @ ubuntu-server: ~ # chown -R openldap: openldap / var / lib / ldap
Launch LDAP service:
root @ ubuntu-server: ~ # /etc/init.d/slapd start
- Check out the newly added entries:
We can check the newly added entries by using the ldapsearch utility:
root @ ubuntu-server: ~ # ldapsearch –xLLL –b 'dc = bits, dc = com, dc = vn'
Inside:- -x: do not use SASL authentication method (default).
- -LLL: disable printing of LDIF information.
- -b: basic search.
If additional entry operations to LDAP server are performed correctly, the ldapsearch utility will display information about these entries similar to the content created in the file /etc/init.ldif.
With the above configuration steps, we have completed the installation and configuration of LDAP server on the ubuntu-server computer. Next, we proceed with the installation and configuration of Ubuntu workstation systems.
3.2. Configure ubuntu-desktop01
In order for the workstation to log in with the account created on LDAP server, we need to perform the configuration steps on the PAM (Pluggable Authentication Modules) and NSSWITCH (Name Service Switch) files in Ubuntu. The steps are as follows:
1. LDAP client installation
The software and utilities that need to be installed on the Ubuntu workstation are:
- libpam-ldap : library used to allow authentication (allow for authentication) via LDAP.
- libnss-ldap : library used to allow querying of session information (allow session information) via LDAP.
- nss-updatedb : utility used to create a local database of the user names. This database is used to overcome the situation where the network has been slowed down by network access (network slowdown), or has been stopped due to a problem (outage).
The steps are as follows:
- Update the package list on Ubuntu and install libpam-ldap, libnss-ldap and nss-updatedb:
ctbach @ ubuntu-desktop01: ~ $ sudo -i
[sudo] password for ctbach:
root @ ubuntu-desktop01: ~ #
root @ ubuntu-desktop01: ~ # aptitude update
root @ ubuntu-desktop01: ~ # apt-get install libpam-ldap
When installing this library, we need to provide the following parameters:
- LDAP Server Uniform Resource Identifier: ldap: //192.168.10.2
- Distinguished name of search base: dc = bits, dc = com, dc = vn
- LDAP version để sử dụng: 3
- LDAP account for root: cn = admin, dc = bits, dc = com, dc = vn
- LDAP root account password: ******
root @ ubuntu-desktop01: ~ # apt-get install libnss-ldap
When installing this library, we need to provide the following parameters:
- LDAP account for root: cn = admin, dc = bits, dc = com, dc = vn
- LDAP root account password: ******
Note : a dialog box appears, informing you that the system cannot manage nsswitch.conf file automatically. We click the OK button and will change the configuration of this file later.
root @ ubuntu-desktop01: ~ # apt-get install nss-updatedb
2. Configure LDAP client
We will manipulate the files of PAM and NSSWITCH to configure the LDAP client. The steps are as follows:
- Backup of files of PAM and NSSWITCH:
root @ ubuntu-desktop01: ~ # mkdir / backup
root @ ubuntu-desktop01: ~ # cp /etc/nsswitch.conf / backup
root @ ubuntu-desktop01: ~ # cp -R / etc / pam / backup - Configure NSSWITCH:
Edit the file /etc/nsswitch.conf (the main configuration file of NSSWITCH). This file identifies the name service that the system uses to search for information. This file also shows the order of the name services so that the search priority system is in a set order.
root @ ubuntu-desktop01: ~ # vim /etc/nsswitch.conf
passwd: ldap files
group: ldap files
Check the configuration just set by executing 02 commands:
root @ ubuntu-desktop01: ~ # getent passwd
root @ ubuntu-desktop01: ~ # getent group
The above two commands will list passwords and groups on Ubuntu desktop and on LDAP server. - Configure PAM:
There are four configuration files for PAM related to LDAP:
- /etc/pam.d/common-account
- /etc/pam.d/common-auth
- /etc/pam.d/common-password
- /etc/pam.d/common-session
Edit these files according to the following steps:
- root @ ubuntu-desktop01: ~ # cd /etc/pam.d
- root @ ubuntu-desktop01: /etc/pam.d# vim ./common-account
account sufficient pam_ldap.so
account required pam_unix.so - root @ ubuntu-desktop01: /etc/pam.d# vim ./common-auth
auth sufficient pam_ldap.so
auth required pam_unix.so nullok_secure use_first_pass - root @ ubuntu-desktop01: /etc/pam.d# vim ./common-password
password sufficient pam_ldap.so
password required pam_unix.so nullok obscure min = 4 max = 8 md5 - root @ ubuntu-desktop01: /etc/pam.d# vim ./common-session
session required pam_unix.so
session required pam_mkhomedir.so skel = / etc / skel /
session optional pam_ldap.so
session optional pam_foreground.so - Create a directory to store home directories corresponding to each account logged into the workstation:
root @ ubuntu-desktop01: ~ # mkdir / home / users
root @ ubuntu-desktop01: ~ # mkdir / home / users / ktm
Note : if you do not follow this step after creating an account on LDAP, you will get an error message during the login process to the Ubuntu client.
- 'Authentication failed'. If you look in the /var/log/auth.log file, we will see the cause of the error: 'Unable to create / home directory / users / ktm / modules'; 'không mở được phiên bản để thực hiện'.
3. Create a login account with phpLDAPadmin
For simplicity in managing OpenLDAP server, we use phpLDAPadmin. This is the web application used to manipulate OpenLDAP server.
The following steps will help us install and use phpLDAPadmin on the Ubuntu workstation to manage LDAP server.
Install phpLDAPadmin with the command :
root @ ubuntu-desktop01: ~ # apt-get install phpldapadmin
Configuring phpLDAPadmin :
root @ ubuntu-desktop01: ~ # cp -R / usr / share / phpldapadmin / var / www / myphpldapadmin
root @ ubuntu-desktop01: ~ # cp /etc/phpldapadmin/config.php /etc/phpldapadmin/first.config.php
root @ ubuntu-desktop01: ~ # rm /var/www/myphpldapadmin/config/config.php
root @ ubuntu-desktop01: ~ # ln -s /etc/phpldapadmin/first.config.php /var/www/myphpldapadmin/config/config.php
root @ ubuntu-desktop01: ~ # chmod + r /etc/phpldapadmin/first.config.php
Access phpLDAPadmin :
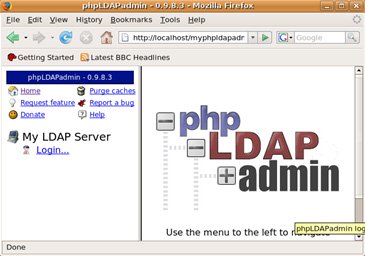
- From the browser window, enter the address http:/// localhost / myphpldapadmin.
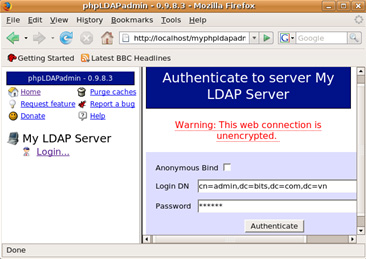
Click the Login button in the left pane, enter the root account information:
- Login DN: cn = admin, dc = bits, dc = com, dc = vn
- Password: ******
Click the Authenticate button to login.
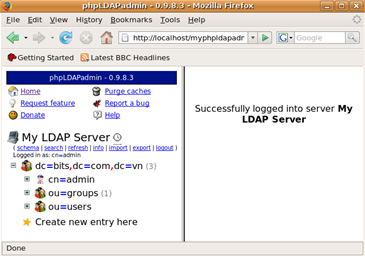
If login to LDAP server is successful, the system will notify:
Create an account on phpLDAPadmin :
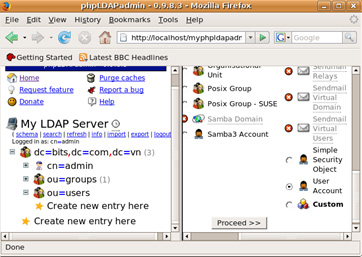
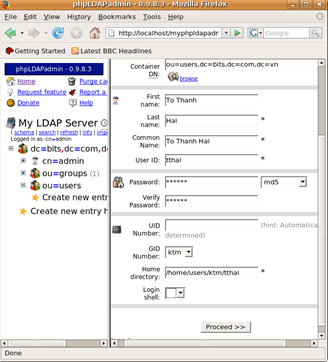
- Click on ou = users, select Create new entry here, select User Account. Click Process >> button.
- Fill in the information related to the account and click the Process >> button.
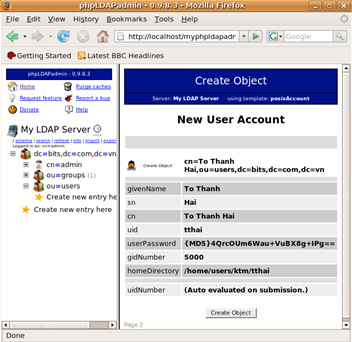
- Review information. After making sure, click the Create Object button.
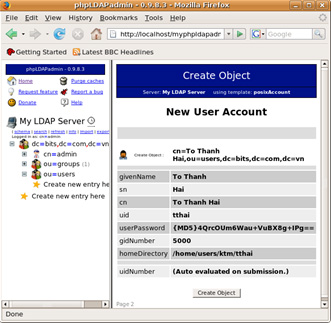
- After the creation, the screen showing the information of the newly created account will appear.
- Click the Add new attribute button to add the LoginShell attribute.
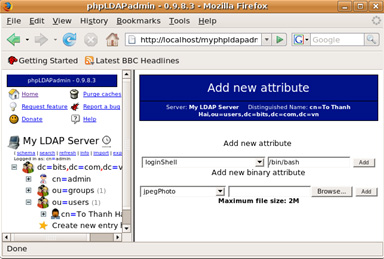
Click the Add button to complete the operation to create and edit the account. At this point, we click the Logout button and start checking the performance of the LDAP system on Ubuntu.
3.3. Configuring ubuntu-desktop02
Take the same steps as the ubuntu-desktop01 computer.
4. Check the system
To check the system after completing the configuration steps, from the ubuntu workstation, we log in with the account created on the LDAP server. In my case, on ubuntu-desktop01, after the system starts, we enter:
- Username: last
- Password: ******
The system will notify: ' Creating directory' / home / users / ktm / date '', we click the OK button to complete the login operation.
Conclude
Using LDAP to build intranet with client / server model, with Ubuntu computers is an effective and cost-effective centralized management solution. With simple installation steps, easy configuration, designing internal network systems with LDAP and Ubuntu is completely feasible.
Appendix 1 - Some useful operations when configuring LDAP on Ubuntu
1. Configure the Ubuntu computer to allow the account on the LDAP server to switch to (sudo) the root system administrator account
To allow the account on LDAP server to be transferred to the root account, on the Ubuntu workstation, we do the following:
Open the file / etc / group, add user01 to the admin line .
# gedit / etc / group
Find admin line: x: 117: ctbach, administrator
Add user01 to the end of the line. After addition, we get the same result as follows:
admin: x: 117: ctbach, administrator, comment
Next, update the LDAP server password so that the Ubuntu system can understand this password:
root @ ubuntu-server: ~ # passwd
Enter login (LDAP) password: ******
New password: ******
Re-enter new password: ******
2. Use a USB disk on Ubuntu server
To use the USB disks on the Ubuntu server (command line interface), we must perform the operation of mounting the USB disk into the Ubuntu server.
- For regular USB disks (without MP3):
root @ ubuntu-server: ~ # mkdir / usb-disk
root @ ubuntu-server: ~ # mount -t vfat / dev / sdb1 / usb-disk - For USB disks with MP3 music features:
root @ ubuntu-server: ~ # mkdir / usbmp3-disk
root @ ubuntu-server: ~ # mount -t vfat / dev / sdb / usbmp3-disk - Once you're done, we should safely disconnect between Ubuntu server and USB disk by:
root @ ubuntu-server: ~ # umount / usb-disk
root @ ubuntu-server: ~ # umount / usbmp3-disk
3. See the login error on the Ubuntu workstation
To see the login errors on the Ubuntu workstation to help us determine the cause of the error during Ubuntu logging in via LDAP, we open the file /var/log/auth.log
References
1. OpenLDAP Server
https://help.ubuntu.com/community/OpenLDAPServer
2. LDAP Client Authentication
https://help.ubuntu.com/community/LDAPClientAuthentication
3. OpenLDAP Client Configuration Guide
http://ubuntuforums.org/showthread.php?t=597056
4. Ubuntu User Document (good)
https://help.ubuntu.com/community/UserDocumentation
5. DNS Server Setup Using Bind in Ubuntu
http://www.ubuntugeek.com/dns-server-setup-using-bind-in-ubuntu.html
6. BIND9 Administrator Reference Manual
http://www.isc.org/index.pl?/sw/bind/index.php
7. Installing phpLDAPadmin
https://help.ubuntu.com/community/InstallingphpLDAPadmin
8. An Introduction to LDAP
http://www.ldapman.org/articles/intro_to_ldap.html
9. Introduction to LDAP (good)
http:///quark.humbug.org.uau/publications/ldap/ldap_tut.html
10. LDAP mini HOWTO (good)
http://www.grennan.com/ldap_HOWTO.html
11. OpenLDAP 2.2 Administrator's Guide
http://www.bind9.net/manual/openldap/2.2/index.html
12. OpenLDAP Everywhere
http://www.linuxjournal.com/article/6266
13. LDAP Attributes
http://www.computerperformance.co.uk/Logon/LDAP_attributes_active_directory.htm
14. Berkeley v4.2 Database Utility
http://packages.ubuntu.com/feisty/utils/db4.2.-util
15. Berkeley Database
http://packages.ubuntu.com/edgy/doc/db3-doc
16. Berkeley Database
http://directory.fsf.org/project/BerkeleyDB/
17. Performing Backup and Recovery with Berkeley DB
http://packages.ubuntu.com/edgy/doc/db3-doc
18. Chapter 19. I / O Redirection (Advanced Bash - Scripting Guide)
http://tldp.org/LDP/abs/html/io-redirection.html
19. /etc/nsswitch.conf - Name Service Switch File
http://www.softpanorama.org/Solaris/Reference/etc/nsswitch.shtml
-------------------------------------------------- -----------
To Thanh Hai - Email: tthai@huesoft.com.vn
Was this article helpful?
Your feedback helps us improve.
Related Articles
 What's New in Ubuntu 21.10?6 minutes read
 What's in the Linksys LAPAC1750C, a centralized enterprise WiFi network management device?7 minutes read
 The best network configuration management tools and software9 minutes read
 Hanoi Telecom launches an anti-network attack solution2 minutes read
 Web-based Dropbox adds document preview and centralized image management3 minutes read
 Why is Ubuntu LTS preferred over regular distros?5 minutes read
Reader Comments 0
Sign in with email or Google to join the discussion.