Table of Contents
EaseUS Partition Master can shrink an existing partition and create a new volume from the released space. It is designed to preserve the files on the resized volume, but no partition change is guaranteed risk-free. Back up important data, verify the physical disk and partition layout, and review every pending operation before clicking Apply.
When to use EaseUS instead of Disk Management
Windows Disk Management can shrink a healthy NTFS volume and create a new simple volume without installing additional software. Try that first for a straightforward split; TipsMake's Disk Management partition guide covers the built-in method.
A third-party partition manager can be useful when you need to move a partition, adjust space that is not in the position Windows requires, preview several related changes, or work with a supported layout that Disk Management cannot resize. Check the current EaseUS Partition Master edition comparison because feature availability and licensing can change.
Prepare the disk
- Copy irreplaceable files to another physical device and test the backup.
- Open Disk Management and record the disk number, capacity, partition style, volume labels, file systems, and left-to-right order.
- Save the BitLocker recovery key and suspend protection before resizing an encrypted system volume.
- Resolve SMART, file-system, cable, or power problems before changing partition boundaries.
- Connect a laptop to AC power and close applications that write to the target volume.
- Do not resize or delete EFI System, Recovery, OEM, or Microsoft Reserved partitions unless following a system-specific recovery plan.
Shrink a partition and create a new volume
1. Install and open EaseUS Partition Master
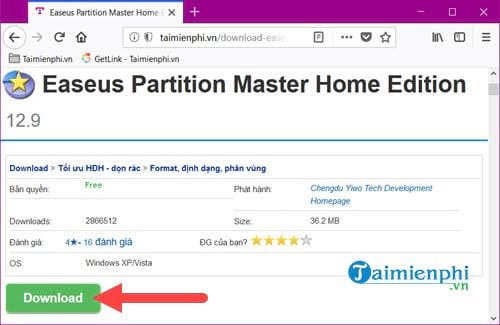
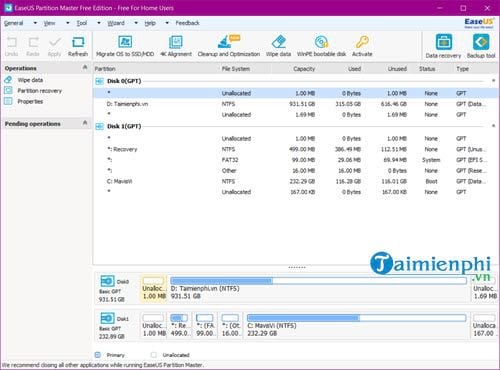
Download the installer from EaseUS, verify its publisher, and decline unrelated offers if any are presented. Open Partition Manager and match the displayed disk to the layout you recorded.
2. Choose Resize/Move
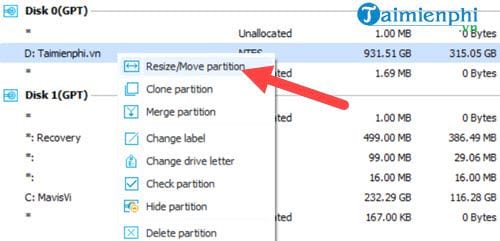
Right-click the partition that has free space and select Resize/Move. Confirm its label, file system, used space, and physical-disk position before proceeding.
3. Release unallocated space
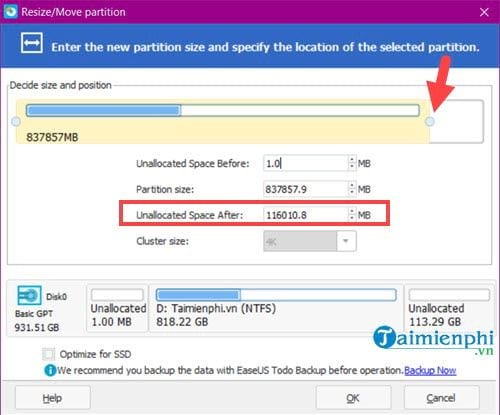
Drag an edge of the partition inward, or enter an exact value for unallocated space. The blue or filled portion represents used capacity; never set the new partition size below the used-space requirement. Decide whether the unallocated space should be before or after the volume based on the later operation you intend to perform.
Choose OK. EaseUS normally adds the resize to a pending-operation list; the disk has not necessarily changed yet.
4. Create a partition in the unallocated space
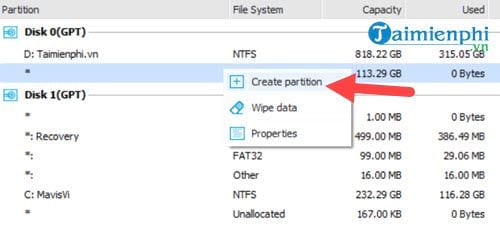
Right-click the unallocated block and select Create or Create partition.
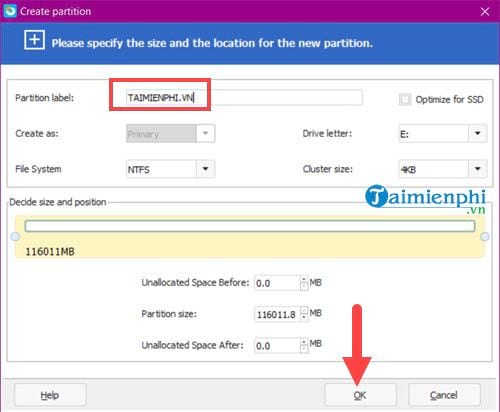
Enter a descriptive label, choose an available drive letter, and select the file system. NTFS is the normal choice for a Windows-only internal data volume; exFAT is useful for a removable drive shared with current macOS systems. Leave cluster size at its default unless a workload specifically requires another value.
5. Review and apply
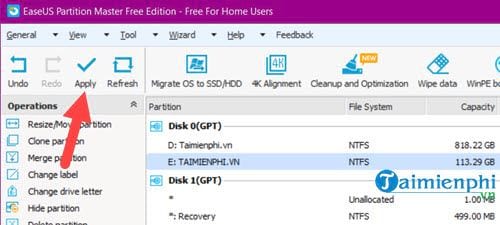
Inspect the full disk map and pending-operation list. The original volume should shrink by the intended amount, and the new partition should occupy only the released space. Confirm the correct physical disk one last time.
Choose Apply or Execute. A system-volume change may require a restart into a pre-OS environment. Keep power connected, do not force a shutdown, and let the process finish.
Verify the new layout
- Open Disk Management and confirm the expected partition sizes and file systems.
- Open both the original and new volumes in File Explorer.
- Create and delete a test file on the new volume.
- Spot-check important files on the resized volume.
- Restart Windows once, then resume BitLocker protection if it was suspended.
- Keep the backup until the layout and files have been tested.
If something prevents the resize
- Not enough movable free space: remove unnecessary files, check the file system, and inspect which files or metadata limit the operation.
- The operation is locked behind another edition: do not purchase impulsively from an in-app prompt; compare the official editions and the built-in Windows alternative.
- The disk reports errors: stop. Back up readable data and diagnose hardware health before retrying. See how to check drive health.
- The wrong partition was queued: discard the pending operations before Apply and start again.
- The new volume is missing after completion: check Disk Management for an unassigned drive letter, offline disk, unsupported file system, or failed operation log.
Repartitioning changes how existing capacity is allocated; it does not create more physical storage or automatically speed up a computer. If the goal is to combine adjacent volumes instead, review the separate partition-merging guide and its backup precautions.
Related Articles
 How to Split the Hard Drive, Merge the Partition on Windows XP8 minutes read
 How to Split and Partition Hard Drive with EaseUS Partition Master Software4 minutes read
 EASEUS Partition Master - Download the Latest EASEUS Partition Master3 minutes read
 EaseUS Partition Master - Increase or Decrease C Drive Capacity Without Data Loss3 minutes read
 (Giveaway) Copyright Free EaseUS Partition Master Professional Edition Best5 minutes read
 How to Partition Hard Drive without Losing Data on Windows 10, 117 minutes read
Reader Comments 0
Sign in with email or Google to join the discussion.