Table of Contents
Windows Disk Management can create a new partition without reinstalling Windows: shrink an existing NTFS volume, then create a New Simple Volume in the resulting unallocated space. The procedure normally keeps files on the volume being shrunk, but partition changes are not risk-free. Back up important data first and do not alter EFI, Recovery, OEM, or Microsoft Reserved partitions.
The steps are nearly identical in Windows 11, Windows 10, Windows 8.1, and Windows 7. The menus look different, but all of them use diskmgmt.msc. Windows 7 and 8.1 are out of support, and standard Windows 10 support ended in 2025; use a supported operating system for an internet-connected PC.
Before changing the partition layout
- Copy irreplaceable files to another physical disk and test the backup.
- Check Disk Management's disk number, capacity, partition style, and current volume layout.
- Save the BitLocker recovery key and suspend protection before resizing an encrypted system volume.
- Connect a laptop to AC power and avoid restarting during the operation.
- Resolve file-system errors or failing-drive warnings before resizing.
- Leave EFI System, Recovery, OEM, and Microsoft Reserved partitions unchanged.
Partitioning organizes space; it does not provide a backup because all partitions on one physical drive fail together. If you need to determine the hardware first, see how to identify an SSD or HDD in Windows.
1. Open Disk Management
Press Windows + R, type diskmgmt.msc, and select OK. You can also right-click Start and choose Disk Management on newer Windows versions.
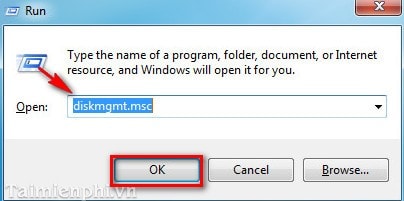
Use the lower pane to distinguish physical disks from their volumes. Confirm the disk by capacity and existing labels. A drive letter such as C: identifies a volume, not the physical device by itself.
2. Shrink an existing volume
Right-click the large NTFS volume that has enough free space and choose Shrink Volume.
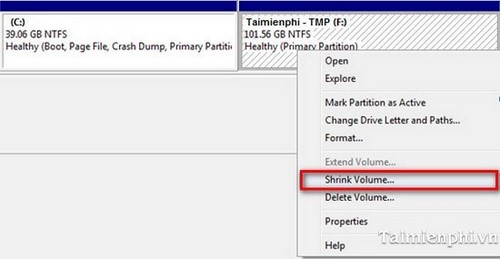
Windows calculates how much contiguous free space it can release from the end of the volume. In Enter the amount of space to shrink in MB, type the size for the new partition. Disk Management uses MiB-style units even though the dialog says MB: 102,400 MB is approximately 100 GiB.
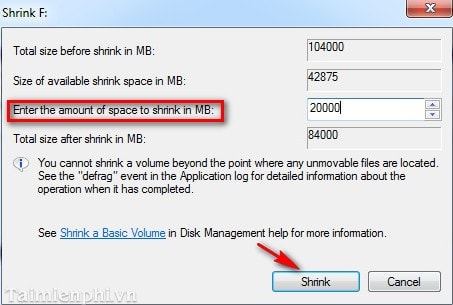
Choose Shrink and wait for the operation to finish. The released capacity appears as a black Unallocated block. If the available shrink amount is much smaller than the free-space figure, unmovable files near the end of the volume may be limiting it. Do not disable recovery or delete system files at random; back up the PC and investigate the layout first.
3. Create a New Simple Volume
Right-click the new unallocated block and select New Simple Volume.
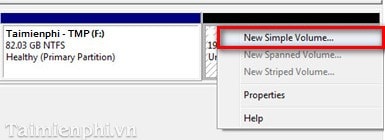
The New Simple Volume Wizard opens. Choose Next.
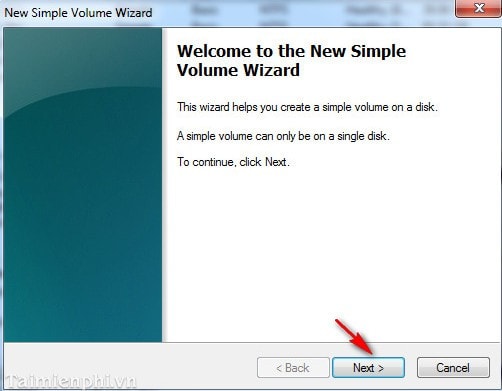
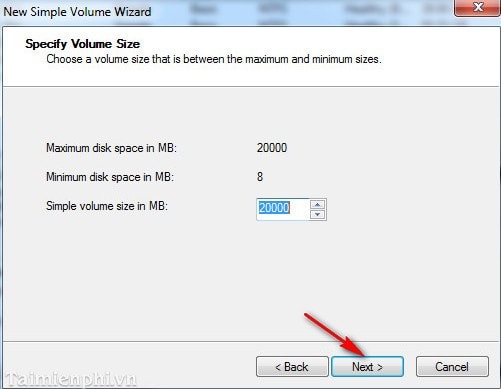
Enter the volume size. Use the maximum value to consume all the unallocated space, or choose a smaller value if you intentionally need another partition afterward.
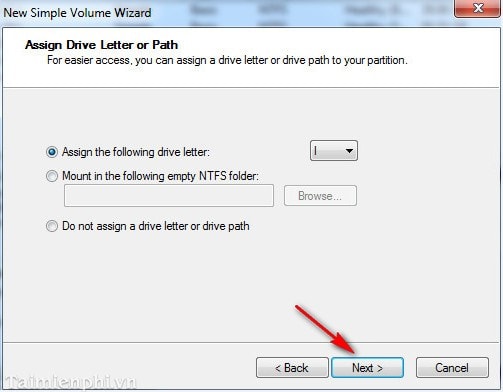
Assign an available drive letter. Avoid changing letters already used by installed programs or saved library paths.
4. Format and label the volume
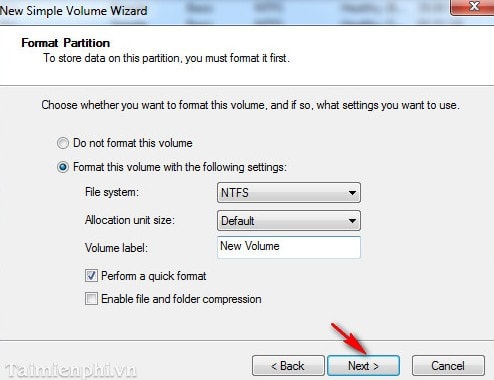
For a Windows-only internal data volume, choose NTFS, leave the allocation unit size at Default, and enter a descriptive label such as Projects or Media. Quick Format is appropriate for a healthy drive; it creates the file system without performing a full surface scan.
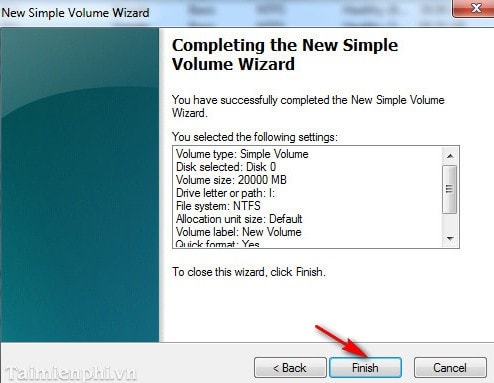
Review the summary and choose Finish.
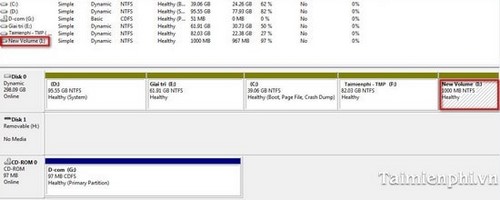
The new formatted volume should show a blue bar in Disk Management and appear in File Explorer with its assigned letter.
Verify the result
- Open the new drive in File Explorer and create a test folder.
- Confirm that the original volume still contains the expected files.
- Restart once if you resized the Windows volume.
- Resume BitLocker and verify that the recovery key is still available.
- Keep the backup until the layout and files have been tested.
Common problems
Shrink Volume is unavailable
The volume may use an unsupported file system, contain errors, be offline, or have a layout Disk Management cannot shrink. Back up the data, verify that the volume is NTFS, and run the appropriate read-only checks before changing it.
There is free space, but Windows can shrink only a little
Page files, shadow copies, hibernation data, or file-system metadata can sit near the end of the volume. Restart, make sure the file system is healthy, and retry. If the desired change is still unavailable, use a reputable partition tool only after creating a restorable backup.
New Simple Volume is unavailable
Check whether you right-clicked unallocated space, not an existing partition. An MBR disk may also have reached its partition limit. Converting to GPT can help on compatible systems, but it is a separate storage operation; read the guide to MBR-to-GPT conversion before proceeding.
You want to merge the space back later
Deleting the new volume erases its files and returns the capacity to unallocated space. Disk Management can extend another volume only into suitable adjacent unallocated space. For a worked example and additional cautions, see how to merge adjacent partitions.
Do not delete a partition merely because it lacks a drive letter. Windows recovery and boot partitions are intentionally hidden, and removing them can make the PC unbootable or disable recovery options.
Related Articles
 How to Split the Hard Drive, Merge the Partition on Windows XP8 minutes read
 How to Partition Hard Drive without Losing Data on Windows 10, 117 minutes read
 How to Partition a Hard Drive on Windows 11 Without Losing Data, Safely4 minutes read
 How to Safely Partition an SSD on Windows Without Losing Data10 minutes read
 5 Simple Ways to Partition Hard Drive without Losing Data on Windows9 minutes read
 Converting MBR to GPT on the Hard Drive Does Not Result in Data Loss4 minutes read
Reader Comments 0
Sign in with email or Google to join the discussion.