Table of Contents
This guide provides a practical overview of Quickly Cut Video in Windows 10 Without Installing Any Software, including its main features, benefits, limitations, and important considerations.
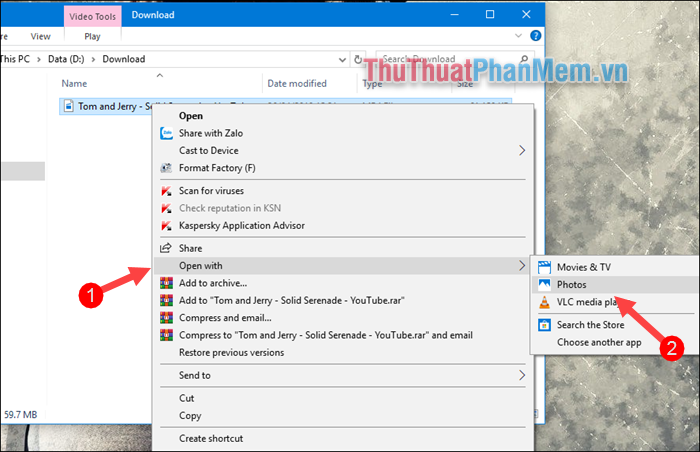
Step 1 : Right-click the video to select and select Open With -> Photos
Step 2: After the video is opened, click on the video, select Edit & Create and then select Trim

Step 3: The video cutting toolbar appears, select the beginning and end of the video you want to cut, select Finish and click Save a copy to save the video.

Step 4: A new window appears, select the saved folder, name the video and then click Save

Step 5 : Wait a moment for the video cutting process to finish:

And here is our result after cutting the video:

So with just a few simple steps, we have successfully cut the video right on windows 10 without installing any other software. Hope you will find the article useful, wish you success!
FAQ
What should I know about Quickly Cut Video in Windows 10 Without Installing Any Software?
Focus on the key features, requirements, limitations, and practical use cases explained in this guide.
How do I get the best results with Quickly Cut Video in Windows 10 Without Installing Any Software?
Follow the recommended steps, use current software or information, confirm compatibility, and review settings before major changes.
Are there any risks or limitations?
Potential limitations depend on compatibility, data quality, cost, privacy, support, and how the product or method is used.
Related Articles
 How to Cut Video on Windows 10 Without Software3 minutes read
 Cut, Merge Video Clips with the Utility Available in Windows4 minutes read
 How to Prevent Others from Installing Software on Windows3 minutes read
 Free Software to Replace the Classic Windows Movie Maker Video9 minutes read
 How to Compress Video Size Without Installing Software: Step-by-Step Guide9 minutes read
 5 Best Video to Mp3 Converter Software Today7 minutes read
Reader Comments 0
Sign in with email or Google to join the discussion.