Photoshop CS: Valentine card
What surprises do you give this Valentine? sweet roses or sweet chocolate bars ?. Whoa, surely your valentine's day will be great. On the occasion of Velentine Valentine's Day, the Network Administrator also dedicates to b
What surprises do you give this Valentine? sweet roses or sweet chocolate bars ?. Whoa, surely your valentine's day will be great. On the occasion of Velentine Valentine's Day, the Network Administrator would also like to give you, especially those with distant lovers, to design a Valentine's card. Hopefully, this will be one of the most amazing and amazing items that you can send to "the other half of love".
Designing a Valentine's card brings together a lot of things like Managing layer files, dragging Set layers from one document to another, combining 2 shapes 1. using some familiar tools like Brush, Pen. But most of these operations have been introduced in the exercises. How to create and use simple brushes, 2-picture collages, specific and detailed is the Creative lesson with New Year's cards. Therefore, in this Valentine card design, I will guide the main operations and mainly use keyboard shortcuts. If you are a new person for the first time to practice this exercise, be patient and repeat the steps through previous exercises. You will see actions become more specific and clear.
I. Chocolate candy box design.
Open a new document: Name: chocolate , With: 500px, Height: 400px, background color: white (#ffffff)
1. Box - The bottom of the box
- Step 1 : Manage File layer:
+ Click the " Create a new set " icon on the layer palette
+ Name set 1: " Day hop "
- Step 2: Exterior design
+ Add a new layer: Layer> new> layer . (or Ctrl + shift + N )> Name a new layer: " Mat do "
+ Set the background color " Set background color ": Red (# DB2908 )
+ Use the tool: Custom shape tool , with drawn lines: paths and shapes: heart
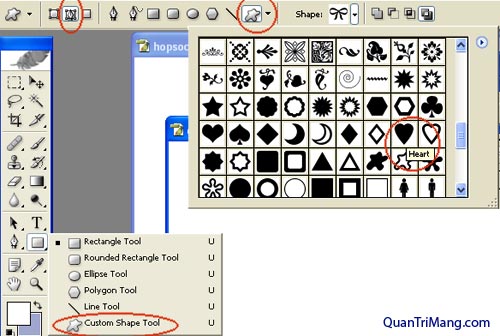
+ Move mouse to draw a symmetrical heart shape above the "Mat do" layer
+ Ctrl + Enter : Select the heart shape (A dashed line will surround the heart shape)
+ Ctrl + Backspace : Fill the selected red color (# DB2908) for the heart.
+ Ctrl + D : Uncheck the image (Losing the broken lines around)
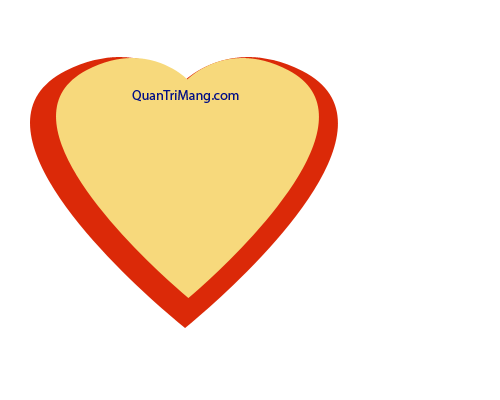
After step 2 you have the picture.

- Step 3 : Exterior design
+ Add new layer: Ctrl + shift + N > Name new layer: " Wine mat "
+ Set the background color : Gold color (# F7D97C )
+ Repeat operation as step 2: Draw a smaller, yellow, and heart shape that is more than 2px away from the red face
- Step 4 : Design box frame
+ Duplicate "Mat wine" layer : layer> new> Layer via copy (Or Ctrl + J ), Name the new layer: " Hop frame "
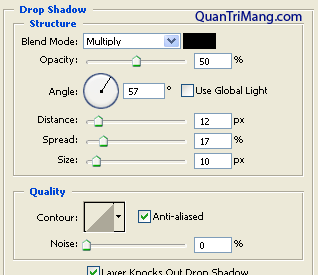
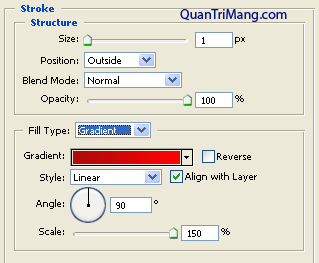
+ Right click layer "frame hop" > Blending options ., Set properties Drop shadow, Inner shadow, Stroke on Layer style as follows
Drop shadow
Inner shadow

Stroke

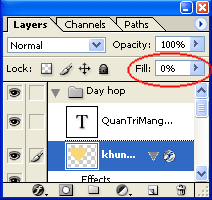
+ On the layer palette, adjust Fill: 0%
Result of step 4:

- Step 5: Frame to prevent candy
+ Click the mouse to select the "Mat wine" layer on the layer palette.
+ Add new layer: ( Ctrl + Shift + N ), name the layer: " Apply glue ".
Note: The "Ngan glue" layer will be between the "Wine mat" layers and "Hop frame".
+ Set the background color to remain Yellow (# F7D97C )
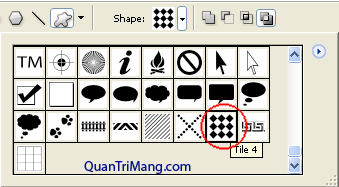
+ Use tools Custom shape tool , line drawing: paths and shapes: Tile 4
+ Move the mouse to frame a shape of the heart shape
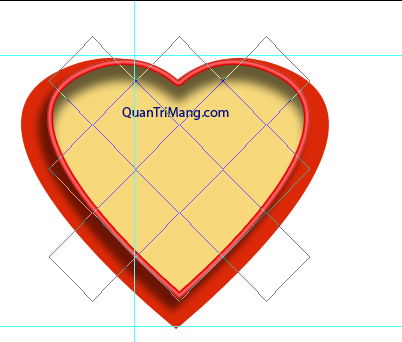
+ Ctrl + Enter: Select image
+ Ctrl + Backspace : Fill yellow for the selected image.
+ Press the Ctrl key and click on the "Mat wine" layer on the layer palette => At this time, a heart-shaped dashed line will surround the "Ngan glue" layer.
+ Invert selection: Select> Inverse (or ctrl + shift + I )
+ Press the " Delete " key on the keyboard, delete the selected outer part of the "Ngan hop" layer
+ Ctrl + D : Uncheck.
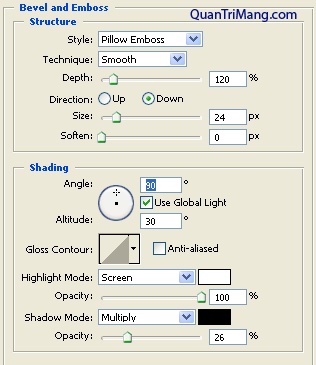
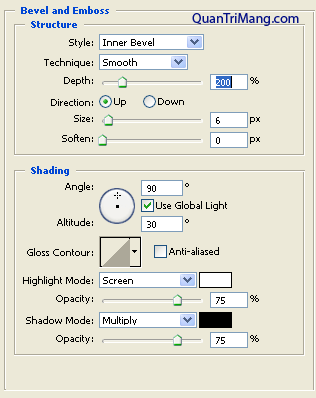
+ Right click layer "Ngan hop"> Blending options .> Set Bevel and embloss properties as follows
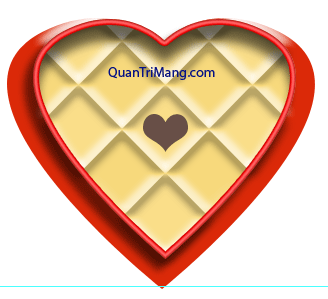
Finish the box bottom design, you have the following picture.

2. Chocolate candy
- Step 6 : Manage layer files ( Create a new set ), name a new set : " glue chocolate "
- Step 7 : create heart-shaped chocolate bars.
+ Add new layer ( Ctrl + shift + N ), name new layer: " Chocolate "
+ Set the background color: Brown (# 684F47 )
+ Use the tool Custom shape tool , drawing line: paths and shapes: heart card
+ Repeat the drawing operations like step 2, to get a small, brown heart shape, located between the boxes of candy boxes
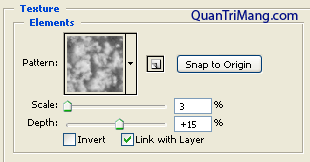
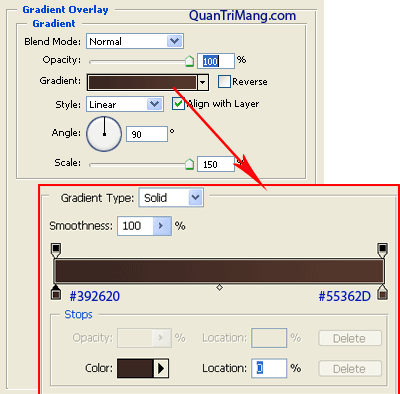
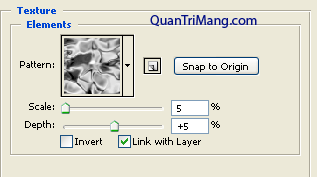
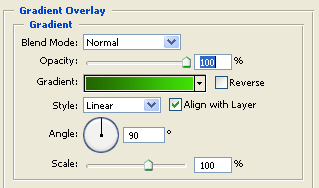
+ Right-click the "Chocolate" layer> Blending options .> Set the Bevel and Emboss properties and Gradient Overlay.
Bevel and Embos
Bevel and Embos> Texture
Gradient Overlay
- Step8 : Multiply " Chocolate " layer into different layers
+ Duplicate (Copy) "Chocolate" Layer: Ctrl + J
+ Continue to make this move into some other layer, so that the number of "chocolate copy" layers is equal to the number of "Prevent" frames
+ Arrange "Chocolate copy" pictures into the remaining candy compartments
+ With small candy compartments, resize the candy bar down to fit the candy compartment with: Edit> Free Transform (or Ctrl + T )
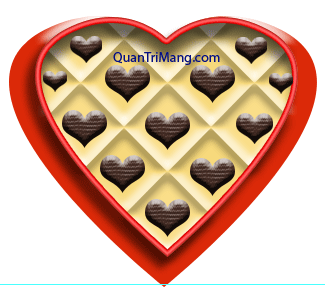
Finally you get the chocolate box.
3. Cover candy box.
- Step 9 : Manage files, name "Nap hop" set
- Step 10 :
+ Add new layer: Name: " Nap hop "
+ Reinstall steps 2, to get red heart shape. And set the Bevel and Embos properties on the layer style as follows:
Bevel and Embos
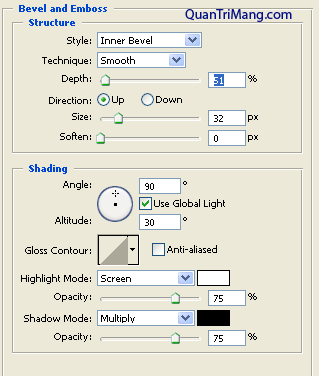
Bevel and Embos> Texture
result

- Step 11 : Rose design.
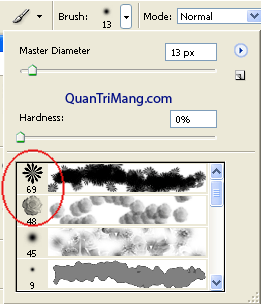
Part of this rose design, you will use 2 brushes: Azalea, Scattere rosses . You'll find two strokes of this pen in the Special Effect brushes section on the Brush drop-down menu
Set the foreground and background colors: Black (# 000000) - Red (# DB2908)
* Draw the leaf.
+ Add new layer ( Ctrl + shift + N ), Name: " La blue "
+ Use " Azalea " brush, size: 90px
+ Click once above the lid of the box, you get the picture of black leaves (the color is taken according to the color of the foreground)
+ Right click "la blue"> Blending options .> Set Gradient Overlay attribute with dark green - light (# 226501 - # 3FE106 )
* Drawing roses.
+ Add " Rose Flower " layer
+ Use the " Scattere rosses " brush to draw a flower above the leaf. Roses will now have a combination of black and red (according to the default foreground color - after), and very blurry
+ To make roses clearer: Right-click layer "Roses"> Blending options .> set the Stroke properties for the layer
Result
* Duplicate the " La blue " layer and the " rose " layer to get 2 leaves and 2 flowers, Arrange them in the proper position on the lid as you like. The candy box will be more beautiful.
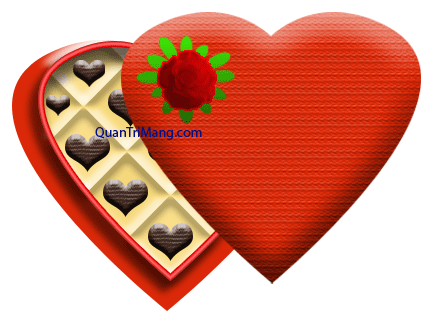
This is my example and also the whole piece of chocolate candy box design.

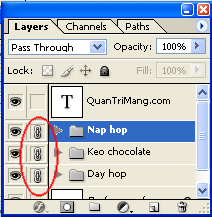
- Step 11 : Set the "Day hop", "Glue chocolate" and "Nap hop" layer sets by: Click on any Set layer, then click on the link icons on the layer palette.
II. Card Background Design
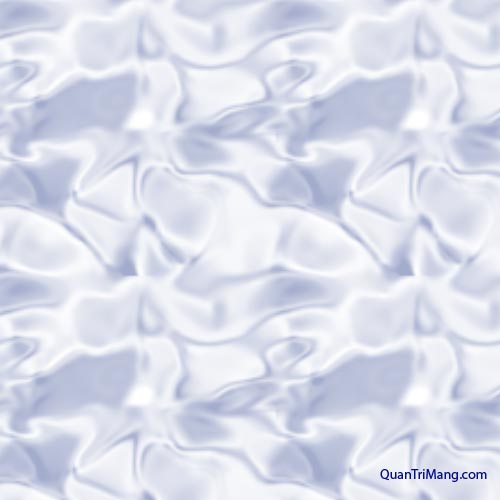
Imagine, you will put the chocolate candy box on a silk sheet, so your card will be more luxurious. The job now is to design the card background like a piece of soft silk
- Step 12
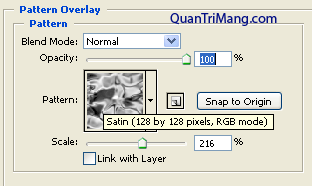
+ Open a new document: Name: Nenthiep , With: 500px, Height: 500px, background color: white (# ffffff )
+ Add new layer: ( Ctrl + shift + N ), name the layer: "Lua", color: White ( #ffffff )
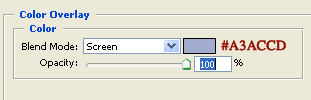
+ Set Color overlay and Pattern overlay properties on layer style for "lua" layer as follows:
Color overlay
Pattern overlay
The silk background will look like you see it
III. Complete the card.
- Step 13 : Now drag the set of layers to the "chocolate" Document to the "Nenthiep" Document.
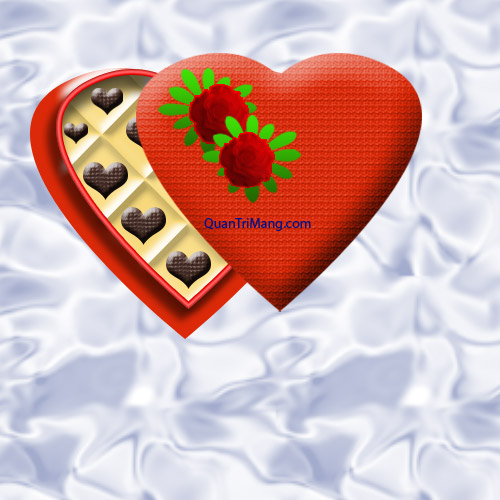
- Step 14 : Find a picture with a rose-shaped picture that you like. My postcard will use this flower shape

Use the pen tool or Magic wand tool to cut off the rose.
Using the two-picture technique: You will put the rose on the "Nenthiep" Documen, put your hips in the appropriate position you want.
For example:

- Step 15: The most complete card is that you don't forget to include a message of love. This part will probably not need to be introduced, you use the text tool and write something.

Wish you Valentine's Day happy and happy.
Was this article helpful?
Your feedback helps us improve.
Related Articles
 How to make Valentine's cards like candy2 minutes read
 The most beautiful Valentine card templates5 minutes read
 Beautiful valentine card, beautiful valentine photo sent to your lover on February 142 minutes read
 Photoshop - Create romantic greeting cards for Valentine's Day7 minutes read
 Quick and easy Valentine painting ideas3 minutes read
 Open a virtual Valentine card, really deep2 minutes read
Reader Comments 0
Sign in with email or Google to join the discussion.