Detecting and preventing intrusion in Forefront TMG - Part 2: NIS
Network Administration - In Part 2 of this series, we will introduce the TMG firewall's advanced intrusion detection and prevention features.
As introduced in part one, this part two will focus on introducing the Network Inspection System (NIS). First, in-depth understanding of the features of this component, let's find out what the Network Inspection System (NIS) is.
Network Inspection System
Network Inspection System (NIS) is a completely new intrusion detection and detection system, it was first introduced in Forefront Threat Management Gateway (TMG) 2010. NIS analyzes network traffic and performs inspections. Low-level protocol to detect and prevent vulnerabilities based on vulnerabilities in Microsoft operating systems and applications. NIS works based on digital signatures. These signatures are developed by the Microsoft Malware Protection Center (MMPC). They are provided to NIS by Microsoft with security updates released during the regular Microsoft upgrade release cycle (every second Tuesday of every month) or may be released without planning. respond to zero-day hazards if needed.
NIS is designed to avoid known vulnerabilities in remote operating systems and applications from Microsoft. The digital signature set is relatively small but very meaningful. The secret of the effectiveness of NIS lies in the protocol analysis language called GAPA (Generic Application-level Protocol Analyzer). GAPA is not different from the protocol parsing function provided by Network Monitor. This type of inspection produces much more accurate results than the byte analysis pattern still encountered. NIS analyzes data packets at the protocol layer, packet structure and message content. It can identify and block attacks that target known vulnerabilities. In addition, NIS can identify protocol irregularities and prevent overuse.
NIS technology is included in many Forefront protection products, including server protection products like Forefront Protection for Exchange (FPE) and SharePoint (FPSP) as well as client protection products such as Forefront Endpoint Protection (FPE) and Microsoft Security Essentials (MSE). When NIS is deployed, Microsoft can gather feedback on the type of attack that has been taking place and use this information to improve the quality of updates to digital signatures.
When a packet is allowed by the firewall policy and inspected by the protocol filter, the NIS policy engine will perform low-level network protocol inspection using the existing digital signature set. Setting. If a match occurs, NIS will take action based on the pre-established policy (blocking or detection) and issue a warning. NIS supports network protocol inspection for DNS, HTTP, IMAP, MIME, MSRPC, POP3, SMB and SMTP. In the future, Microsoft may add some protocols if demand is high.
Activate and configure NIS
NIS can be activated and configured by using the Getting Started Wizard and clicking the Define Deployment Options link , then selecting Activate complementary license and enable NIS .
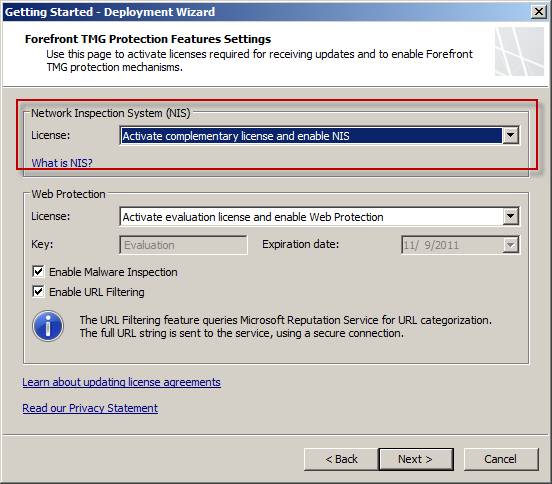
Figure 1
Set up NIS Signature Update Settings and select automatic definition update action . You can select Check for an install definitions (recommended) , only check for definitions , or no automatic action . Select Automatic polling frequency and specify the upgrade warning threshold.
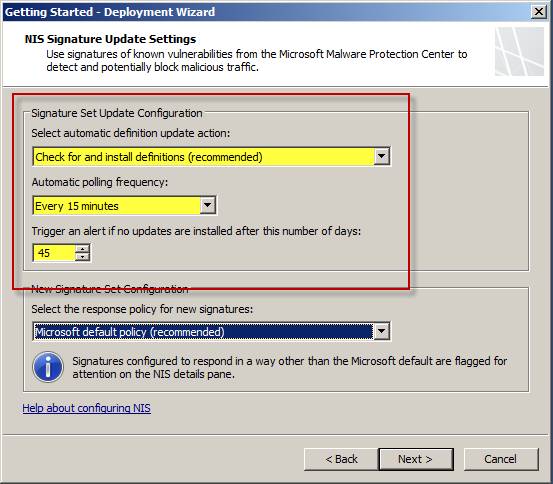
Figure 2
Define New Signature Set Configuration by selecting the default response policy for new signatures. You can accept Microsoft default policy (recommended) , Detect only response , or No response (disable signature) .
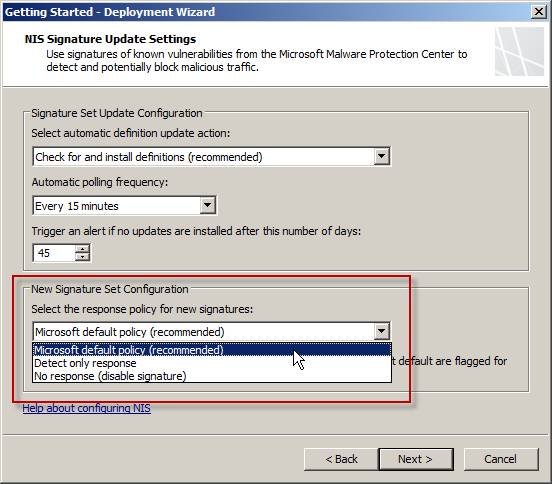
Figure 3
Once the NIS is enabled and configured, you can access the NIS configuration by opening the TMG management console, marking the Intrusion Prevention System , then selecting the Network Inspection System (NIS) tab in the main console. At the top of the main window, you can see the status of NIS Status , Signature Set Version , New Signature Response: and Update Action:.

Figure 4
Click on any link that will appear on the NIS property sheet. On the General tab you can enable or disable the entire NIS.
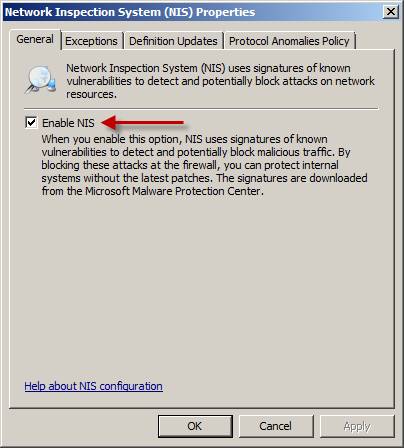
Figure 5
On the Exceptions tab , you can define the network object (network, network set, computer, set of computers, address range, subnet or set of domains, etc.) to be excluded from NIS inspection. Exempting from inspecting some of the network traffic required in some situations, for example reliable systems exchange a lot of information and you need to reduce the load on the TMG firewall, or it can be a delivery application. Network protocols do not follow RFC standards.
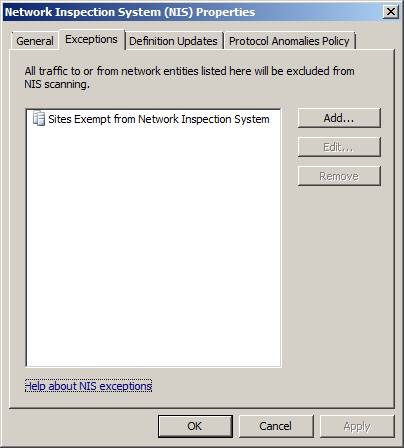
Figure 6
On the Definition Updates tab , you can review and change settings for updates and alerts as well as the default response policy for a new signature. By default, Microsoft will allow you to select the following cases: the signature will be activated, set to lock or only detected. This decision is made based on the signature type and their trust. By clicking Version Control ., the administrator can ' roll back ' back to the previous signature file if needed. This technique is quite necessary when the new signature set raises problems in your network environment. If you choose this option, you will see a warning indicator saying ' activating an older NIS signature set to expose your network to newly discovered threats '.
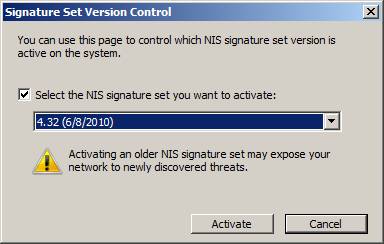
Figure 7
On the Protocol Anomalies Policy tab , administrators can define how the NIS responds when it detects an abnormal network traffic. As mentioned earlier, NIS will perform protocol inspections and be able to identify when traffic does not comply with RFC. By default, NIS is configured to allow anomalous traffic, to avoid blocking legitimate traffic. If you choose to block anomalous traffic, increase security, the risk of blocking legitimate communications also increases.
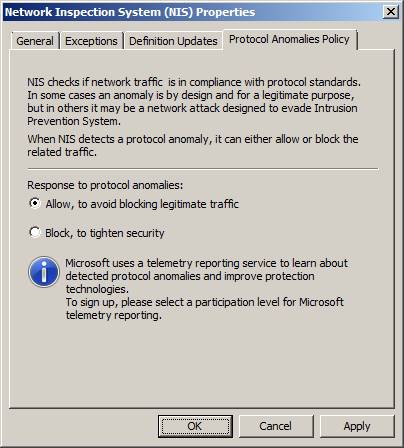
Figure 8
Check out the NIS digital signature
In the middle of the main window, you can observe the current NIS signature set. As you can see, there are about 200 signatures loaded . You can group signatures of interest such as: policy type, business impact, category, published date, severity, fidelity, protocol and status by selecting the Group by: menu. You can also sort by clicking on the column header. You will see that we classify signatures by Published Date , a classification method that allows quick viewing of the latest signatures that have just been added.
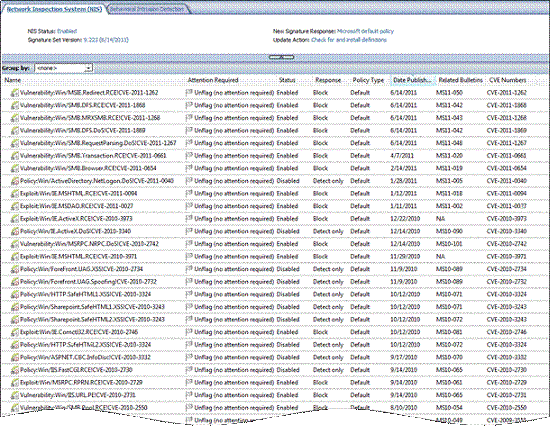
Figure 9
Double clicking on a signature will bring up a window containing detailed information about it. Here we have opened the properties of the signature based on the Win / MSIE.Redirect.RCE! CVE-2011-1262 vulnerability . As you can see, the response policy for this signature is set to Microsoft default (recommended) and the signature is enabled and set to lock. The administrator has the option to override the default response policy by clicking Override . Here, you can enable or disable the signature or change the response policy if needed.
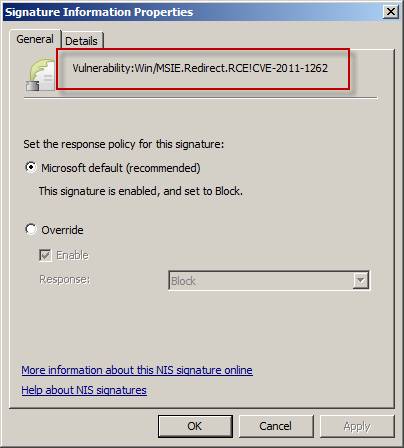
Figure 10
Clicking the Details tab will reveal more information about the signature, including the affected application, category, CVE number, business impact, publication date, default response, default status, etc. There is a field so administrators can add notes about the signature. Click More help about this NIS signature online will take you to Microsoft knowledge support, where you can see more details about the signatures.
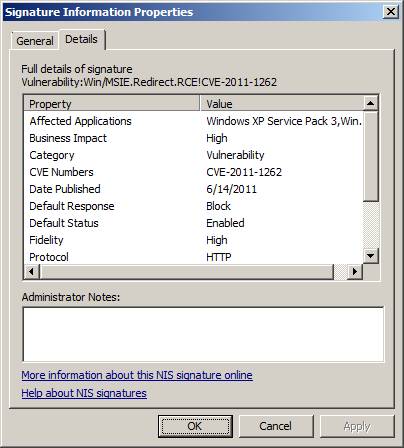
Figure 11
NIS response configuration
Panel Tasks has many links to several configuration tasks. Two important configuration options that can be accessed here are Set All Responses to Microsoft Defaults and Set All Responses to Detect Only . If you want the NIS configuration to be just an intrusion detection system, set the default response policy to only detect. NIS will continue inspecting traffic but will only warn, not block. This method can be useful when activating NIS for the first time on the production network. After believing that NIS will not block normal traffic, you can set up all responses with Microsoft default values.
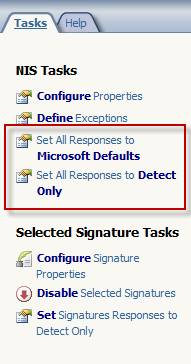
Figure 12
Digital signature types
There are three types of NIS signatures:
- Based on vulnerabilities - This signature will detect exploits for known vulnerabilities. They are different from traditional attack-based signatures because most variants of attacks can be identified. There are many signatures with high accuracy and are often enabled to allow the default lock.
- Exploitation-based - This type of signature is like traditional attack-based signatures, designed to detect a very specific exploit of a known vulnerability. They are also highly accurate and are often enabled to allow the default lock.
- Policy-based - This is a medium-precision signature type, which is primarily designed for authentication needs. Not enabled by default. If the administrator activates this type of signature, their default response policy will be set to only detect status. These policy-based signatures are created when a signature cannot be created based on a vulnerability or based on exploitation.
- There are also many other signatures created specifically for testing purposes. These signatures are enabled and set to block default blocking. They can be used to ensure the TMG firewall and NIS are inspecting the correct network traffic and giving the correct response.
Upgrade signature
Signature-based technology, NIS is only effective when the latest signatures are updated in a timely manner. These signatures can be downloaded from Windows Update or local WSUS. To ensure the NIS has been properly updated, highlight the Update Center button in the navigation interface tree. The main window will indicate the upgrade status for the protection mechanism and will have detailed information about when the upgrade occurred, the version number of the current signature set as well as the registration status.

Figure 13
If the management interface indicates that the NIS signatures are out of date, you can check and install the new definition using the corresponding links in the Tasks panel.
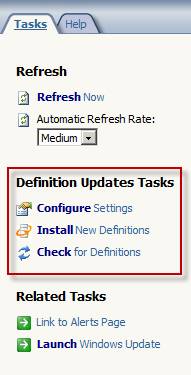
Figure 14
Conclude
Intrusion detection and prevention system (IDS / IPS) is a basic component of any network security architecture. Forefront Threat Management Gateway's Network Inspection System (NIS) is the only addition to IDS / IPS. Designed specifically for detecting and preventing vulnerabilities in Microsoft operating systems and applications prior to remote exploitation, NIS provides a valuable layer of protection for Microsoft network products. To this extent, it is not designed to replace the existing enterprise IDS / IPS but only complement this system by providing the ability to detect and respond to threats to the Public is based on the Microsoft vulnerability has been known. With signature updates created by the Microsoft Malware Protection Center (MMPC), NIS is very accurate and effective, causing very few errors. The NIS is encapsulated in the cost of a TMG subscription, so there is no need for additional registration to perform this function. Enabling the NIS on the Forefront TMG 2010 firewall will significantly improve the security situation for your entire organization.