Optimize Windows 7 computers
In this article we will show you some tips for best performance for Windows 7 computers.
Windows 7 has some significant improvements in performance compared to its predecessor, Windows Vista. However, if you want to get the best performance possible, you need to make some small adjustments to the system to eliminate some resource-intensive programs and features. In this tutorial, we will show you some ways to increase the performance of your computer without upgrading hardware.
First of all, you need to keep in mind: A quick search on the Internet will lead you to a treasure trove of little tweaks to your operating system, but you need to know - many suggestions. just a 'yellow mineral', some guidelines for previous operating systems like Vista and XP can reduce the performance of Windows 7 systems.
The adjustments and suggestions we provide here will not turn an old computer into a completely new computer, but they will give your computer a little extra speed, storage space. of a Windows 7 computer installed by default. If you plan to make other changes to Windows 7 far beyond the options we introduced here, then you need to be careful about the advice you want to make for the system. operator. Don't be fooled by advice and guidance from less reputable places you find on the Internet. Carefully research the changes you intend to make to your system before doing anything, otherwise you will most likely encounter unexpected situations (or even not can be repaired).
Speed up a new Windows upgrade
When sitting in front of a new desktop computer after you've finished installing Windows 7, you might be surprised to find your components work perfectly. For most components, Windows 7 is quite good at setting up drivers for networks, video, output devices and other components - well, but that's not all.
To maximize performance for your computer, the first thing you need to do is find and install Windows 7 drivers for all the key components that come with the system. The motherboard driver is the most important component you need to consider, especially if the video and audio systems are integrated into the motherboard. If these components are not integrated with the motherboard, you need to add the video card and sound card drivers to your search list, followed by the output devices and any other components you attach. included with the system (such as Wi-Fi card, PCI devices and printers). If you're not sure what components you have, use the free DriverMax program to scan your entire system for components and driver updates.
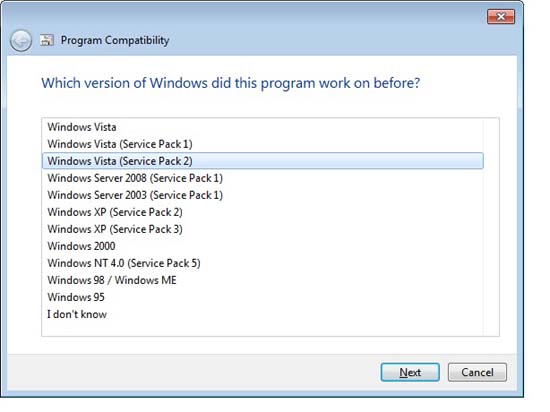
Can't find a driver for Windows 7 for a product? In this case, try using Windows Vista drivers instead. If something goes wrong, right-click the executable file and left-click Troubleshoot Compatibility. Perform reminders on the wizard and find the program running in the previous version of Windows but not running in Windows 7. Select Windows Vista as the following operating system, click Next for the prompts, then run the installation file again.
Finally, although it may be odd, don't use Windows Updater to install drivers for your computer - Microsoft is very notorious for releasing old and incompatible drivers through this service.
Optimize storage space
If you have Windows 7 installed as an upgrade from Windows Vista, you will find a folder called C: Windows.old . This folder will hold all the contents of the old Windows Vista system. It is very large and takes up a lot of hard disk space. Look for the files you want to keep in the new Windows 7 operating system, then delete this entire folder to increase the space for your hard drive.
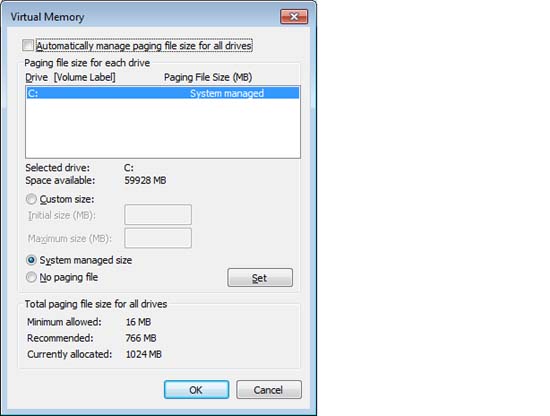
If a computer has more than one hard drive, you can increase its performance by moving the system's paging file location from the drive containing the C: partition to a separate hard disk. To do so, open Control Panel and select System . From here, click Advanced System Settings . Select the Advanced tab, then click the Settings button underneath the Performance section . On the new window that appears, select the Advanced tab. Finally click Change . Uncheck the box labeled Automatically labeled manage paging file size for all drives . Select C: from the Drive box and move it to the option No paging file . Next, choose another drive and choose System managed size . Click OK and restart the computer.
Increasing productivity
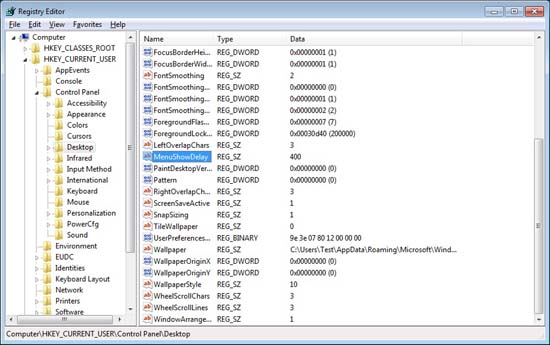
To get a faster experience with Windows 7, change the amount of mouse time and clicked menus to appear. Click the Start button and type regedit in the 'Search programs and files' box . Welcome to the Windows 7 Registry - here you should not touch or change anything without a good reason. Right-click the arrow next to HKEY_CURRENT_USER . Open the Control Panel folder, then click directly on the Desktop. In the right pane, search and double-click MenuShowDelay . Change the value from 400 to a lower value; This is the number of milliseconds between your mouse click on a menu display. Restart the computer for the changes to take effect, or you can continue with the next adjustments.
Do you see folders named Mouse (below Desktop)? Click this folder, then search and select MouseHoverTime Registry key. As above, change this value to a lower value. Then close the Registry Editor, restart the computer.
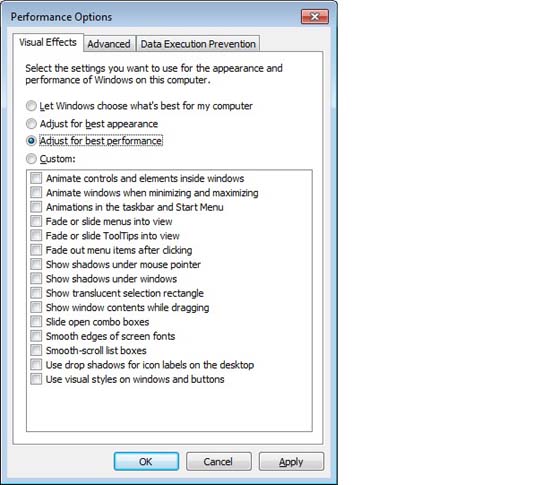
If you are willing to sacrifice the interface to get speed, you can change the visual settings of the Windows 7 interface to improve performance. Go back to the System section of the Control Panel and click on Advanced System Settings. Again. In the System Properties window, select the Advanced tab, then click the Settings box under Performance. The Performance Options window will appear. In this window, you will see a list of selected checkboxes corresponding to all the windows on display in the operating system.
If you're not interested in turning your operating system into a version of Windows 2000, click the button for Windows to adjust its visual settings to get the best performance. This is a pretty harsh step - if you like a method that changes gradually, deselect the Windows Aero related check boxes (such as Aero peek and transparent glass). You will still be able to maintain the beauty of your desktop while improving performance slightly.
Conservation of resources
Once you have installed a reasonable number of programs on your computer, you should ensure that your system does not have any unwanted applications running in the background, because these programs will degrade performance. Actual productivity for your computer. These programs often start automatically during the operating system boot process, they are often designed to help you load the applications associated with them faster. The problem here is that they always run, regardless of whether you like to use the application during that session.
Click Start and type msconfig in the 'Search programs and files' field . Press Enter . In the System Configuration window, select the Startup tab. Move your mouse between the headers of the Manufacturer and Command columns, shrink the Manufacturer column because the Command column is the column you should be interested in.
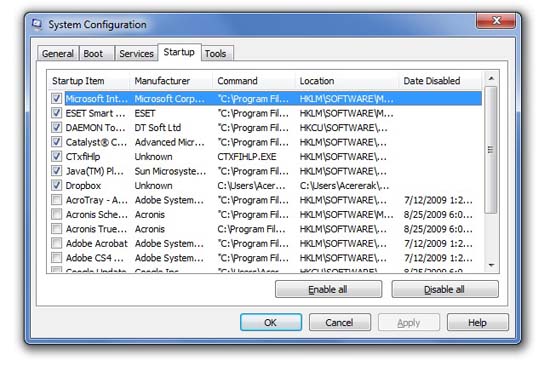
Some startup applications that start on your computer will be in the background, consuming resources. For example, iTunes: If you have installed this application, you will see iTunes and QuickTime listed in the Startup tab. Both iTunesHelper.exe and QTTask.exe files are additional files that are not required for your system, please uncheck them.
For other programs on the list, you should perform a web search for the application's executable files to determine if the program is worth keeping or should remove. Once you've checked the programs you want to launch at startup and uncheck the unwanted programs, click OK .
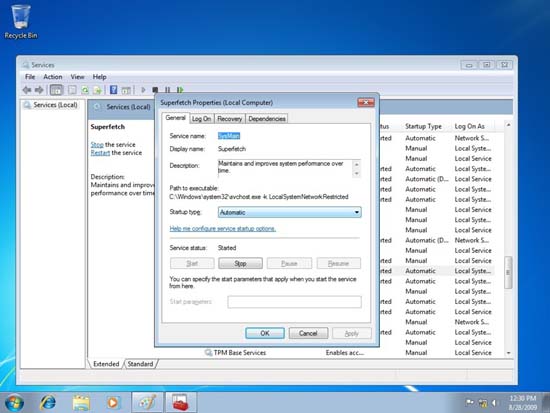
In addition to startup programs, you will see services on your computer; These are things you also need to adjust slightly to improve system performance. For services, click Start, type services.msc into the search field, and press Enter . When the Services window appears and your work is similar to the startup programs, there is only a list of executable files and options that may clutter over the startup window.
Maintain peak performance
If you want to keep the system fast, clean the folder C: WindowsTemp when there is a chance. Do this as soon as you boot into the operating system, or even in Safe Mode , to make sure that you have deleted all unused files from your drive. Do not use the uninstall function of Windows 7 or the default uninstall file for the application to remove it from the hard drive. Instead, you should use the Revo Uninstaller utility, which is an application used to remove programs that are using their default uninstaller, but it is much more powerful than uninstall programs. Set this default by scanning the system and Registry to clean the traces of programs in your entire hard drive.