Learn about Layers Palette in GIMP
GIMP photo editing application provides a powerful set of tools to work with layers in graphic files. The tools are grouped together in the Layers Palette.
Table of Contents
GIMP photo editing application provides a powerful set of tools to work with layers in graphic files. The tools are grouped together in the Layers Palette, including thumbnails of each layer in order in the image. You can open the Layers Palette in a separate window or combine with another palette and switch back and forth with tabs. The Layers Palette allows designers to build images with different and separate elements.
Open new palette
1. Click the "Windows" menu .
2. Select the "Dockable Dialogs" option.
3. Select "Layers".

Add the Layers tab
1. Click the arrow near the top of the existing palette.
2. Select the "Add tab" option.
3. Select "Layers" and the Layers tab will appear at the top of the window next to the tab for the original palette.
Tip : The palettes may appear in a separate window or as a control panel in the main window. Click "Single-Window Mode" from the Windows menu to switch the display method.
Note : The information in this article applies to GIMP 2.8 and may change more or less in other versions.
How to use Layers Palette in GIMP
The first tool is the drop-down menu that controls the mode of the layers. It affects how a layer interacts with layers that appear below in stacking order. There are a variety of options that can create extremely different effects and graphic designers using Layers in GIMP should take the time to test these different options.
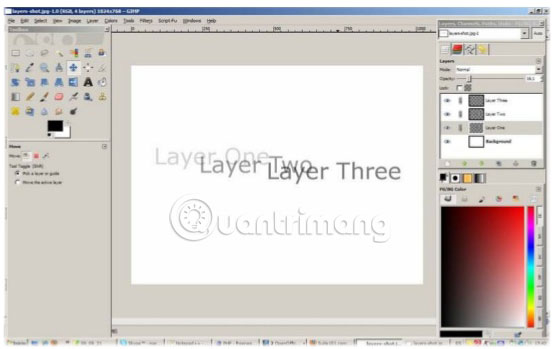
Below that is the Opacity slider , which is used to control whether the underlying layers can be seen through the upper layers. The Lock button below the slider is used to make all transparent pixels in a layer remain transparent even when the Paint Brush is applied, useful for changing the color of a part of the image without doing it. change the shape of other parts.
The main part of the Layers Palette is the layers. The Layers Palette shows the current sort order of all layers in an image, and the order of this layer can be changed by clicking on a layer and dragging it up or down in the palette. The order can also be changed by selecting a layer and clicking the arrow button in the bottom bar of the palette.
A layer can be hidden by clicking on the eye icon, which appears to the left of each layer. The layer will show again if clicked on this icon again. The right button of the eye icon can be used to link two or more layers together, so that if a layer is moved or shrunk, the linked layers also move or change the proportion corresponding to first layer. A new layer can be added to the Layers Palette by clicking on the button to the left of the bottom bar.
The fourth button from the left can be used to duplicate a layer. When a new element is pasted into the image, it can be merged with an existing layer, by clicking on the anchor button or manually assigning a new layer by clicking on the New Layer button as above.
The final control option in the Layers Palette is the Trash Can button , which is used to delete a selected layer. The Layers Palette provides designers with a variety of features to make the image more interesting and outstanding. Spending a lot of time experimenting with these options will yield surprising results.
Hope you are succesful.
Was this article helpful?
Your feedback helps us improve.
Related Articles
 How to view the Layers list in GIMP3 minutes read
 How to change the layer size in GIMP10 minutes read
 How to Create a Realistic Lightsaber in GIMP3 minutes read
 How to Recolor Anything on Gimp9 minutes read
 How to create clipping mask in GIMP11 minutes read
 New features of GIMP version 2.1010 minutes read
Reader Comments 0
Sign in with email or Google to join the discussion.