Introduce and deploy VMware vSphere Data Recovery
In this article we will introduce you to VMware vSphere Data Recovery software and how to deploy it how to perform data recovery..
Network Management - In this article we will introduce you to VMware vSphere Data Recovery software and how to deploy it how to perform data recovery.
One of the new features in vSphere is Data Recovery, in the 'Essentials Plus' solution or vSphere Advanced version. This new feature is provided as a virtual machine within the vSphere environment and integrated with the vCenter server to provide centralized management of backups.
vSphere Data Recovery has greatly improved compared to the previous 'VMware Consolidated Backup' with a fairly complete GUI management interface with a variety of wizards that help install and manage all backup and restore tasks.
main function
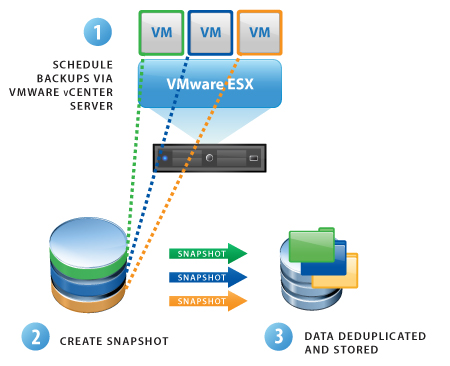
- Complete and complete backup of virtual machine images (VM) and backup / restore file levels for Windows virtual machines.
- Support VSS for Windows virtual machines for more reliable backups
- Avoid duplicating data to reduce storage space for backups
- The vCenter management interface for centralized GUI management and the use of multiple wizards to simplify operations.
- Disk storage using a variety of standard connection protocols - iSCSI, FC, NAS or internal storage
- vSphere is fully integrated and has many improvements, continues to backup virtual machines when they are transferred to another host.
You can check VMware Data Recovery for free by evaluating VMware vSphere here.
Is this an alternative to your current disaster recovery solution?
The answer here is no, vSphere Data Recovery is not intended to be a backup solution, although it can greatly improve your disaster recovery capabilities. There are two main reasons for this, the first being that the software only supports disk backups, so you still have to provide some form of off-site storage. The second problem is that, despite the file level recovery feature, this feature only supports Windows virtual machines, there are no plug-ins for applications like Exchange or SQL. vSphere DR is best suited for solutions where you need to restore an entire virtual machine, but when you just need to restore an important email to your CEO, you will need to use the application. My usual backup.
Deploy vSphere Data Recovery
There are two parts to installing Data Recovery: installing the management plug-in and importing the virtual machine. Both parts are provided on the same ISO CD image so the first thing you need to do is burn it to a CD, or simply mount it on your vCenter server using a virtual CD application like Daemon Tools for example. When you have completed this step, the program will automatically run, otherwise you will need to double-click the CD to activate the launcher. The original picture is provided below.
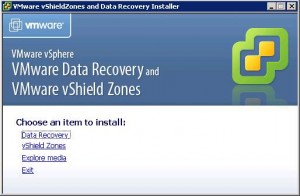
You will see that the CD image also has installation files for vShield zones, although this is a completely different feature so please ignore it now and select the " Data Recovery " option. Click " Next " throughout the installation process, because without any options you can change, agree with the registration and then you will be surprised by the very fast installation process of the program. .
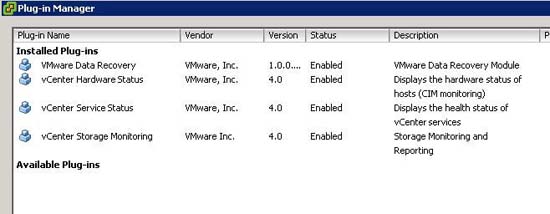
When you're done, you won't see any new entries in the Programs list, all installed here is an additional plug-in for the vSphere client. So if you regularly run vSphere client on another system for your vCenter server, you need to run the above installation procedure on your client to add plug-ins. When the installation is completed, if you open vSphere client and select " Manage Plug-ins " from the " Plug-ins " menu, you will see the Data Recovery module listed there:
Deploy virtual Data Recovery device
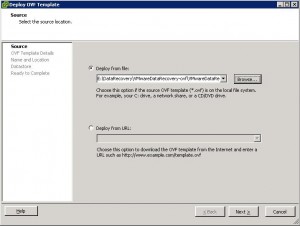
Data Recovery is provided as an OVF sample file so to deploy it on your virtual environment, you need to open the " File " menu in vSphere Client and select " Deploy OVF Template " to start the wizard. On the first page, select the " Deploy from file " option, then browse in DataRecovery CD to locate the sample file .ovf:
Click " Next ", and the wizard will show you the details of the virtual machine, you cannot change anything here, you can just click " Next " to select the name and location to which the device will be installed. put. There is no need to change the name unless you really want it and the location will be the default unless you have multiple data centers in your vSphere client. In the next page, select which datastore to deploy the virtual machine, only requires 5B of free space and is not required to be on the shared space, so the location depends on your network topology. Click " Next ", your final decision is to map the network.
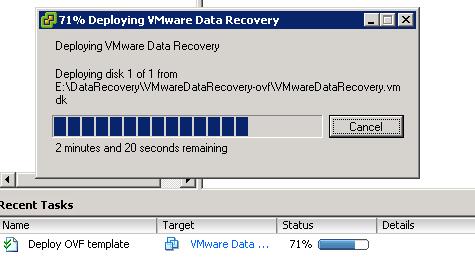
The last page will list all the options you have chosen, give you the last chance to check if everything is correct, assume it is correct, then click " Finish " to begin. deployment. A window will appear showing the deployment process and you will also see it appear in your " Recent Tasks " panel, the time will depend on a few factors but it will probably take a while:
When the deployment is complete, you will see the new VM in the vSphere inventory, select it to see the configuration but have not started yet because you still need to decide what to do about the backup space first.
Select the location to save backup data
There are two basic types of storage supported by Data Recovery, internal VM storage using a virtual disk located on vSphere data store, networked storage such as shared folder of Windows. Internal VM storage is usually much faster than storing on the network, though network storage will be more flexible, typically when it comes to creating secondary backups for your DR data. The two are not mutually exclusive, though to make the test easy, you should use internal storage, then when planning your online backup configuration, because you are now completely can change network storage if necessary.
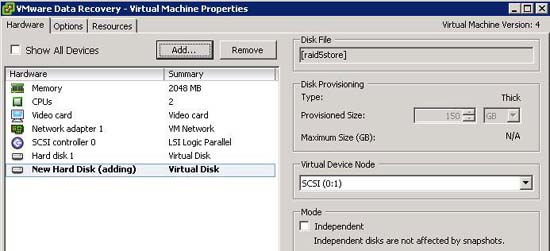
If you provide internal storage for Data Recovery, you need to add a second hard drive to the virtual machine, which will be provided as a location to store backups. To do this, select the VM in your vSphere client, then from the " Summary " tab, click the " Edit Settings " option. Click the " Add " button to start the " Add Hardware " wizard, then select the device type as " Hard Disk ". On the next page, select " Create a new disk " and click ' Next ", then you must specify the size of the disk.
Increasing backup backup and avoiding copying data will help reduce backup data size but to start, you definitely need to have double the amount of VM data you are trying to backup. Don't worry much about this number because you can easily reduce or increase the storage size before doing so by deleting or recreating the virtual disk. Ignore the provisioning and tolerance options in this case because no component is involved, then select another database if needed. Click " Next ", the next page will list advanced options, but you can safely ignore it to click " Next " to go to the last confirmation page, check what your choices are in the list. book and click " Finish ". Now you will see the second disk in the list when " Adding " in the settings page, click " OK " to close the window, you will see the task run to add the disk to the VM.
Conclude
In this article, you learned how to add Data Recovery plug-in to vSphere client and how to deploy DR in your virtual infrastructure to prepare to start using it for protecting your virtual machines. In another article, I will show you how to create and restore backups using vSphere Data Recovery.