Table of Contents
- 1. How to speed up VMware virtual machine
- 1.1 Setup RAM on VMware
- 1.2. Defragment hard drives on virtual machines
- 1.3. Setup Ram for VMware virtual machine
- 1.4. Set virtualization and CPU multiplier on VMware virtual machine
- 1.5. Accelerated graphics processing settings on VMware virtual machines
- 1.6. Use the Suspend feature instead of Power Off
- 2. How to install Kali Linux on VMware
- 2.1. Setting up Kali Linux on VMware
- 2.2. Install Kali Linux
- 3. How to change the MAC address of the VMware virtual machine
- 3.1. Change MAC address on Windows virtual machine
- 3.2. Change MAC address using network settings in VMware
- 4. How to connect 2 virtual machines in VMware
- 4.1. Set up virtual networks for virtual machines
- 4.2. Virtual network configuration on virtual machine
- 4.3. Check
- 5. How to install Android on VMWare
- 5.1. Prepare
- 5.2. Setup on VMware
- 5.3. Install Android on a virtual machine
- 5.4. Boot setup and fix black screen error
- 5.5. Setup settings in Android and check
1. How to speed up VMware virtual machine
This guide compares 5 leading Tips for Installing and Using VMware Virtual Machine, focusing on useful features, compatibility, ease of use, and overall value.
1.1 Setup RAM on VMware
If your computer has a lot of RAM, you should set a little more RAM for VMware to make VMware run smoother.
Step 1: Open VMware and click on the Edit menu (1) => Preferences.. (2) .

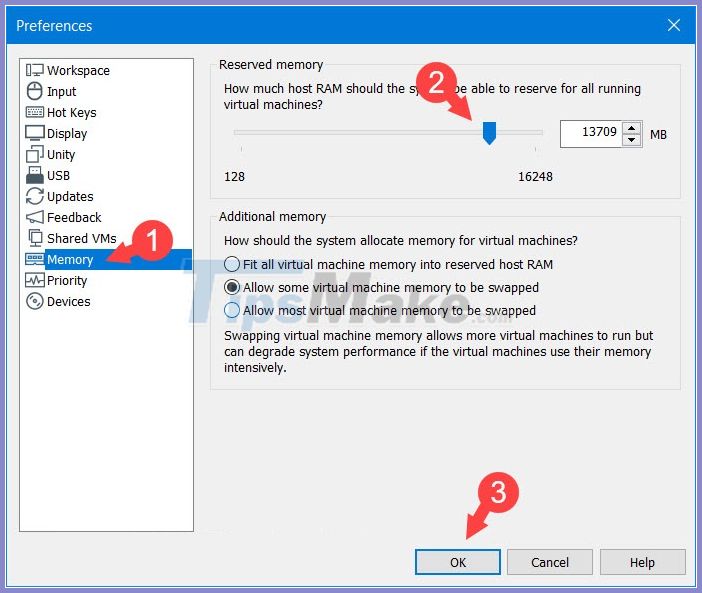
Step 2: You click on Memory (1) => set the Ram level for VMware by sliding the slider to the right (2) => OK (3) .
Note: You should set the Ram level for VMware to approximately 70-80% of the RAM on your computer to provide good performance and not make your computer slow, laggy.
1.2. Defragment hard drives on virtual machines
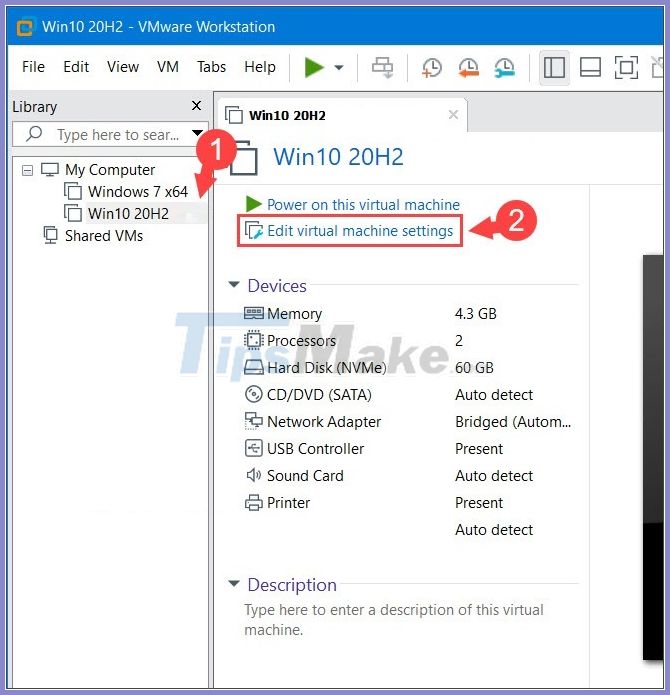
Step 1: Click on the virtual machine (1) => Edit virtual machine settings (2) .
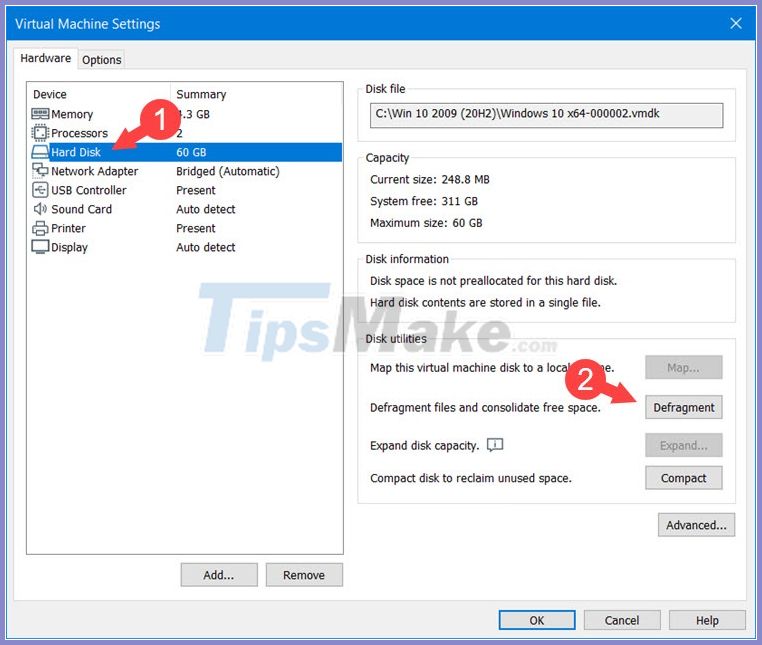
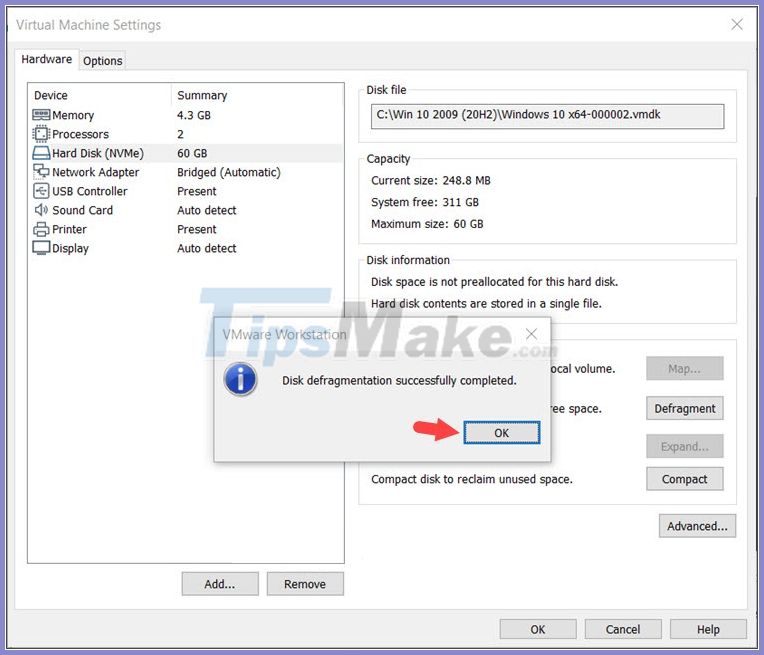
Step 2: Click on Hard Disk (1) => Defragment (2) .
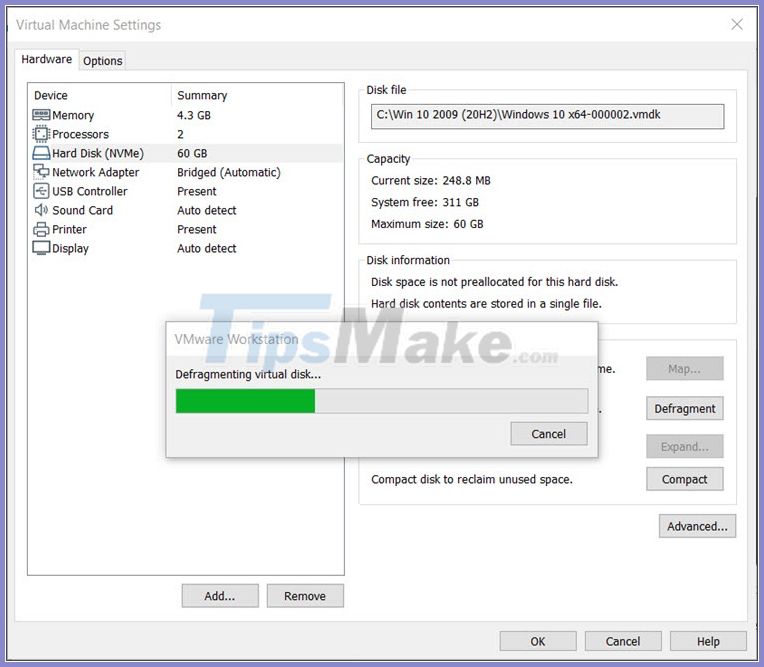
After that, the hard drive defragmentation process will take place.
Step 3: After the notification pops up, it's done. Click OK to continue.
1.3. Setup Ram for VMware virtual machine
Step 1: Click on the virtual machine you need to set up Ram (1) => Edit virtual machine settings (2) .
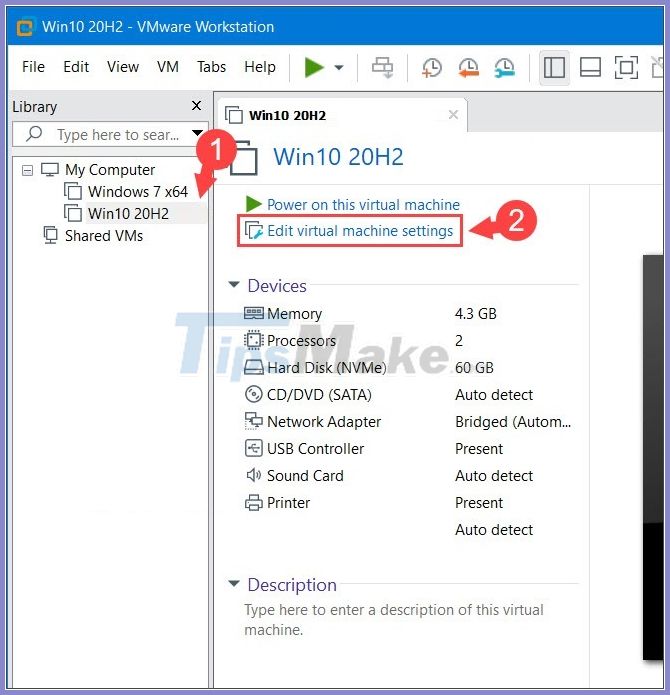
Step 2: Choose Memory (1) => adjust the Ram level (2) in accordance with your computer => OK (3) .

1.4. Set virtualization and CPU multiplier on VMware virtual machine
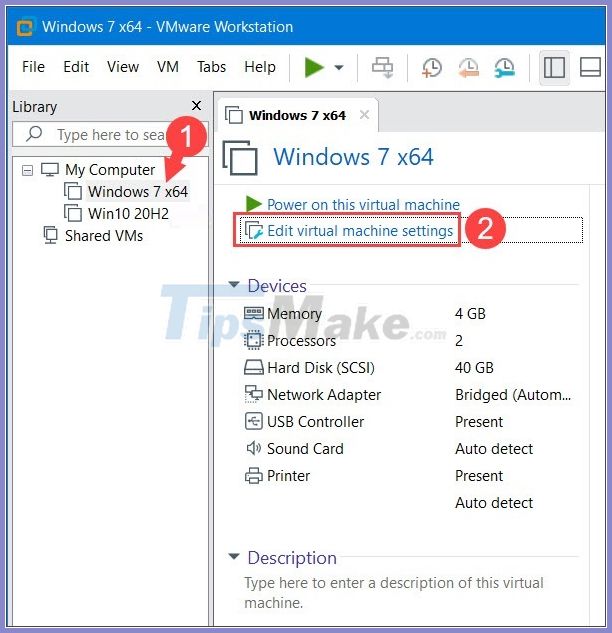
Step 1: Click on the virtual machine you need to set up (1) => Edit virtual machine settings (2) .
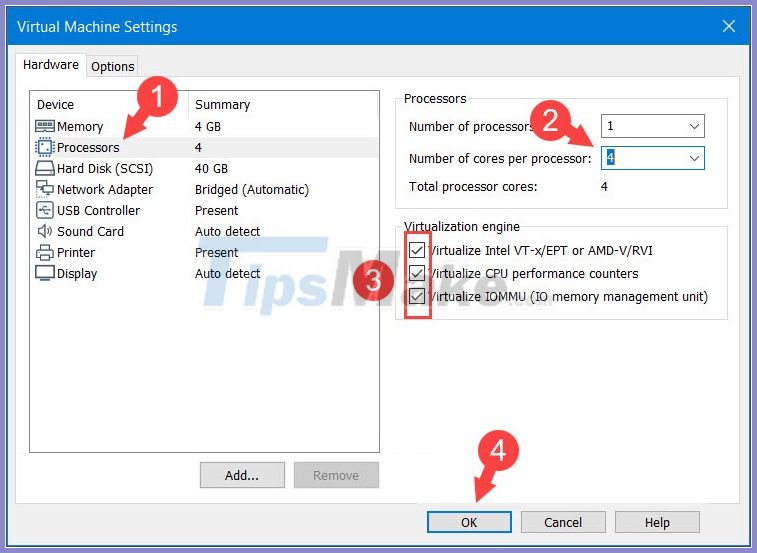
Step 2: Select Processors (1) => set the CPU multiplier in Number of cores per processor (2) . In addition, you can set virtualization and check 3 boxes in the Virtualization engine (3) if your CPU supports virtualization. Press OK (4) to save the settings.
Note: Number of processor means the number of CPUs on the mainboard and most motherboards today use 1 CPU, except for some main series for the server such as ASUS Z10PA-D8C, Gigabyte C621-WD12.. only supports 2 CPUs. You should set this to 1 to avoid errors when using VMware.
1.5. Accelerated graphics processing settings on VMware virtual machines
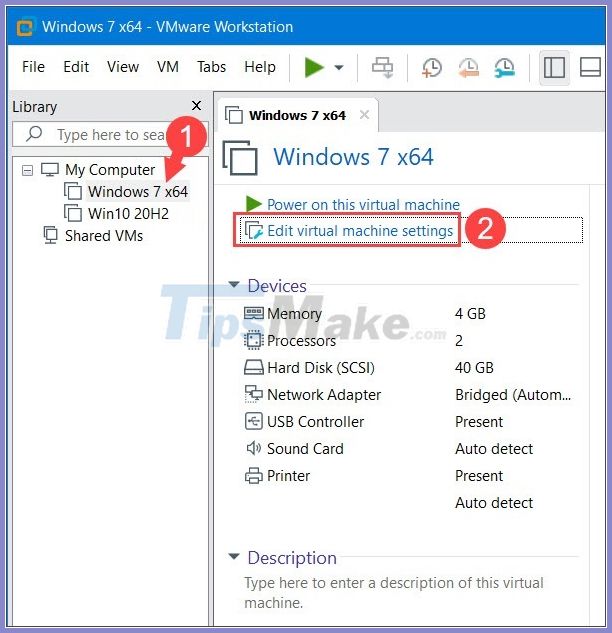
Step 1: Click on the virtual machine you need to set up (1) => Edit virtual machine settings (2) .
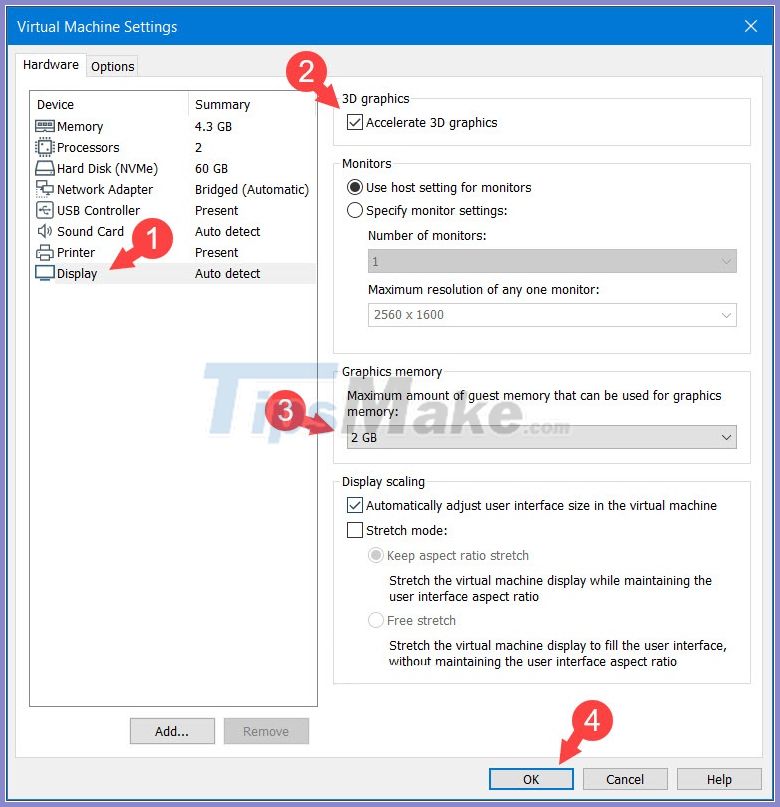
Step 2: Go to Display (1) => check Accelerate 3D graphics (2) => set VRAM (3) for virtual machine => OK (4) .
1.6. Use the Suspend feature instead of Power Off
This feature helps you quickly open a virtual machine similar to sleep, hibernate on Windows.
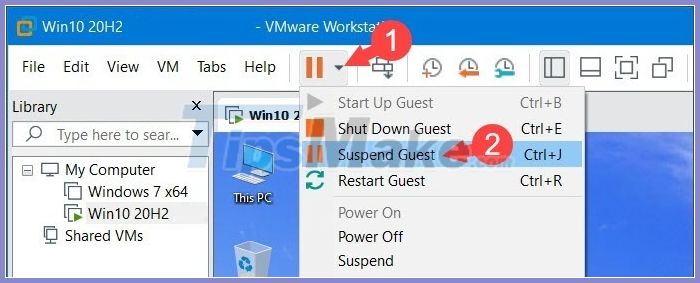
Step 1: You click on Power (1) => Suspend Guest (2) .
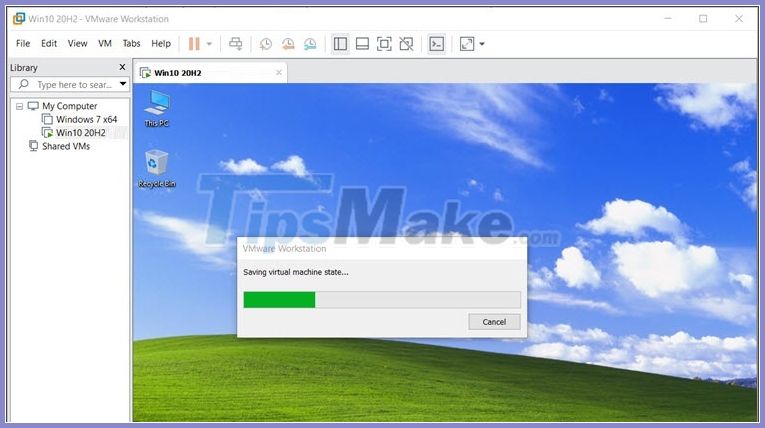
After that, VMware will save your settings and temporarily close your virtual machine.
Step 2: To reopen the virtual machine, click Resume this virtual machine and you 're done.
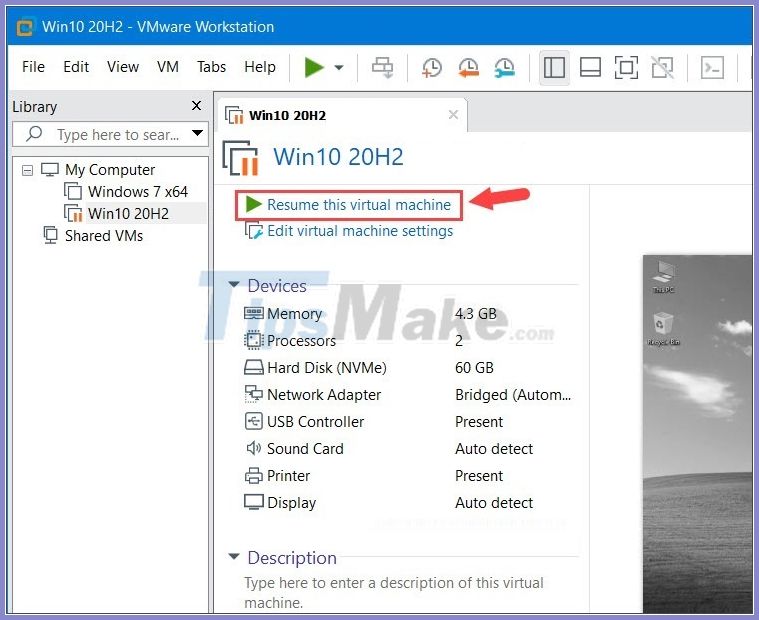
With optimized and accelerated ways for VMware virtual machines, you will work more efficiently and comfortably.
2. How to install Kali Linux on VMware
Kali Linux is an Supported operating systems that integrates a lot of security tools for security researchers and hackers to use. To experience Kali Linux, you can install it on VMware virtual machine through the tutorial below.
2.1. Setting up Kali Linux on VMware
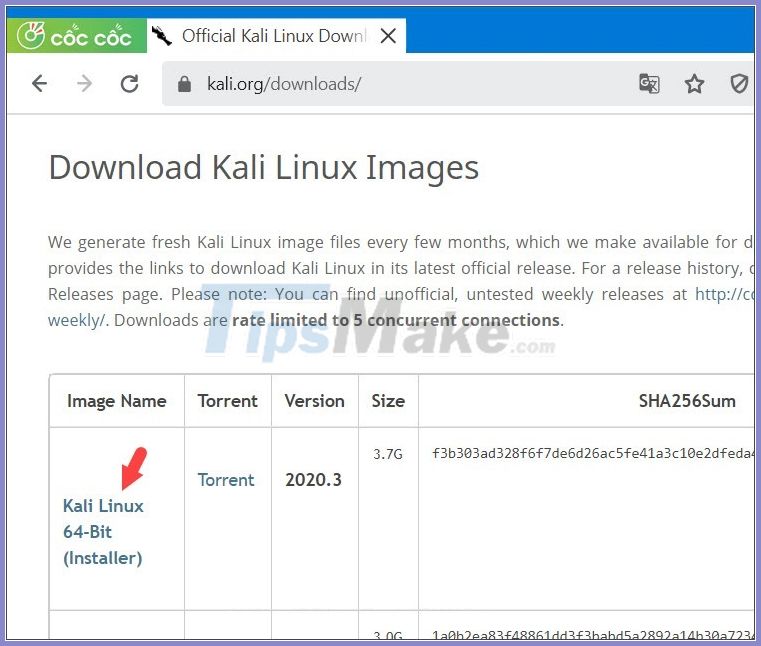
First, visit link here to download the Kali Linux installer.
Click on Kali Linux 64-Bit (Installer) to download.
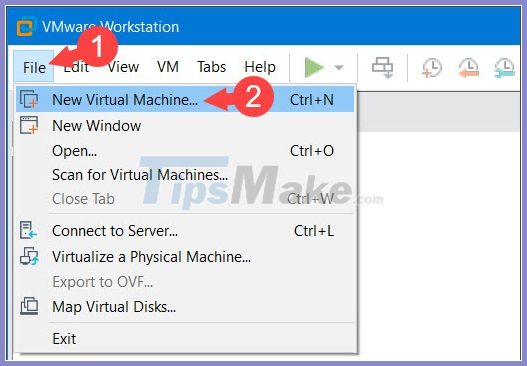
Step 1: Open VMware, click on File menu (1) => New Virtual Machine.. (2) .
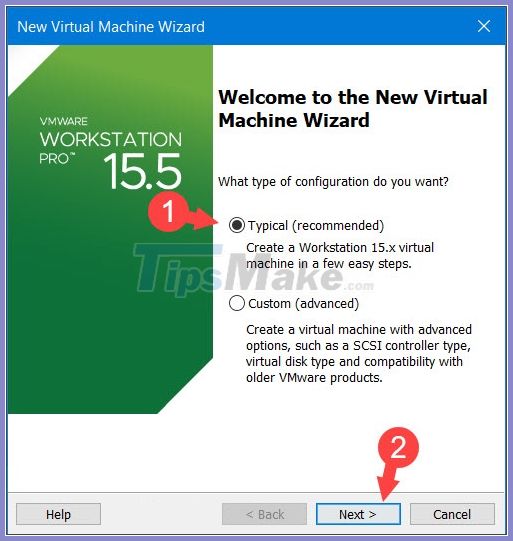
Step 2: You click on Typical (1) => Next (2) .
Step 3: You choose Installed disc image file (1) => Browse (2) .
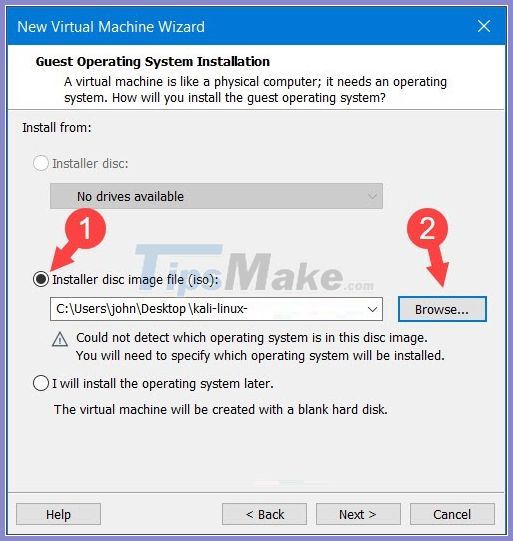
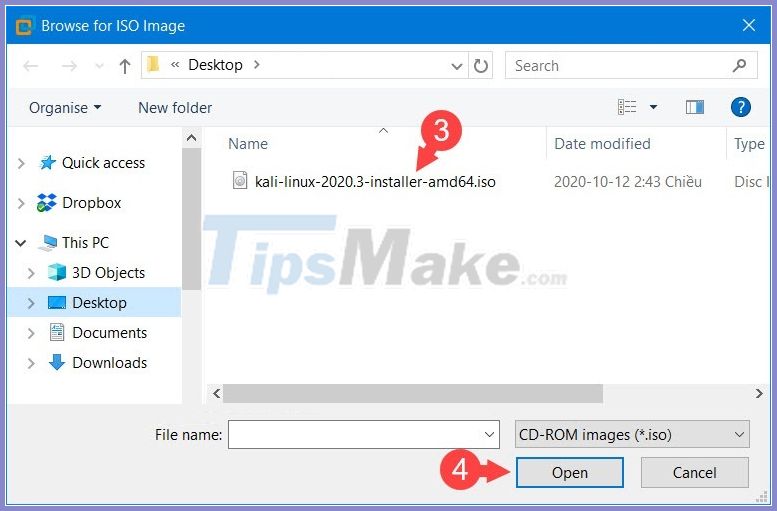
Next, you select the iso file (3) => Open (4) .
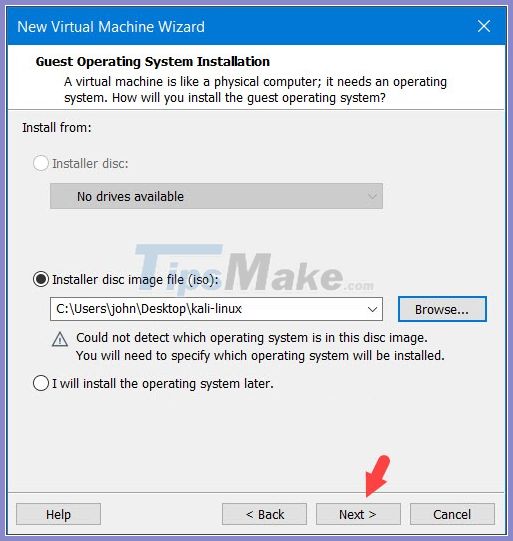
Click Next to continue.
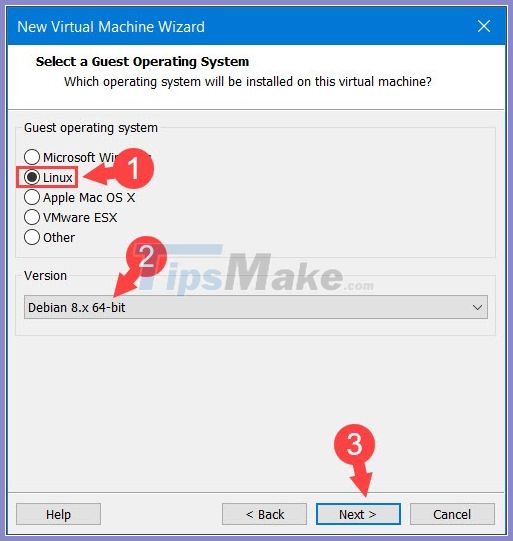
Step 4: Choose Linux (1) => Debian 8. x 64-bit (2) => Next (3) .
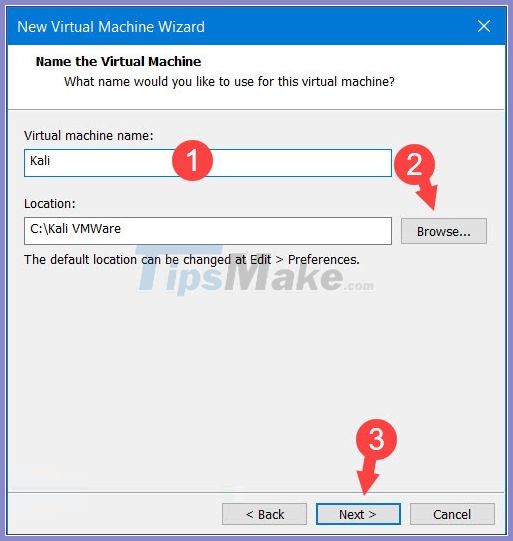
Step 5: You name the virtual machine (1) => Browse. (2) to choose where to save the virtual machine after the installation. Next, you click Next (3) to continue.
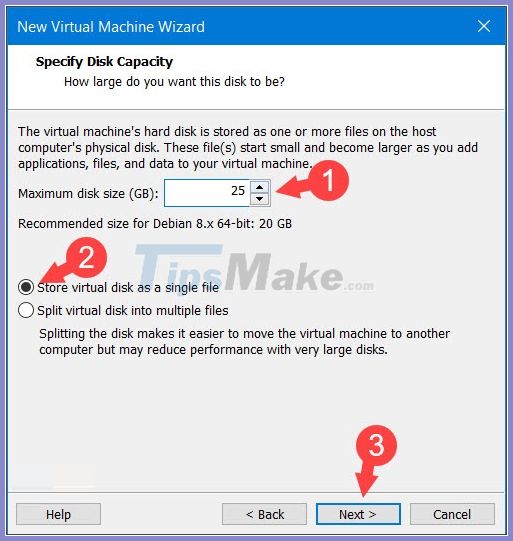
Step 6: You set the disk space (1) at least 20GB. Next, you click on Store virtual disk as a single file (2) => Next (3) .
Click Finish to complete.

2.2. Install Kali Linux
Step 1: Click on the Kali Linux virtual machine you just set up and select Power on this virtual machine .

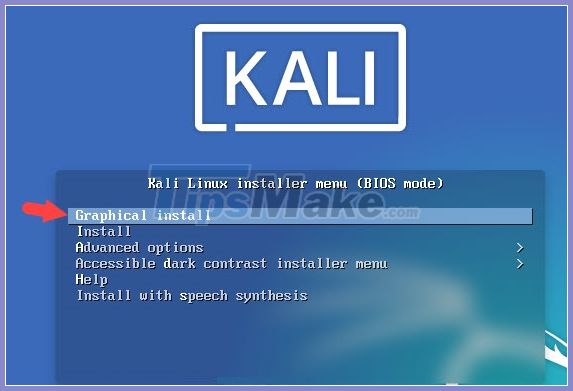
On the Boot menu, click Graphical install .
Step 2: Click on English (1) to select English language => Continue (2) .
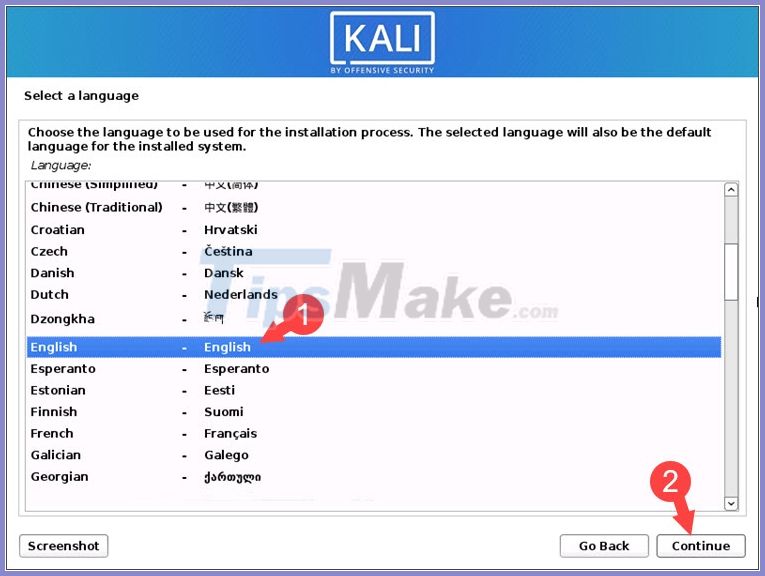
Next, you select the area as United States (3) => Continue (4) .
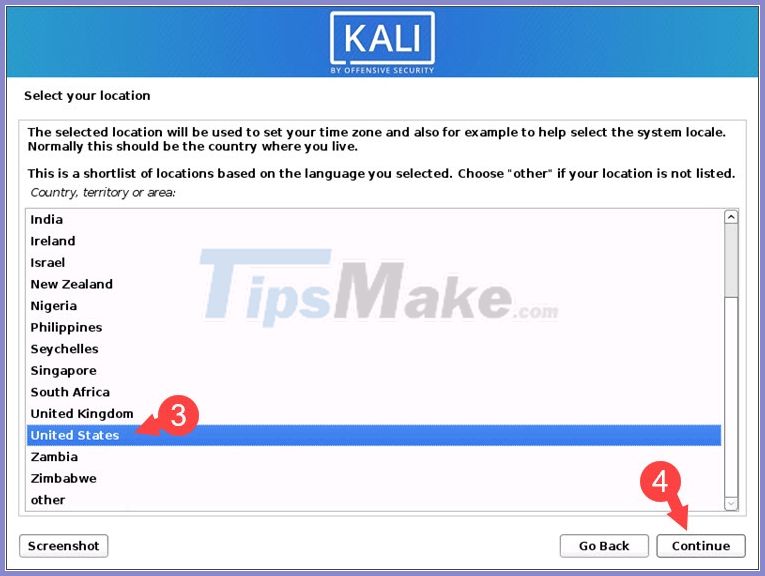
Select the keyboard language as American English (5) => Continue (6) .
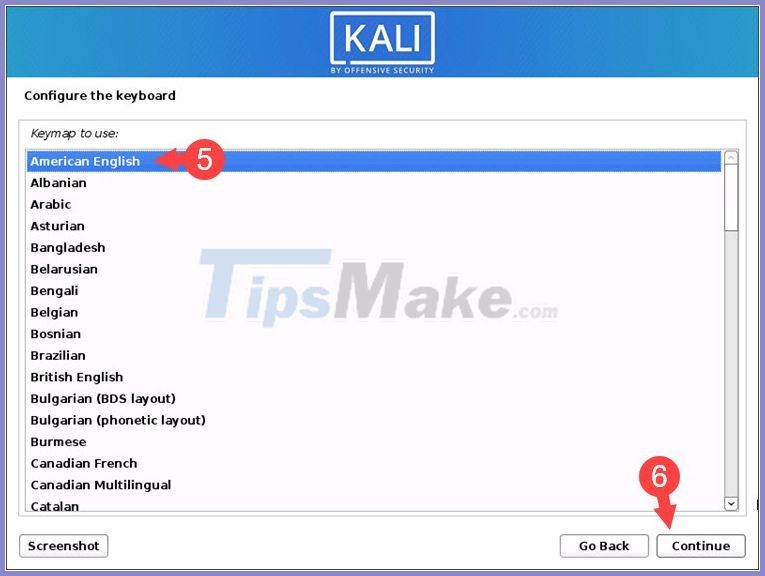
Step 3: You name the virtual network (1) => Continue (2) .
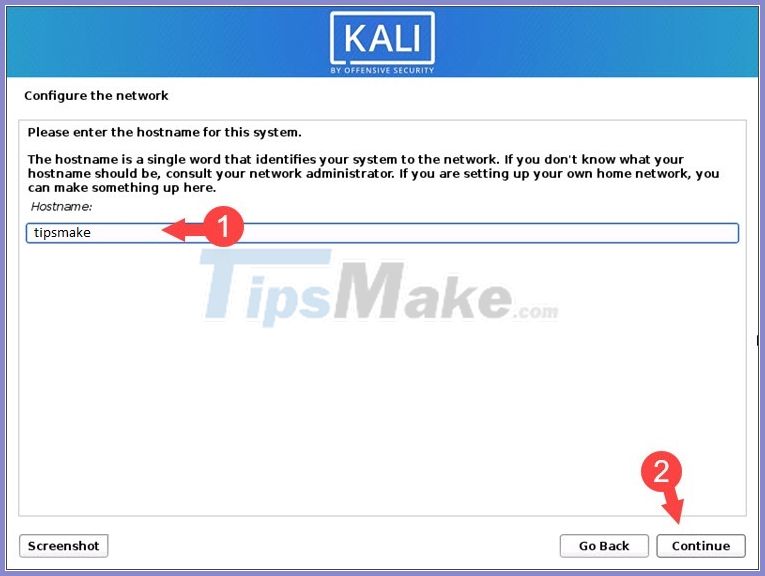
Step 4: Name the domain (1) => Continue (2) .
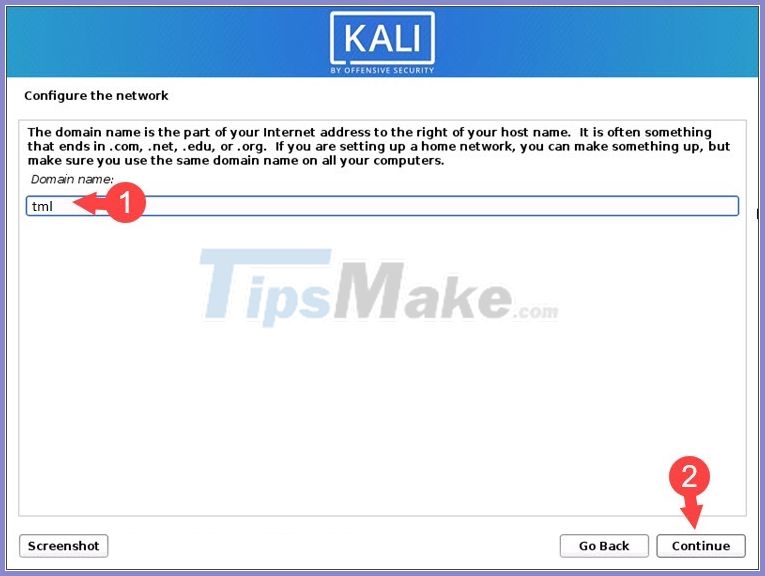
Step 5: Enter your name (1) => Continue (2) .
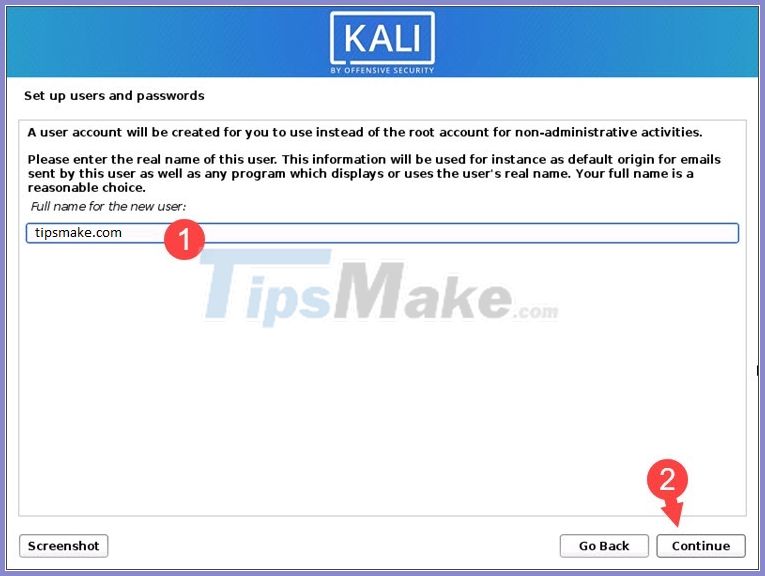
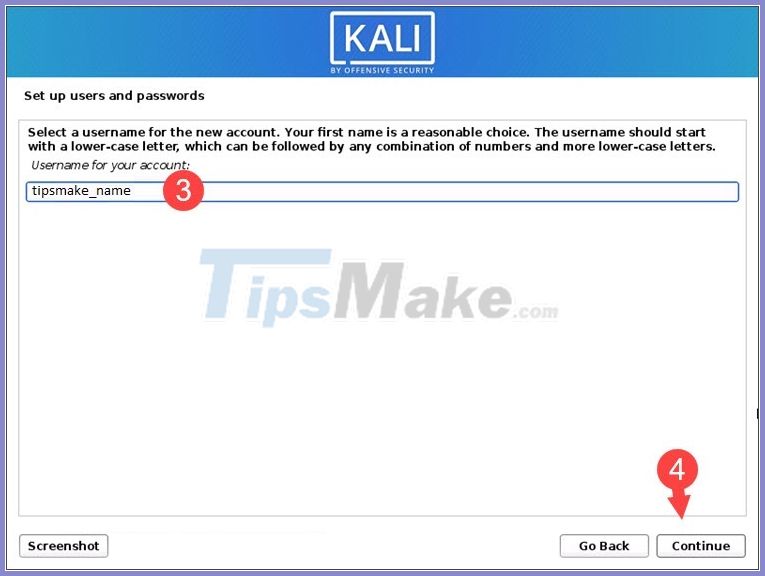
Name the User (3) => Continue (4) .
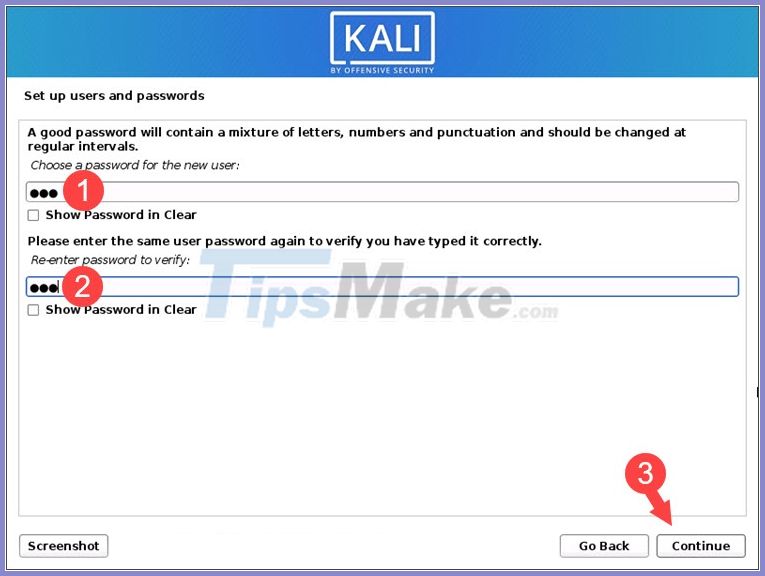
Step 6: Set the password (1) and re-enter the password (2) for the Kali virtual machine => Continue (3) .
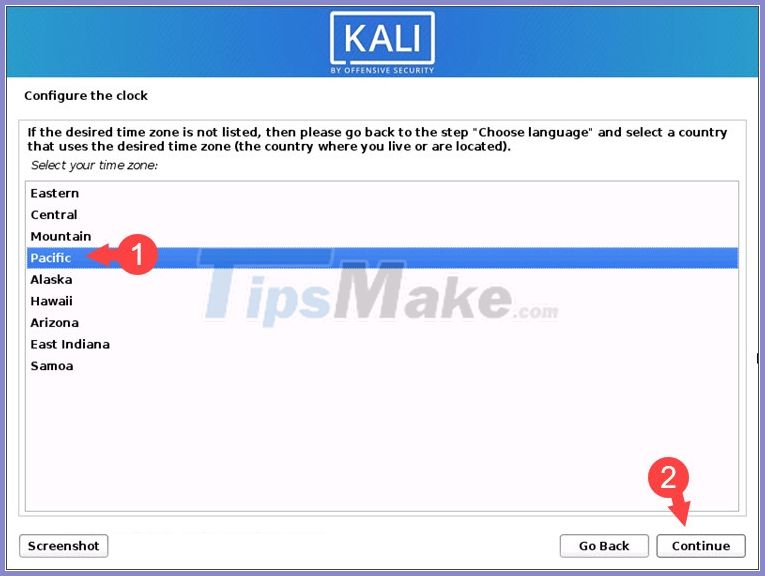
Step 7: You choose the time zone Pacific (Pacific) (1) => Continue (2) .
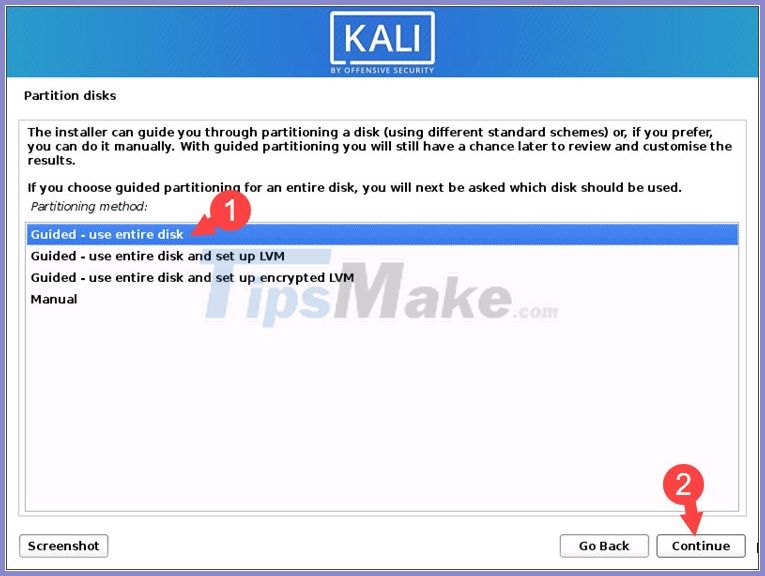
Step 8: Choose Guided - use entire disk (1) => Continue (2) .
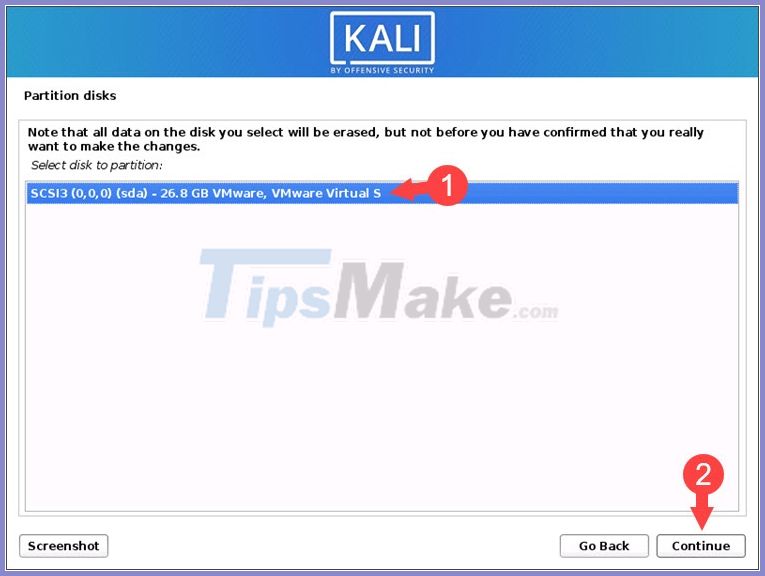
Step 9: Select virtual drive (1) to install => Continue (2) .
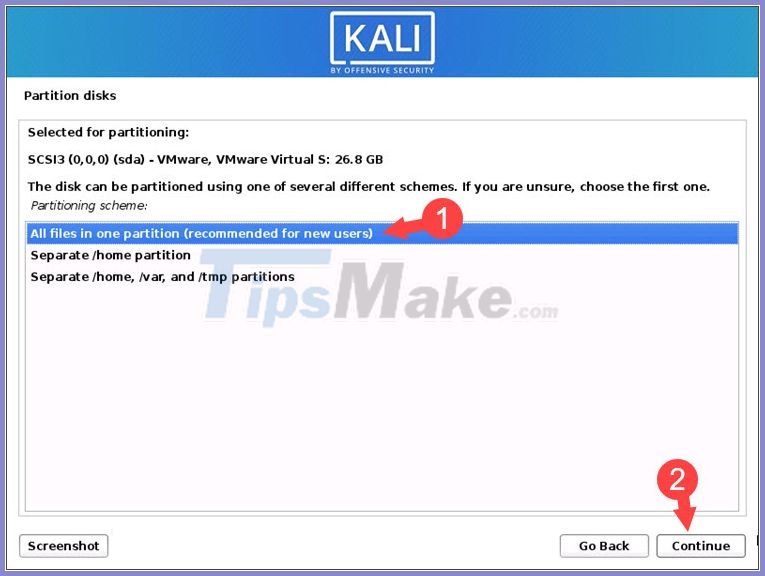
Step 10: Select All files in one partition (recommended for new users) (1) => Continue (2) .
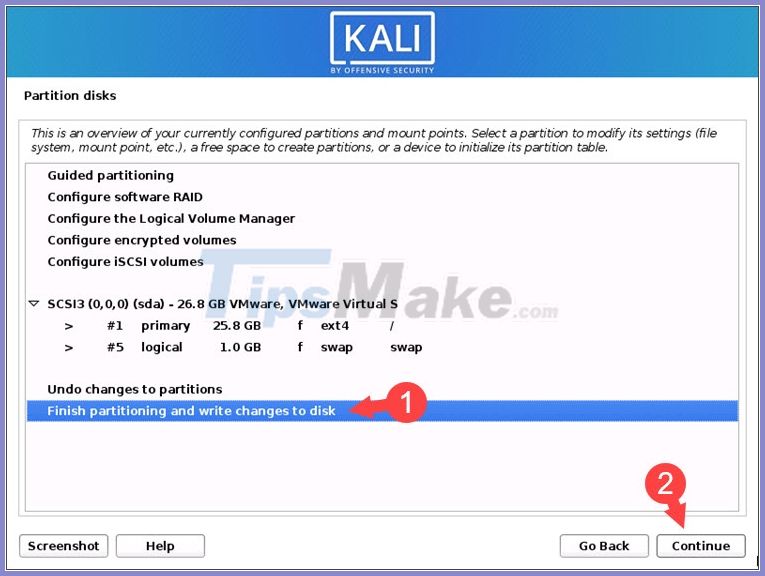
Step 11: Select Finish partitioning and write changes to disk (1) => Continue (2) .
Step 12: Select Yes (1) => Continue (2) .
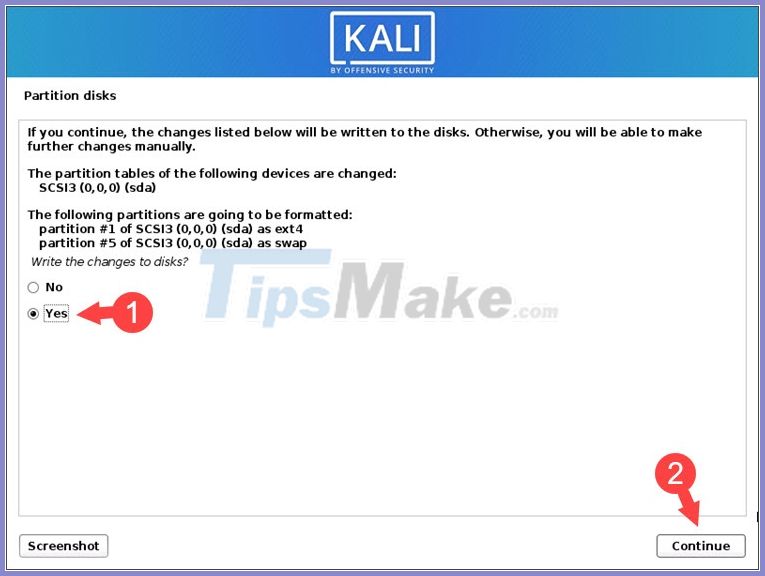
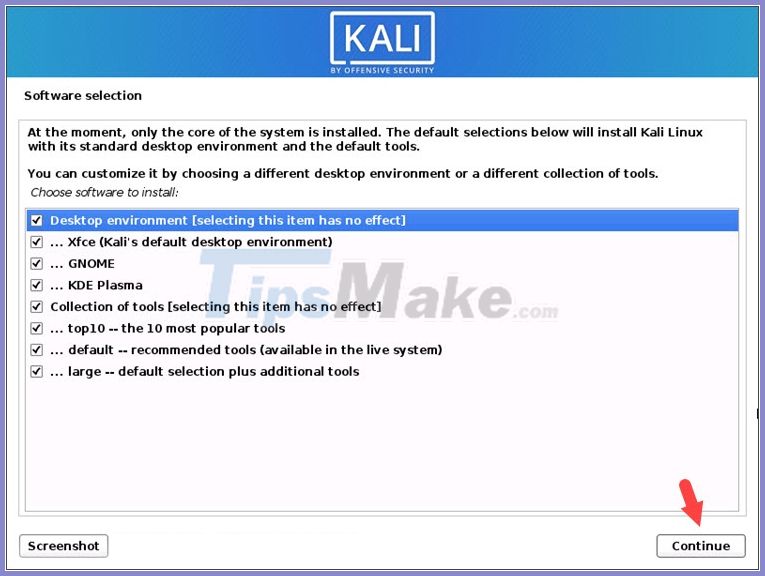
Step 13: You check all the necessary items and click Continue .
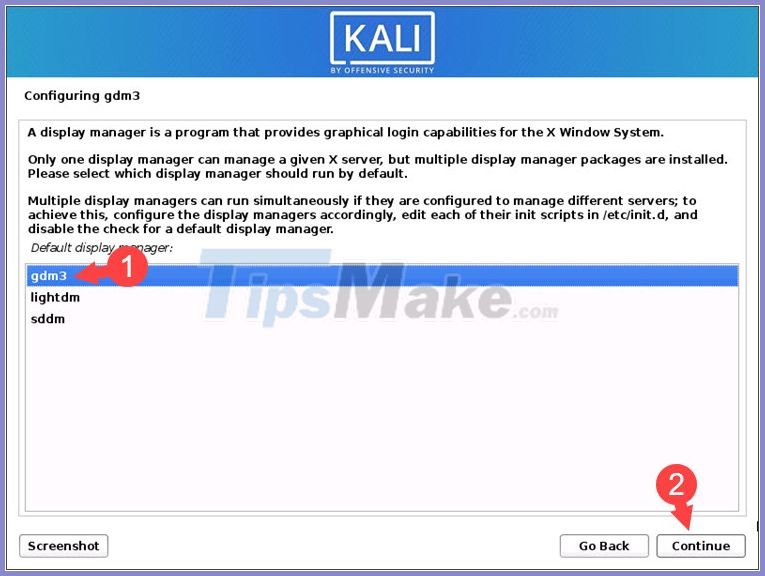
Step 14: Select the screen manager as gdm3 (1) => Continue (2) .
Step 15: Click Yes (1) to install GRUB boot => Continue (2) .
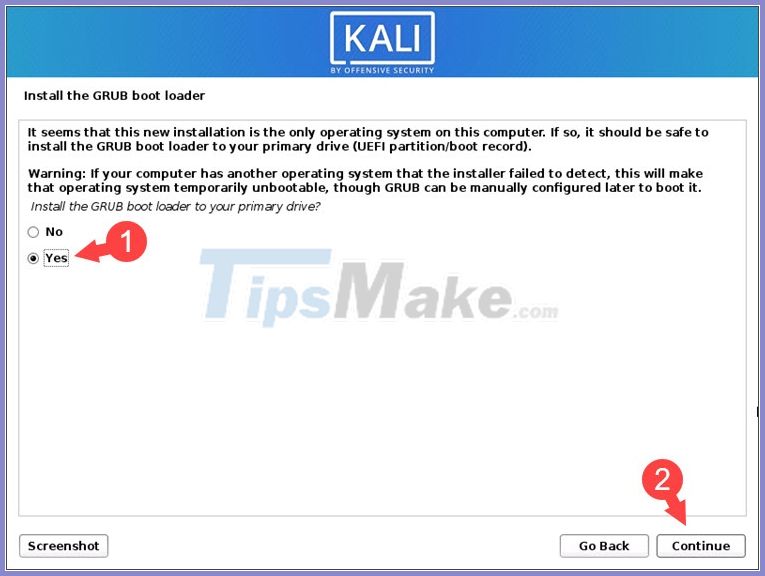
Next, you choose the drive (3) to install => Continue (4) .

At this step is finished, click Continue to complete.
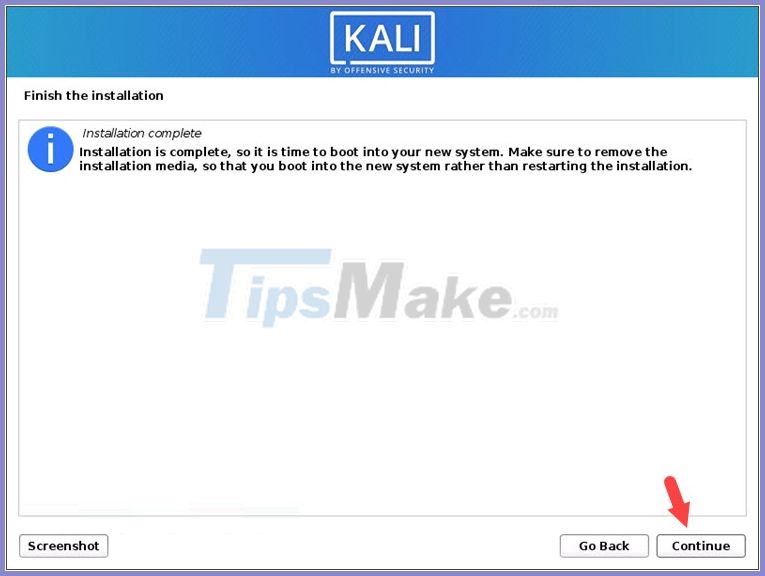
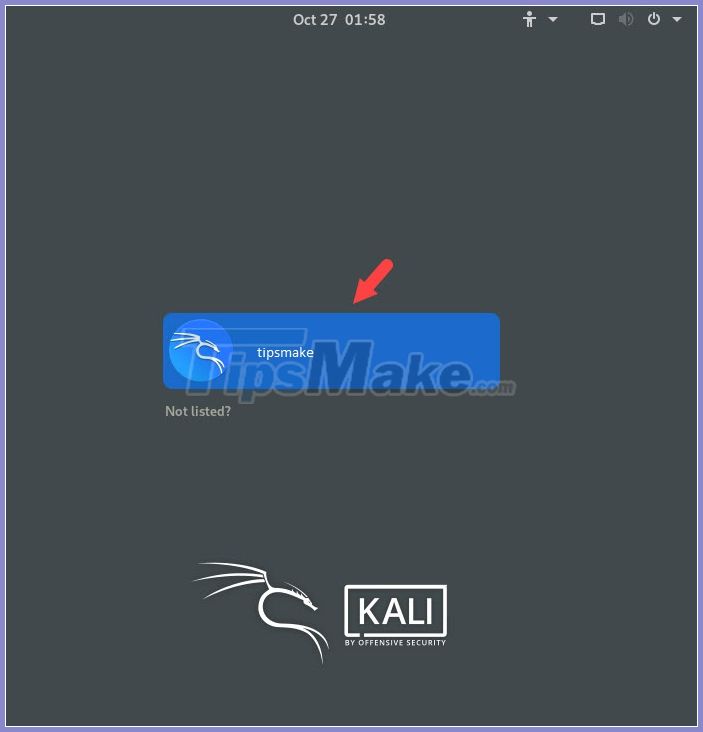
Step 16: After restarting Kali Linux , click and login to your account.
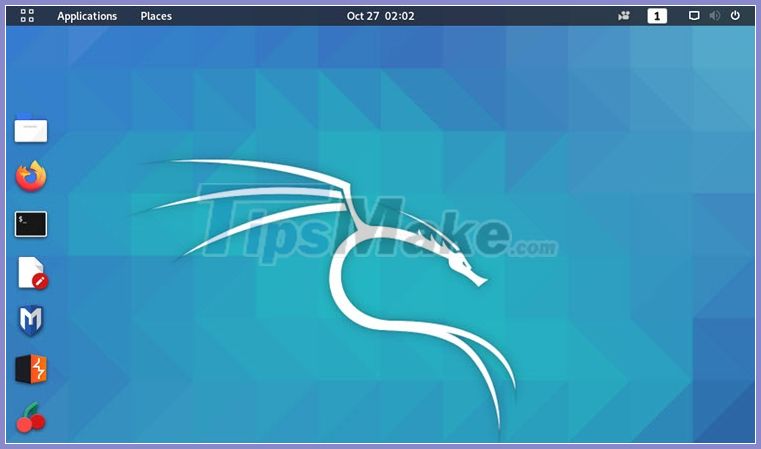
The main interface of Kali Linux will be as shown below. Since this tool is developed on a Debian Supported operating systems, you will find Debian's wallpapers under Kali Linux.
With full and detailed instructions on how to install Kali Linux on VMware, you can try to install and experience the tool for 'hacker' extremely unique and interesting.
3. How to change the MAC address of the VMware virtual machine
Change the MAC address on VMware virtual machines so you can access blocked websites or create some settings to improve security on virtual machines.
3.1. Change MAC address on Windows virtual machine
The MAC address on the virtual machine before changing is 00-0C-29-C1-DA-FA .

We will proceed as follows:
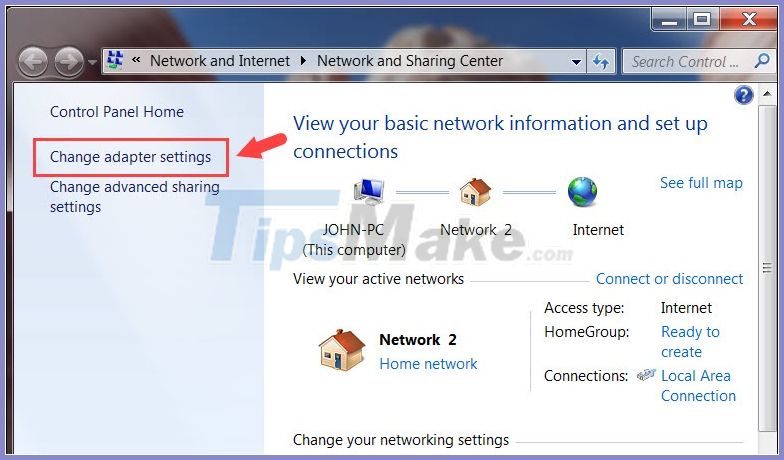
Step 1: Click on Network (1) => Open Network and Sharing Center (2) .
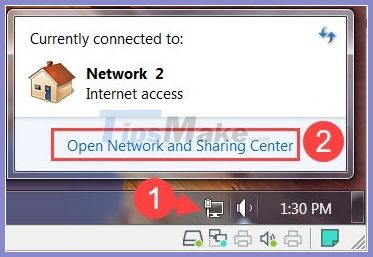
Next, click Change Adapter settings .
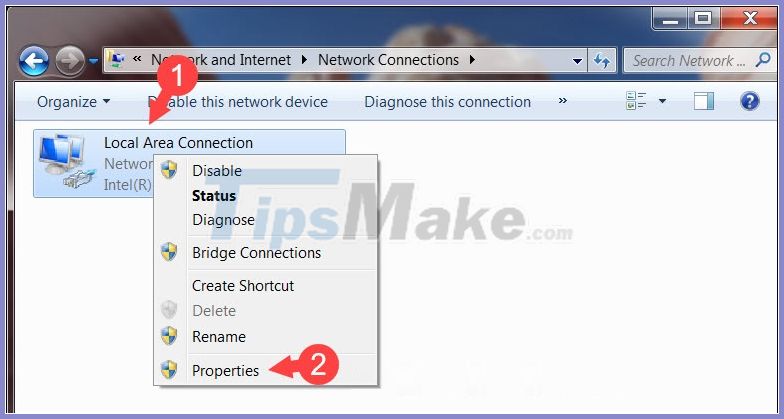
Step 2: Right-click on Local Area Connection (1) => Properties (2) .
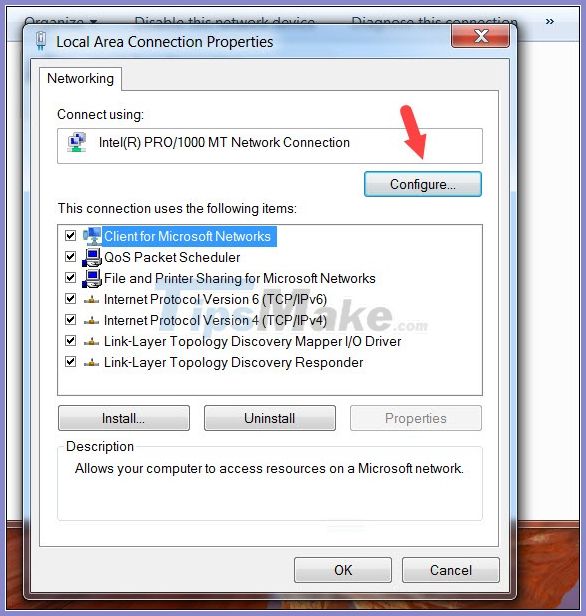
Next, click Configure.
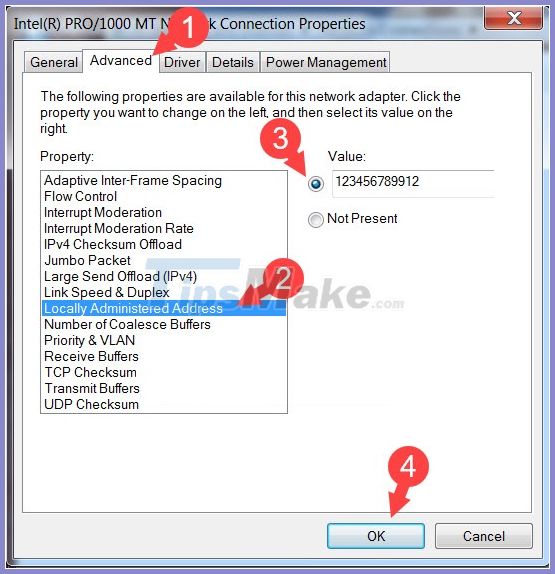
Step 3: Click on Advanced (1) => Locally Administered Address (2) => check Value (3) and enter any 12 characters => OK (4) .
Note: Some network cards integrated on different motherboards will display the name Network Address instead of Locally Administered Address .
After entering, check if the MAC address has changed. If the new MAC address has changed like in the example below, it is successful.
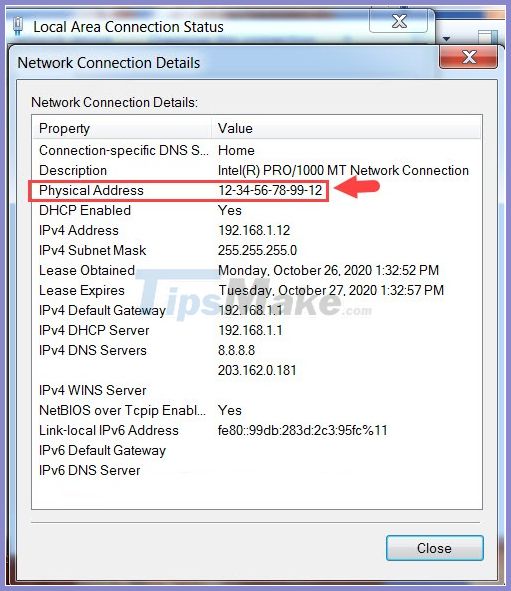
Alternatively, you can change the MAC address in Registry or use TMAC software.
3.2. Change MAC address using network settings in VMware
With this way, we can change the MAC address on VMware virtual machines, apply to virtual machines running Ubuntu, macOS, CentOS. As shown below, you can see that Windows 10 virtual machine has MAC address. is 00-0C-29-7E-98-0C .

Step 1: You need to turn off the active virtual machine by pressing Power (1) => Power Off (2) => Power Off (3) .
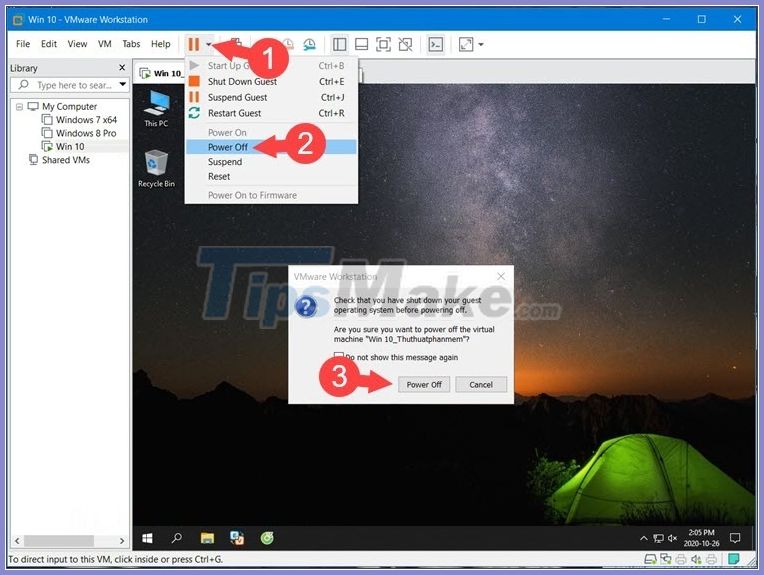
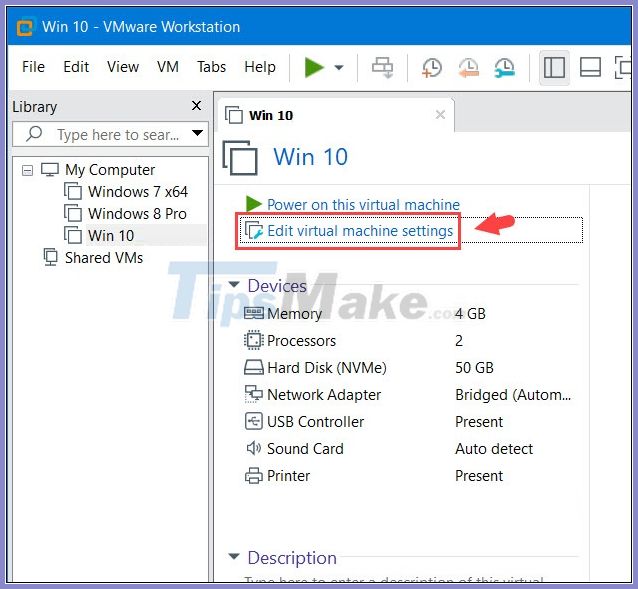
Next, click on Edit virtual machine settings after the virtual machine is turned off.
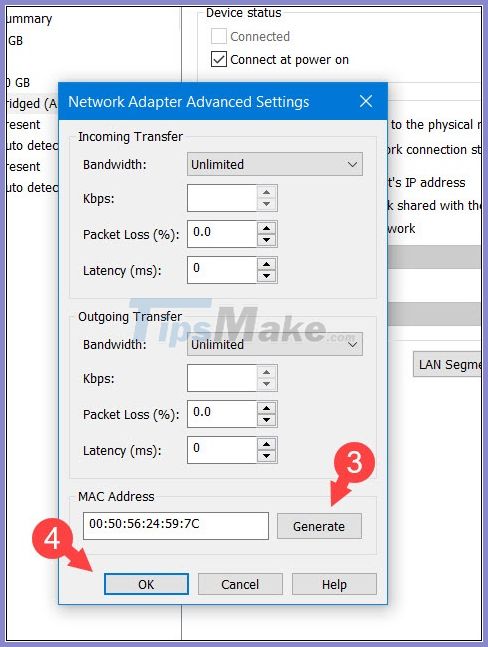
Step 2: Click on Network Adapter (1) => Advanced.. (2) .
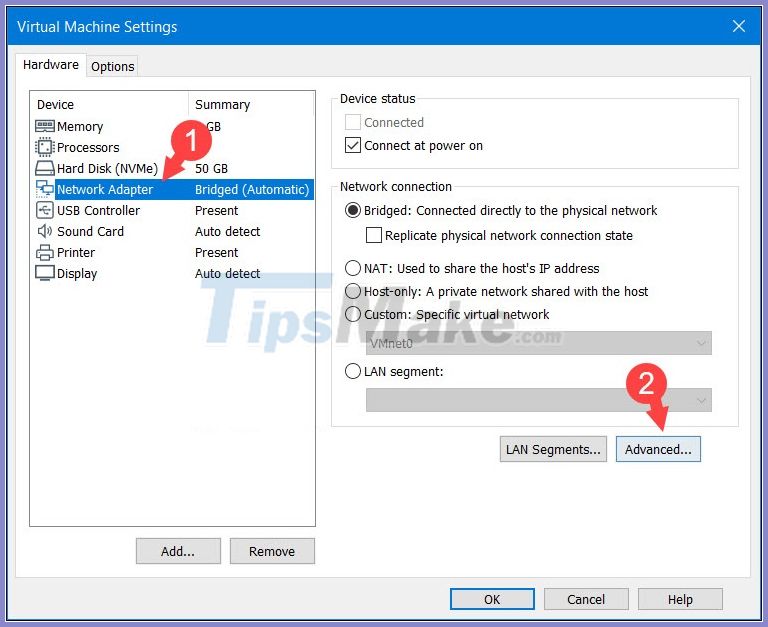
Next, press Generate (3) in the MAC Address => OK (4) .
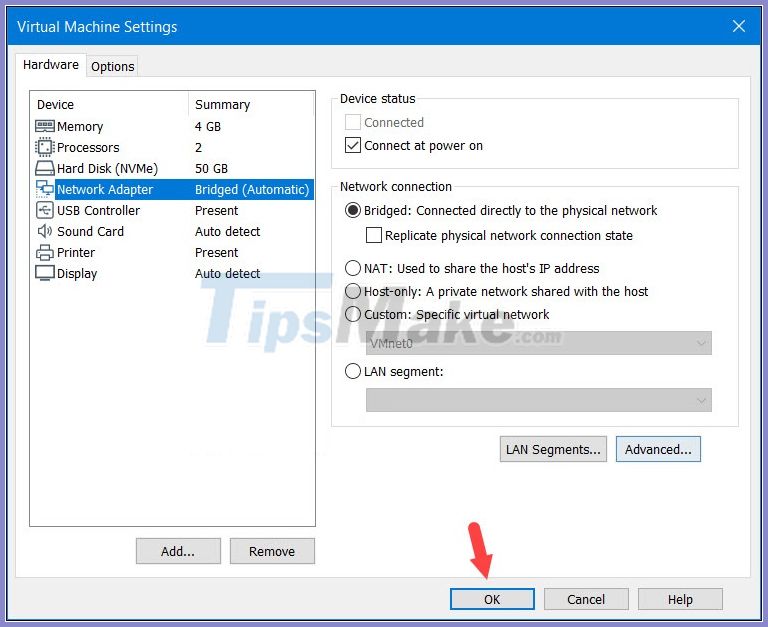
Click OK to save and open the virtual machine to check.
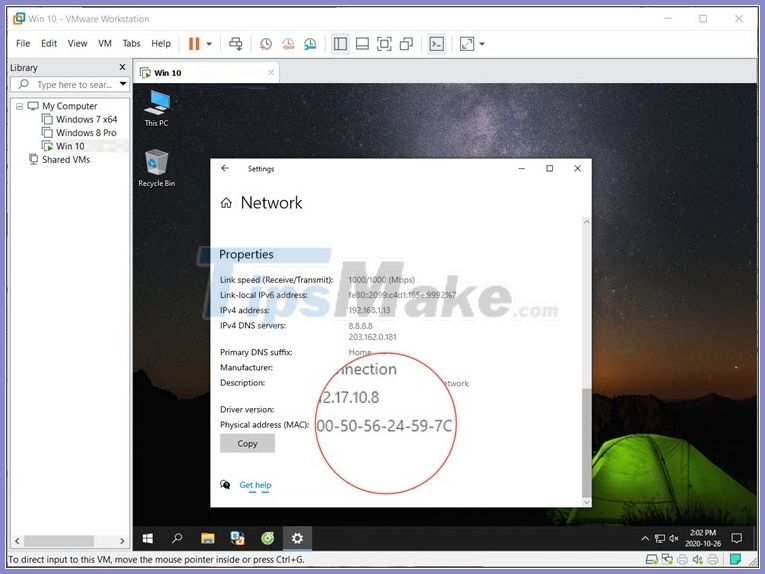
After opening the virtual machine to check, you will see the MAC address has been changed as in the example below.
With this simple and quick guide, you can change the MAC address on the virtual machine for added security.
4. How to connect 2 virtual machines in VMware
Connecting 2 virtual machines in VMware makes it convenient for you to exchange data and avoid data leakage, virus infection between virtual machine and real machine. Please follow the instructions below.
4.1. Set up virtual networks for virtual machines
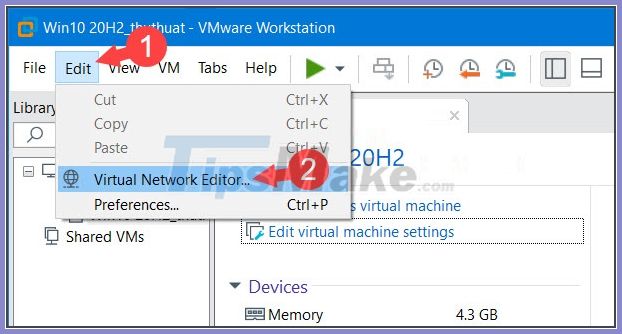
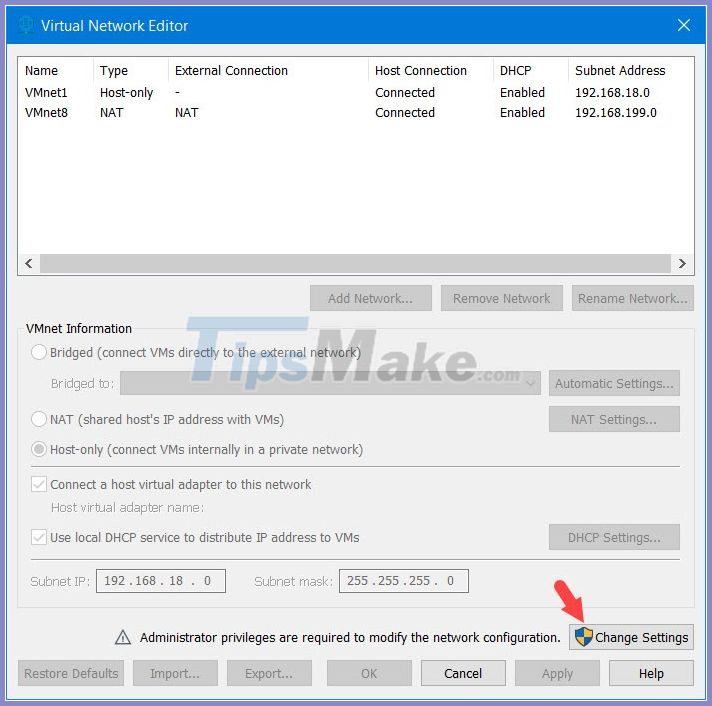
Step 1: Open VMware, click the Edit menu (1) => Virtual Network Editor (2) .
Next, you click on Change Settings to get the admin's editing rights.
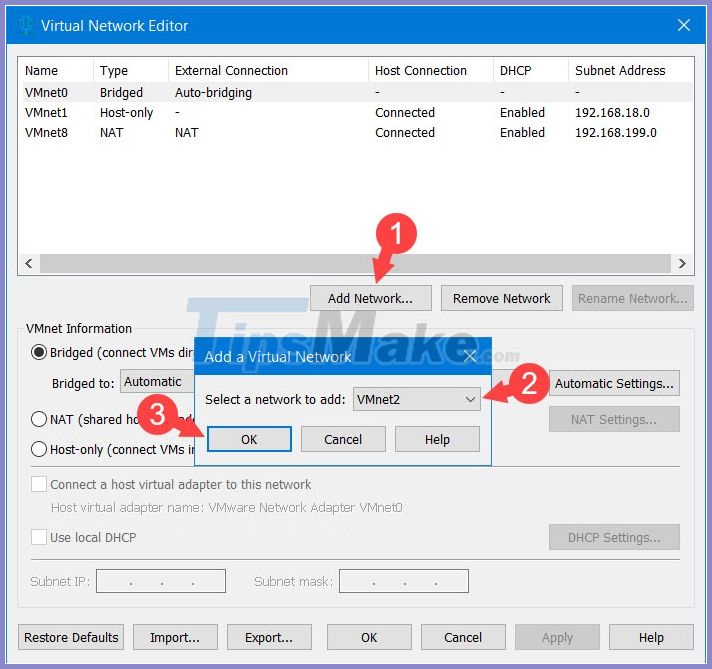
Step 2: Click Add Network.. (1) . The bulletin board appears, choose VMnet virtual network (2) => OK (3) .
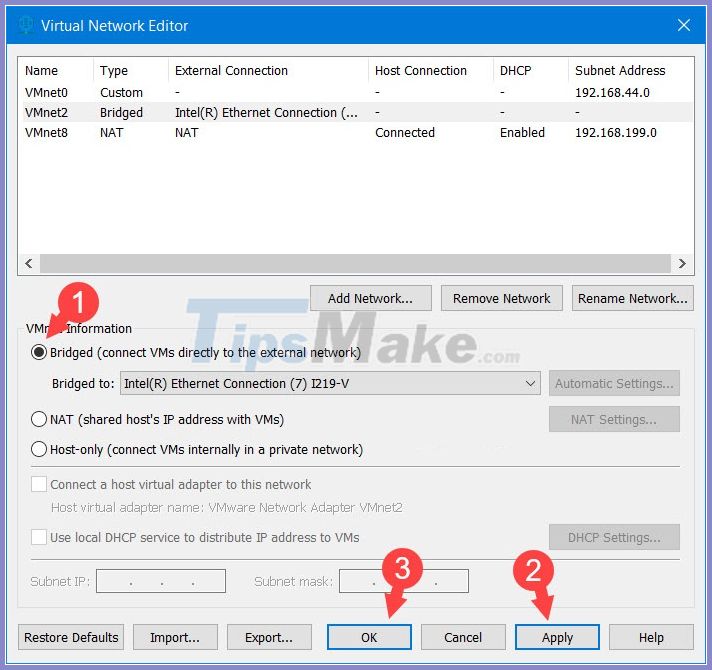
Step 3: Select Bridged (1) to provide Internet for the virtual network => Apply (2) => OK (3) .
Note: If you want the virtual machine network to connect to a private intranet, separate from your computer, choose Host-only instead of Bridged .
4.2. Virtual network configuration on virtual machine
After creating the virtual network, you can configure and connect to the network for virtual machines on the same network.
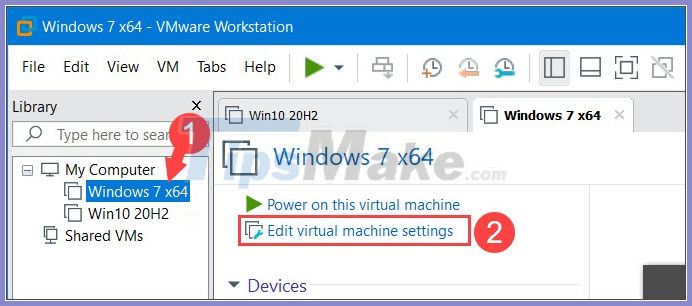
Step 1: Open the first virtual machine (1) => Edit virtual machine settings (2) .
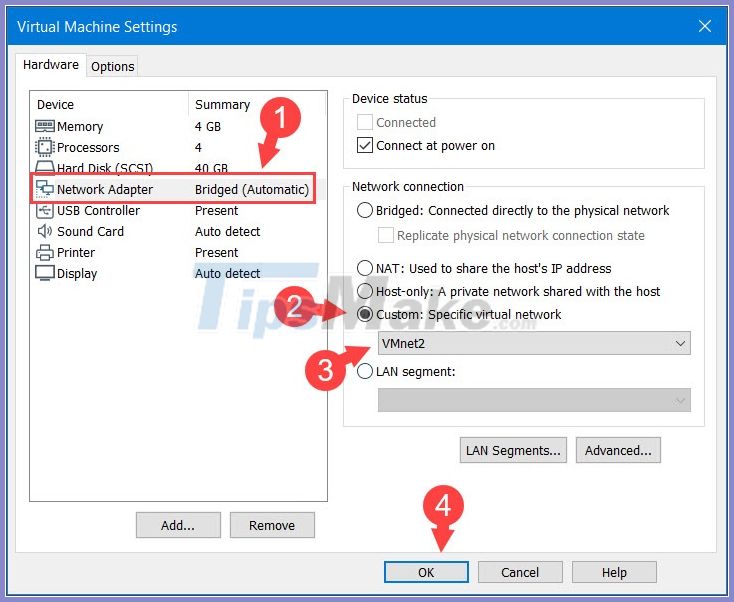
Step 2: Click on Network Adapter (1) => Custom (2) => Select virtual network just created (3) => OK (4) .
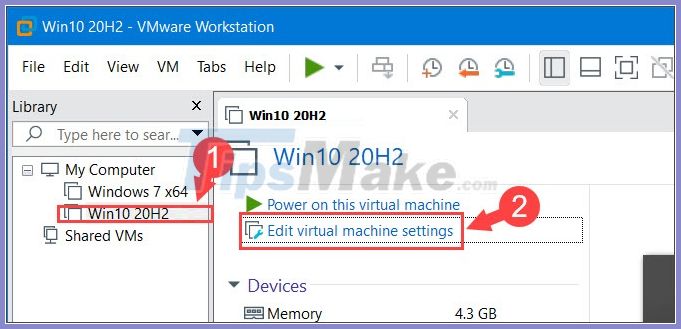
Step 3: Click the second virtual machine (1) => Edit virtual machine settings (2) .
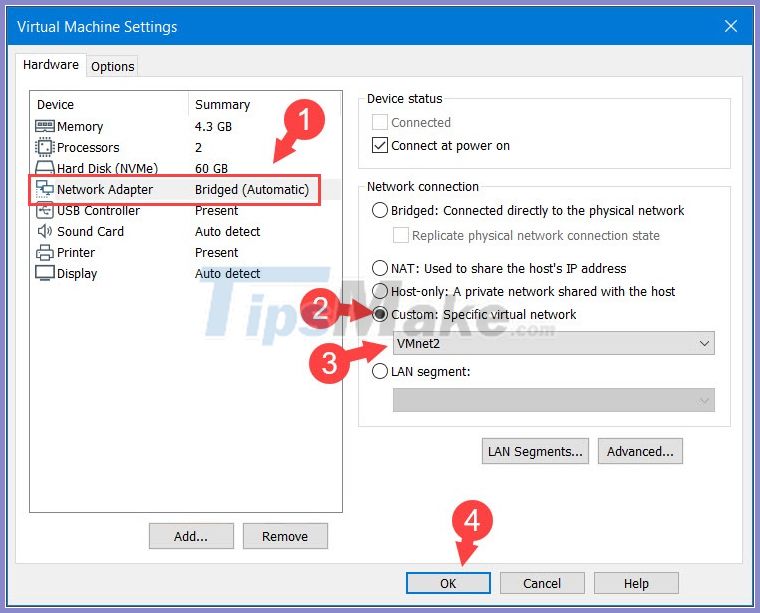
Step 4: You do the same setup by clicking Network Adapter (1) => Custom (2) => Select virtual network just created (3) => OK (4) .
4.3. Check
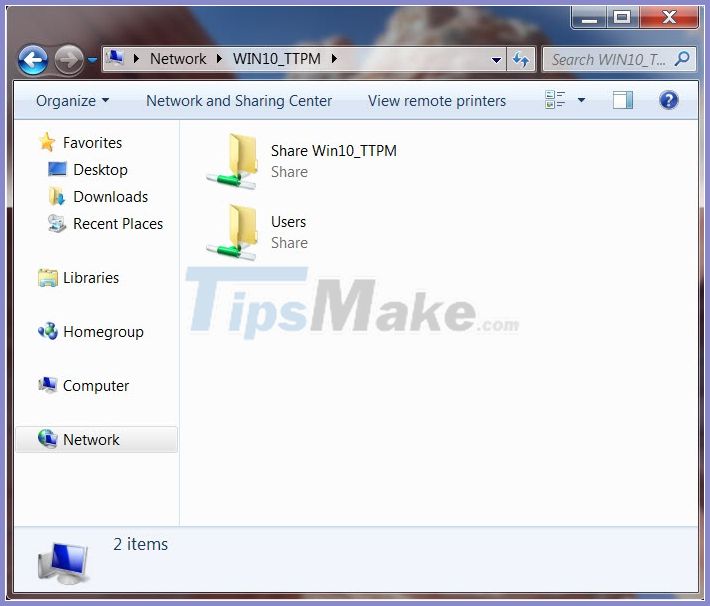
After the installation is complete, boot the virtual machine up. Then you turn on the Sharing feature to check. On my Windows 7 virtual machine will display 3 devices in the network.
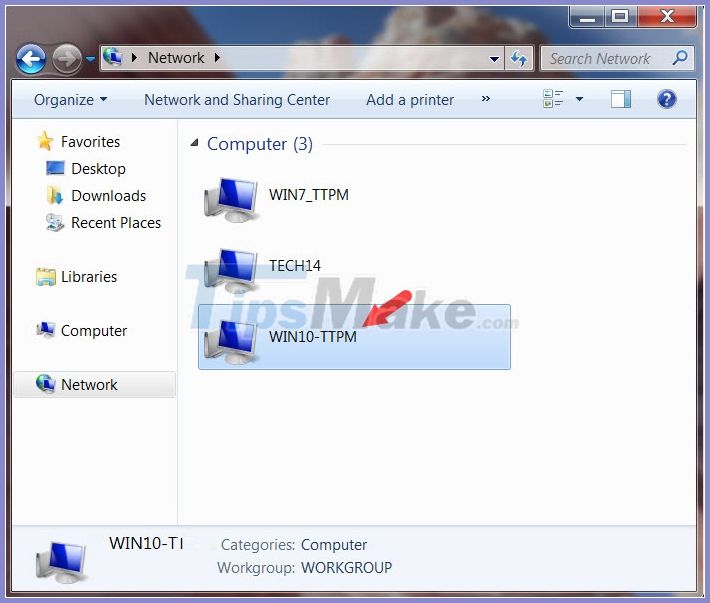
After clicking on the network and showing the shared folder is successful.
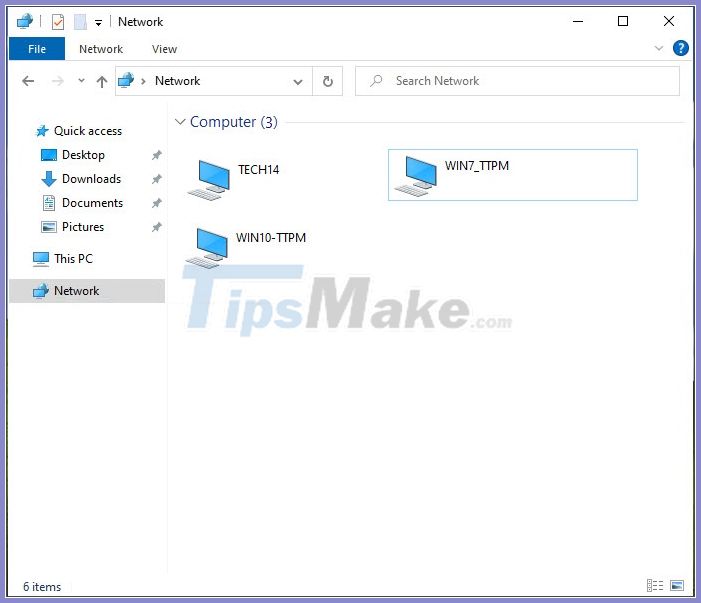
On the second virtual machine also shows 3 connected devices.
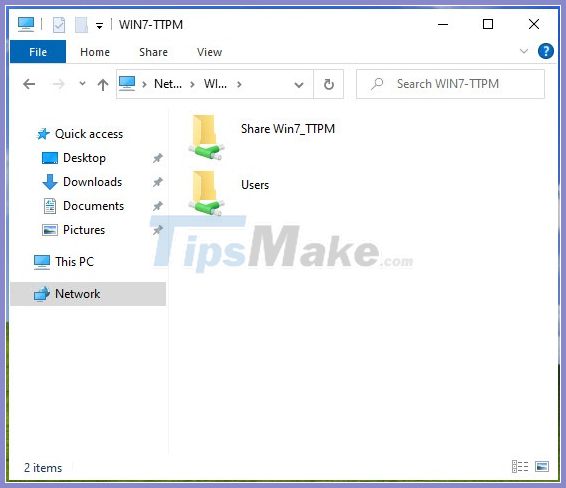
When you click on the network and the folders pop up are successful.
With the quick virtual machine connection tutorial, you can exchange data or use the virtual network system to do various network tests.
5. How to install Android on VMWare
Most of us used to emulate Android with Bluestack, Nox App Player. but you may not know how to install the Android Supported operating systems on a virtualized environment. With the following instructions, let's learn how to install Android on the famous virtualization tool VMware.
5.1. Prepare
- VMware Workstation software, you can download it at the following link here .
- Android x86 installer, download link here.
5.2. Setup on VMware
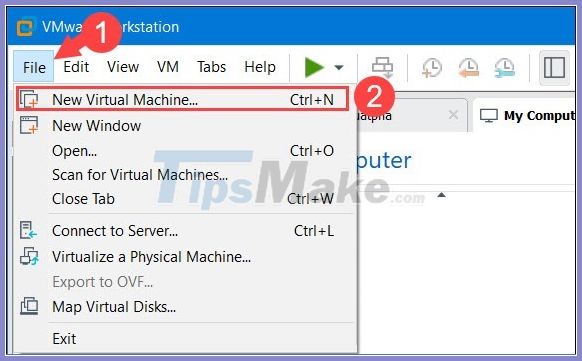
Step 1: Open VMware and go to File menu (1) => New Virtual Machine.. (2) .
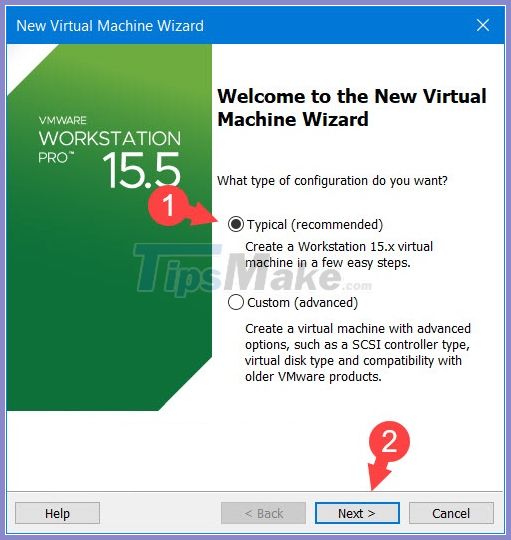
Step 2: You click on Typical (1) => Next (2) .
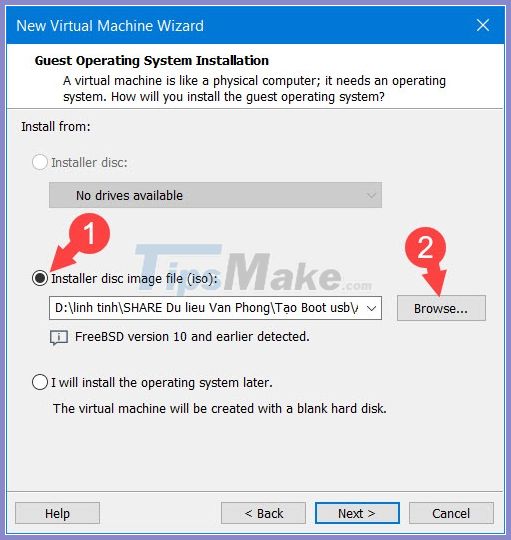
Step 3: Click on Installer disc image file (iso) (1) => Browse. (2) .
Step 4: Go to and click the downloaded android installation file (1) in the preparation => Open (2) .
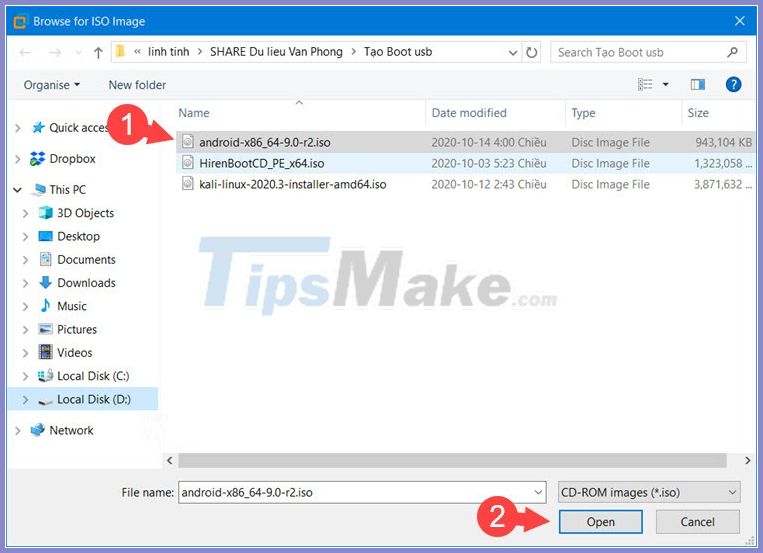
Then, click Next to continue.

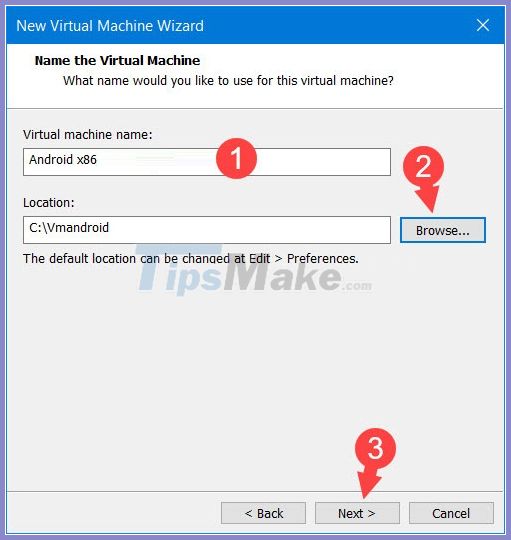
Step 5: You name the virtual machine (1) => click Browse.. (2) to change the location to save the virtual machine after installation. Next, click Next (3) to continue.
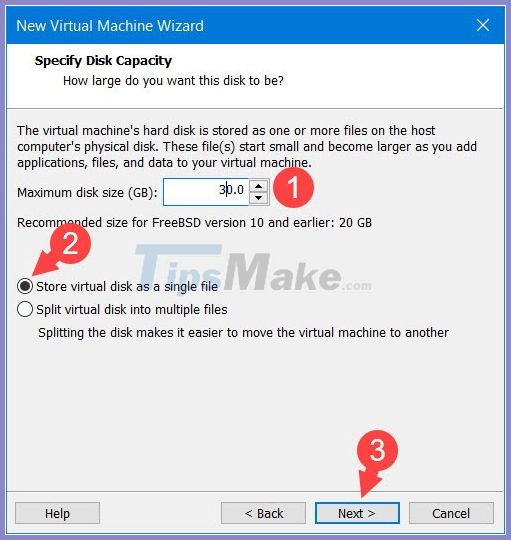
Step 6: You change the hard drive space for the virtual machine (1) at least 20GB. Next, you click on Store virtual disk as single file (2) => Next (3) .
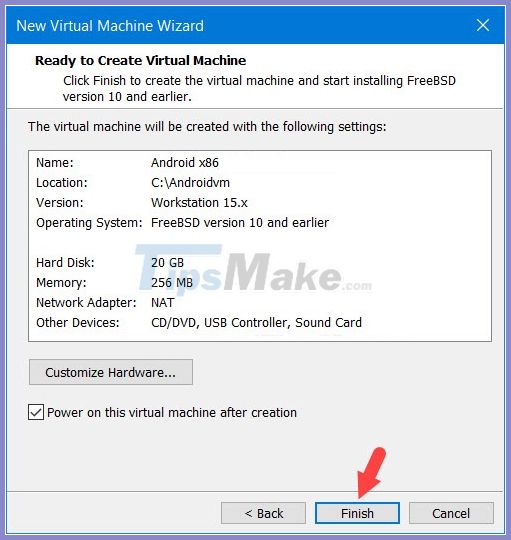
Step 7: Click Finish to complete.
5.3. Install Android on a virtual machine
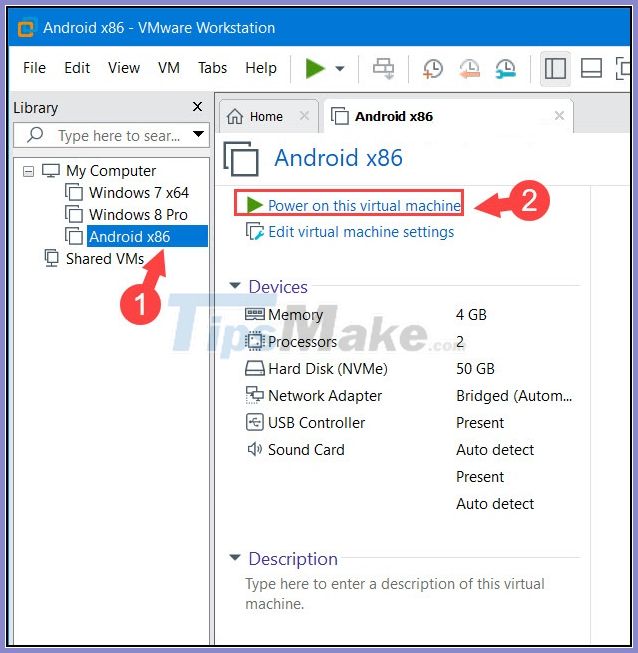
Step 1: Click on the Android virtual machine (1) => Power on this virtual machine (2) .
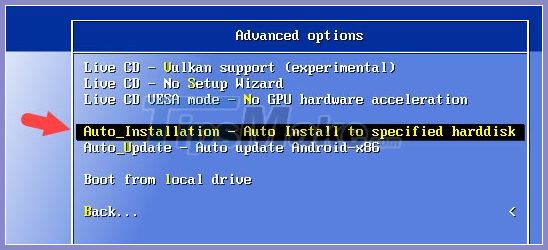
Step 2: Once opened, select the line Advanced options.

Select Auto Installation - Auto Install to specified harddisk .
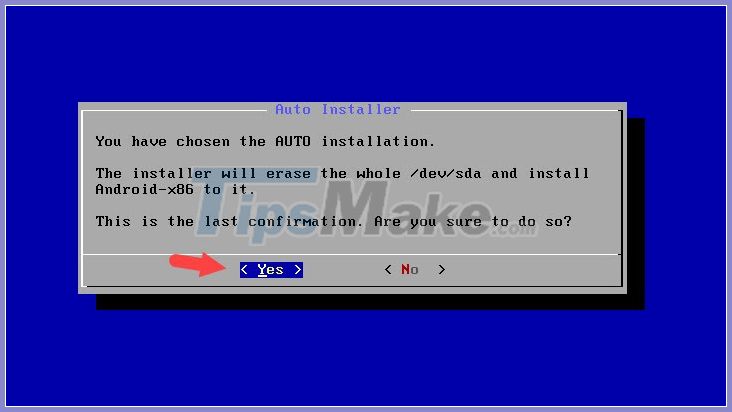
Step 3: Click Yes to proceed to format the memory and install Android.
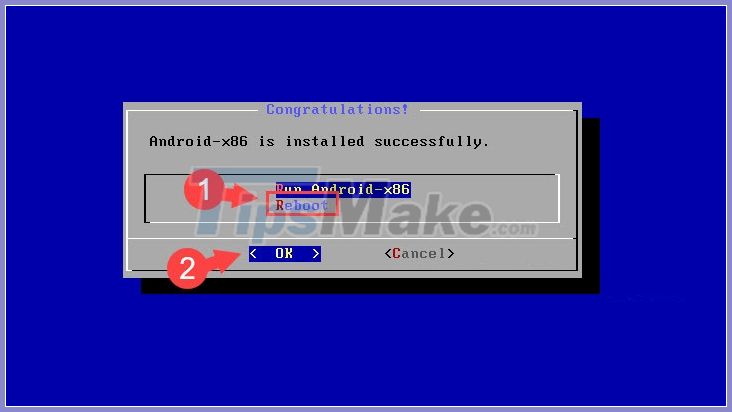
Step 4: Do not click Run Android-x86 to avoid the black screen error. Instead, press Reboot (1) => OK (2) .
5.4. Boot setup and fix black screen error
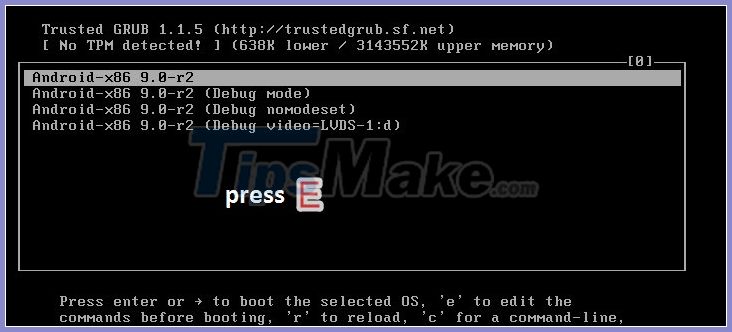
Step 1: After rebooting and entering the boot menu, press E to edit the first boot menu.
Then, press the E key again to edit.
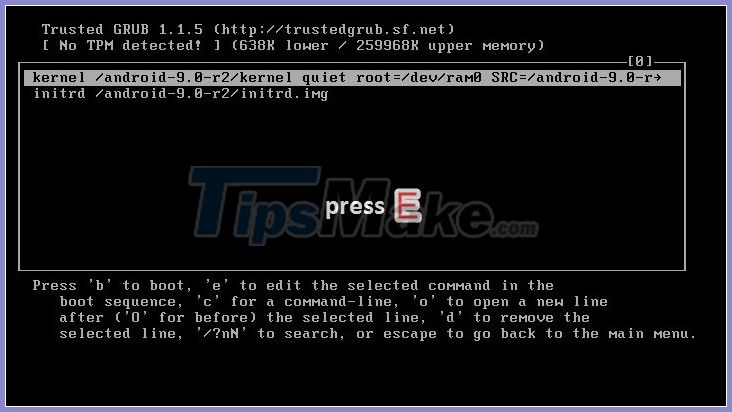
Step 2: You press the ← arrow key on the keyboard to return.
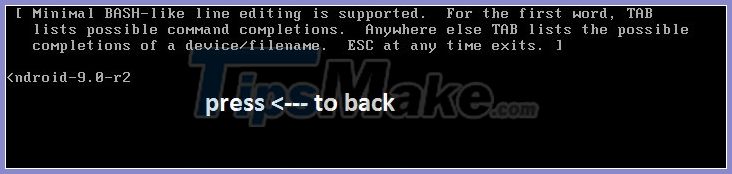
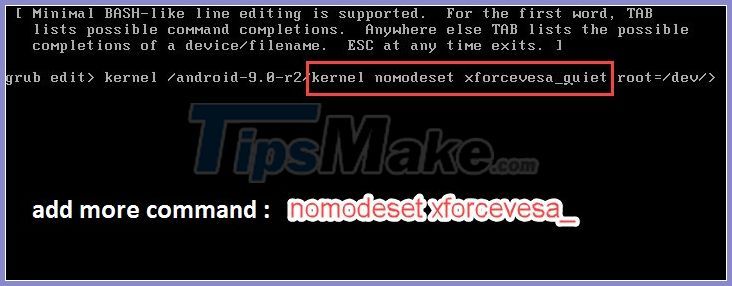
After you return to the line of quiet kernel , insert the following command:
nomodeset xforcevesa_
After inserting the command line will be nomodeset xforcevesa_quiet kernel .
Then, press the Enter key to save the command line.
Step 3: Press B to return to the previous item.
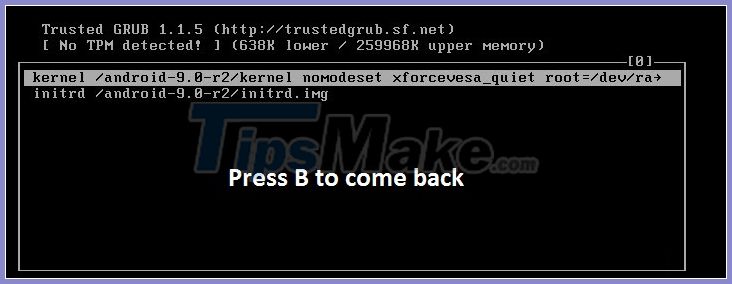
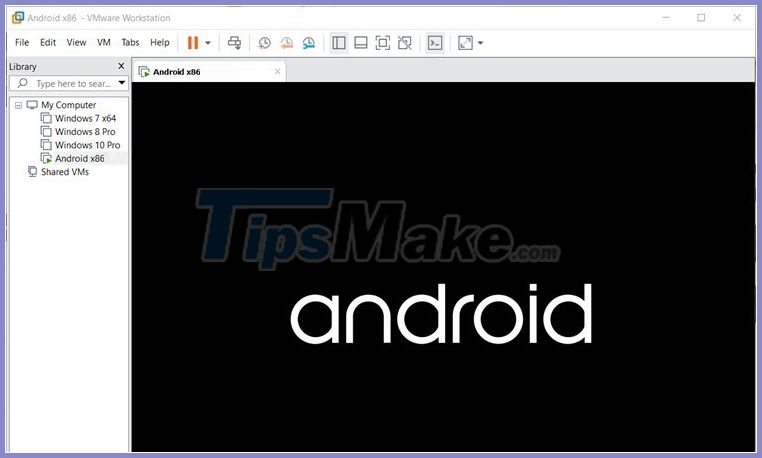
After returning to the previous item, the command line will run itself and you wait for the Android boot menu to appear successfully.
Note : If the Android boot menu runs too long then you should turn off the Android virtual machine and increase the minimum 2GB RAM, minimum 2-core CPU to boot and run Android stably.
5.5. Setup settings in Android and check
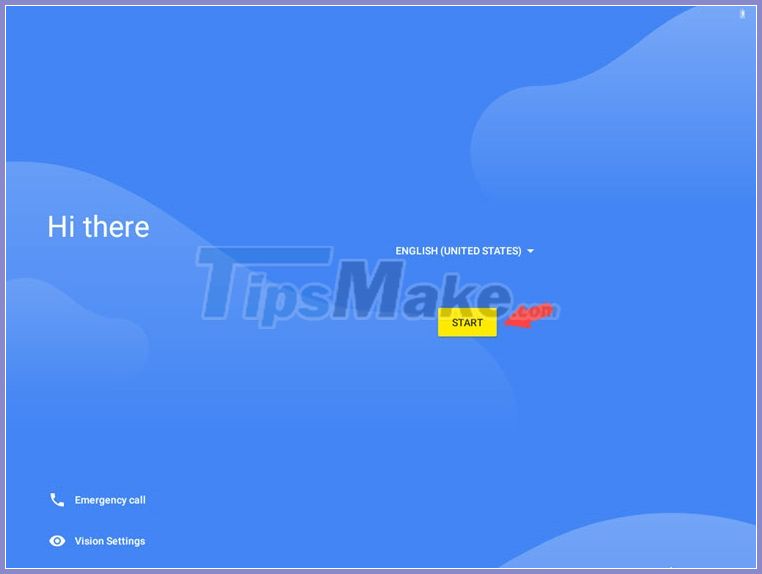
Step 1: Once the Android screen ends, the Android setup begins. Click Start to get started.
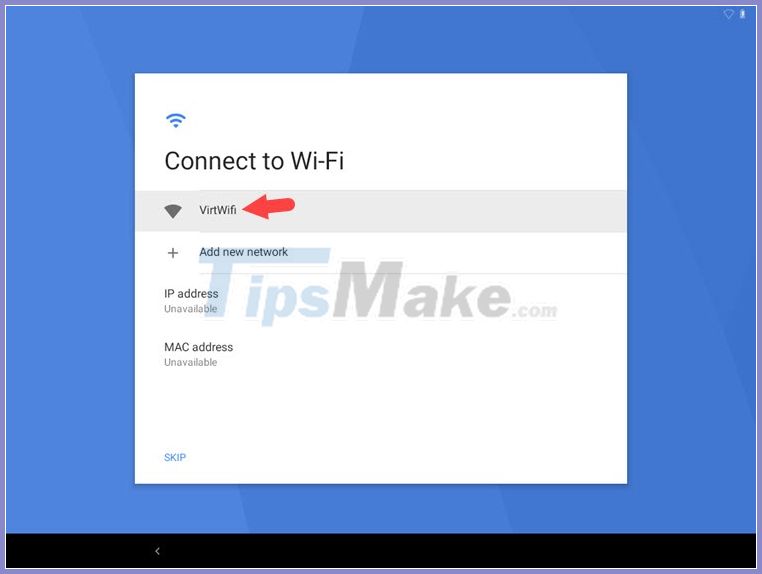
Step 2: Select VirtWifi network to connect.
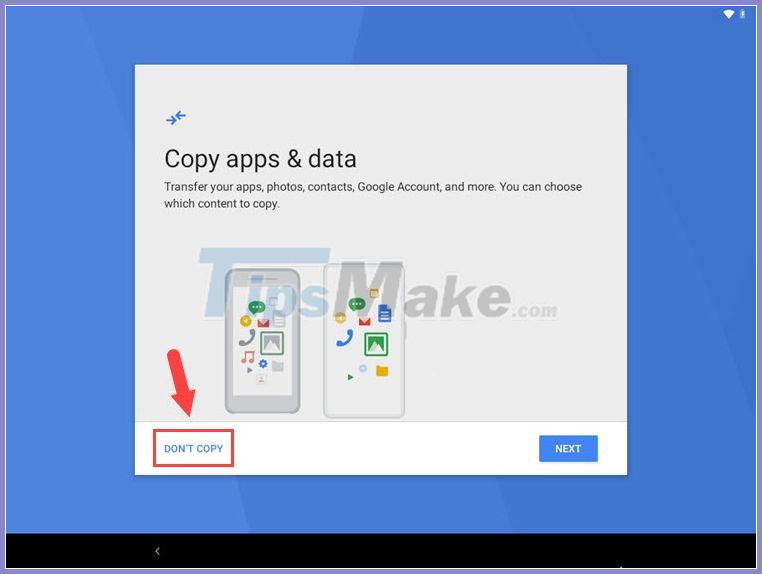
Step 3: Select Don't copy to not import data from Google account.
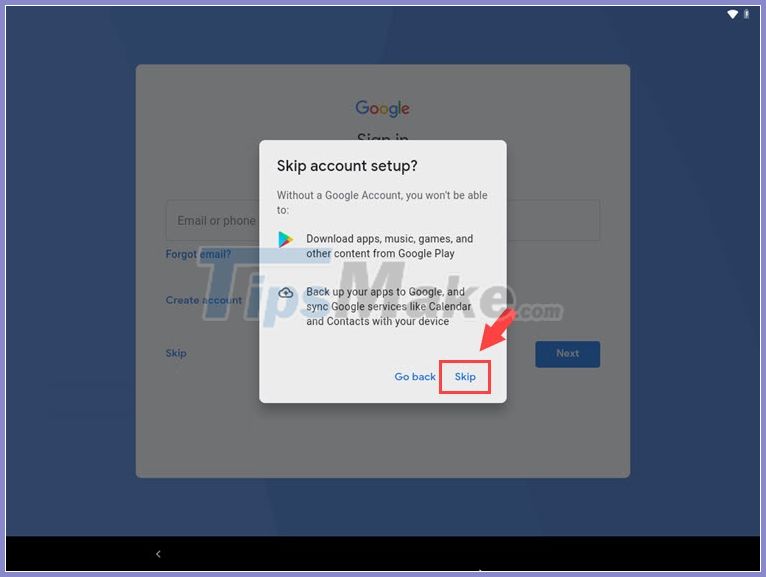
Step 4: You can enter your Google account to install the app, get data or skip it and log in later by clicking Skip .
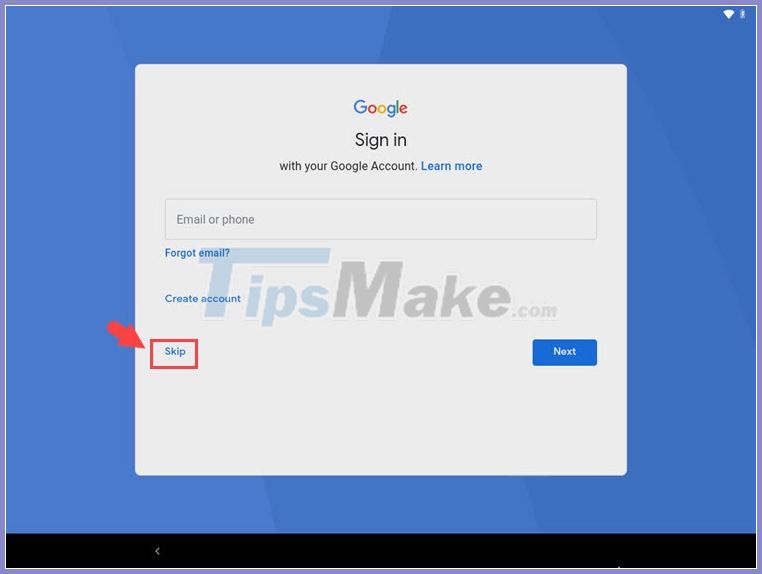
Next, click Skip to continue.
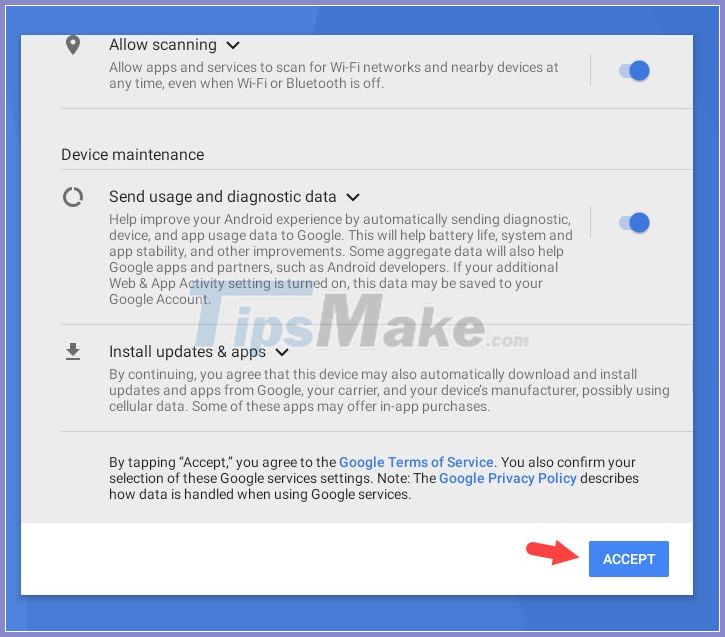
Step 5: Click Accept to agree to the terms of Google.
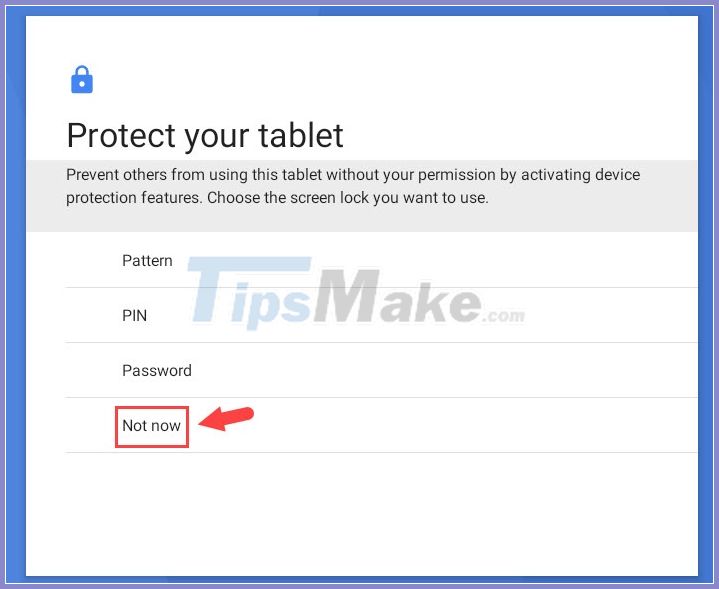
Step 6: Click Not now to skip creating a lock screen password.
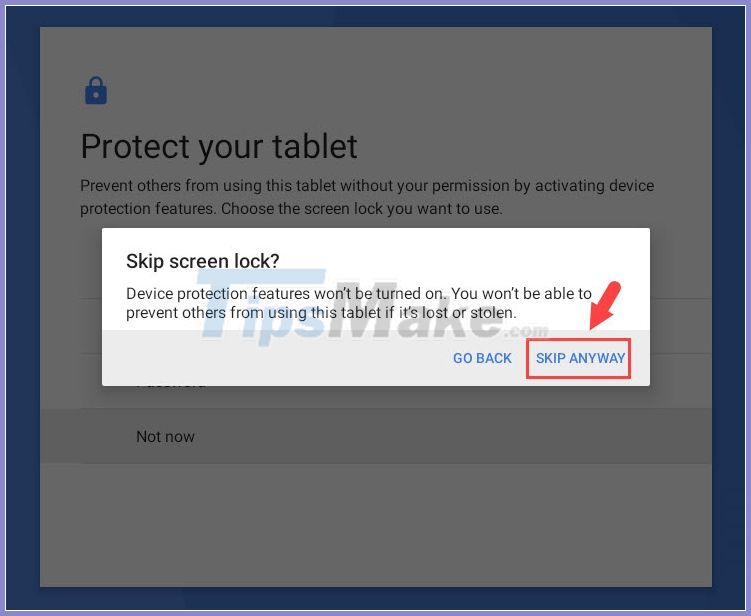
Select Skip anyway to confirm.
Step 7: Finally, Android has been set up and is waiting for you to use. In this step requires you to choose the Launcher to use, you choose Quickstep (1) => Always (2) .
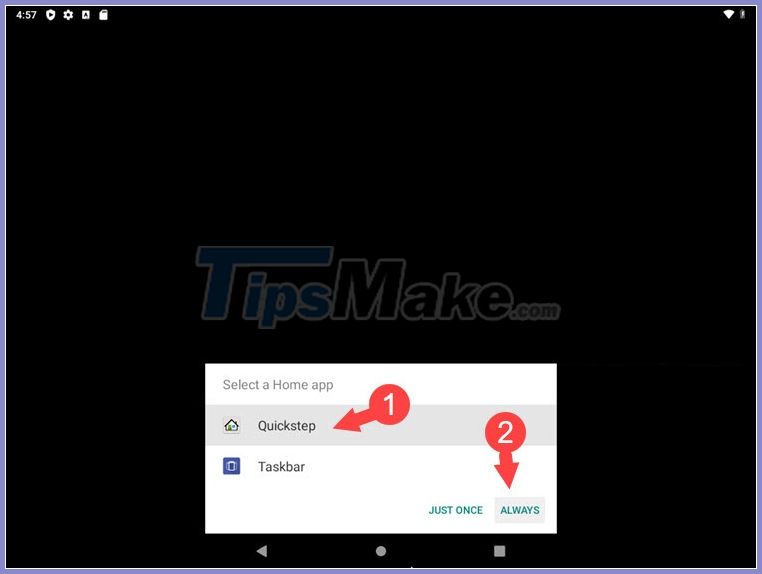
And the interface of the Android Supported operating systems on a virtual machine as shown below with Play Store for you to download the application.

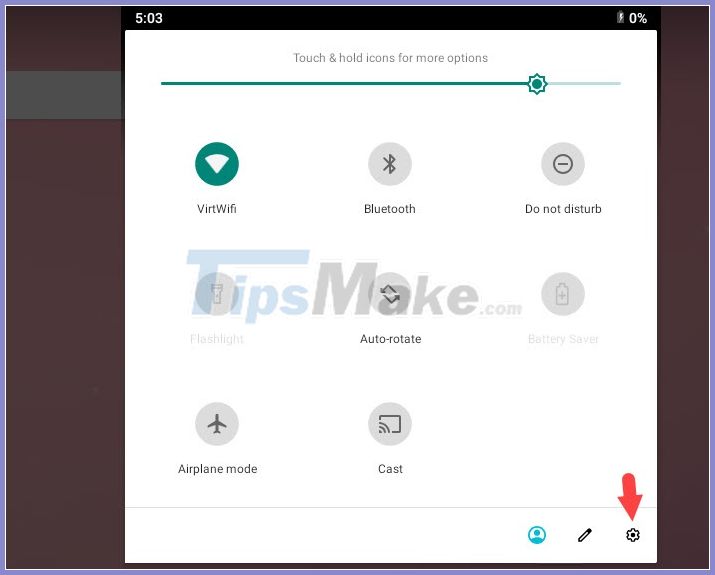
Step 8: To check the Android version, drag the mouse down from the top of the screen to open the Action Center and click on the - to expand.
Next, you click on the Settings icon.
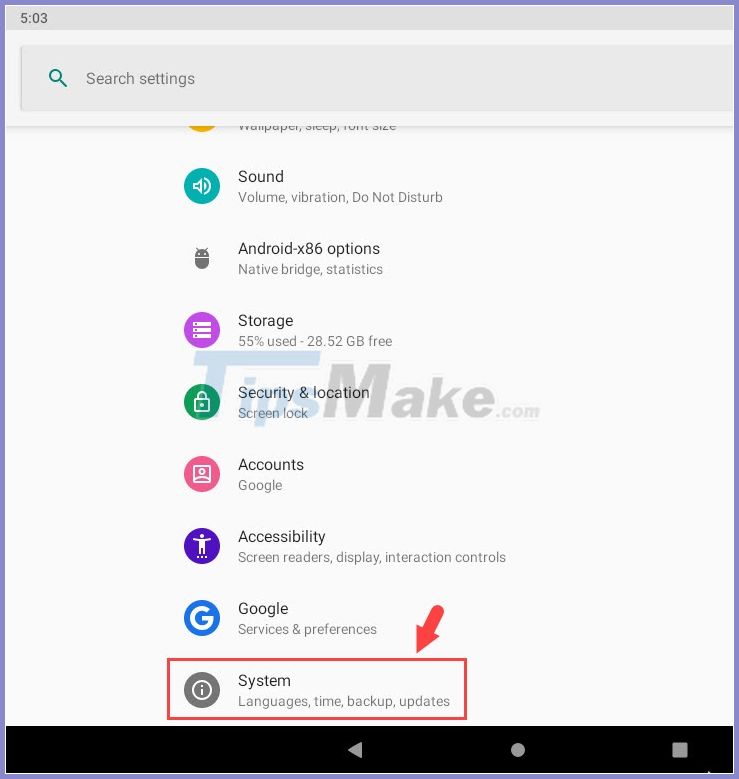
Step 9: In the settings, scroll down and find the System item.
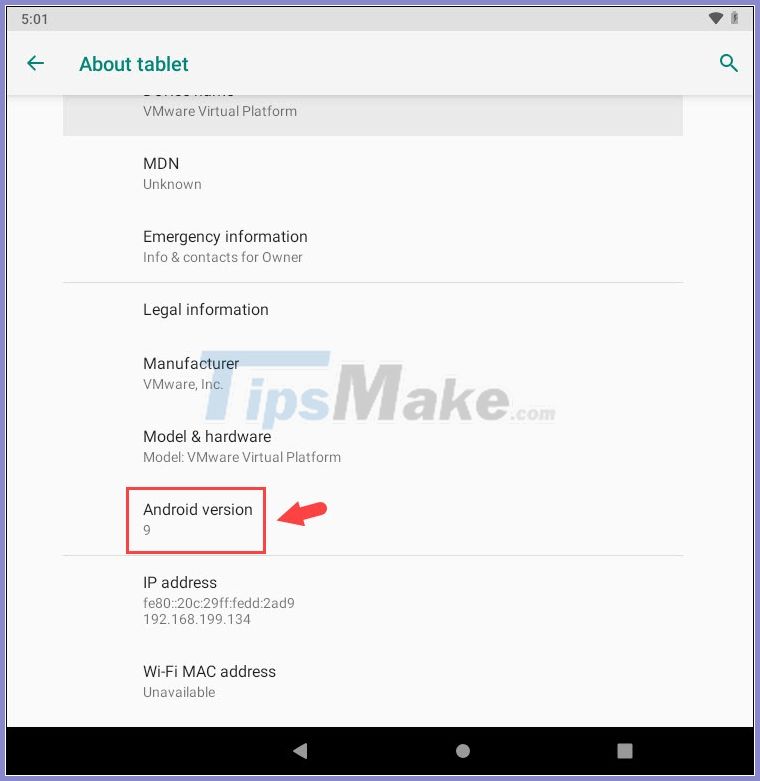
Here, you can see what is your current Android version in the Android version section. In the article below, the current Android version is Android 9 .
Due to running on the architecture of Intel and AMD chips, not ARM architecture, some software and games will crash when installing applications. However, this is also a good way to use the Android Supported operating systems and make good use of the hardware on your computer.
Good luck!
FAQ
How should I choose among Tips for Installing and Using VMware Virtual Machine?
Compare compatibility, essential features, ease of use, security, support, and total cost rather than choosing only by popularity.
Are free options suitable for everyday use?
Free tools can be sufficient for basic needs, but advanced features, commercial use, or priority support may require a paid plan.
What should I check before installing or using one?
Verify the official source, system requirements, recent updates, privacy practices, and support for your device and file types.
Related Articles
 Instructions for Fixing Errors Do Not Install Vmware Tools3 minutes read
 Install Windows 10 on Vmware Workstation6 minutes read
 VirtualBox and Vmware Player: Which Virtual Machine Should You Choose?9 minutes read
 How to Install Ubuntu in Vmware, Installing Ubuntu on a Vmware Virtual Machine4 minutes read
 How to Installing and Using VMware Virtual Machines4 minutes read
 How to Copy Data from Real Machine to VMware Virtual Machine4 minutes read
Reader Comments 0
Sign in with email or Google to join the discussion.