Create a Windows 7 installation DVD with built-in SP1
Although Service Pack 1 version for Windows 7 is not complete, many readers still want to integrate the SP1 SP1 version for Windows 7. 7.
Although the Service Pack 1 version for Windows 7 is not yet complete, many readers still want to integrate the SP1 SP1 test for Windows 7.
By tapping the RT Seven Lite tool, you can create an ISO file that installs Windows 7 SP1. Readers can also apply the method in the article to integrate the completed SP1 version when it is officially released by Microsoft.
Step 1: First, users access here to download RT Seven Lite tool. After downloading, please install and start this software. It is recommended to select RT Seven Lite v2.0 or higher version.

The working interface of RT Seven Lite.
Step 2: Under the Home tab, click the Browse button to browse to the ISO file of Windows 7 installation or the installation directory of this operating system. If you choose the ISO option, you will also need to specify a location to extract the ISO file, the article will work with the popular option of using the original ISO file of Windows 7.
Step 3: You will see the data extraction process done with time may take a while. When done, you will be prompted to select your version of Windows 7. Select the appropriate version, please check before choosing Slipstream Service Pack before clicking OK to continue.

Select the appropriate version of Windows 7.
Step 4: At this time the Slipstream RT Service Pack dialog box will open. Just enter the SP1 file for Windows 7 by clicking on the left Browse button and navigate to the SP1 file path before clicking the Start button to start the integration process.

Integrate the SP1 file to create the DVD.
Step 5: Wait a few minutes until you see the Proceed button appear, click this button to start downloading images and other things. After doing so, please switch to the Task tab to continue the work.
Step 6: Under the Task tab, go to the ISO Bootable option to pre-check it, then switch to the ISO-Bootable tab.
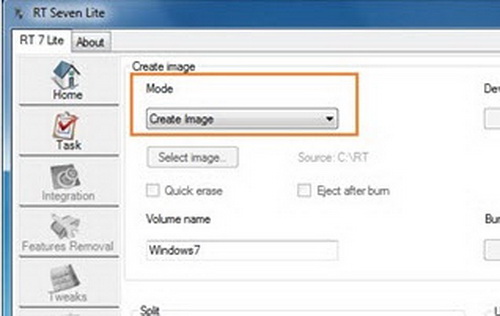
Step 7: Here select the Create Image option in the Mode drop-down list. If you want to directly burn the files to a DVD, select the Direct Burn option in the Mode drop-down list. In this tutorial, the article will select the Create Image option.
Step 8: Now click on the Make ISO button and choose a location to save your ISO file. Windows 7 SP1 ISO image file is ready for you to proceed to burn a new special Windows 7 installation disc.
Was this article helpful?
Your feedback helps us improve.
Related Articles
 How to create Windows 11 installation USB for computers that do not meet TPM 2.0 hardware5 minutes read
 How to create USB Windows 10 Technical Preview installation4 minutes read
 How to Create a Windows 7/Vista Bootable USB Drive6 minutes read
 How to create an EXE installation file15 minutes read
 Instructions for creating Windows installation USB on both GPT and MBR standards with Rufus5 minutes read
 How to create a Windows 11 installation USB using Rufus and Media Creation Tool.7 minutes read
Reader Comments 0
Sign in with email or Google to join the discussion.