10 things to do after installing Windows 7
 Although it is a quite powerful and feature-rich operating system, Windows 7 will make many people disappointed because they do not know how to customize and exploit its features .
Refer to the following 10 essential jobs for your 'brand new' computer and operating system to function smoothly, quickly and conveniently.
1. Earn an antivirus program
In this day and age, it is difficult to accept a computer, whether connected or not, is not equipped with an antivirus program. So is Windows 7, but not all anti-virus software is compatible with this operating system.
AVG Anti-Virus is a not-so-bad choice among free security software but the beta versions of Panda Antivirus Pro 2009, F-Secure Internet Security and McAfee Total Protection are also worth buying even if they are fee-based software.
Recommended option: F-Secure's latest beta is quite powerful, full-featured and is now available for free for 6 months.
2. Customize the toolbar again
Most users feel a little surprised with a fairly large taskbar and icons are equally big. If you want, you can make it more familiar by: right-clicking on the toolbar, selecting Properties and selecting " Combine when taskbar is full " in the "Taskbar buttons " list.
Click on the " Use small icons " box if you want to 'clearance' your screen.
3. Customize Explorer
Windows 7 is equipped with many improvements, but the default mode of Explorer is still quite old and you should customize this function after installation. Click Start to access the Folder section, select ' Folder Options ' in the list.
Windows 7 Explorer window only displays some main drives and folders. This makes the process open faster but at the same time it also makes the user 'spend more' clicks.
If you like the style of working in Vista's Explorer, select the General tab and click both " Show all folders " and " Automatically expand to current folder " boxes.
Windows 7 also has the ability to hide empty drives, but this can sometimes cause unfamiliar users to accidentally change the content in another folder. To remove this feature, simply select the ' View ' tab and uncheck the " Hide empty drives . " section.
And the most sincere advice is to choose a mode that fully displays the extensions and hidden files to avoid being trapped by hackers. This work is exactly the same as in Windows XP. Click on the ' View ' tab and select " Show hidden files, folders and drives ", uncheck the boxes at the top of the " Hide extensions for known file types " section and " Hide protected operating system files ", click OK to finish the job. .
4. Discover secret wallpapers
Right-click on the blank space on the screen, select ' Personalize ' to start decorating your screen with an extremely impressive wallpaper, including a set of photos of the user's country. To get this set of wallpapers out, do the following:
Click on the screen >> Browse , navigate to the folder under the path of WindowsGlobalizationMCT , then select the area where you live or a country you like, click OK to enjoy the new photos.
(If you can't find the MCT folder? That's because you missed or didn't do the 3rd step in this article: Customizing Explorer)
Disclosure: The image of South Africa (South African) has some very beautiful photos. Discover it.
5. Speed up Windows 7
By default, Microsoft leaves Windows 7 in a power-balanced mode. This makes the computer "hungry" less power, but also works a bit slower.
If you are using Windows 7 on the desktop and it is important that you like speed, you can speed up the system by accessing the Control Panel window> Hardware and Sound > Power Options > Create a Power Plan , select ' High Performance 'then give it any name, click Next > Create , select the " Change plan settings " section and comfortably customize the system speed according to your needs.
6. Extend battery life
If you install Windows 7 for your laptop, battery life is more important than working speed. Microsoft has a built-in (hidden) tool for users to do this. Here's how to call this program out.

First, you need to close (exit) all applications that are working in the system tray (right bottom corner, location near the clock) including important programs such as virus killers, firewalls .
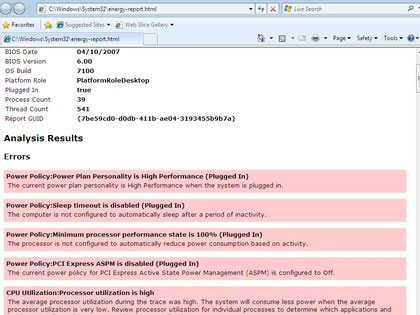
Click Start , type CMD , right-click the cmd.exe command line and select ' Run as administrator '. At CMD window type ' powercfg -energy ' >> Enter .
Windows 7 will analyze your entire system for about 1 minute and give a detailed report of what it finds. Refer to the recommended list of Windows 7 to increase battery life.
Recommendation: Please use the ' Power Efficiency Diagnostics Report ' report to make adjustments.
7. Expand search capabilities of Windows 7
Windows 7 operating system is reinforced by Microsoft with a strong search function. Not only can it search files on your computer or hard drive, but you can also search on your requested websites to save time. To do this, users need to add a 'search connector'. It sounds complicated but this can be done quite easily by yourself. Open the options at the Open button, select 'Add the connector'. Here you can search by website search in the Searches folder or just search in Explorer window.
How to create a search connector for Windows 7 is easy. For example, if you want to search for documents on ICTnews, first open Notepad, copy the following code and save it as ICTnews.osdx using UTF-8 encoding.
QuanTriMang
OpenSearch QuanTriMang with Federated Search
quantrimang.com & web.count = 20 "/>
quantrimang.com "/>
Now, there is no need to visit any particular Google or website, you can still search for documents on that site. Search results will be displayed right in your Explorer window.
To create a search connector for other websites, you just need to edit the content in the ' ShortName ' and ' Description ' tags and enter the web address instead of the quantrimang.com address.
8. Run the old software
Built on Vista's code set, most software now works quite well with Windows 7 but if you still have problems? Please use the 'virtual XP' feature set. However, this feature requires certain hardware conditions. Download the ' AMD Virtualisation Compatibility Check ' tool kit (if your PC uses an AMD chip) or the Intel Processor Identification Utility . If your system passes the tests of this toolkit, the next step is to visit the Microsoft website to learn more about virtual XP mode in Windows 7 (Look in Microsoft Virtual PC ).
Note: Virtual XP mode can only run on CPUs that support hardware virtualization.
9. 'Military death guard body'
User feedback on Windows 7 is still quite good so far, but it is still early to conclude whether this system is likely to cause a disaster for you or not, so it is best to be prepared for a bad case. Best right now.

Create a fix CD for Windows 7 immediately after installation to take precautions
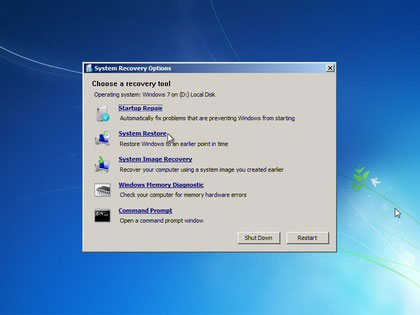
Windows 7 has the ability to create a boot disk and fix errors quite well and you should make 1 or 2 ready to take precautions. In the Control Panel window select System and Security > Backup and Restore > Create a system repair disc and burn to CD.
If a bad day, your computer can't boot anymore, put this boot disk in the CD drive and start the process of finding - fixing errors.
10. Keep searching and exploring
At this point, your Windows 7 PC is pretty good and safe to be ready for service, but remember, you have a whole bunch of other unknown things about this operating system.
We recommend that you take the time to visit the ' Free Windows 7 Software and Resources ' page (continue to find free software and tools for Windows 7) to continue exploring as well as give it new capabilities.
You should read it
- Learn the Windows 10 installation process
- Steps to prepare for installing Windows Server 2008
- How to install Windows 10 Technical Preview
- Instructions to fix Windows 7 installation error
- How to create Windows 11 installation USB for computers that do not meet TPM 2.0 hardware
- How to set up the Windows Store app installation to any D drive or drive
 Network connection with Windows 7 HomeGroup
 Activate Remote Desktop in Vista and Windows 7
 Optimize Windows 7 computers
 Running XP Mode in Windows 7 does not require CPU support for virtualization
 WindowBlinds 7 Final: 'master' beautifies Windows
 User management in Windows 7