Table of Contents
The OpenAI API lets an application send input to OpenAI models and receive generated output. Use it when you need AI inside a website, product, backend process, or automation workflow. Use ChatGPT itself when a person simply needs an interactive chat interface.
A ChatGPT subscription and OpenAI API billing are separate. Paying for a ChatGPT plan does not automatically include API usage, and API charges do not create a ChatGPT subscription.
What you need before starting
- An OpenAI Platform account with API access in a supported location.
- A project in the API Platform.
- A project API key stored securely.
- Billing or credits if required for the account and workload.
- A server-side application, development computer, or trusted automation platform from which to make requests.
Use the official OpenAI API quickstart alongside this guide because dashboard labels, SDK versions, and recommended models can change.
ChatGPT and the API are different products
| ChatGPT | OpenAI API |
|---|---|
| Ready-made interface for people | Programmable interface for software and workflows |
| Plan-based product access and limits | Usage-based API billing and rate limits |
| Conversation features are provided in the product | Your application controls prompts, storage, tools, interface, and user access |
| No code required for ordinary use | Requires code or a compatible automation platform |
The API is appropriate for tasks such as classifying incoming support requests, summarizing uploaded documents, extracting structured fields, drafting responses for human approval, or powering an application feature. It is not a shortcut around ChatGPT plan limits.
Create an OpenAI API key
- Sign in to the OpenAI Platform.
- Create or select the project that will own the application and its usage.
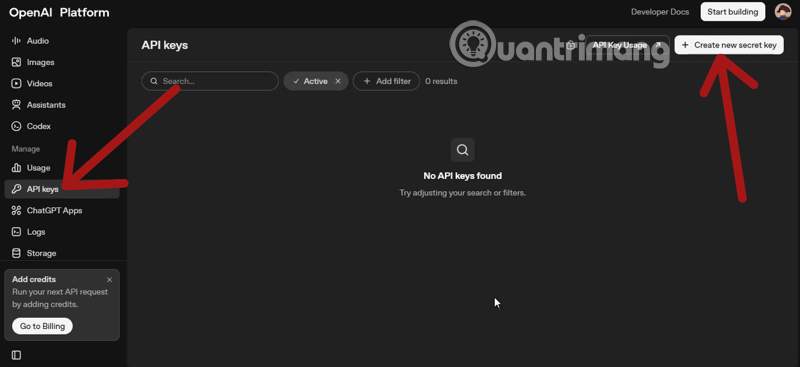
- Open the project’s API Keys page and select Create new secret key.
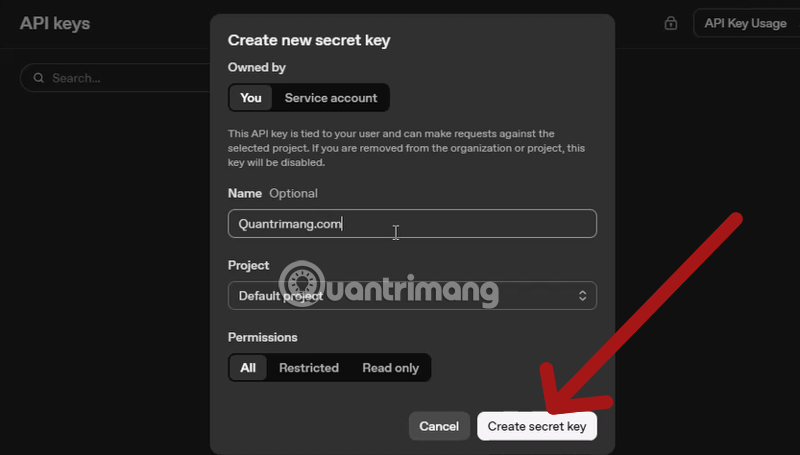
- Give the key a name that identifies its purpose, select the intended project and permissions where available, and create it.
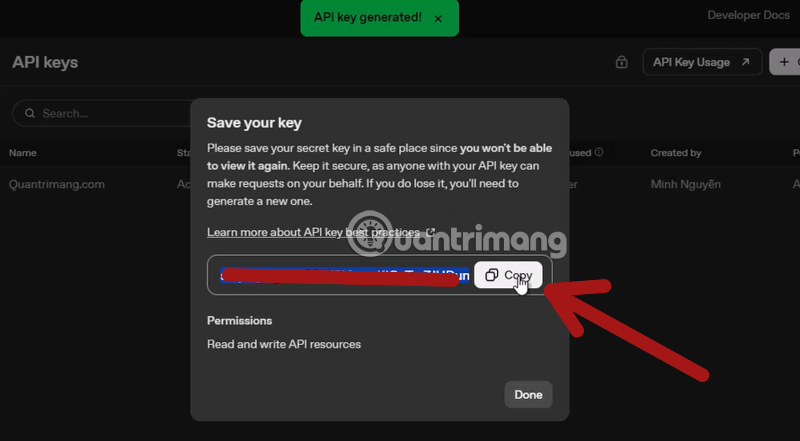
- Copy the key when it is displayed and place it in a password manager, development secret store, or production key-management service. Do not save it in an ordinary shared note.
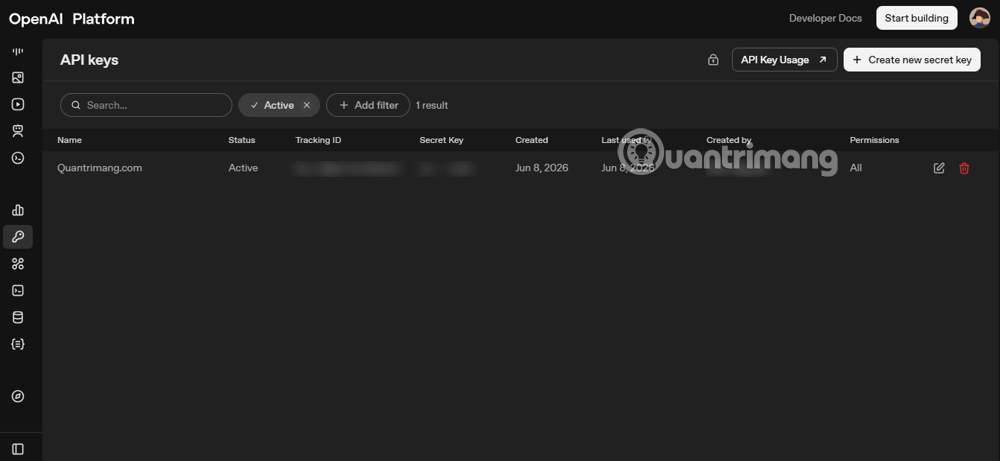
The API Keys page lists the keys associated with the project. Revoke a key that is unused, exposed, or assigned to a retired application.
Protect the API key
An API key authorizes billable requests. OpenAI’s API authentication documentation says not to share a key or expose it in client-side code such as a browser or mobile app. Keep the key on a server and load it from an environment variable or secret manager.
- Do not paste a real key into source code, screenshots, tickets, email, or chat.
- Do not commit a key or a populated
.envfile to Git. - Do not put a standard API key in frontend JavaScript. Send the request through your authenticated backend.
- Use separate projects or keys for development, testing, and production so access and spending can be isolated.
- Grant only the permissions an application needs.
- If a key may have leaked, revoke it promptly, create a replacement, and inspect recent usage.
Make your first API request with Python
OpenAI recommends the Responses API for new text-generation projects. The older Chat Completions API remains supported, but a beginner should learn the current interface first.
1. Install the official SDK
python -m pip install openai2. Set the environment variable
On macOS or Linux:
export OPENAI_API_KEY="your_api_key_here"In Windows PowerShell, set the variable for the current session:
$env:OPENAI_API_KEY="your_api_key_here"Use your operating system’s secret storage or deployment platform for a production service. Do not paste the real key into the Python file.
3. Create and run the script
from openai import OpenAI

client = OpenAI()

response = client.responses.create(
    model="gpt-5.6-luna",
    instructions="Answer as a concise customer-support assistant.",
    input="My order arrived damaged. What information should I provide?",
    max_output_tokens=300,
)

print(response.output_text)
The SDK reads OPENAI_API_KEY automatically. The request sends instructions and user input to the selected model, while max_output_tokens places a ceiling on generated output. Run the file with:
python example.pyIf the model is not available to your project, open the current OpenAI model catalog and choose a model supported by the Responses API. Avoid copying an old model name from a tutorial without checking its status.
Connect the API in n8n or another workflow tool
A no-code or low-code platform still makes API requests and still needs secure credentials. The exact node labels change over time, but the safe pattern is consistent:
- Create a dedicated OpenAI project and key for the workflow.
- In n8n, add an OpenAI node and select an operation that matches the task.
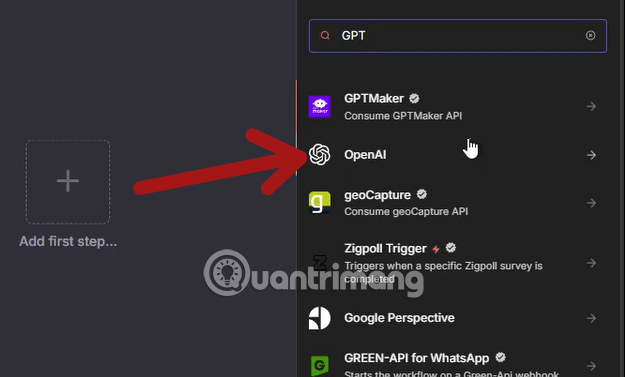
- Open the node’s credential setting and create a new OpenAI credential.
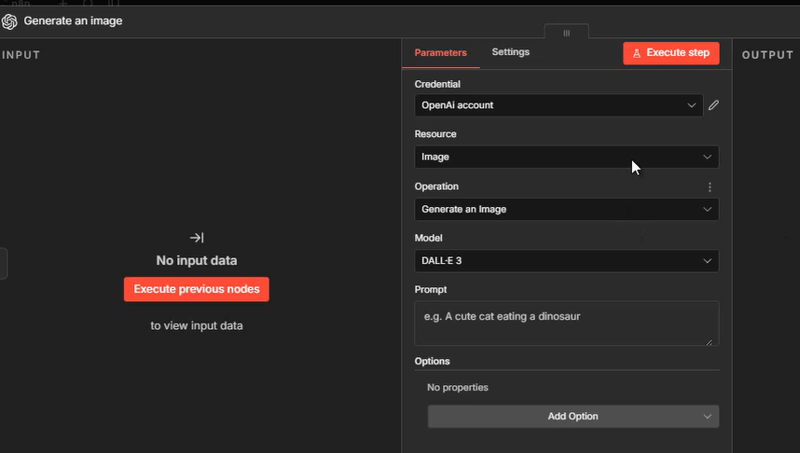
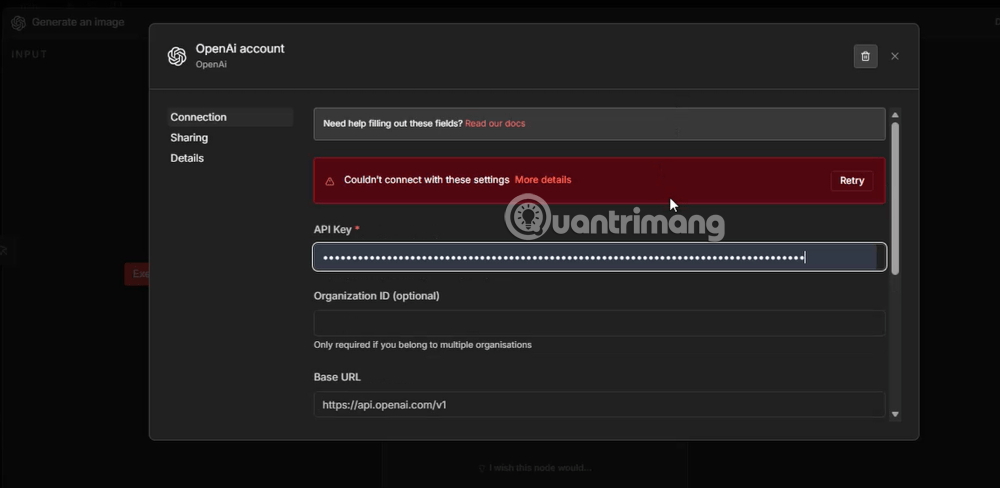
- Paste the key into the protected credential field and save it. Never place the key in an ordinary text or code node.
- Send a small test input, inspect the output, and add validation before connecting the workflow to live customer or business data.
- Set project-level spend alerts and a hard limit appropriate for the workflow.
Zapier, Make, Activepieces, and similar tools use comparable credential and action concepts. If self-hosting is a priority, this Activepieces overview explains another automation option. A visual builder reduces coding, but it does not remove the need for access control, error handling, privacy review, and cost monitoring.
Configure billing and cost controls
Open the organization or project Billing area to see which payment options and credit requirements apply to the account. Do not rely on a fixed minimum deposit quoted by an older guide; account eligibility and billing options can differ.
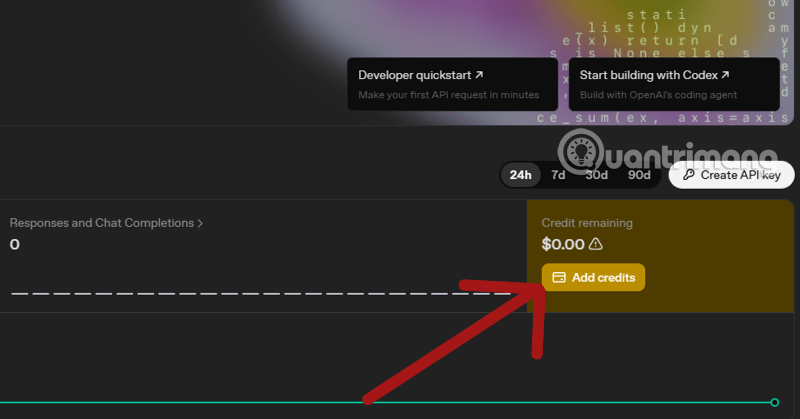
Add an accepted payment method only through the official Platform. Review the amount and project before confirming.
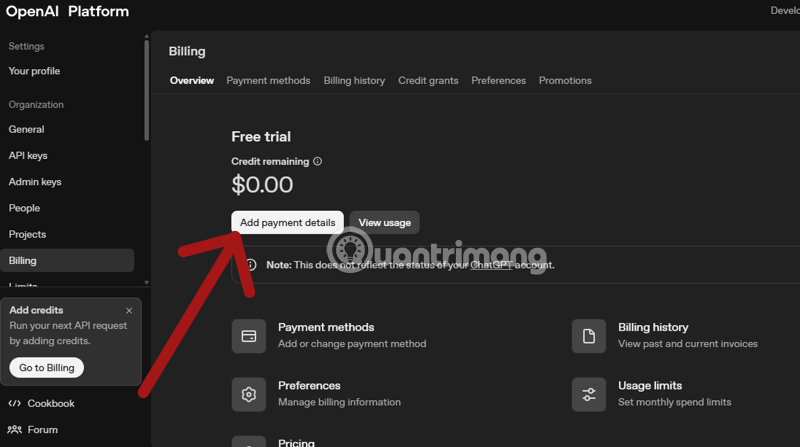
Then configure two separate controls:
- Spend alerts notify administrators when usage reaches selected thresholds, but traffic continues.
- Hard spend limits cause affected requests to return a 429 error after tracked monthly spend reaches the organization or project cap.
OpenAI notes that hard-limit enforcement is not instantaneous, so recorded spend can slightly exceed the configured amount. Set alert thresholds below the hard cap and leave room for administrators to investigate unexpected activity. The current steps are in the official spend-limits guide.
Choose a model by workload
The current GPT-5.6 family uses three general tiers:
| Model | Use it when | Trade-off |
|---|---|---|
gpt-5.6 or gpt-5.6-sol | The task needs the strongest reasoning or coding capability | Highest cost in the family |
gpt-5.6-terra | You need a balance of capability and cost | May not match Sol on the hardest tasks |
gpt-5.6-luna | The workload is cost-sensitive or high-volume and can use a smaller tier | Test quality carefully on complex tasks |
Do not choose solely from a marketing description. Build a small evaluation set containing representative inputs, expected properties, difficult edge cases, and unsafe or malformed inputs. Compare output quality, latency, and total cost before changing a production model.
Specialized image, realtime audio, transcription, embedding, and moderation tasks use other models. Confirm endpoint and modality support in the model catalog.
Control cost without reducing reliability
- Measure before optimizing: Review project usage by model and environment.
- Cap output: Set a reasonable
max_output_tokensvalue and ask for concise structured output. - Send only needed context: Do not attach an entire document history when the task needs one section.
- Use the least expensive model that passes your evaluation: A cheap failed output can cost more after retries and manual correction.
- Cache stable results: Avoid regenerating identical classifications or summaries when your application can safely reuse them.
- Validate before retrying: Prevent unbounded loops when a request fails or returns malformed output.
- Separate environments: Put development and production in different projects with different caps.
- Use asynchronous processing where appropriate: Batch or deferred work can be a better fit than keeping a user waiting, but check current endpoint terms and pricing first.
Prepare a workflow for production
- Keep API calls on an authenticated server.
- Validate user input and limit request size.
- Request structured output when downstream software expects a schema.
- Handle timeouts and 429 or 5xx errors with bounded retries and backoff.
- Log application-level events and the API request ID, but never log the secret key.
- Apply content and domain-specific safety checks before showing or acting on output.
- Require human approval for high-impact actions such as refunds, account changes, medical or legal decisions, or outbound messages.
- Review OpenAI data controls and your own privacy obligations before sending personal or confidential information.
A useful first project is a narrow workflow with a measurable success criterion—for example, classify support tickets into five queues and send low-confidence results to a person. Once it is reliable, add complexity gradually. If you want to compare the setup with another provider’s API, the Claude API guide shows the same core ideas of server-side credentials and measured usage.
Related Articles
 Image Library on ChatGPT: a Complete Guide on How to Use the Library5 minutes read
 How to Convert ChatGPT-5 to ChatGPT-4o3 minutes read
 Learn About ChatGPT-4o: Features, Benefits and How to Use It: Complete Guide7 minutes read
 What Is ChatGPT Pro? Is It Worth It in 2026?8 minutes read
 How to Personalize ChatGPT 5 for a More ChatGPT 4-Like Experience8 minutes read
 Effective Ways to Use ChatGPT in Excel8 minutes read
Reader Comments 0
Sign in with email or Google to join the discussion.