Table of Contents
When you need to feed a large amount of data to an AI model for analysis, you need to consider its conversational memory, also known as the context window. If you send too much data, the model will forget some of your instructions, leading to inaccurate and useless results.
The Google Gemini 1.5 Pro model can handle a large amount of data simultaneously, supporting up to one million words per prompt – equivalent to over 700,000 words. In addition, the 1.5 Pro is multimodal, meaning it can work with up to one hour of video, 9.5 hours of audio, and over 30,000 lines of code.
This article helps you understand what Gemini can do and how to set up API calls to start communicating with it. With its huge context window, you can send extremely long prompts with complex instructions, examples, and data to be transformed—all without needing any Machine Learning credentials.
What is the Gemini API?
The Gemini API provides access to Google's AI model suite:
- Gemini 1.0 Pro, a natural language processing (NLP) model with chat and code generation features.
- Gemini 1.5 Pro, a multimodal model with a context window of up to 1 million tokens.
- Gemini 1.5 Flash, a faster multimodal model with tighter input and output limits.
By connecting these models to your internal tools, applications, or products, you can leverage their features wherever you're working without constantly switching to the chat interface.
There are two ways to connect to the Gemini API. The first is to use the free plan through Google AI Studio — this is the easiest way to set up. If you want more control and integration with other models, you can set up access through Google Vertex AI Model Garden.
How to obtain your Gemini API key and establish a Gemini API connection.
Step 1: Create a Google AI Studio account
Visit the Gemini API website and click on Sign In to Google AI Studio . Follow the steps to create a new account or sign in with your existing Google credentials.
Step 2: Open the API documentation and reference materials.
Each API works differently, so you need to rely on the API documentation to understand the features and use cases. The API reference documentation, on the other hand, is a technically detailed set of commands, parameters, and setup instructions to help you implement it in your project.
Below are links to the Gemini API documentation and the content creation API reference documentation.
Step 3: How to get your Gemini API key
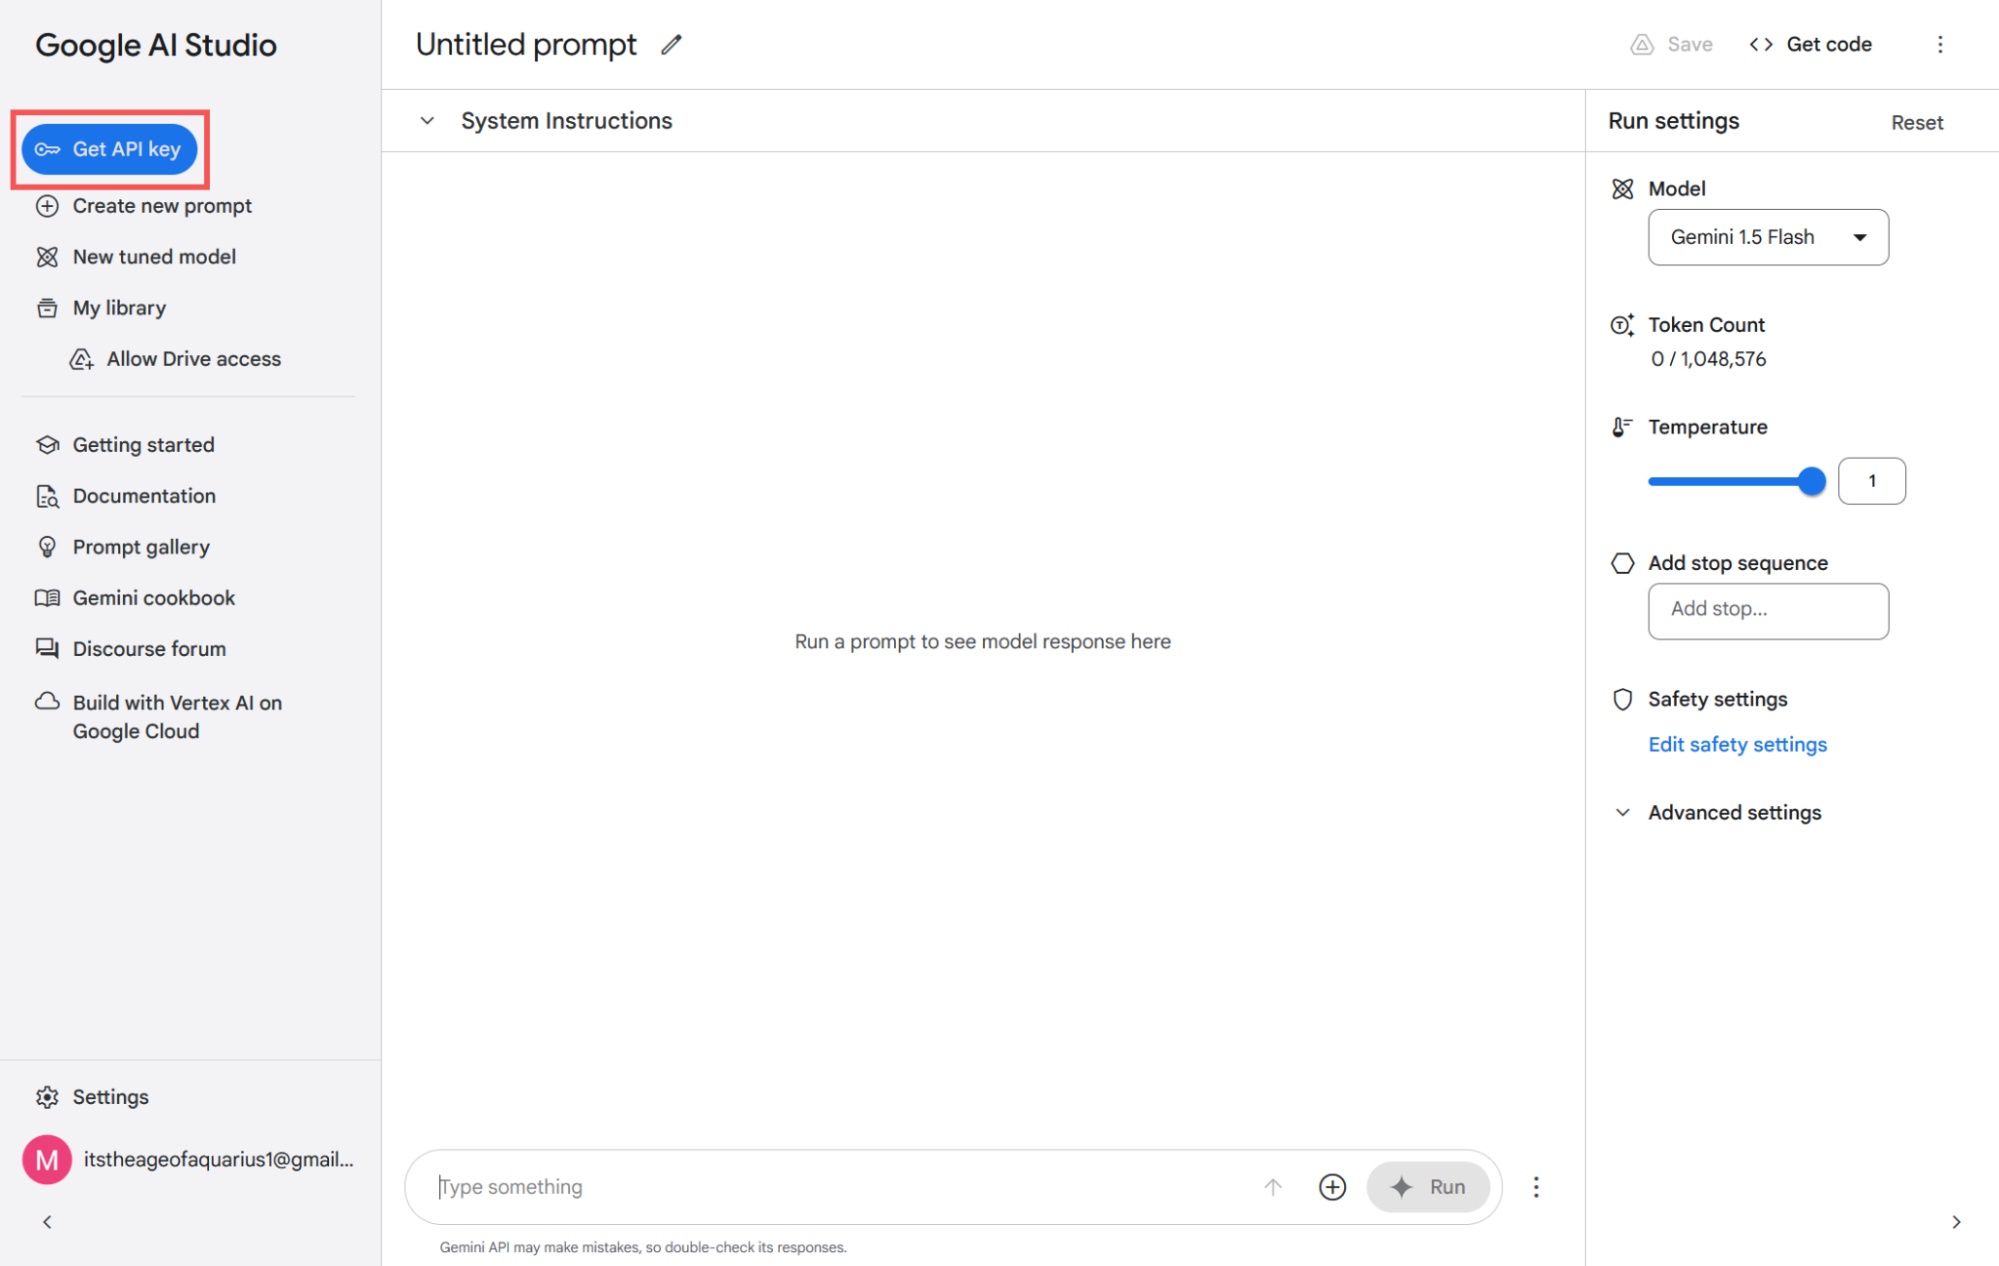
After logging into Google AI Studio, read, accept, and close any pop-up information windows that appear on your screen. You can check out the Gemini models here, adjusting some basic settings on the right-hand side.
In the upper left corner of the screen, click the Get API key button.
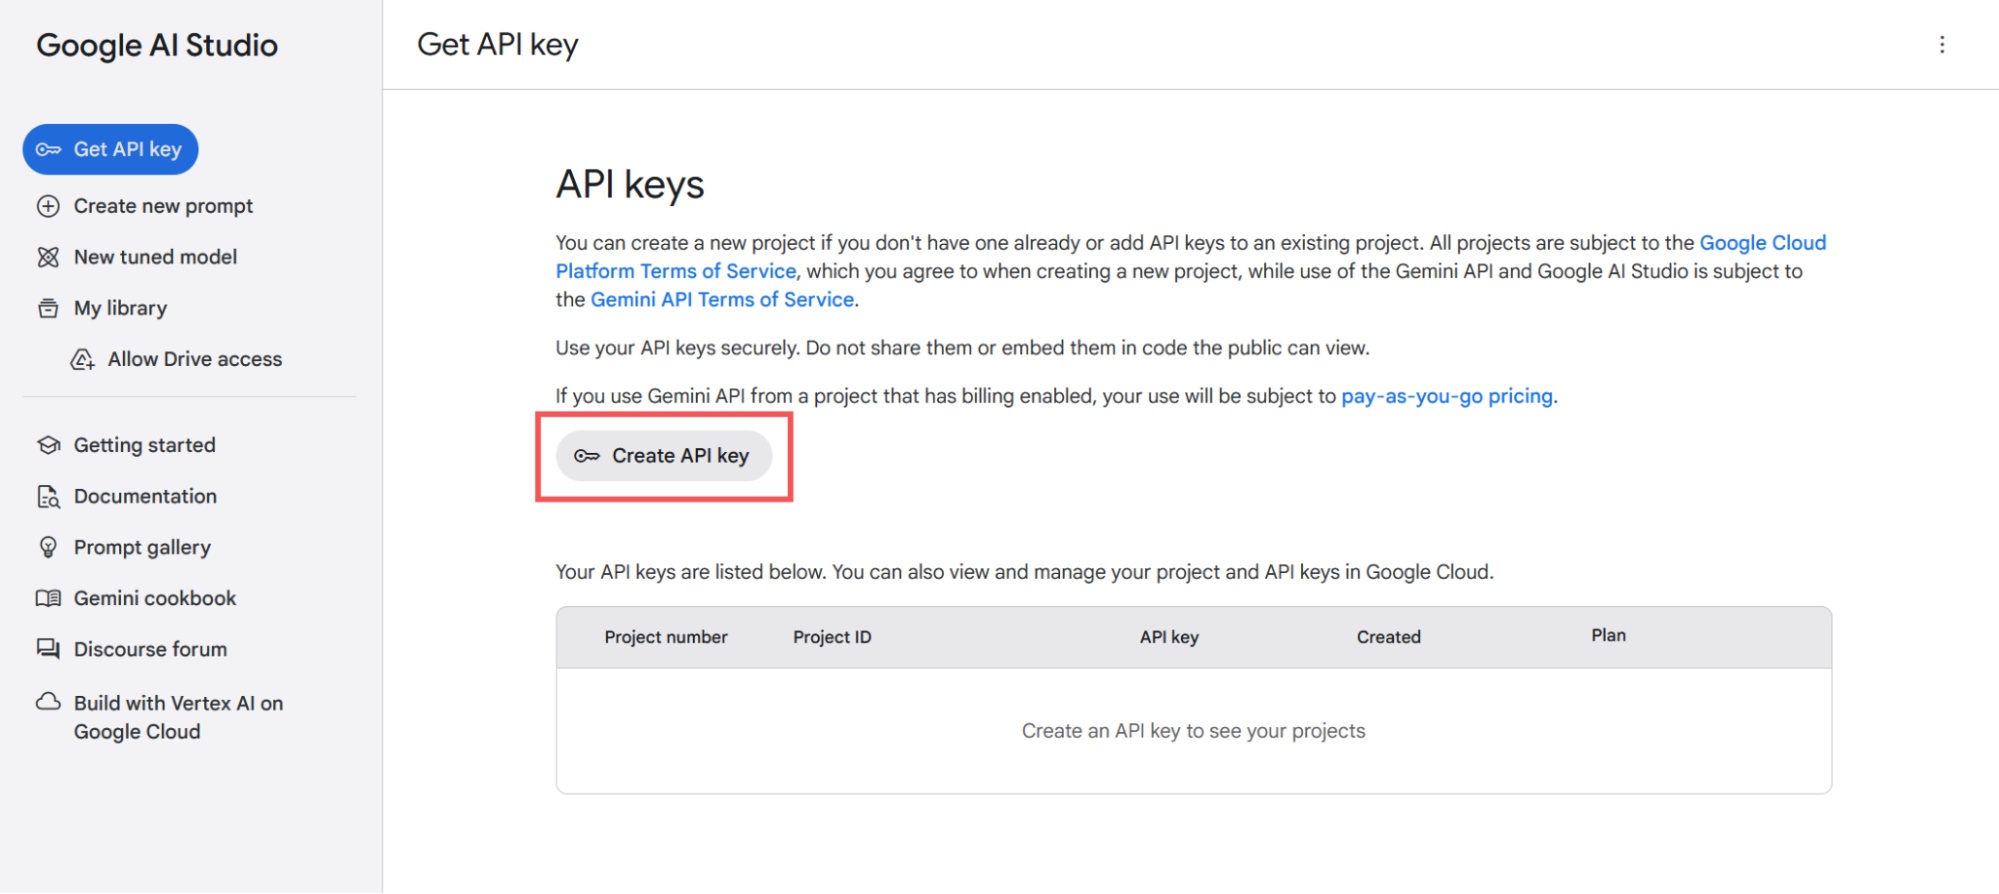
Next, click the Create API key button.
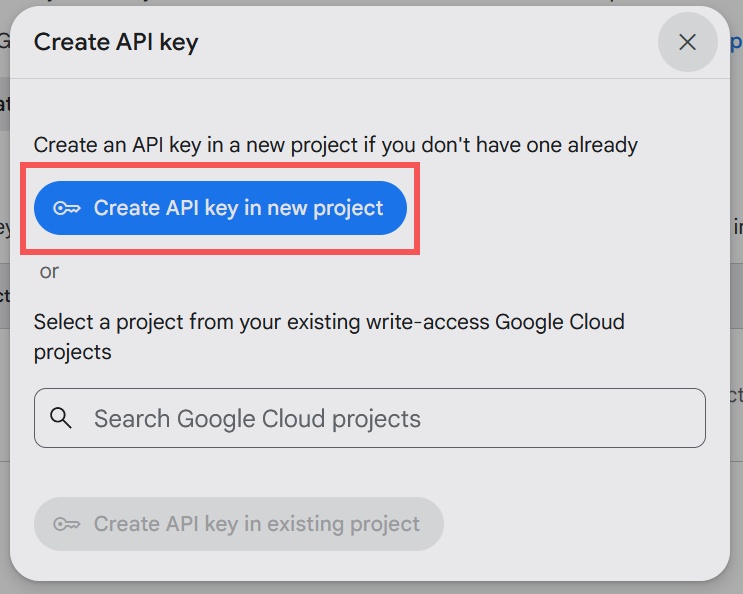
Accept and close the security setup prompt. Then, click the Create API key in new project button.
Google will generate a new API key. Copy that key, then close the pop-up window.
Important note : You need to keep this API key safe at all times. If someone finds your key, they can use it, and depending on how it's used, that could disable your endpoint. Do not share this key with anyone who doesn't need it, and if you're publishing your application to the public web, be sure to learn about best practices for API security.
Returning to the API Key dashboard, you should see a new key added to the list and a new section with the cURL command appearing below. If you don't see it, try refreshing your browser page.
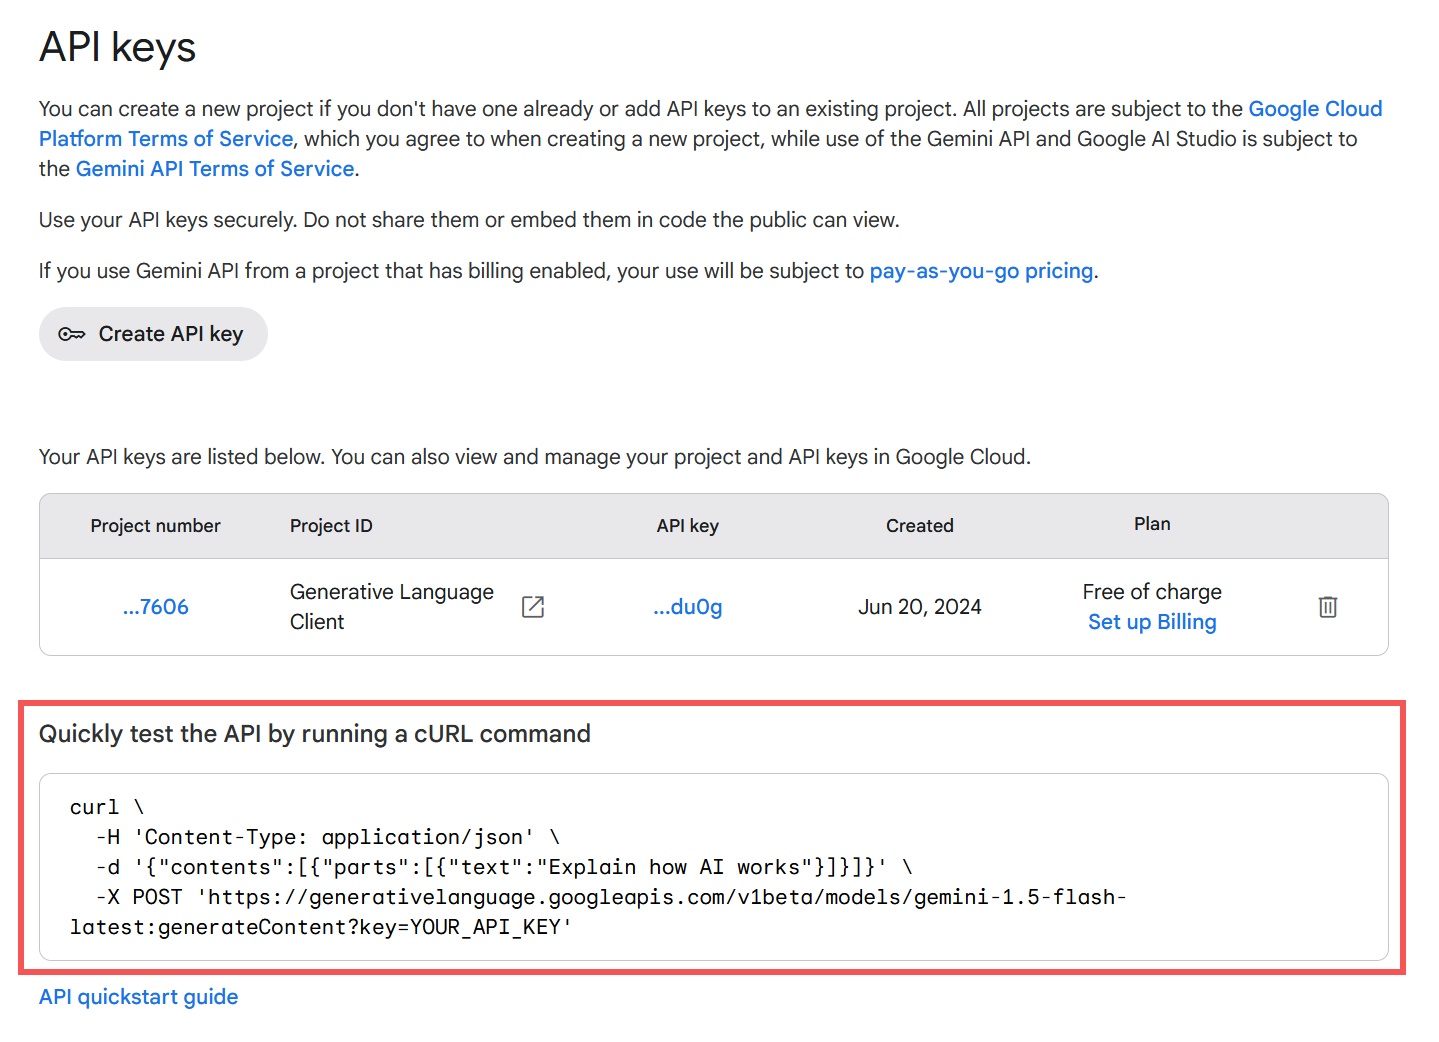
Let's analyze the meaning of each of these lines.
curl For terminal users, this command initiates a new connection. The backslash is a line break for readability; it doesn't affect the command itself. We won't need it.
-H 'Content-Type: application/json' This is the request header, marked with the -H flag. It contains the Content-Type key set to the value application/json. This tells the API endpoint what type of data to expect. Postman, the platform being used to call the API in this tutorial, has this set by default, so we won't need it either.
-d '{"contents":[{"parts":[{"text":"Explain how AI works"}]}]}' The -d flag marks the data you are passing along with the request. Written in JSON, "contents" marks the contents of the request, divided into "parts". It contains a "text" part with the value "Explain how AI works" - this is the prompt you are sending to the AI model.
-X POST 'https://generativelanguage.googleapis.com/v1beta/models/gemini-1.5-flash-latest:generateContent?key=YOUR_API_KEY'The -X parameter sets the HTTP request type - in this case, it's the POST method. URL refers to the API endpoint URL where you send the request.
Step 4: Set up API calls
We now have all the necessary information to start calling the Gemini API. If you want to follow along, you can create a free account on Postman, an API design and testing platform. You can also do this using a no-code application builder or an in-house build tool.
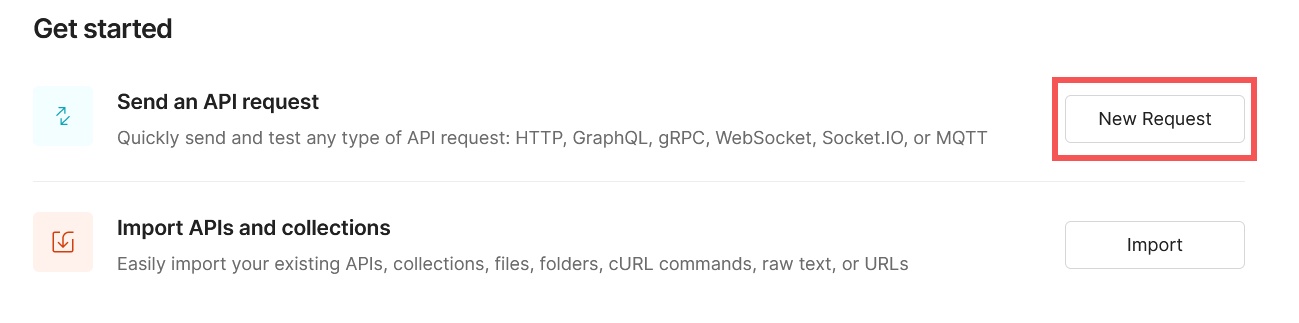
If you're following these steps on Postman, log into your dashboard and click New Request at the top of the screen.
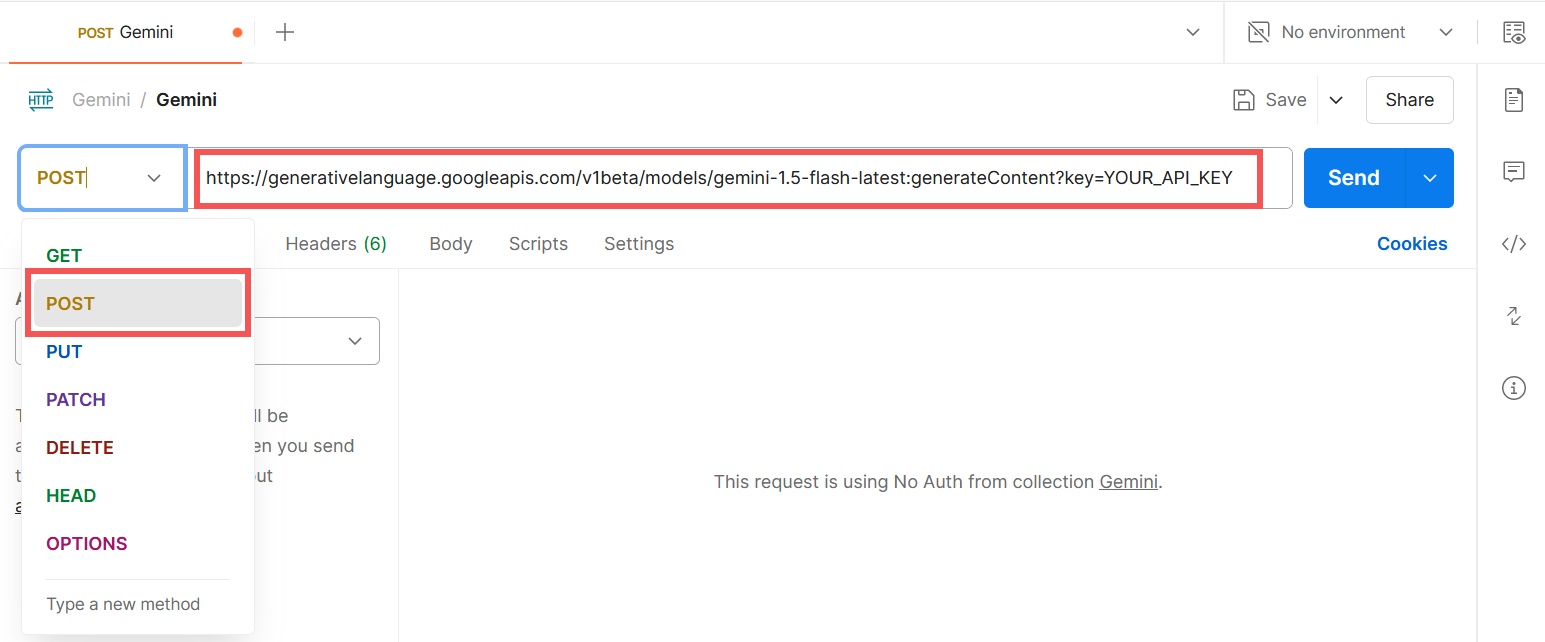
We'll start by adding details to the -X flag. In the request input field, click the GET drop-down menu and change it to POST. Then, copy the URL with the -X flag (without the parentheses at the beginning and end) and paste it in.
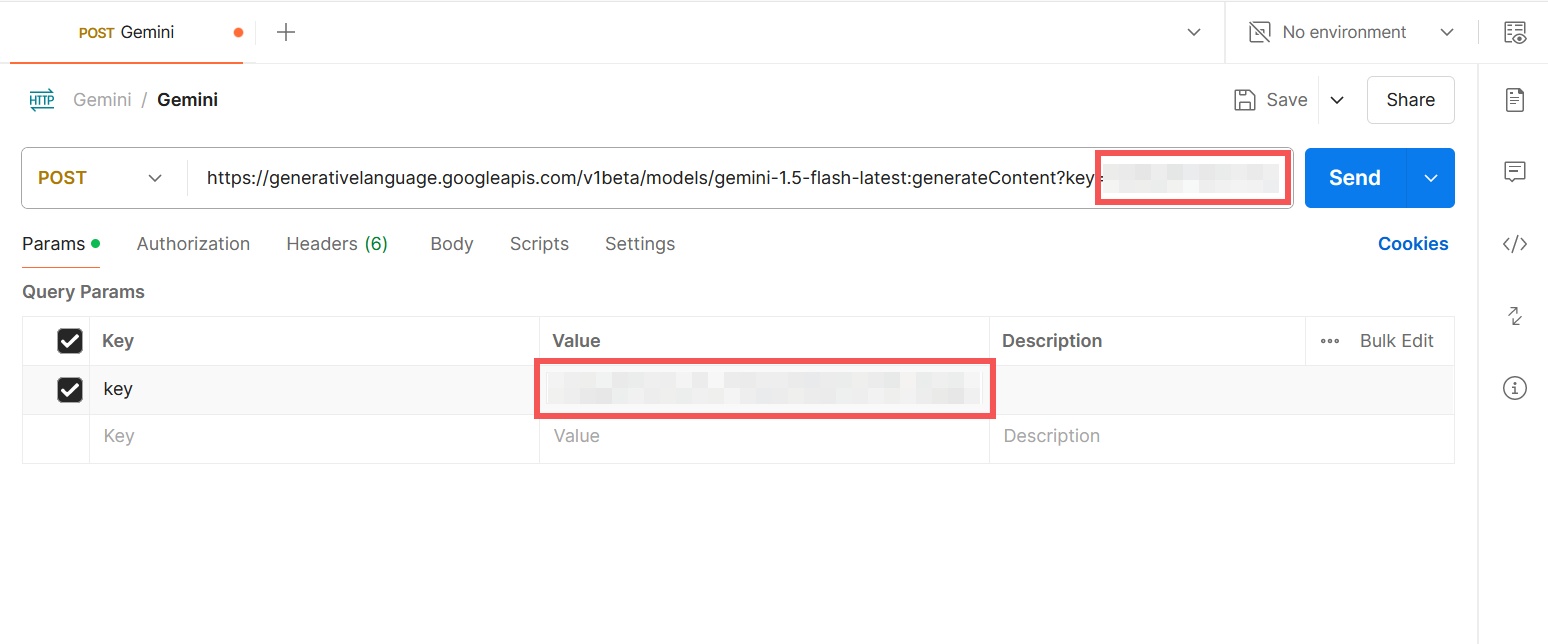
Just below, you'll see the update interface displaying a new parameter. Postman discovered it in the URL: It's "key=YOUR_API_KEY". This is where you'll pass your unique API key. Delete YOUR_API_KEY (in the URL input field or the query parameter table below) and replace it with your API key.
Setting up a new API is more of a troubleshooting race than a smooth ride, so let's explore how it works. Click the Send button and see what happens.
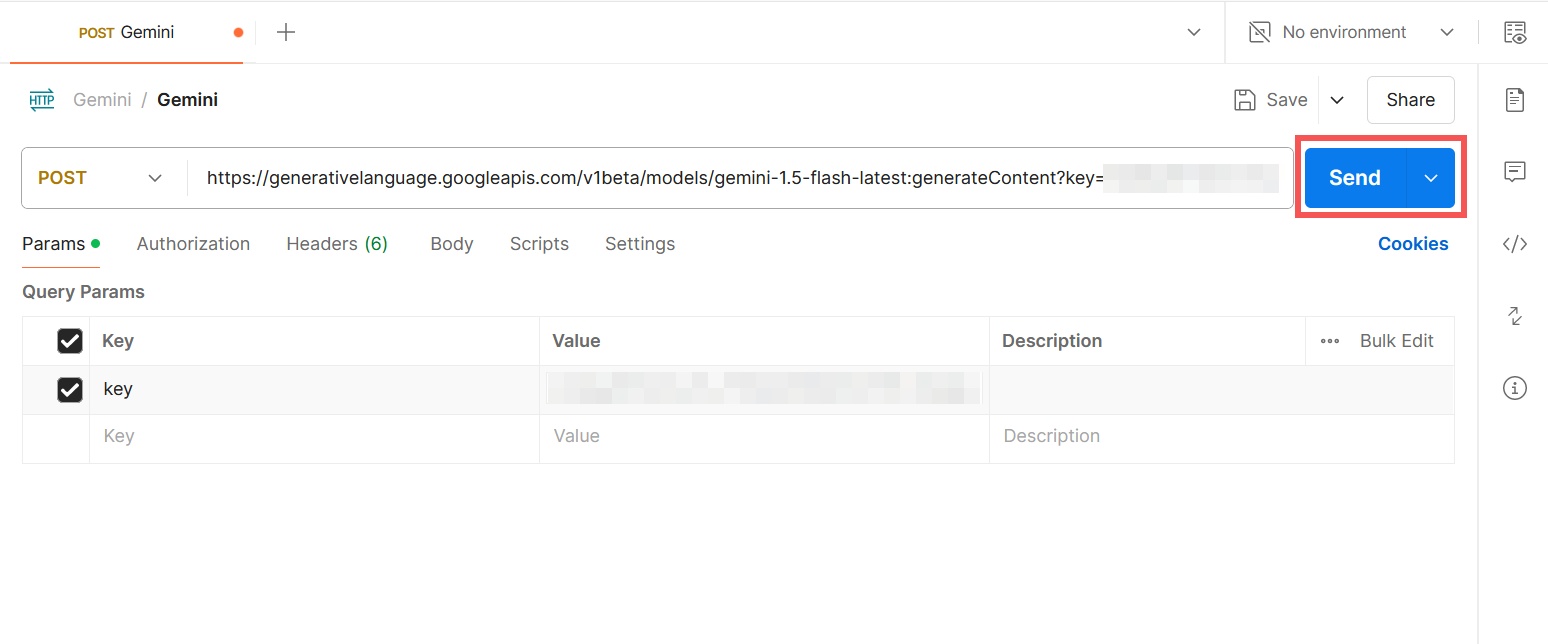
That's an HTTP 400 Bad Request error. It tells us the body isn't specified. This isn't surprising: We haven't configured the request body in Postman, so it's sending an empty request to the API.
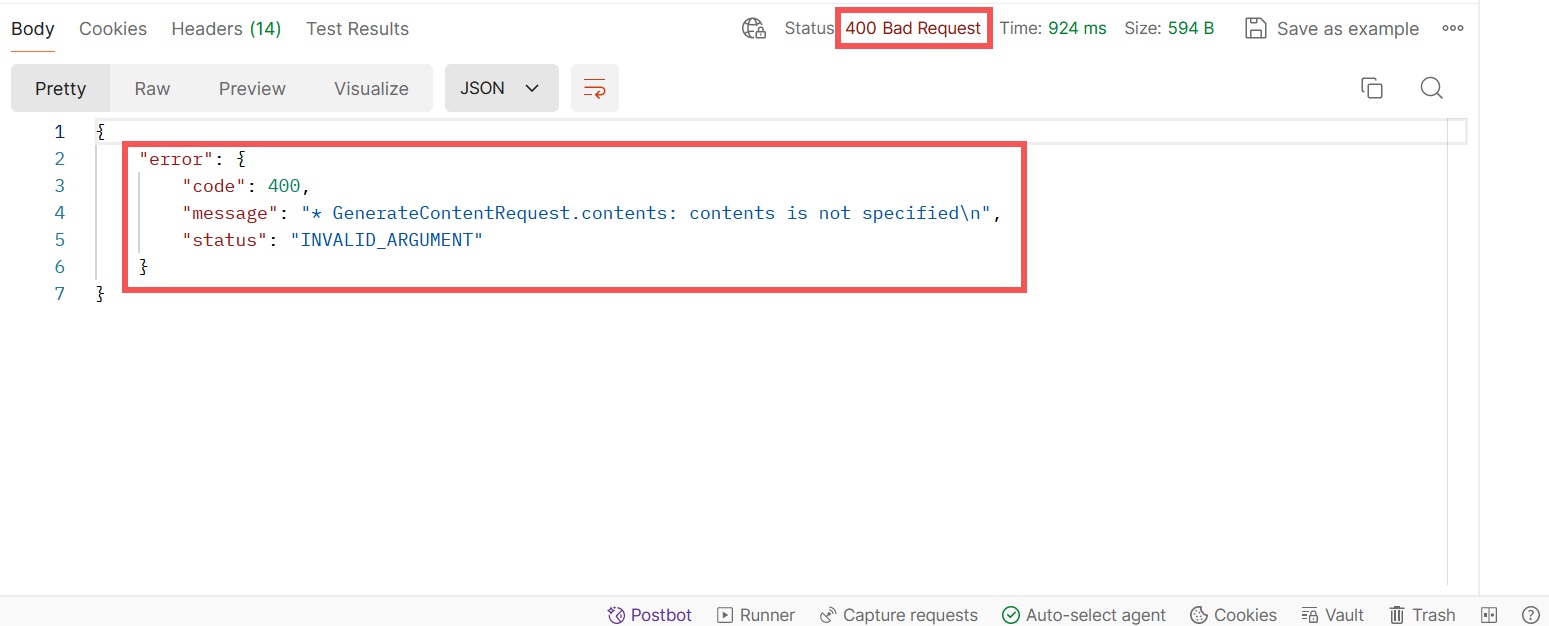
Whenever you encounter errors while making API calls, pay attention to syntax errors and refer back to the API documentation and references. If you're having trouble resolving them, remember that ChatGPT can help you with JSON requests and formatting.
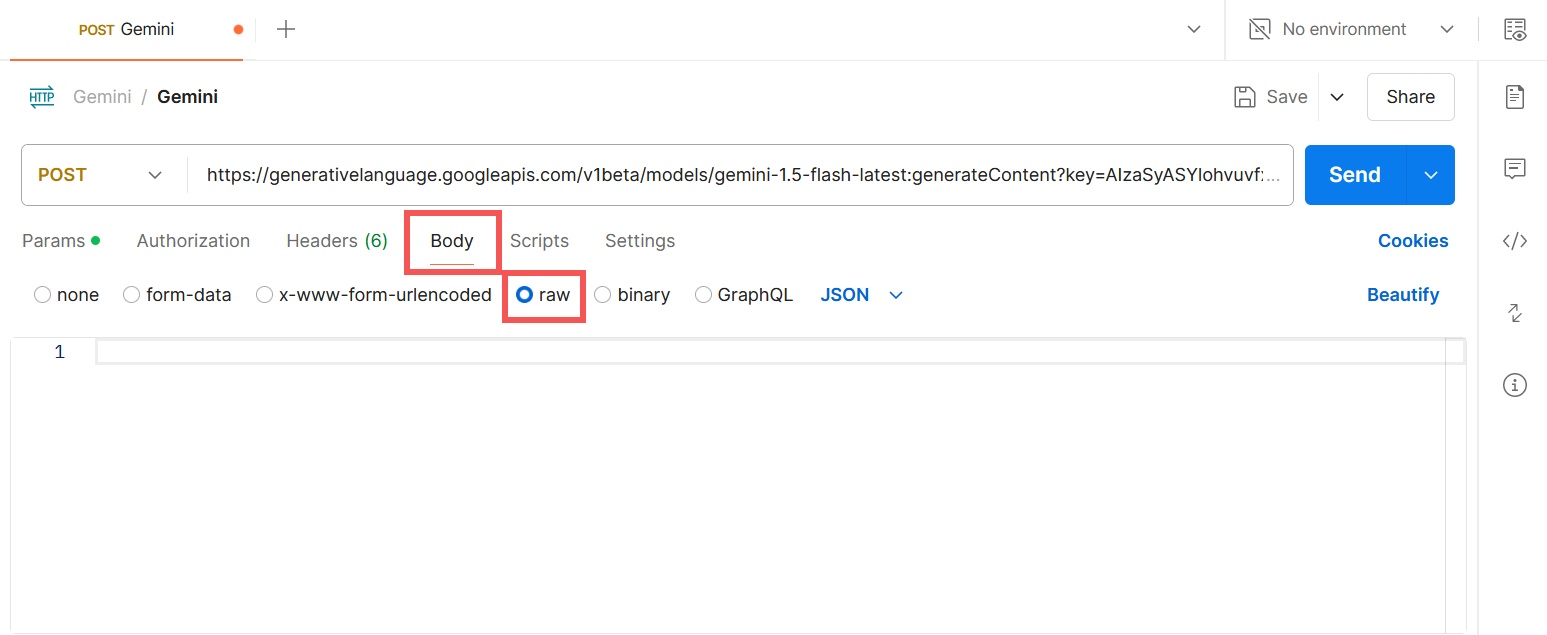
Step 5: Set up the call content
Let's set up the call content to fix the error. Go back to the Requests tab at the top in Postman, under the endpoint input field, click the Body tab and then select Raw .
We will paste the entire content of the -d flag from the previous request. The article has formatted it for readability. You can copy and paste it into line 1 of the interface:
{ "contents": [ { "parts": [ { "text": "Explain how AI works" } ] } ] } 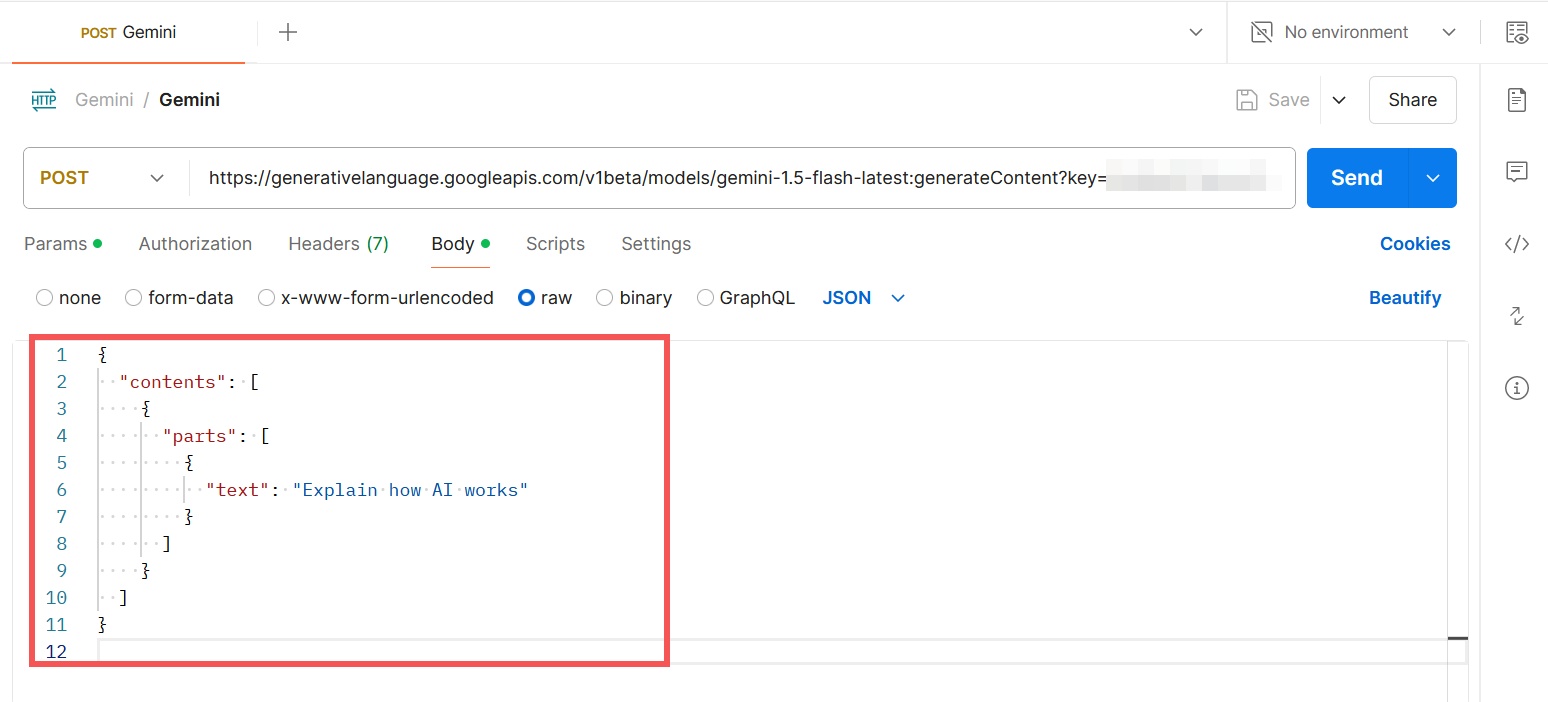
That will work. There's only one way to be sure: Click the Send button.
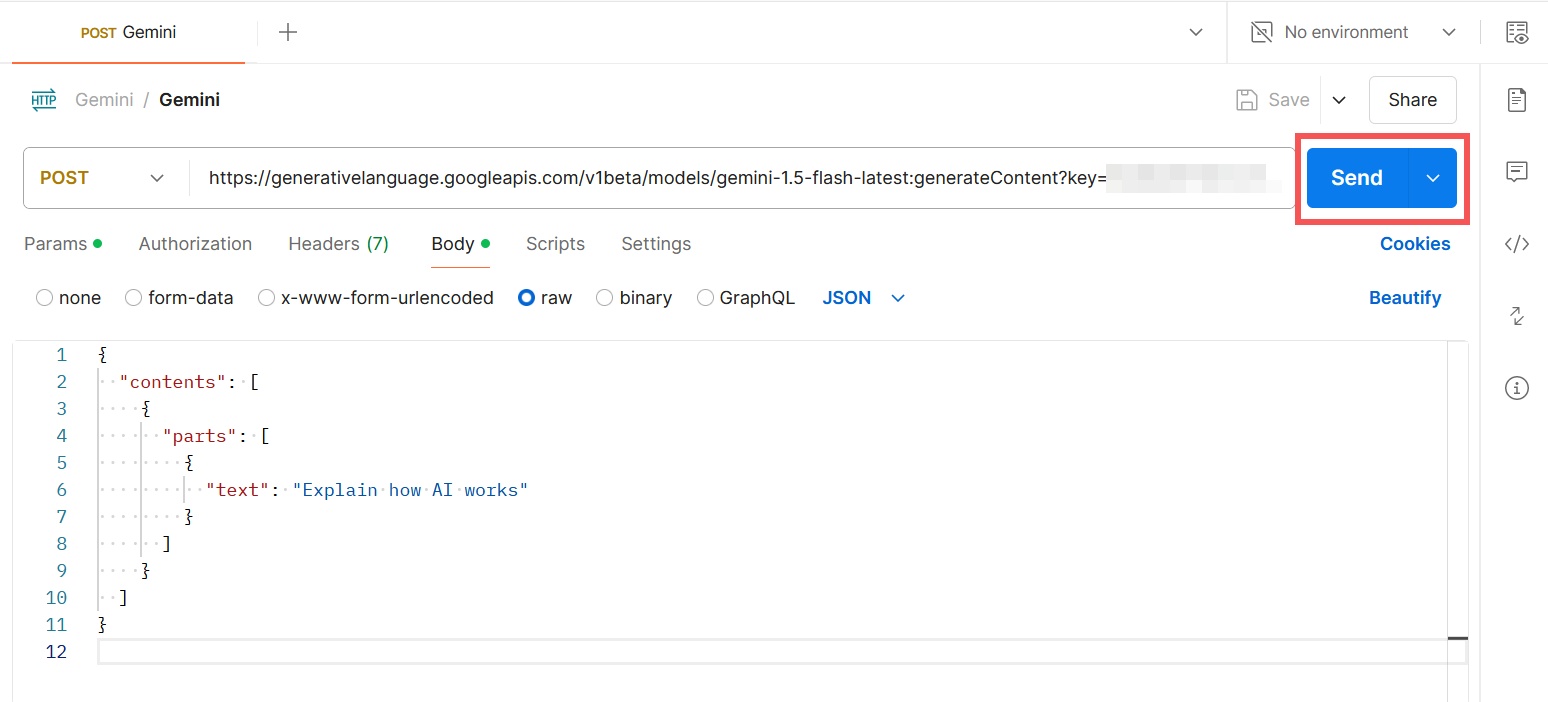
If you've followed these instructions correctly so far, you'll see something new in the responses tab: HTTP status code 200 OK and a complete response from Gemini.
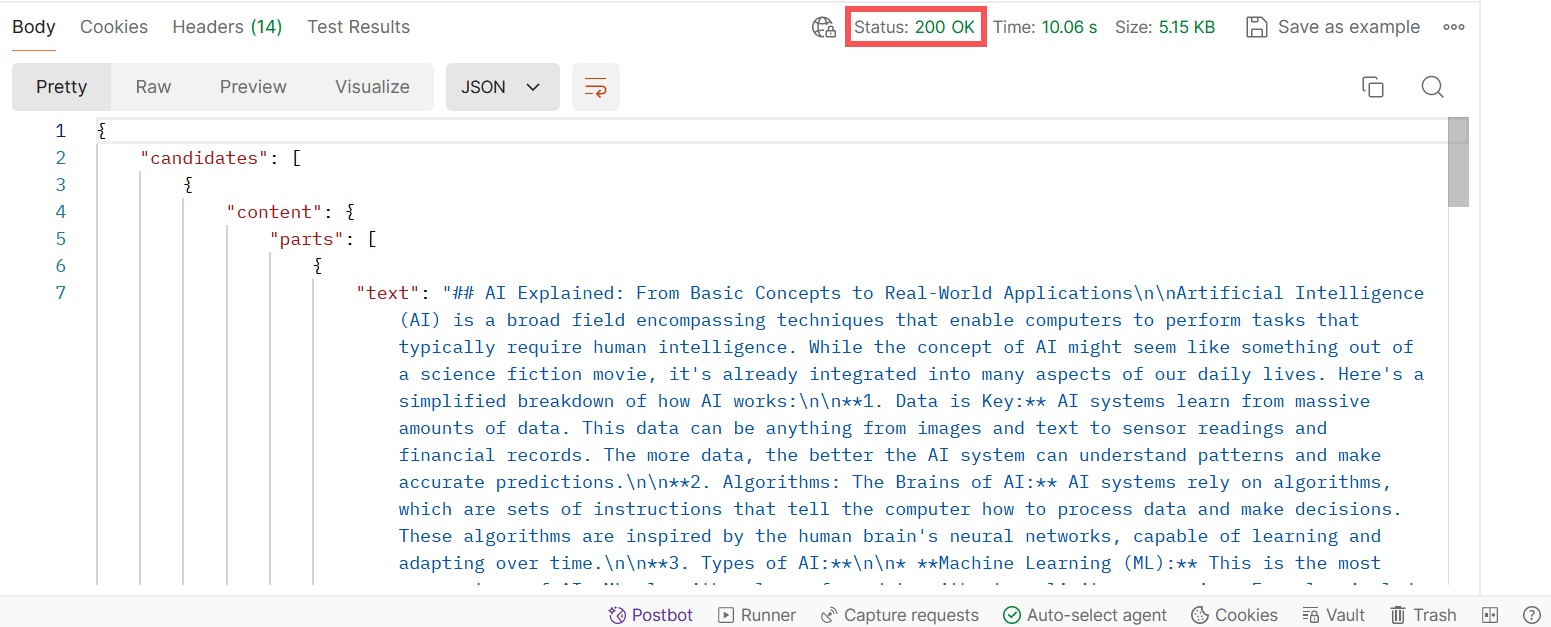
There's an interesting aspect to this lengthy response. Scroll to the bottom of the page and take a look.
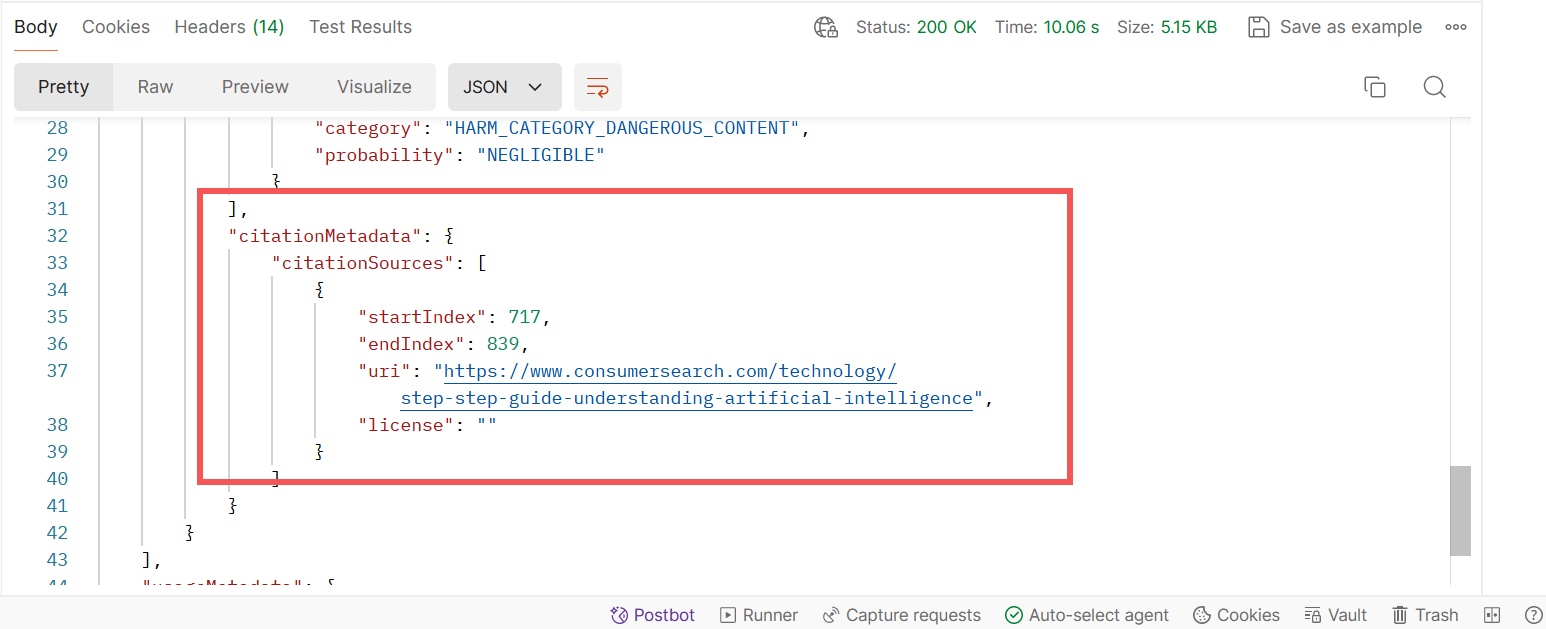
The "citationMetadata" and "citationSources" keys indicate that Gemini searched the web to generate the response. It based its response on the page displayed in the "uri" key. This could also explain why the API took longer than usual to respond: In the example case, it took 10 seconds to receive a response.
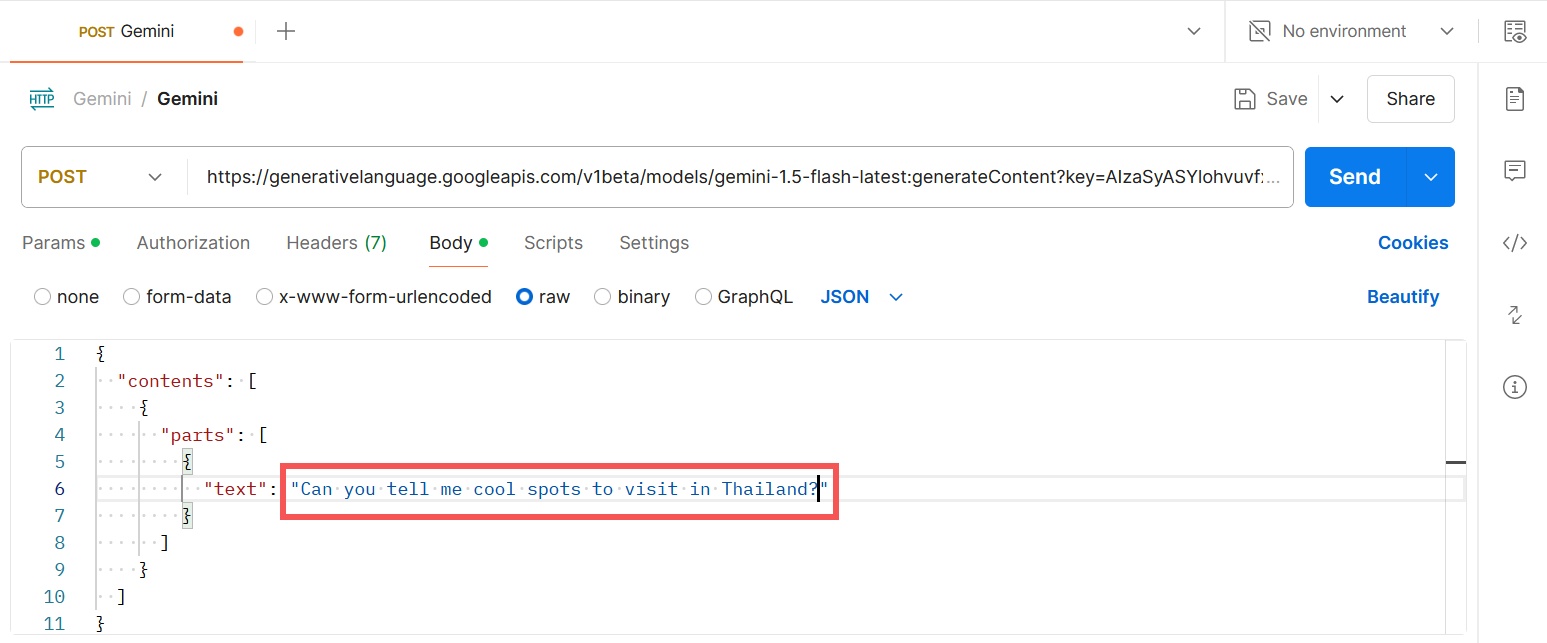
Step 6: Pass your prompts
We're communicating with the Gemini API, but this won't be helpful if you can't pass your prompts. On the Postman requests tab, replace the value inside the "text" key with your text. Make sure the quotation marks are still at the beginning and end, otherwise the call will return an error.
When you click the Send button, you'll see a new response at the bottom of the screen.
Step 7: Change the settings
You can add multiple parameters to the body of the call to control the build settings in Gemini: Visit the API documentation's model reference page to see them all.
This page may be confusing the first time you read it. The first section you need to look at is the guidance on the required body shape.
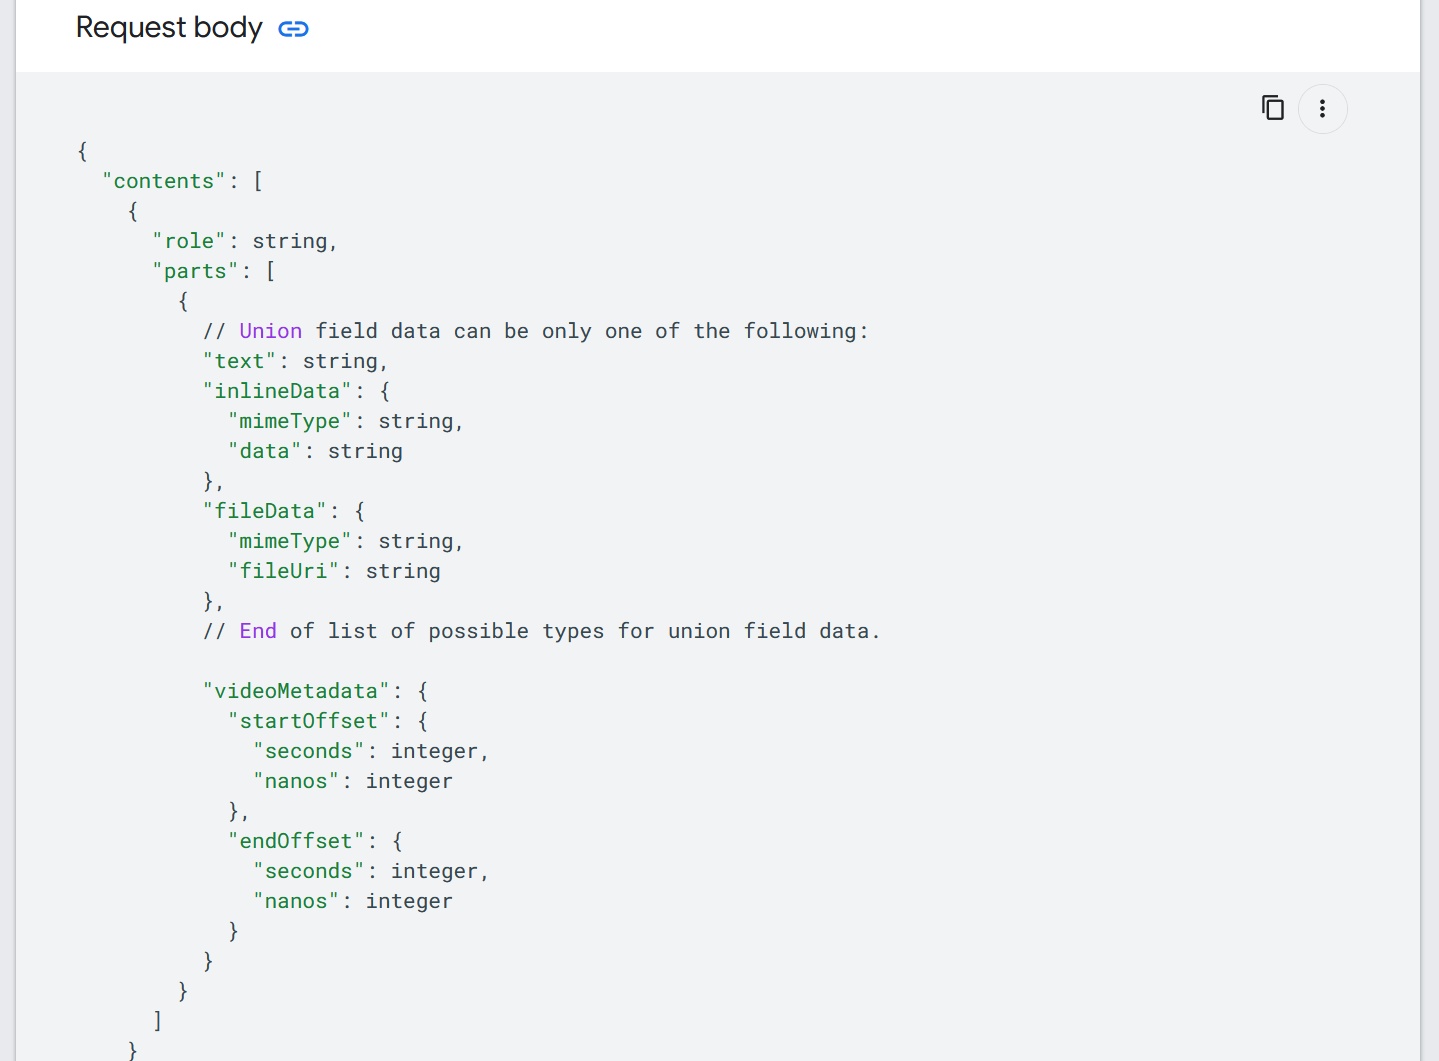
By copying and pasting this entire JSON into the Postman request body, you will be able to control the generation process. Note that the parameters are marked with acceptable data types—string, integer, floating-point number, numeric—so remember to replace them with actual values before running the command.
If there are any unnecessary parameters, simply remove them from the request body. Make sure you also remove all parentheses associated with them, so that every part of the command opens and closes correctly. Postman will warn you if it finds these issues, and if you can't figure out how to fix it, paste it into ChatGPT and ask it to correct your syntax.
The second useful part of the page is the explanation of the function of each parameter, located right below the Request body .
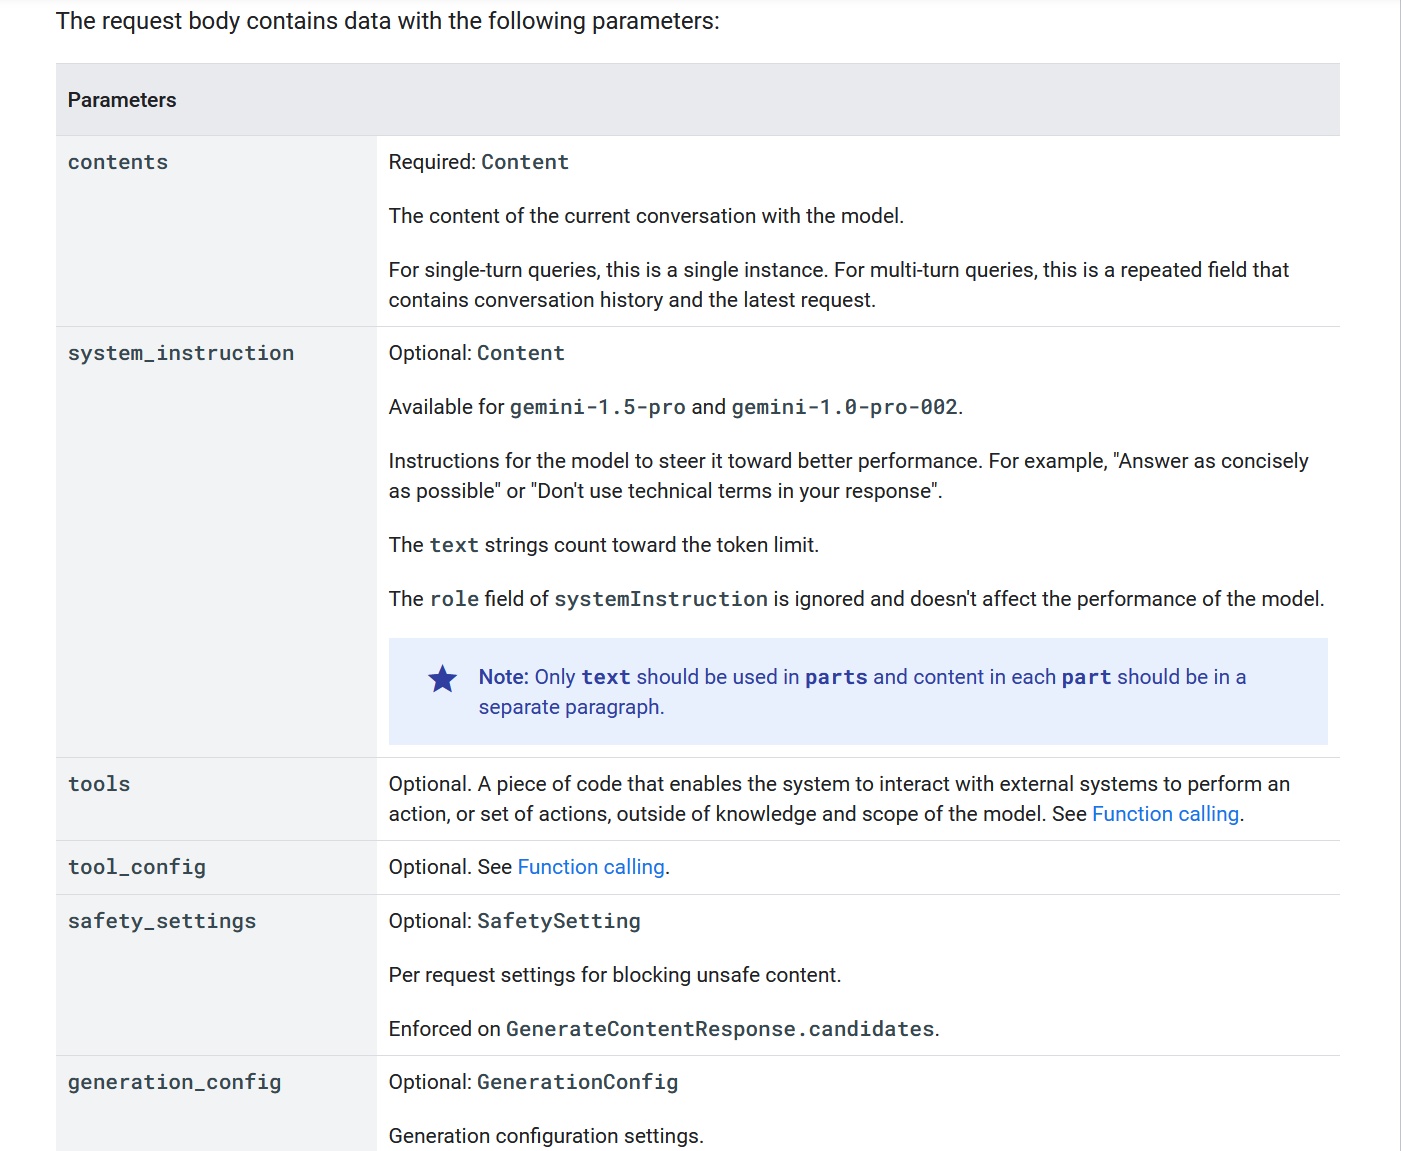
You will find helpful explanations of the meaning of each parameter, its function, the models it operates in, and the accepted values.
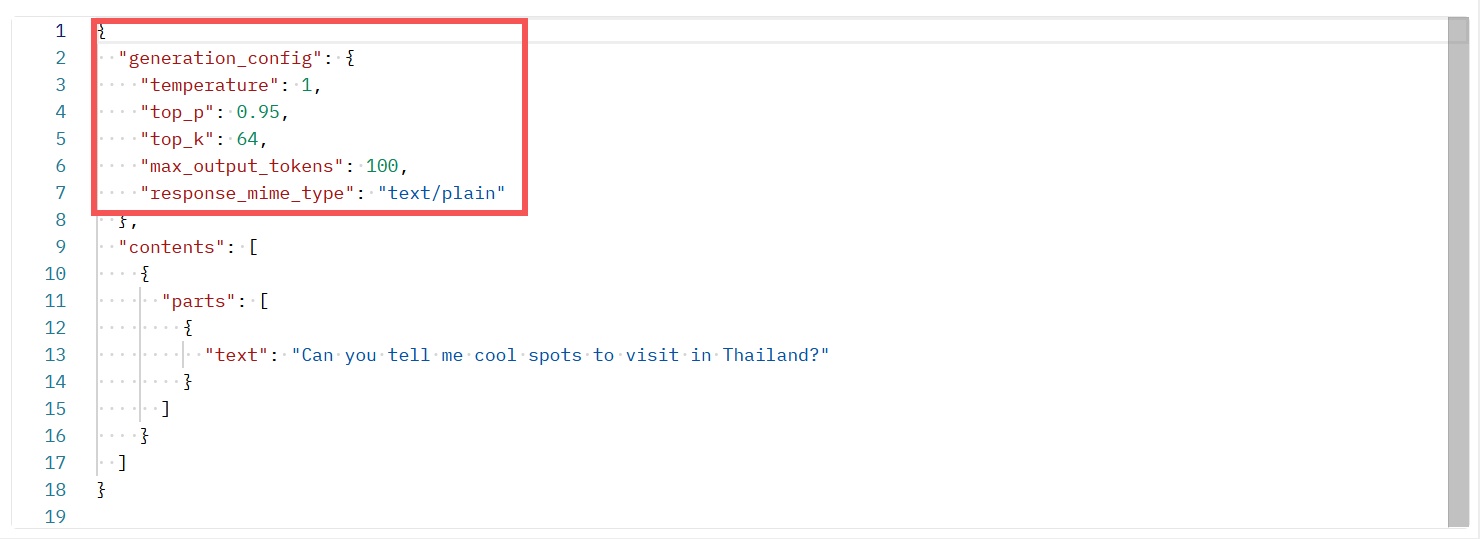
Here's a quick guide to the meaning of each of these configuration parameters:
- Temperature controls creativity and randomness.
- top_p controls vocabulary diversity.
- `top_k` controls the number of words that are likely to appear when generating a response. For example, `top_k` set to 64 tells the model to select only the 64 words with the highest probability of appearing.
- max_output_tokens controls the total response length. In the example, it's limited to 100 tokens.
And this is the result you get after clicking the Send button.
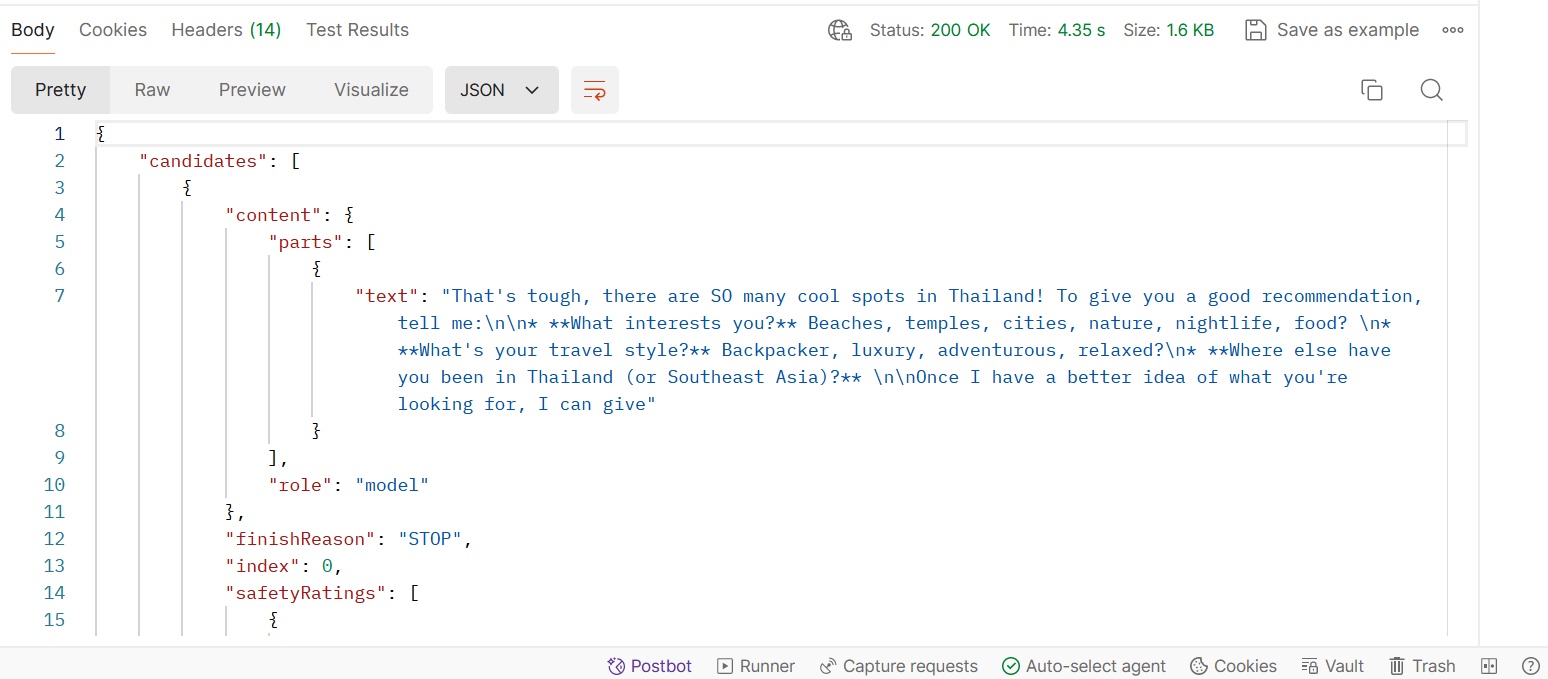
As you can see, the `max output tokens` parameter has truncated the response, which means the settings are working as expected.
Step 8: Modify the AI model
So far, we've been working with the latest Gemini 1.5 Flash version, but there are other models we can call using this API. You can do so by changing the model name in the endpoint URL.
In the Postman input field, find the name of the Gemini model you are using.
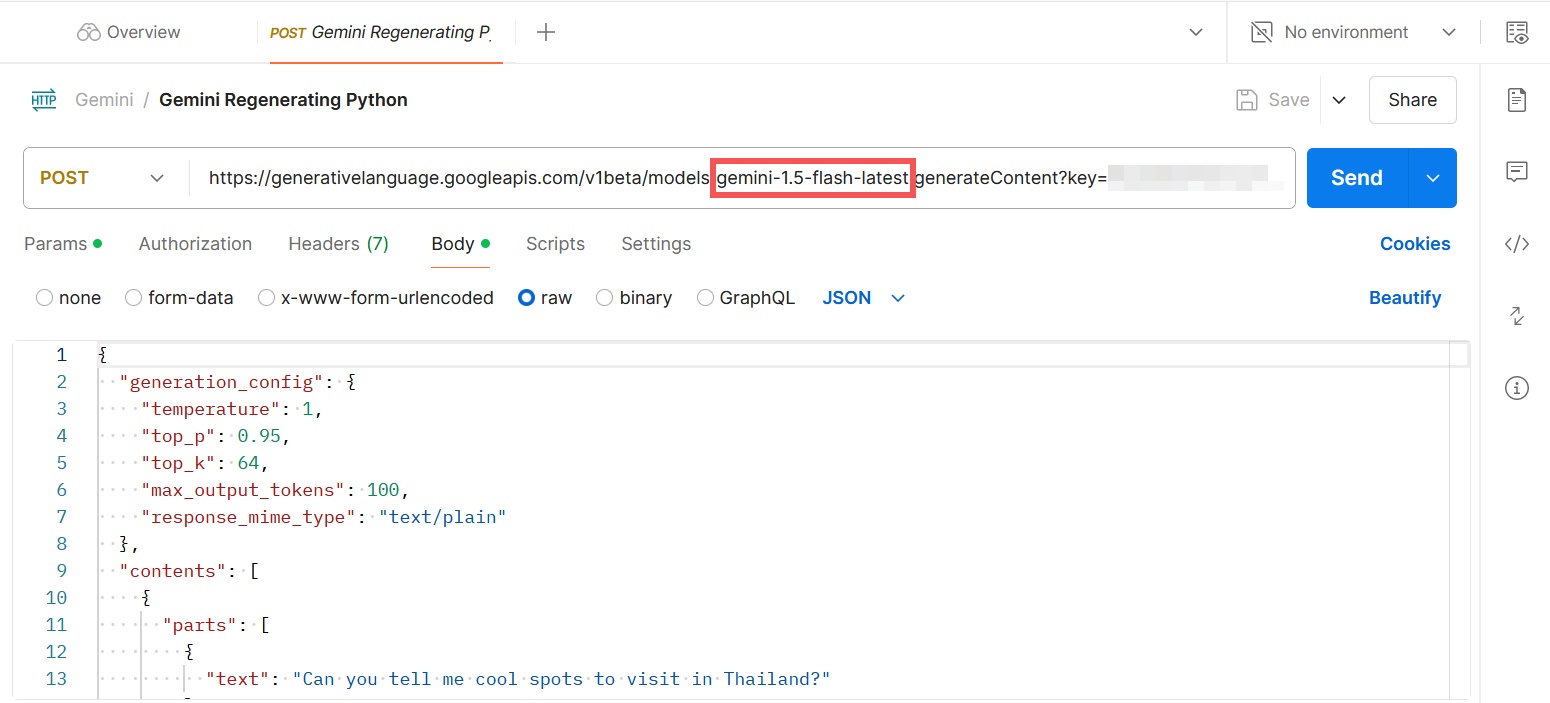
Replace that name with the name of a different model. You can find a complete list on this page or copy and paste one of them from here:
-
gemini-1.5-pro-latest -
gemini-1.0-pro
Make sure the slash at the beginning and the colon at the end remain in the endpoint URL. After you click the Send button, your instructions will be sent to the new model, and you may receive responses of varying quality.
Step 9: Integrate Gemini into your application
You can integrate Gemini's basic functionality into your application using Google AI Studio and its free API. Refer to the documentation of your no-program app builder or your internal tool for instructions on connecting the API to it, and you'll be able to start setting up calls immediately. For example, here's a guide on how to set up an API connection using FlutterFlow.
However, if you want to deeply integrate Gemini models into your application and protect your data, using Vertex AI through Google Cloud Platform is the best option. In this case, you need to know or understand programming. Alternatively, find an expert to help set up endpoints and API calls, and from there, you can add those settings to your product or application.
Was this article helpful?
Your feedback helps us improve.
Related Articles
 Gemini 3.1 Pro or Gemini 3 Pro: Better?8 minutes read
 Instructions for Getting Started with Gemini Embedding 211 minutes read
 How to Turn Gemini into a Powerful Productivity Tool: Step-by-Step Guide8 minutes read
 4 Google Apps That Work Better with Gemini: Explained5 minutes read
 Instructions for Using the Gemini Utility: What to Know4 minutes read
 What Is Google Gemini? How Does Gemini Work?6 minutes read
Reader Comments 0
Sign in with email or Google to join the discussion.