Table of Contents
This guide explains how to create a Mirror Shadow in Photoshop, with clear steps, practical tips, and important checks before you begin.
Step 1: Open the image in Photoshop, click on the Marquee Tool (1) => Rectangular Marquee tool (2) => Select the object to create shadow (3) with this tool.

Step 2: Use the commands Ctrl + C and Ctrl + V to copy the object area you have just created. Next, click on the layer just created (1) , press Ctrl + T to select the Free Transform command and move that layer below the original layer (2) as shown below.

Step 3: You right click on the layer just edit (1) => Flip Vertical (2) .

Step 4: Click on the Opacity (1) and reduce it to 30-40% (2) as shown below.

Step 5: You localize the object as shown with the Rectangular Marquee tool (1) => Blur (2) => Blur Tool (3) .
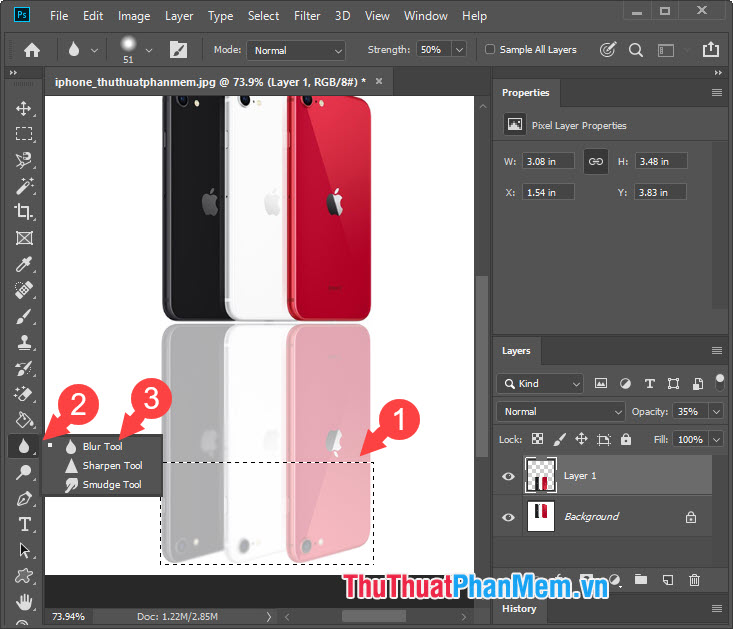
Then right-click on the screen and set Hardness at 30-40%. Next, you left click and move the mouse to blur all the areas you have selected.

Step 6: Click on the fill tool (1) => Gradient Tool (2) => select the black and white gradient style (3) as shown. You can choose different color gradients depending on the object and image object you use, but you should set the gradient color to a maximum of 2 colors to ensure light harmony.

Next, left click and draw a line from the bottom to create light colors.
Note: To best fill the color, you have to see which side of the image your subject is facing the light to decide to fill it in that direction. If you are unsure much about gradients and how to fill them up beautifully, read through the article below:
http://TipsMake. vn/to-mau-chuyen-sac-trong-photoshop-huong-dan-dung-gradient-trong-photoshop/

After a successful color cast, our image will be a bit more "magical" than the light-dark effect, as if shining light on.

Step 7: You add a few small details such as borders, background color. As shown below, I use the Brush tool to draw more borders to the sides and blur with the Blur tool to make it feel like a sample. are placed on a very shiny surface.

With the basic sharing on how to create mirror shadows in Photoshop, hope readers will have design works that bring "depth" and more vividness. Good luck!
FAQ
What should I know about Create a Mirror Shadow in Photoshop?
Focus on the key features, requirements, limitations, and practical use cases explained in this guide.
How do I get the best results with Create a Mirror Shadow in Photoshop?
Follow the recommended steps, use current software or information, confirm compatibility, and review settings before major changes.
Are there any risks or limitations?
Potential limitations depend on compatibility, data quality, cost, privacy, support, and how the product or method is used.
Related Articles
 How to Create Text Shadow in Photoshop5 minutes read
 How to Create Professional Shadow Effects in Photoshop4 minutes read
 How to Create Beautiful Shadow Effects in Photoshop3 minutes read
 How to Create a Shadow Border in Photoshop12 minutes read
 Shadow Defender - Shadow Defender Download and Installation3 minutes read
 Erase Shadow from Photo: How to Delete Shadows from Photos7 minutes read
Reader Comments 0
Sign in with email or Google to join the discussion.