How to use Custom Shape Tool in Adobe Photoshop
Sometimes, you see an interesting design created in Photoshop and wonder what tool is used to create it. Then you find out that the design was created using Photoshop's Custom Shape Tool.
Sometimes, you see an interesting design created in Photoshop and wonder what tool is used to create it. Then you find out that the design was created using Photoshop's Custom Shape Tool.
What do you think about custom shapes? The most unique shape designs you have seen are like stock art. But this powerful tool can provide much more and its flexibility is often underutilized. Today's article is a guide for beginners to use Custom Shape Tool in Photoshop.
Step 1: Set up Photoshop file
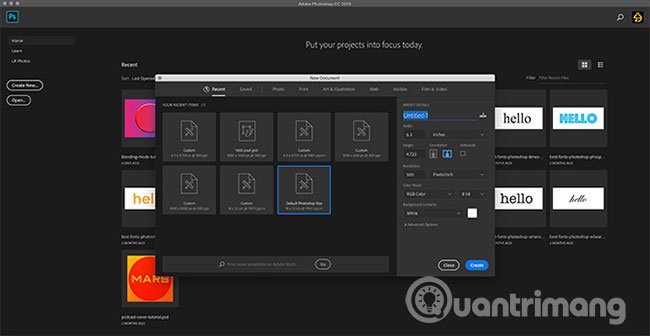
The first thing you need to do is set up your document in Photoshop. For the purpose of this tutorial, simply open the program and select Default Photoshop Size .
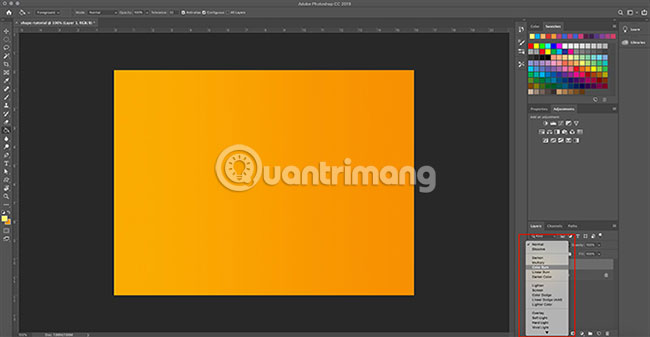
Next, add some basic colors to the background, so you can see how the colors interact with them (we'll talk more about this in the next section).
For this image, we will add a simple orange gradient. Then, make the gradient darker by applying a Layer style.
If you don't know how to create a gradient, see TipsMake.com 's detailed tutorial on how to create a custom gradient in Photoshop.
Step 2: Learn about Custom Shape Tool
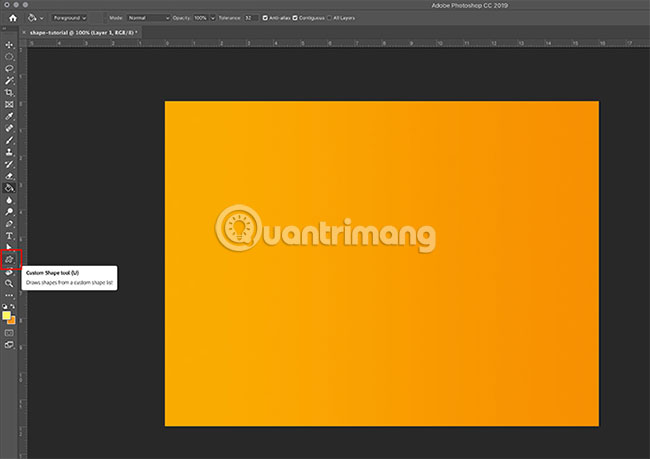
Next, go to the Custom Shape Tool. The Custom Shape Tool can be found in the left toolbar.
You can recognize the Custom Shape Tool through an icon that is almost like a puddle. Click this icon to make sure the Custom Shape Tool is working.
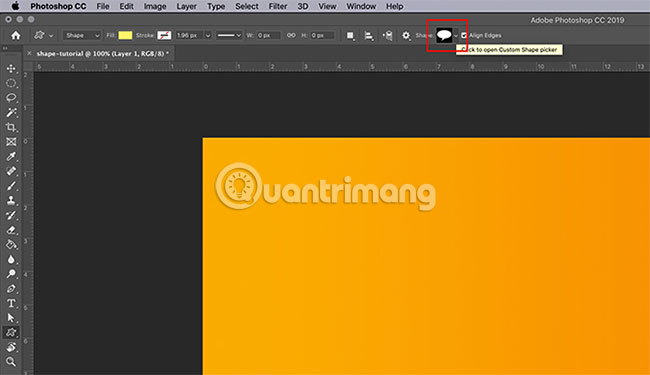
After the Custom Shape Tool is activated, you will see the toolbar along the top part of the workspace change to match the parameters.
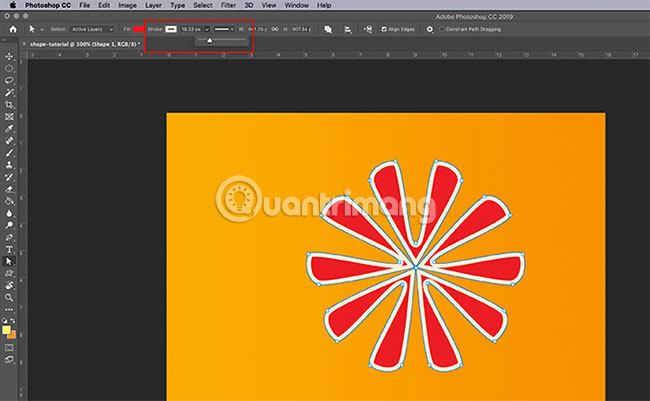
The most important part when using Custom Shape Tool is to select the shape. To select a shape from the Photoshop library, go to the Custom Shape Picker menu.
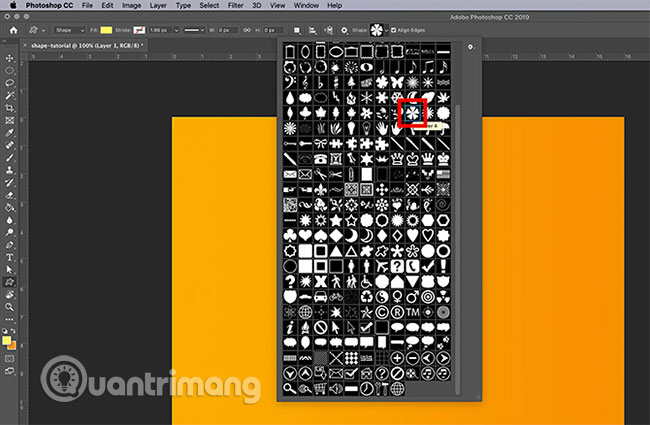
When you click on the drop-down menu, you will see all available options. These shapes include from frames and signs, to natural elements, bubbles to contain text, hearts and squares.
Today's tutorial will choose one of the flower pictures.
Shape adjustment tools

After selecting the desired image, you need to select the color for both Fill and Stroke.
Fill is the color that will appear inside the shape. Stroke is the color of the outline line around the shape.
These two options can be found in the upper left corner of the workspace. By clicking on the respective color swatches, you will see a drop-down menu appear.
From there, you can choose the color for the Fill or Stroke. You may also not choose any color. If you want to leave the Fill or Stroke blank, select the white box with a red dash line.
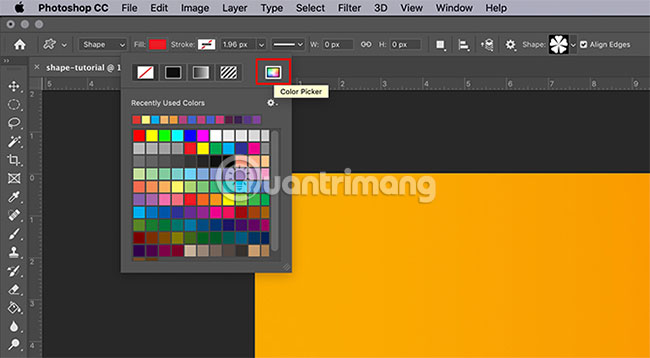
Also, if you don't like any of these colors, you can also choose a custom color from the Color Picker. The Color Picker is found on the right side of the drop-down menu.
Would you like to use custom colors at the same time? This is how to create a color palette in Photoshop.
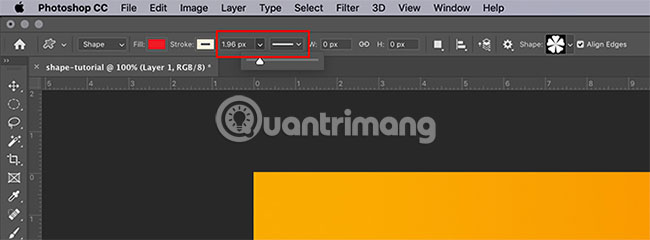
The last setting you need to keep in mind is the options Width and Type for the stroke.
These settings will be covered later in the tutorial, but now just note that they are placed next to the Fill and Stroke options. You can also adjust the width and stroke type, before shaping or after you finish.
Step 3: Draw the shape you want

Now that you are familiar with the Custom Shape Tool, it's time to draw a 'flower'.
First, create a new layer for the shape. This is very important, because it allows you to easily edit your shape and use the blending mode to adjust the colors later.
Next, make sure the Custom Shape Tool still works. Then click and drag the cursor on the page to draw a shape. You can see that its outline is blue.
Don't worry too much about the exact location or size of this shape. You can fix them later.
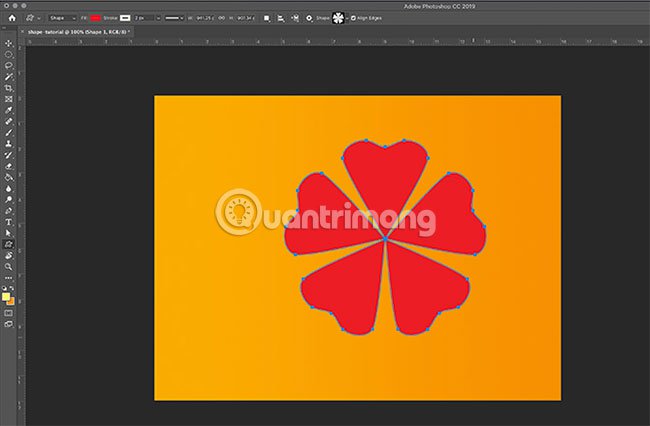
When the shape is about the size you want, release the cursor. The lines will automatically be colored in blue (the color you set for the Fill option initially).
You will also see small markers placed at important points, along the blue border around the flower. You can use these markers to adjust your shape.
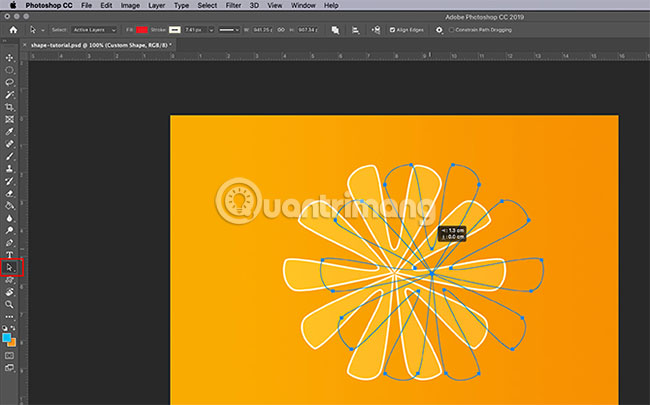
Step 4: Adjust the shape
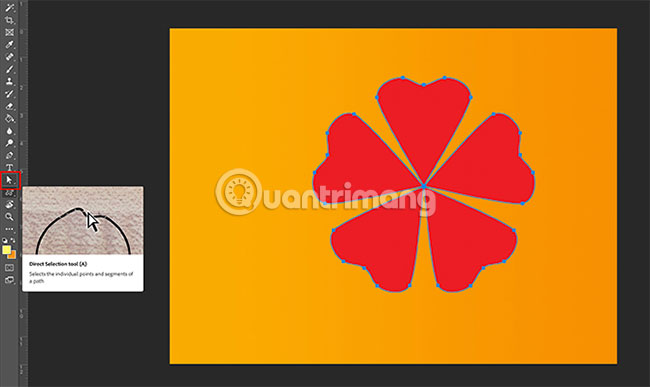
To adjust the shape, go to the left toolbar and click on the Direct Selection Tool. The symbol of the Direct Selection Tool looks like a small white arrow.
The Direct Selection Tool allows you to adjust individual anchor points along a path. After activating the tool, you will see all the blue markings turn white. These are anchor points.
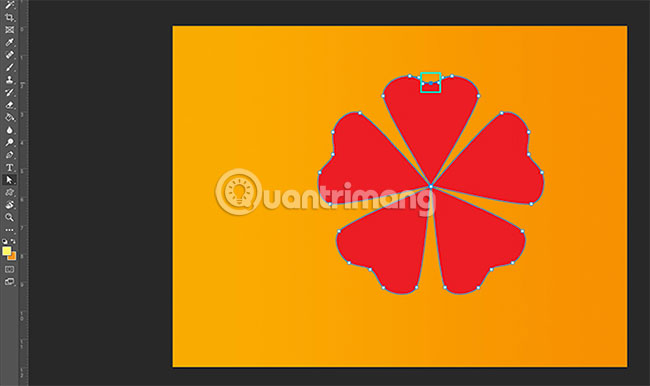
To adjust the anchor point, click on one of the white dots, it will turn green again so you know it has been selected.
Next, click and drag this anchor point to a new position to adjust the shape.
Suppose, if you want to make petals smaller, press and drag the point on the top of the petal down, towards the center. Petals will be divided into two.
When the anchor point is where you want it, release the mouse button. The flower will automatically adjust to this new path.
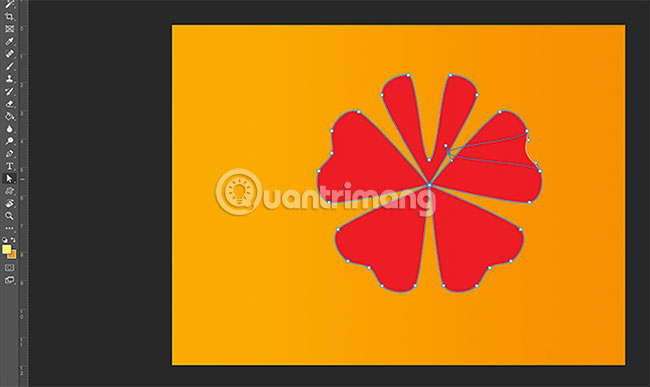
Do the same with other anchor points to create identical petals. Keep adjusting until you feel satisfied.
Step 5: Adjust anchor points

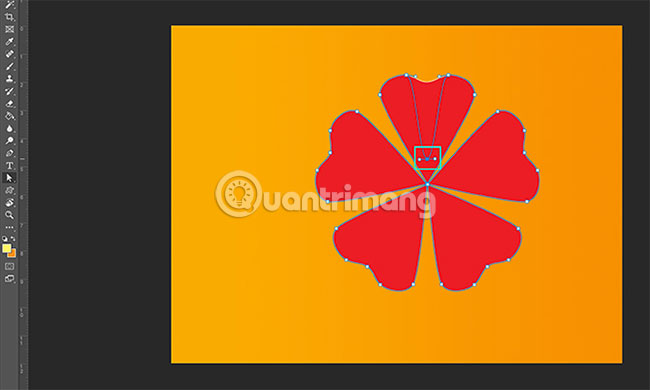
When clicking on an anchor point, you may notice that two small handles on its sides.
These are your drag control points. When you adjust them, they change the shape of the anchor point, instead of moving it from point A to B.
To adjust these handles, click on the anchor point you want to adjust. Then click on the drag operation control point you want to adjust. It will turn green.
When you click on this dragging control point, hold and move the cursor. You may notice that the curve of the shape associated with that particular anchor point will also change. All other anchor points will remain the same.
If you don't like this curve after editing, just go to Edit> Undo Drag Control Point . Photoshop will revert the changes you have made.
Step 6: Adjust Stroke
Now, you have finished adjusting the shape of the flower. Next is the time to refine the Stroke.
Make sure the shape is selected. Next, go to the toolbar at the top of the workspace and click the drop-down Stroke Size menu .
By dragging the slider back and forth, you can make your stroke line look slimmer or thicker.
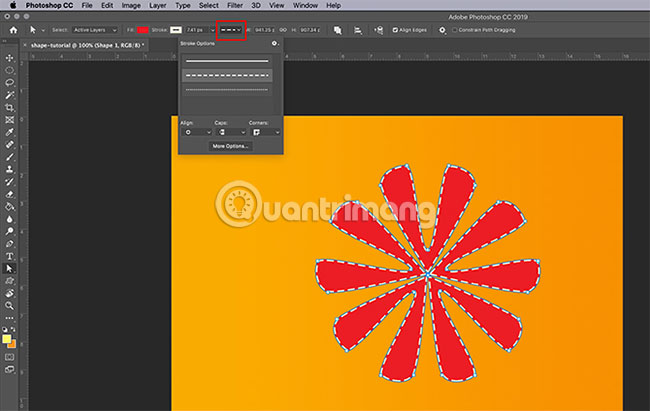
You can also change the Stroke type by clicking on the drop-down menu next to it.
Step 7: Make the final adjustments
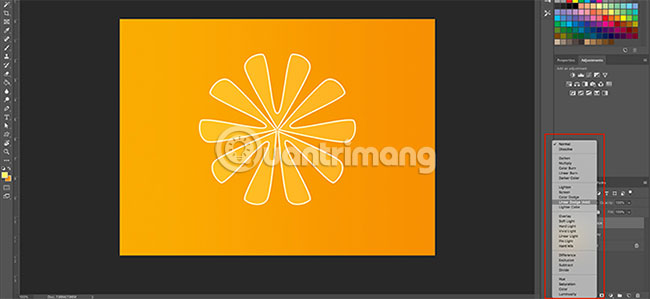
At this point, we have adjusted the shape, color, width and type of Stroke. It's time to see if this custom shape makes you happy.
If you're not happy with the color part, you can adjust it further by using Blending Mode in the Layers panel .
You can also move the position of the shape on the page. To do this, go back to the left toolbar. On the Direct Selection Tool , click the small white arrow in the corner to access the drop-down menu. Select the black arrow instead.
This black arrow is the Path Selection Tool . When the tool is active, click on the shape so that the blue lines appear. Then click and drag the shape to the new position on the page until you are satisfied with it.
There are many other, smaller improvements that you can make with Photoshop's Custom Shape Tool. However, knowing these basic steps, you will be able to adjust even the most boring shapes in Adobe and turn them into something great.
Do you want to know more about the Layers panel and how to use it to change design colors? See TipsMake.com's guide explaining how to use Photoshop Blending Mode.
Hope you are succesful.
- How to create a custom Color Palette in Adobe Photoshop
- Link download Adobe Photoshop CC
- Instructions for using Photoshop CS5 to edit photos in full set
- Instructions for using Photoshop for newbies
- Adobe XD 45.0.0 (48027)/45.1 - Download Adobe XD 45.0.0 here
- How to blur photos using Adobe Photoshop Fix Android
- How to download Photoshop CS2 for free, Photoshop CS2 key from Adobe
- Create surreal fire fire effect in Photoshop
- Free software that can replace Photoshop
- 3 tips to improve low-resolution image quality
- How to split photos with Photoshop
- Photoshop shortcuts help you work faster (part 2)
- Photoshop shortcuts help you work faster (part 1)
- 49 smart Photoshop tips you need to know (Part 2)
- Tutorial to create a photo-crumbling image in Photoshop
- Create text effects like Star Wars movie Poster in Photoshop
- 4 tips to help identify photos that have been edited
- How to use Photoshop CS5 - Part 5: Photo editing


 The Shape Builder tool in Illustrator
 PowerPoint 2016: Working with Shapes
 PowerPoint 2019 (Part 23): SmartArt Graphics
 PowerPoint 2019 (Part 16): Shapes
 How to Create Speech Bubbles in PowerPoint
 How to create Picture in Picture effect in Photoshop
-
 Application
-
Web Email
-
Website - Blog
-
Web browser
-
Support Download - Upload
-
Software conversion
-
Social Network
-
Simulator software
-
Online payment
-
Office information
-
Music Software
-
Map and Positioning
-
Installation - Uninstall
-
Graphic design
-
Free - Discount
-
Email reader
-
Edit video
-
Edit photo
-
Compress and Decompress
-
Chat, Text, Call
-
Archive - Share
-
-
System
-
Mac OS X
-
Hardware
-
Game
-
Tech info
-
Technology
-
Science
-
Life
-
Electric
-
Program
-
Mobile