Table of Contents
System Restore can roll Windows system files, drivers, registry settings, and installed programs back to a restore point without intentionally replacing personal files. It is not a file backup, and protection may not be enabled on every PC. Check the setting before you depend on it.
After the June 2025 security update, Windows 11 version 24H2 retains restore points for up to 60 days. Storage pressure, maintenance, or configuration can still leave fewer points, so create one before a risky driver or software change.
Turn System Protection on or off in the interface
- Open Start, type Create a restore point, and select the matching Control Panel result.
- On the System Protection tab, select the Windows system drive, usually C:, and click Configure.
- Select Turn on system protection or Disable system protection.
- If enabling it, set the maximum disk-space usage. Windows removes older points as the allocated space fills.
- Click Apply, then OK. To verify protection, click Create and make a test restore point.
Disabling protection stops new restore points for that drive and can make existing points unavailable or remove them. Do not turn it off as a cleanup step unless you accept losing that recovery option.
Use Group Policy on managed editions
This method is available on Windows Pro, Enterprise, Education, and applicable managed editions. An administrator should follow the organization’s policy rather than changing a managed device locally.
- Press Win + R, enter
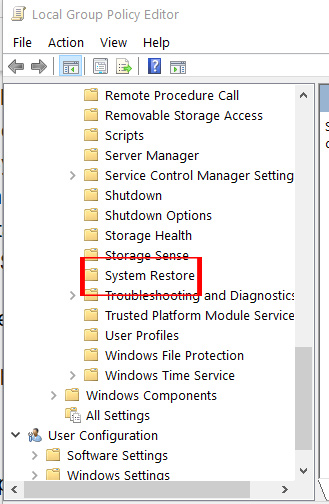
gpedit.msc, and press Enter. - Go to Computer Configuration > Administrative Templates > System > System Restore.
- Open Turn off System Restore.
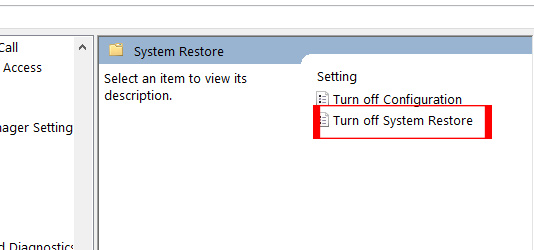
- Enabled: turns System Restore off and prevents access to its wizard and configuration.
- Disabled: permits System Restore and its configuration.
- Not Configured: leaves the behavior to local configuration or another applicable policy; it does not by itself guarantee protection is active on the drive.
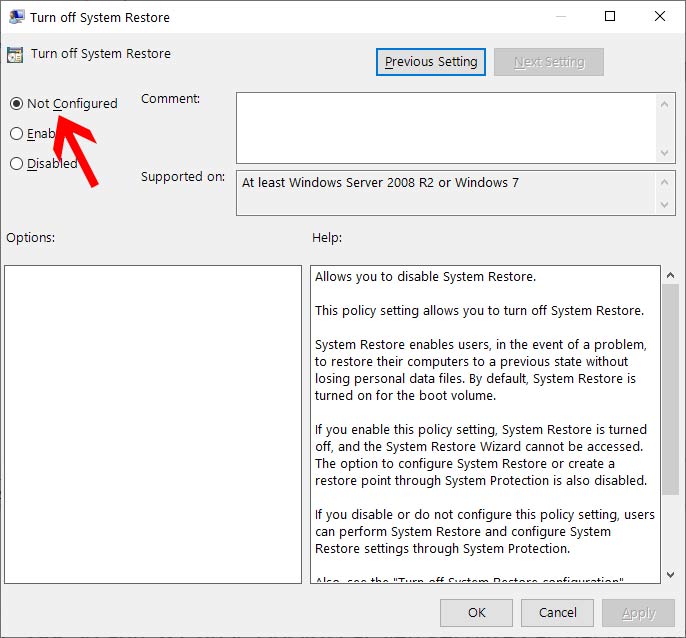
Click OK, then restart Windows or update policy if the change does not appear immediately. Also review Turn off System Restore Configuration when the controls remain unavailable.
Set the policy through the registry
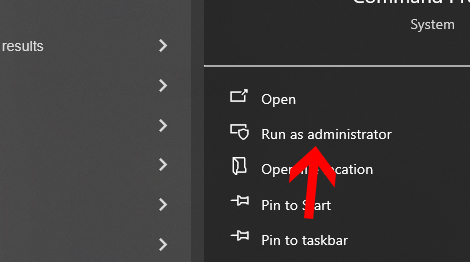
The registry commands below control the same machine policy. They are useful on a standalone PC, including an edition without the Local Group Policy Editor. Open Windows Terminal as administrator.
To enforce System Restore as off:
reg add "HKLMSOFTWAREPoliciesMicrosoftWindows NTSystemRestore" /v DisableSR /t REG_DWORD /d 1 /fTo remove that policy value and return control to local System Protection settings:
reg delete "HKLMSOFTWAREPoliciesMicrosoftWindows NTSystemRestore" /v DisableSR /fDeleting the policy value does not necessarily enable protection for drive C. Reopen Create a restore point, configure the drive, and create a restore point to verify the result. A domain or device-management policy may reapply the restriction.
PowerShell alternative
In Windows PowerShell running as administrator, use Enable-ComputerRestore -Drive "C:\" to enable protection or Disable-ComputerRestore -Drive "C:\" to disable it. Use the interface to verify the state afterward.
How to confirm System Restore works
- Open Create a restore point.
- Confirm the system drive shows Protection: On.
- Click Create, give the point a recognizable name, and wait for confirmation.
- Click System Restore and confirm the new point appears; cancel before applying it.
To launch the restore wizard directly, press Win + R, enter rstrui.exe, and press Enter. TipsMake also explains how to use recovery tools when repairing a PC and how to troubleshoot a freezing Windows computer.
Important limitations
- System Restore does not recover ordinary personal files that were deleted.
- It does not replace File History, cloud versioning, disk images, or offline backups.
- Restoring can remove apps, drivers, and updates installed after the chosen point; use Scan for affected programs first.
- Malware can damage restore points. Do not treat them as an isolated backup.
- If Windows will not start, System Restore may be available in Windows Recovery Environment.
Microsoft documents the Disable System Restore policy and the Windows 11 24H2 retention change.
Related Articles
 Instructions on How to Use System Restore on Windows8 minutes read
 Configure the System Restore Feature in Windows 109 minutes read
 How to Use System Restore in Windows: Turn Off, Turn on, Create, Restore3 minutes read
 Instructions for Restoring the System on Windows6 minutes read
 Instructions for Creating Backup and Restore Points (Restore4 minutes read
 Enable or Disable Secure Sign-In on Windows 10, Windows 11: Step-by-Step Guide8 minutes read
Reader Comments 0
Sign in with email or Google to join the discussion.