How to turn on Wake-on-lan on Windows 10 to turn on and start the remote computer
Wake-on-LAN (WOL) is a remote boot feature. Wake-on-LAN allows the computer to 'listen' to a 'magic packet' that contains a MAC address to wake up a computer over a LAN or Internet.
Wake-on-LAN (WOL) is a remote boot feature. Wake-on-LAN allows the computer to 'listen' to a 'magic packet' that contains a MAC address to wake up a computer over a LAN or Internet. This article will guide you to turn on Wake-on-LAN (WOL) in Windows 10 to start the remote computer.
Step 1 : First you need to turn on the Wake-on-LAN feature in the BIOS if you have an integrated Ethernet network adapter. For Asus motherboards, it is located in Advanced> APM> Power On By PCI-E / PCI . If the user does not see this option in the BIOS, check the motherboard vendor's instructions to see if it supports the Wake-on-LAN feature.
- Instructions for entering BIOS on different computers

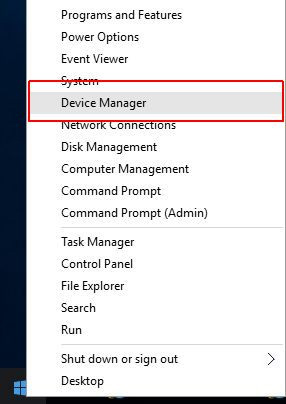
Step 2 : Log in to your computer and open Device Manager by clicking Win + X and clicking Device Manager .
Step 3: In Device Manager , expand Network Adapters section and locate the network adapter, then right-click it and select P roperties . A properties window of the network adapter will appear.

Step 4: In the Network Adapter properties, go to the Advanced tab and find the Wake on Magic Packet option , turn it into Enabled as shown below.

Step 5: Click the Power Management tab and check the settings. Select the Allow this device box to wake the compute and Chỉ cho phép một gói tin để thực hiện máy .

Now, the Wake-on-LAN feature works on Windows 10 computers.
I wish you all success!
Was this article helpful?
Your feedback helps us improve.
Related Articles
 Learn about the nature of Wake-On-LAN feature8 minutes read
 Fix Wake on Lan error not working on Windows 102 minutes read
 How to turn on Wake-On-LAN for the computer - Turn on the remote computer in the LAN4 minutes read
 How to turn off Tap to Wake on iPhone X so that the screen does not light up when touched3 minutes read
 Set the automatic time to turn on the computer with DD-WRT4 minutes read
 How to turn off programs that start with Windows 105 minutes read
Reader Comments 0
Sign in with email or Google to join the discussion.